Crocheted oven mitts are wonderful things! What's so great about these common kitchen accessories? There are several answers to this question. Firstly, a beautiful potholder, as well as one connected in the same style with it, will decorate and complement the overall interior of the kitchen. Secondly, it is an indispensable assistant when working with hot pots and pans. Thirdly, while knitting these products, the craftswoman will improve her needlework skills. Another plus is that these kitchen accessories do not require a lot of thread. Therefore, this is a good option to use leftover yarn. The scope for imagination and creativity in making these gizmos is simply unlimited. You can come up with models and patterns yourself, or you can use ready-made ones.


If you are a beginner knitter and are not confident in your skill, do not despair. First learn to knit, then learn our step-by-step master class for beginners and feel free to get to work. You will succeed.
The first way to create crocheted potholders with patterns
We invite you to knit these fun potholders with your own hands.

For two potholders you will need 150 g of white yarn, 150 g of green and 100 g of light green. Take 100% cotton thread. Hook No. 4.
Making useful household items with your own hands is a delightful hobby!
It is advisable to knit such potholders in 2 threads, otherwise they will turn out thin and will heat up quickly. Knitting potholders is carried out only by one type of loops - single crochet. Each next row is turned 1 vp.
Model No. 1 “Small cage”. Using green thread, knit a chain of 35 chain stitches. plus 1 ch. rise. Knit in b/n stitches.
Rows 1 - 5: *5 loops with green thread, 5 loops with white thread* - 3 times. Finish row 5 stitches with green thread.
6 – 10 rows: * 5 loops with white thread, 5 loops with light green thread * - 3 times. Finish row 5 stitches with white thread.
Repeat from rows 1 to 10 until you have a total of 35 rows. You can clearly see how to change colors in the photo. Decorate the binding with green thread in 1 circular row of b/n columns. In each corner, knit 3 tbsp from one corner loop of the previous row. b/n. For the loop at the end of the tying circle, perform 15 ch. and tie them st. b/n.
Model No. 2 “Large cage”. Dial 15 v.p. green and white thread and knit 19 rows st. b/n. On the 20th row, swap the color of the threads - green to white, and white to light green. Knit in single crochets for another 19 rows and finish knitting. Perform the binding and loop in the same way as in the description for model No. 1.
As you can see, everything is very simple. By spending just a couple of hours of your time, you can knit delicate and beautiful potholders.
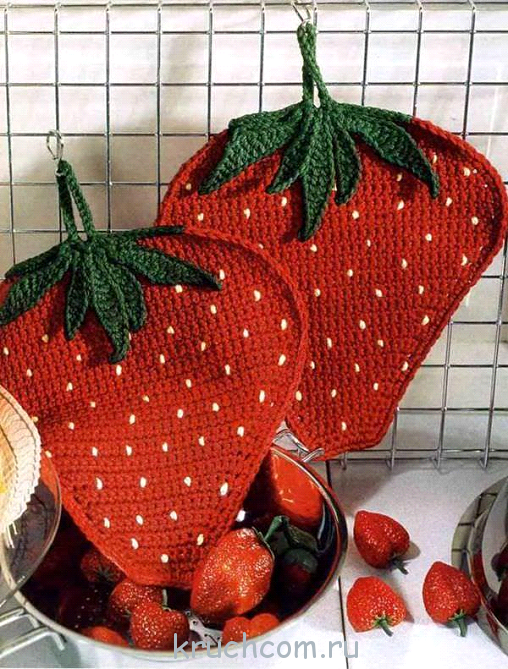
Potholder in the shape of a strawberry with a detailed description of the work
A potholder in the shape of a berry can become an original decoration for your kitchen interior. We will make it in the shape of a strawberry. Knitting of this type is so captivating that time flies unnoticed. Find a couple of hours of free time, study this master class and knit such beauty.

Clear sequence of work
To crochet a “Strawberry” potholder, you will need a hook No. 3.5, green and red wool, 50 g each.
Using green thread we knit a chain of 16 chain stitches. and close it in a ring.
1 row. 6 v.p. (3 lifting loops + 3 ch), 3 tbsp. s/n. in the second and third air loops of the base of the chain, arch of 8 vp, 3 tbsp. s/n. in the third and fourth ch. to the base of the chain from the edge of the hook, arch of 3 vp, 6 tbsp. s/n. in the fifth and eighth ch. at the base of the chain, arch of 3 c. p., 3 tbsp. s\n. in the ninth and tenth ch. the base of the chain from the hook, the arch from the 8th century. p., 3 tbsp. s\n. in the tenth and eleventh centuries. p. base of the chain from the hook, 3 in. p., 6 tbsp. s\n. remaining in. n. base of the chain. Finish the row with a connecting column. We continue knitting up to the 3rd row inclusive in accordance with the pattern shown in the next photo.
Scheme:At the beginning of the 4th row, we attach a red thread and knit according to the pattern up to the 17th row. Finish knitting. Fold the potholder in half and stitch.
Instead of red thread, you can use yellow, orange or pink. Such a kitchen accessory self made will be an original and unique gift for a friend, sister or mother on her birthday or March 8th.
Create a kitchen accessory in the shape of a Star
Chic and very original decor for the kitchen is an oven mitt in the shape of an asterisk. It looks like a real work of art. Many housewives even feel sorry for using them for their intended purpose; they hang them for beauty. By looking at the following photo, you can see that this accessory really looks great. Potholders in the shape of flowers also look very beautiful, choose your option in the article

Detailed master class describing the work process
To knit such a potholder you will need hook No. 2, 100% cotton thread, 50 g each, in two colors. Alternate threads by color according to your taste. The star potholder should be knitted in 2 threads so that it holds its shape well and does not turn out too thin.
Knit a chain of 8 vp. and close it in a ring.
1 row. 18th century s/n.
2nd row. *1 tbsp. b/n., 23 century. p.*, repeat *-* 9 times (scheme No. 1). Continue knitting according to pattern No. 2, while knitting the 3rd and 4th rows, change the thread to a different color and knit the 5th and 6th rows, then knit 2 more rows with the thread of the previous color. After this, wrap each petal and perform 2 rows of tying. Tie a loop from the 20th century. p., tied in one row of st. b/n.
Scheme

The “Star” oven mitt is a breeze to knit and is very interesting to work on. Try it and you will see for yourself. Watch the work step by step in the free video lesson:
Lace version of the product with manufacturing instructions
It’s impossible not to look at the lace potholders shown in the next photo. I don't even want to use these accessories. These are real works of art.

The good news is that every knitter can create these beautiful accessories.
Sequence of work for beginners
To knit a potholder, you will need the remains of any yarn and a hook that matches the thickness of the thread. The potholder consists of two parts - upper and lower.
Square crochet potholder “Flower”. Bottom: 1 row. Tie a chain of 4 chain stitches and close it into a ring. 4 air loops, close into a ring.
2nd row. *3 tbsp. s/n., 3rd century. P.*. Repeat 4 times, finish connecting. Art.
3rd row. Knit according to the pattern: st. s/n., but in the air loops of the previous row - 2 tbsp. s/n. 4 ch, 2 tbsp. s/n., and then – st. s/n. in Art. s/n. previous row.
Thus, we knit the number of rows you need. The more rows you knit, the larger the potholder will be.
The knitting pattern for the lower part is shown in the photo below:
Top: 1 row. 4 v.p. close in a ring.
2nd row. 3 v.p. rise, knit into a ring *1 tbsp. s/n., 4 v.p.* Repeat 15 times (16 st. s/n.).
3rd row. *6 tbsp. s/n. in 4 v.p. previous row, conn. Art. next 4 v.p. previous row*. Repeat 8 times.
4 row. 3 v.p. rise, * 4 ch, art. s/n. in connection Art. previous row. * Repeat 8 times.
5 row. 1 v.p. lifting, *6 tbsp. s/n., 2st. b/n., * Repeat 8 times.
6th row. 5 connection art. into the shell of the previous row (black arrow in the diagram), *3 tbsp. s/n., knitted together (bump), 3 v.p., cone, 3 v.p., knob, 7 v.p., st. b/n. in middle school s/n. shells of the previous row, 7 vp* Repeat 4 times.
7 and the next rows are knitted according to the pattern.

The round potholder “Flower” is knitted in the same way, only in the round. To knit round shape even lighter than the square one.
Diagram of the lower part of the round potholder:

Each master class presented in this article will help knitters create original and unique potholders for the kitchen. Take this information into your arsenal, take out the remnants of yarn from the bins and create, create, create. Comfort and beauty for your home!
Video tutorials for beginners
Option for Easter: pockmarked chicken.
In the form of a chicken:
Berry themes again:
Kitchen hand-made is especially popular these days. Unusual decorative elements created for the kitchen with your own hands are not only original decoration interior design, but also a chance for the needlewoman to fully demonstrate her imagination and creativity. The most common handicraft items for the kitchen, which you can easily make with your own hands, are potholders. There are plenty of methods and materials from which kitchen potholders are made, but crocheted products look especially cute and homey.
Kitchen oven mitts have many advantages: they not only complement the overall interior of the kitchen, but are also an indispensable housewife's assistant in working with hot frying pans and hot trays. Moreover, in the process of knitting, the needlewoman improves her crocheting skills and also develops her creative potential, coming up with new patterns and models. And one more advantage of crocheted oven mitts is that they don’t require a lot of yarn to make; you can use unused leftover threads from previous knittings.

Crocheting oven mitts is a great way for beginners to get acquainted with all the possibilities of crochet. As a rule, for beginning craftswomen, a potholder is the springboard from which their journey into the world of crochet needlework starts.
Crocheting a potholder yourself is not such a difficult task as it might initially seem. Especially if you have little experience in this matter. But, even if you don’t have the skills to work with a crochet hook, don’t despair - thanks to step by step instructions and the detailed diagrams presented in this article, any student will master the skill of crocheting potholders in the shortest possible time.
For beginners in knitting, we recommend that you practice making the simplest tacks in the shape of a square, made in fillet technique. Those who are already familiar with the basics of crocheting will enjoy master classes on knitting a round potholder with a floral pattern, a potholder in the shape of a juicy watermelon slice, as well as an unusual triangular potholder decorated with berries and leaves.
Small square potholder using fillet technique

Absolutely easy to make square potholder - the best option for those who are just getting acquainted with crochet. Sirloin knitting does not require a lot of time, so it only takes an hour to admire a brand new kitchen accessory.
Tack pattern:

Abbreviations in the text:
- VP – air. a loop;
- Runway - air. lifting loop;
- CCH or art. s/n – double crochet;
- RLS or art. b/n – single crochet;
- PSSN – half double crochet;
- pet. - a loop;
- flail - chain;
- PR – previous row;
- СС – connecting column.
Knitting steps.
We knit a flail with a thread of the desired color. on 8 VP, close the SS into a ring.
Row No. 1: 3 runways, 1 st. s/n in a ring, 3 VP, 1 tbsp. s/n in the ring, 4 rapports: “2 tbsp. s/n in a ring, 3 VP, 1 tbsp. s/n in the ring.” SS.
Row No. 2: 3 VP, 2 tbsp. s/n in chain. from 3 air. pet. PR, 3 VP, 3 tbsp. s/n in the same chain, 1 VP. SS. Change the color of the thread.
Row No. 3: 3 runways, 2 tbsp. s/n in chain. from 3 VP PR, 3 VP, 3 tbsp. s/n in the same chain, 1 VP, 3 tbsp. s/n in next flail from air pet., 1 VP, 4 rapports: “3 tbsp. s/n in next flail from VP, 3 VP, 3 tbsp. s/n in the same chain, 1 VP, 3 tbsp. s/n in next flail out of 3 VP PR, 1 VP.” SS. Change the color of the yarn.
We knit rows No. 4-6 according to the pattern, alternating the color of the thread according to the tack sample shown in the photo. From a chain of 8-12 stitches. make a loop for hanging on a hook. A small kitchen oven mitt is ready!
Yellow-brown potholder made using chain knitting technique

If the canvas of the previous potholder is slightly translucent due to the pattern, as a result of which it will not always be able to protect the housewife’s hands from hot kitchen utensils, then such a dense potholder, knitted from two round motifs with strong threads, is an ideal assistant in household. It performs its functions 100%, moreover, it pleases the eye with its original floral pattern.

Completing of the work.
Knitting the upper part.
We collect a flail with a yellow thread. from 6 VP, we close it in a circle with SS.
Row No. 1: 1 runway, 9 st. b/n in a circle. SS.
Row No. 2: 1 runway, 1 st. b/n in runway PR, 10 rapports: “2 tbsp. b/n in the next Art. b/n PR". SS. Change the thread color to brown.
Row No. 3: 1 runway, 1 st. b/n in the next Art. b/n PR, 1 tbsp. b/n in Art. b/n first row, 7 rapports: “2 tbsp. b/n in the next 2 columns b/n PR, 1 tbsp. b/n in Art. b/n first row.” SS. You should get 27 sc.
Rows No. 4-5: 1 runway, 27 st. b/n in columns b/n PR. Change the thread again to yellow.
Row No. 6: 1 runway, 2 tbsp. b/n in the next 2 tbsp. b/n PR, 2 tbsp. b/n in Art. b/n 4th row, 7 rapports: “3 tbsp. b/n in the next 3 tbsp. b/n PR, 2 tbsp. b/n in columns b/n 4th row. SS. We get 34 RLS.
Rows No. 7-8: 1 runway, 34 st. b/n in PR columns. Change the thread to brown.
Row No. 9: 1 runway, 2 tbsp. b/n in the next 2 tbsp. b/n PR, 1 tbsp. b/n in a column of b/n of the seventh row, 3 tbsp. b/n in the next 3 columns b/n PR, 2 tbsp. b/n in the b/n column of the seventh row, then 7 rapports: “3 tbsp. b/n in the next 3 columns b/n PR, 1 tbsp. b/n in Art. b/n seventh row, 3 tbsp. b/n in the next 3 tbsp. b/n PR, 2 tbsp. b/n in Art. b/n seventh row.” SS.
Rows No. 10-11: 1 runway, 62 st. b/n in PR columns. We cut off the thread.
We tie the upper part with openwork.
Row No. 1: with yellow thread we knit 1 runway, 3 tbsp. b/n in the next 3 columns b/n 10th row, 2 tbsp. b/n in the next 2 tbsp. b/n PR, 3 tbsp. b/n in the next 3 columns b/n 10th row, then 7 rapports: “1 tbsp. b/n in the next column b/n PR, 3 tbsp. b/n in the next 3 tbsp. b/n 10th row, 2 tbsp. b/n in the next 2 tbsp. b/n PR, 3 tbsp. b/n in the next 3 tbsp. b/n 10th row.” SS.
Row No. 2: 1 runway, 1 st. b/n in the next Art. b/n PR, 3 VP, repeats to the end of the row: 2 tbsp. b/n in the next 2 tbsp. b/n PR, 3 VP. SS. We cut off the thread. We attach it in the desired place for knitting a loop; we create it from 10 VPs. The upper part of the potholder is ready.
Bottom of potholder.
We start with the chains. on 6 VP, close in a circle with SS.
Row No. 1: 1 runway, 9 st. b/n in the ring. SS.
Row No. 2: 1 runway, 1 st. b/n in runway PR, 10 rapports: “2 tbsp. b/n in the next Art. b/n PR". SS.
We knit all other rows in circular rows, including the 10th row, do not forget to evenly add stitches to create a symmetrical circle.
Assembling the potholder.
Using thread and needle we connect both parts into a single whole. If desired, from the lower part you can walk in a circle with columns of non-woven or PS. Ready!
Original potholder “Juicy Watermelon Slice”

Creative needlewomen will definitely like this elegant and very “appetizing” potholder in the shape of a watermelon slice. It will add cheerful, playful notes to the kitchen interior, delighting the hostess day after day with rich colors and ease of use.
Knitting a potholder is not difficult, and almost every knitter has yarn in standard colors (green, light green, white, red). In total, one medium-sized potholder takes up to 50 grams of yarn.
Knitting progress.
Knitting begins with red yarn. We knit the initial chain. on 5 VP, close in a circle with SS.
Row No. 1: 3 runways, we knit 8 tbsp into the circle from the runway. s/n.
Row No. 2: in each column s/n PR - increase from 2 tbsp. s/n (16 columns).
Row No. 3: we knit in columns s/n, while in every 3rd column s/n PR we make an increase of 2 tbsp. s/n. (21 columns).
Row No. 4: we knit in columns s/n, while in every third column s/n PR we make an increase of 2 tbsp. s/n. (28th column).
Row No. 5: we knit in columns s/n, while in every fourth column s/n PR we make an increase of 2 tbsp. s/n. (35 columns).
Row No. 6: we knit in columns s/n, while in every fourth column s/n PR we make an increase of 2 tbsp. s/n. (43 column).
Row No. 7: we knit in columns s/n, while in every fourth column s/n PR we make an increase of 2 tbsp. s/n. (53 columns). Cut the thread and replace it with yarn white.
Row No. 8: we knit in columns s/n, while in every fourth column s/n PR we make an increase of 2 tbsp. s/n. (66 columns). Change the thread to a light green color.
Row No. 9: knit into each stitch. on the 1st column b/n. (66 columns). Change the thread to green.
Row No. 10: we knit in s/n columns, while in every sixth column of s/n PR we make an increase of 2 tbsp. s/n. (77 columns). SS. There is no need to cut the thread; we immediately begin knitting loops for hanging. We collect the flail. from 15 air pet., close it into a ring using the connection. Art. with a tack cloth, we tie it with non-woven or PS posts. We fasten the thread in secret loops and cut it off.
Tack Finish:
We embroider watermelon “seeds” with brown or black thread, make 5 stitches in the 4th-fourth row, and 8 stitches in the seventh row. In order for the thread not to be visible when moving from one stitch to another, you need to pull it extremely carefully inside the s/n columns so that it is not visible either from the front side or from the back.
Neat triangle potholder with berries and leaves

Needlewomen are so skilled in crocheting potholders that some of them can be called real works of art without undue modesty. For example, the unusual triangle potholder shown in the photo below.
If you have become proficient in knitting standard square and round potholders, it’s time to start knitting and creating such an original kitchen accessory.
Knitting pattern:

Progress.
The most interesting thing is that for our triangle you need to knit a regular square with a light openwork pattern. We knit a flail with a thread of the main color. at 8 air pet., close in the circle SS.
Row No. 1: 3 air. pet. lifting, 2 tbsp. s/n in a circle from VP, 3 VP, rapport 4 times: “3 tbsp. s/n in a circle, 3 VP. SS. Next, we continue to knit according to the pattern until the fabric reaches the desired size. We fold the resulting square in the order shown on the pattern. We tie the folded triangle with picot arches according to the above tying pattern.
We knit a leaf:
We collect a flail with a green thread. from 16 air. pet. (15 VP + 1 VP), knit in forward and reverse direction st. b/n 5 rows. We cut off the thread.
Knitting a berry:
We collect a flail with a red thread. for 4 air pet., close in a circle with a connecting column.
Row No. 1: 1 runway, 10 st. b/n in the ring, SS.
Row No. 2: 3 runways, 9 st. s/n in art. b/n PR. We cut off the thread.
Row No. 3: with a green thread we raise 3 runways, 9 tbsp. s/n in art. s/n PR. We tighten all the columns and fasten the SS.
Potholder decor:
Carefully sew three leaves and three berries to the potholder. Ready!
Various ideas for crocheting potholders


A good housewife has everything beautiful in her kitchen. But how often the picture is spoiled by old burnt rags, which are used to handle hot dishes. But this is not only not aesthetically pleasing, but also inconvenient and dangerous - you can easily burn your fingers. But if you know which hand you need to hold it in, then you can consider this issue resolved. Even remnants of yarn and deformed threads from old knitted products also well suited for tying potholders; they can be of varying complexity - from those that will take you half an hour to almost works of art. But be prepared for the fact that your household may accidentally burn the result of your labor or smear it with food.
Simple for beginners
This project will require a minimum of time and skill from the knitter, and will help beginners hone their skills in forming an even, neat fabric.
The potholder has square shape, we start work from the center. We close 4 loops in a circle, 1 lifting loop and begin the pattern: single crochet and 2 chain loops. In subsequent rows, 1 loop is made between single crochets, only adding two at the corners. And so on until the potholder is the right size. And a cheerful terry edge is achieved simply by increasing the number air loops: we knit not one, but four.

Experiment with colors; if desired, make the main part of the potholder striped. Melange yarn will have an interesting effect - the smooth transitions of color will be advantageously set off by a plain border.
Fun geometry
The classic “granny square” pattern also produces original crocheted potholders. The patterns of the pattern are extremely simple: a ring of 4 loops, 3 lifting loops, 2 more as part of the pattern and 3 and a loop between them. To get even corners, add 2 loops. The columns are arranged in a checkerboard pattern. By using different colors of yarn you can achieve a very interesting effect. Such squares with rows in rainbow colors look bright and unusual.

Volumetric flower
Based on the granny square pattern, many new ones have appeared that will allow you to make excellent crochet potholders. Schemes can start either from the center of the square or from the corner, but here is also an option with a voluminous flower in the middle.

The work is done in rows like this:
Yellow
1. Core of the flower: ring - 4 air loops.
2. 1 lifting loop, 8 arches of air loops and single crochets.
White color
3. We make chamomile petals: on each arch we knit 3 air loops, three and again 3 loops.
Green color
4. The basis for the leaves will be elongated arches of 4 loops, which will pass behind the white petals. Due to this, the flower will rise and become voluminous.
5. We begin to work according to the principle of the usual “granny square”. Next, the color of the thread is arbitrary.

Please note: the points in the diagram are not air loops, they are just symbols places where subsequent elements are attached.
Tutti Frutti
Funny fruits will take up residence in your kitchen if you know how to knit in the round. If not, then this is a great opportunity to learn and then use your new skill when knitting hats, napkins, baskets and even pillows.

To crochet neat potholders, patterns must be calculated based on certain rules. Then the canvas will not gather into a cone and will not fold into flounces.
When knitting with double crochets, we always start with 6 chain stitches, in the first row we make 12 stitches. s/n, mentally divide them into 12 wedges and in each subsequent row add a loop to the wedge. To avoid getting a regular hexagon, the increments need to be shifted slightly relative to each other. This does not affect the number of loops, but this results in an even, flat circle. If we knit with single crochet stitches, we do the same, but we start with 6 stitches and make additions in every sixth part of the circle.

Round potholders
We continue to develop the theme of knitting in the round. Small remnants of multi-colored yarn will be useful for this work; with them you can create beautiful crochet potholders. The schemes are quite simple; when working with a project, you can complete it in half an hour.

The highlight of the first version of the two-color potholder is a row of “melange” yarn, which was obtained by connecting one thread of each color. Work in rows is done like this:
- Circle of 4 chain stitches in color A.
- 11 double crochets.
- In each stitch of the 2nd row we make two double crochets with a multi-colored thread.
- Same as row 3, but in color B. Total 44 columns.
- We tie the edge of the potholder with color A in a “shell” pattern: we knit five double crochets in one loop, skip one, single crochet, skip another and repeat five stitches.

Kitchen Starfall
The “star” potholder (hook) looks very impressive and complex. The diagram, on the contrary, shows that everything ingenious is simple, and if you are familiar with the basic techniques of knitting, then you can do this work. More often, these potholders are made in different colors, then it seems that the stripes are cleverly intertwined with each other.

Well, let's reveal the secret of the “star”:
- We close 8 air loops in a circle.
- We make a flat circle, which will be the center of the “star”. In this example, double crochets (18 pcs.) are used, however, there are variations of the pattern where single crochets are used.
- Now we make very elongated arches, which will become the basis of the petals: 1 lifting loop, 23 chain loops, single crochet - all in one loop. Skip the loop and repeat in a circle. It turns out 9 petals.
- We tie the loops with single crochets.
- Then you can use a different color. We continue to tie the petals with single crochets, making the necessary additions: two stitches at the tips of each petal. So we knit 6 rows.
- Now the most interesting stage. We arrange the petals beautifully and begin to tie the edge of the potholder with single crochets. At the tops of the flowers we make a picot (there are 3 air loops between two columns). This is necessary so that the fabric does not wrap around the binding. You can also make a loop for hanging - this is one picot, but not from 3, but from 20 loops.

This is how this elegant “star” is made. You can increase the number of rows of binding, then the potholder will look like a circle with a voluminous center.
Luxurious sunflowers
This cheerful flower will decorate any kitchen. Many craftswomen knit patterns, and they range from simple circles of black or brown yarn, tied in a circle with yellow “shells,” to intricate ones, like this one.

But in fact, if you carefully read the description of the previous potholder, then this flower will be easy for you to repeat. We do the same steps - a flat circle, but from double crochets in the amount of 11 pieces and petals we knit not 9, but 12. We tie them with 3 rows of single crochets and continue working in circles according to the pattern, making the necessary additions.

Do not forget that a potholder is, first of all, a functional item. Multi-ply cotton yarn is ideal for crocheting potholders. Pattern patterns with a minimum of holes will allow you to create a product that will reliably protect your hands. But this does not mean that you need to give up beautiful openwork potholders. If there are many holes in the pattern, be sure to make a two-layer version. Sew on just a crocheted square or circle, or a lining made of non-woven fabric and cotton fabric.
In the kitchen, when preparing dishes, oven mitts will help you handle hot dishes. You can link DIY beautiful crochet potholders. In this article we present several knitted potholders with patterns and detailed description doing the work.
When knitting small items for the kitchen, you will learn how to make complex patterns, elements and these techniques can be used in knitting other larger items. You can start knitting potholders with simple circuits that you understand, knit more complex patterns using master classes with step-by-step photos.
Braided potholder comprises connected strips two colors, they are intertwined and tied along the contour to be combined into one fabric, an interesting chess pattern of colored squares is obtained.

Colored potholder with spiral pattern It is knitted with simple double crochets in the round, but at the same time 2 to 4 threads of different colors are used in the work.

Potholder in the shape of a flower It is knitted according to a simple pattern, and the outline of the flower is tied in a contrasting color at the end.

For the kitchen you can knit simple beautiful potholders. To make the base of the potholder, made according to a simple pattern, resemble a flower, it is tied along the contour of the petals with a thread of a contrasting color.

Knitting three-dimensional elements is described in detail when knitting this model of a potholder for the kitchen. With practice, you can knit beautiful things with three-dimensional flowers on the canvas.

Beautiful potholder sunflower will decorate your kitchen. The middle of the potholder is made with black flowers, and the petals are made with yellow yarn; tie the outermost row of petals with green thread, like leaves.

More simple potholder sunflower Even a beginner learning to crochet will knit with wavy edges.

Beautiful flower potholder can be knitted from a simple circle, the flower petals are knitted second row on the circle, they can be made in different colors using leftover threads.
If you are just starting to knit, then crocheting potholders are very good for practicing knitting even loops, square or round fabric. After all, before you take on a complex thing, you need to develop the skills of uniform thread tension and maintaining the same knitting density in length and width. But knitting potholders is not just for beginner needlewomen. A crocheted potholder will decorate your kitchen, create coziness in your home, it can be an excellent gift for March 8th or just a nice souvenir.
Crochet potholders can be crocheted either in the simplest way: 2 squares or circles of the same color sewn around the perimeter, or in more complex ways. You can make beautiful crochet potholders if you sew them in the center volumetric flower or use unusual techniques. For example, the bargello crochet technique.
A special place among crocheted potholders is occupied by potholders - mittens.
If you don’t want to buy a ready-made potholder, you can knit it from thick knitting yarn. The potholder will be thick and effective. Using it you will definitely not burn your hands.
There are a lot of tack patterns, we found them on the Internet:
- potholders in the form of animals
- potholders mittens
- potholders in the form of a dress
- tape potholders
- potholders in the form of a square, circle, hexagon and any other crochet motif.
If you have a lot of potholders, but you don’t know how to use them in the house, then here’s an idea, you can decorate the walls with potholders:


Crochet potholder, models from our website

The potholder is very beautiful; tying one and using it for hot dishes would be a real blasphemy. So most likely such a beautiful potholder, crocheted will serve as a decoration in your kitchen. To knit a potholder you will need: yarn of three colors (red,
Read completely

Pekhorka yarn "Children's novelty". Hook 2.0. Crochet potholder, description 1p - With colored (Purple, yellow, blue) thread, cast on 8 ch and close into a ring. 2p - Knit 18 double crochets in a circle 3p - On the 1st st. s/n of the previous row*
Read completely

My name is Povarova Alexandra. I am submitting a pot holder - a sheep - to the competition in the "Professional Look" category. To make oven mitts you will need 2 hours of time and some cotton thread. If you tie only the muzzle, attach a magnet,
Read completely

The description is given in the sequence in which the potholder was knitted. We knit the body in red in the form of a circle. Steam through damp gauze with an iron from the wrong side. How to knit in the round, read the article "Knitting in the Round" part 1 and
Read completely

You will need the remains of multi-colored threads, hooks No. 4 and No. 5. 2 buttons for eyes. Potholder diameter: 23 cm. Cast on 24 ch. knit in single crochet stitches in the round. Each row will end together. column. Row 1: Work 24 sts. b/n. 2nd -3rd row:
Read completely

This motif is especially suitable for those who want to try the most various options. Experiment with both the color and shape of the spots. To knit a potholder you will need: 50 g of brown yarn and 50 g of red-brown yarn, a suitable hook
Read completely

Two crocheted potholders: a strawberry and a sunflower are great gift ideas for March 8th. The author of the descriptions is Natalya (Podarok). Potholder "Strawberry", description of work The potholder in the shape of a strawberry is knitted in the round according to a detailed pattern. In the first row knit 8
Read completely

Crocheted mitten potholder. Model from Japanese magazine. Using this knitting pattern, you can make not only a potholder, but also a regular mitten. Potholder - crocheted mitten description Cast on 44 chain stitches + 1 chain stitch for lifting. Knit
Read completely
Crocheted potholder "chicken". Master Class!

To crochet a potholder, you will need some thick yarn in two colors; hook No. 3.5-4; beady eyes. Description of work: at the beginning of each row, knit 3 chain stitches for lifting. Using an orange thread, pick up 6 chain stitches and close them in a circle. Knit
Read completely
Crochet potholder, ideas from the Internet
Spiral potholder
For knitting you will need:
- yarn 4 colors, one of them section dyed
- hook No. 7
- knitting needle

Crochet potholders sugar bowl and jug
These are these pot-bellied jugs - double ones, knitted in the round. When I was a child, my friend’s grandmother knitted similar ones, and they captivated me then. I wrote a description, maybe it will be useful to someone.


Crochet pot holder Rose
Adapted by Hazel Cooper
connecting post
VP-air loop
RLS single crochet
PSN-half double crochet
Double crochet double crochet
Steel hook No. 7 and knitting thread No. 10 in white and pink or ecru and pink.

Crochet Christmas potholder
In anticipation of the upcoming New Year's holidays I propose to decorate the kitchen interior with elegant oven mitts in the form Christmas balls. Potholders will not only fulfill their functional purpose, but will also create a festive atmosphere in your home.
Potholder size 17 x 19 cm.
Materials:
- 16 g of thick red cotton yarn, 12 g of green, 6 g of white and a little gray yarn;
- hook number 2.
Crochet potholders with crossed posts
Jacquard potholders: cow and tiger cub
Crochet potholders
In this way, you can tie not only potholders, but also a rug for the bathroom or room.
To begin with, knit a fillet mesh: *1 double crochet, 2 ch*, repeat from * to * the size you need. Then take 2 yarns of a contrasting color and knit chains of air loops from them. Using a knitting needle, braid with chains fillet mesh in two different directions. The fabric should be thick, suitable for crocheting and matting.


Crochet potholder with flowers
A very beautiful potholder, it would be a shame to use one. Most likely it is knitted for beauty.
We found the master class not in Russian, but you can figure it out from numerous photographs.

Crochet blanket or potholder
If you knit one such motif, then you will get a pot holder, if there are many, then a blanket.
Knitting density: 6 stitches. x 14 rub. = 10 x 10 cm.
For knitting you will need:
- yarn of two colors at least 75m/50g
- hook No. 8

Crochet cup holder

Crocheted potholder with imitation Russian embroidery
I suggest you experiment and knit this wonderful ornament on a potholder.
Preparation of materials.
For our creative process you will need:
- Yarn 50g/160m, 1 skein of white and 1 skein of red, I use Yarnart Jeans (Turkey).
- Hook No. 2.
- Scissors.
- Drawing diagram.
And don't forget good mood, time and patience :)


Crochet potholders, video tutorials
Crochet pot holder
It is crocheted No. 3. You will need thick threads of several colors: black, yellow, white, red and green.
Crochet potholder for beginners
At all simple model potholders, consists of two parts. Suitable for those who are just starting to crochet.
The video should load here, please wait or refresh the page.
Crochet mitten for the kitchen
The potholder is knitted from knitted yarn.
The video should load here, please wait or refresh the page.