The bracelet with a cute “Mermaid Braid” pattern has a very simple and uncomplicated weaving technique. But despite this, the accessory is very interesting and beautiful!
You can weave it on a Slingshot mini-loom or on an ordinary loom, using only two rows and the last two columns.
You should prepare the following materials:
- colored elastic bands (various shades, at your discretion);
— a miniature machine, with two columns, “Slingshot”;
- small hook;
- S-shaped clip.
The first thing you need to do is choose the shades of elastic bands for the bracelet! In today's case, the braid of the product will be green, and the pattern itself will be in rainbow shades. The first rubber band, as a rule, is put on two posts of the “Slingshot”. Previously, it is twisted, as a sign of infinity.

In the future, one side of the fastener, that is, clips, will be attached to this part. Next, an elastic band is added for the central pattern. It must be folded in two and put on one of the posts of the mini-loom, in this case the right one.

On top, add a green elastic band. It should be secured in the usual way, on two “horns” of the machine.

Having inserted the hook into the recess of the post, under the “double” red elastic band, you need to hook the last one, the green one.

Then throw it towards the center.

Afterwards, lower the entire structure a little lower so that you can add further rubber bands. On the opposite side, add another “double” elastic band.

Another elastic band is also placed on top of the columns, in the color in which the braid of the product will be.

The hook is again wound under the red elastic band. They need to hook all the lower elastic bands.

Then, holding the red and green loops with your finger, remove them from the post. This is what should happen in the end!

The rubber bands added, folded in two, after such manipulations, should always remain at the very bottom. All the lower loops should be removed; in the future there will be four of them on each post.


You must complete the weaving correctly, otherwise the decoration will unravel over time and lose its original shape! Finish weaving at this stage, when there are four elastic bands on one column and three on the second.


And then all the lower elastic bands are removed. There should be all seven loops on this elastic band.


Then, collecting loops on one of the posts.

Attach an S-shaped fastener to them.

Now all that remains is to find the first elastic band at the other end of the product, and then attach a plastic fastener to it.


And so, the “Mermaid Braid” bracelet is ready!

Final view. Photo 1.

Final view. Photo 2.

Final view. Photo 3.

Final view. Photo 4.
You can use different shades of rubber bands in weaving a bracelet, which will allow you to create a unique decoration that suits you and your outfit!
Next time, try weaving a bracelet from rubber bands called
A mermaid made from rubber bands is very interesting and an unusual option weaving a bracelet from elastic bands. You can also weave a three-dimensional figurine of a little mermaid from multi-colored elastic bands, which can be used as a keychain. To make a three-dimensional figure from elastic bands, you will need a special machine, and to weave a bracelet you will only need a small slingshot and two colors of latex rubber bands.
In our article you will find detailed and step by step description the process of making bracelets with a mermaid pattern.
How to weave a mermaid bracelet from rubber bands: detailed description
We invite our needlewomen readers to learn how to make an original and colorful “mermaid” elastic bracelet with their own hands. This bracelet design option will be suitable for wear by both boys and girls of any age. When creating such original decoration made of elastic material, you can use either a special machine, a slingshot or improvised material (fork, pencils and other materials).
In our master class, we suggest using only two posts on a special weaving machine. The algorithm for creating this type of bracelet with a “mermaid” pattern can be very quickly and easily remembered, and then, if necessary, reproduced in practice.

Before you start weaving a bracelet with an unusual pattern, you need to prepare the required tools and materials:
- Special machine for weaving with rubber bands;
- Hook for knitting elastic bands;
- Elastic bands made of elastic material in two colors. Use elastic bands of contrasting colors in your work so that your product has an original and bright appearance.
In our master class, we use yellow and black material to create a bracelet from rubber bands. Black elastic bands will be used as the basis of a woven mermaid bracelet, and elastic bands yellow tint will form an original pattern.
Only two vertical rows of posts should be used on the machine. The holes on these rows of columns should be facing you. This arrangement of the recesses will make it easier for you to remove the elastic loops from the columns. The process of forming the entire base of the bracelet from rubber bands will be located on two columns from the edge of a special machine.

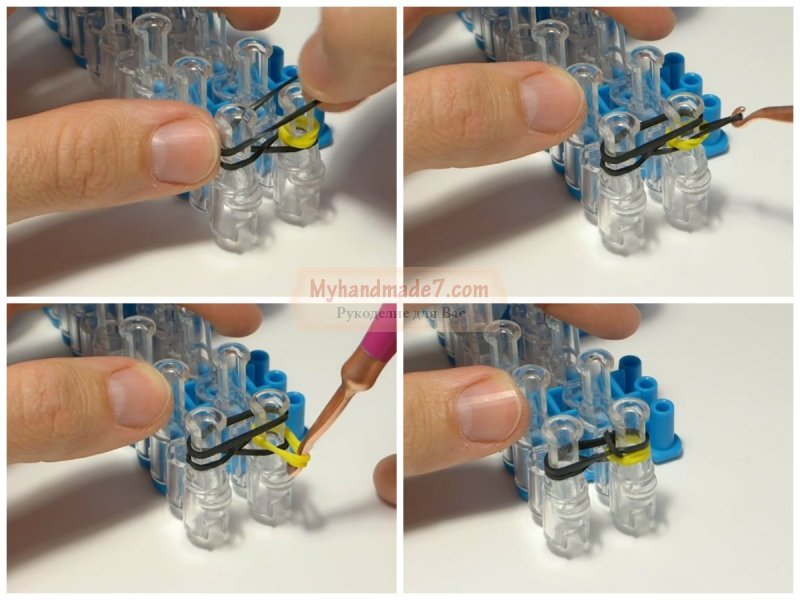
You need to place the first black elastic band on the posts of the machine in the shape of a figure eight. This element of weaving is very often used in this type of creativity, so experienced craftswomen should be very familiar with it. The next elastic used in weaving should be yellow. Throw it onto one machine post located on the right side. In this case, you need to twist this yellow elastic band twice. Next, again, you need to throw a black elastic band onto two posts of your machine. There is no need to twist this rubber band anymore.

Now use it at work crochet hook. Insert it inside the yellow loops on the right column, grab the loop and pull it through the yellow ring. After this, slip the loop into the central location so that the loop overlaps the last black ring. The remaining two yellow stitches need to be thrown onto the left column, then the black elastic onto two columns.
Then the crochet hook should be inserted into the yellow loop, hook two loops on one post and throw them into the center of the structure. Repeat all the manipulations we described above until you obtain the desired length of the mermaid bracelet. Complete the weaving of the accessory and fasten the clasp to the end of the structure.
Creating a three-dimensional figurine of a mermaid from elastic bands is a rather complex and time-consuming process. To make such a keychain, you need to stock up on a sufficient number of multi-colored latex rubber bands and special machine for weaving. you will need a lot of patience and perseverance to form small parts DIY mermaid face, swimsuit and tail.
For a better perception and understanding of the process of weaving a three-dimensional figurine of a mermaid from rubber bands, we invite you to take advantage of master classes with a demonstration of a visual video. You will be able to repeat all the manipulations and steps together with the figurine weaving master.

Video on the topic of the article
Watch a selection of videos that demonstrate the process of creating a little mermaid from rubber bands.
Mermaid made of rubber bands- this is not only a beautiful multi-colored figurine that can become a reliable keychain for your keys, but also an interesting pattern for a bracelet that can be worn by both girls and boys. To create a pendant you will need a machine and several colors of rings, and to make a bauble, you just need to use a slingshot, and you only need materials in two shades.
A special master class will help you find out how beautiful mermaid made from rubber bands, video The lesson will give you all the tips, and you will definitely not get confused with the execution of this figure.
Bracelet made of rubber bands “Mermaid”
Bright and stylish bracelet made of rubber bands “Mermaid” you can create it on a slingshot or on a machine, or using improvised materials as a tool, such as forks or pencils. For this product we will use only two columns, so you will quickly remember the algorithm of actions, complete this product, and then share the secrets of your skill with your friends.
Now you can move on to the master class, how to make a mermaid braid using rubber bands, and we need to dwell on the materials, since we have already talked about the main tool and you have probably made a choice in favor of the one that is most convenient for you. We will use the machine because it can be placed on the work surface and then we will have both hands free, because sometimes you need the help of a second hand when you remove the loops from the pins. For this product, you can also use a mini-machine, but the slingshot must be held in your left hand, and then you only have your right hand to work with.
The material for such a product is, of course, multi-colored rubber bands; in this case, we only need two colors. It is advisable that they be contrasting, and you can choose the color at your discretion. In our case, it will be a bold combination of yellow and black, yellow to form the pattern, and black to serve as the base.
Using the same principle, you can also perform “Mermaid braid” made from elastic bands on a slingshot, and on a large loom we will remove one outer row so that only two remain, and all weaving will be done on the two outer columns. Make sure that the notches are facing you, this will allow you to slip off the loops more comfortably.
We will throw the first black one with an “eight”, as in all cases when you perform. The next one will be yellow, it is thrown over only one column (on the right), twisting it twice. Then again you need to throw a little black one over both columns; you no longer need to twist it, like the subsequent rings of the base.

After this, it's time to make the first stitches, because on the right column we have three rows of loops. To make a stitch, we need a hook, which must be inserted inside the yellow turns on the right column, pick up the warp loop and pull it through the yellow ring, throw it into the center so that the stitch now completed overlaps the last black ring. The next two solar turns need to be thrown over the left column, then the black one over both, and again you can make new stitches.
Please note that on the left column you now have four rows, because there is still a loop left from the first “eight”, which we removed a step earlier from the neighboring one on the right. The hook also needs to be inserted into the sun ring, pick up both loops on this pin and throw them into the center. You can remember the algorithm of actions, how to weave a mermaid bracelet from rubber bands, and be guided by it further, continue.

However, there are some features that you can better see in the video presented. When you make the next stitches on the right pin, reinserting the hook into the last sun ring, with the tool you need to pick up and throw off all the previous loops on this pin, i.e. not only black, but also yellow.
Now you know exactly how beautiful they turn out bracelets made of elastic bands on a slingshot “Mermaid Braid”, and you can experiment with different color combinations.

How to weave a mermaid from rubber bands
Weaving from elastic bands “Mermaid”- the process is quite complex, and this can only be understood by looking at ready-made craft. For the hair and tail it is necessary to use rings of different colors, on the face it is necessary to create a mouth and eyes, and, of course, do not forget about a swimsuit for our Ariel.
Performed mermaid made from rubber bands on the machine, you will not get the desired result with other tools: a slingshot, a fork or a mini-machine. During the master class, carefully look at how the machine should be positioned, which row should be extended in relation to the others, and also in which direction the recesses on the pins should be turned.
When you study, how to weave a mermaid from rubber bands, you need to follow the master, stopping the video to repeat all his steps. Unlike weaving baubles, there is no way to remember the algorithm of actions, since each step is unique.

Now you know for sure how to weave a mermaid from rubber bands, and a novice master can be advised to start with a bauble, and only then take on more complex figures.
You must understand that to create such a figure, certain skills are required; firstly, you must be able to mentally divide the workspace into zones, imagining that in this part you will have a head, and here - a tail. This will help you avoid making the main mistake of using the wrong color.
One of our favorite characters from fairy tales and myths is, of course, mermaids. These mysterious and beautiful creatures attract the attention of all fans of the fantasy and science fiction genres. They are beautiful, graceful and feminine.
Today we will find out how to weave a mermaid from rubber bands.
To weave a mermaid we will need:
- Elastic bands are red, green, lilac, black, beige;
- Hook;
- Clip.
How to weave a mermaid from rubber bands using the lumigurumi technique?
The little mermaid will be created using the lumigurumi method. We will start with the head and red elastic bands.
Let's form a ring of six loops.
In the second row, as usual, we will double the weaving by adding increments to each stitch.
At the end of the row we have twelve loops.
In the third row we will again increase the diameter of the product, adding loops to every second loop.
After weaving, we already have eighteen loops.

We weave the fourth row without increments.
In the fifth row we will smoothly transition to the little mermaid's face, so we will prepare skin-colored elastic bands.
We will weave without increments.
In the first six loops we weave red elastic bands, and in the next six we weave skin-colored elastic bands, then another six again in red.

We weave the sixth row, just like the fifth.
In the seventh row we will first weave five red elastic bands, then two beige ones, on the eighth loop we attach an eye, weave the ninth and tenth loops with beige elastic bands, in the next one again an eye, then seven red elastic bands.

The eighth and ninth rows will also be without increases.
In the eighth row we weave five red, six beige and seven red elastic bands.
In the ninth row, four are red, seven are beige and seven are red again.
Now let's make eyelashes.
Turn the weave inside out and attach the black elastic to the elastic with the eye. Then we turn our head back and take out the black rubber band.

Our tenth row is decreasing. It consists only of beige rubber bands.
Decrease through one loop.
As a result, there are twelve loops on the part.
We fill the head with padding polyester.
In the next row we decrease in each loop. Accordingly, in the end we will get only six loops.

In the twelfth row we again add each loop, as we move on to weaving the body.
As a result, we again get twelve beige loops.

In the thirteenth row we add through three loops.
We weave the fourteenth and sixteenth rows with beige elastic bands, and the fifteenth with lilac ones.
As a result, we will get a stripe in the center.
At this stage you can make the arms.
We make a ring again, but now from five loops.

Opposite the knot we attach another one to attach the arms.
Attach the arms using two knots on them.

In the seventeenth row we decrease through three loops.
We supplement the figure with filler.
At this stage we move on to weaving the tail, so we change the elastic bands to green ones.
The eighteenth row is increased again. We will increase every three stitches. But also on this row we will form a headband for the ponytail.
So we weave into each loop.

We weave the nineteenth row without increments.
Add filler.
In the twenty-fourth row we begin to decrease. We decrease every three stitches.
We decrease the twenty-fifth row through two loops.
In the next row we do not decrease or increase.
In the twenty-sixth row we make a decrease in each loop and add filler to the tail as we weave.

Now all we have to do is make the fins for the tail, the top and the hair.
For the fins we cast on a ring of six loops.
Attach with additional elastic bands to the tip of the tail on both sides.

Now, to make the fins more magnificent, we will tie them in a circle.
We put the hook through the loop and pull the elastic through this loop, then we will pull another one and make a knot.
We insert the hook into the next loop, pull one elastic band, then another one, but only through the two outer loops and make a knot.
So we tie both fins.

To form the top, we will need lilac elastic bands.
Let's make a chain of two loops.
Let's insert the hook into the very first loop, pull one elastic band through it, and we need to pull the next elastic band through all the elastic bands on the hook.

We repeat the last step one more time.
We form a knot and turn the part over.
And we simply weave two elastic bands and make a knot with the third.
From this knot we form a chain of four loops.
We return the hook to the elastic band, which is the very first one, and weave it in exactly the same way, only on the other side.

Now let's make the hair.
Somewhere on the side, where you need to make a parting, place the hook under the loop.
We stretch a red elastic band through it and simply form a chain.

We form it on the right side and apply it to the left. Somewhere behind the level of the left eye we attach this chain to the head using another elastic band. Next, we again dial the chain to the required length.
Then we pierce the head again with the hook in the same place, but now we will attach the chain on the left side of the head.
And so we will weave until the head is completely covered with strands.
We alternate, first weave to the left, then the chain to the right, and so on.
As a result, a parting is formed on the little mermaid’s head, from which the hair goes in different directions.
You can fasten them with a rubber band.
We put on the top.
Our beauty is ready!