Good day to you, our dear craftswomen and needlewomen!
Our creative work today is dedicated to new material that recently appeared on the pages of our store.
Foamiran.
With this master class we will slightly reveal to you the possibilities of this modern material. Light, delicate and very pleasant to the touch.
For work we will need:


Let's start by cutting out the parts.

Press a rose petal size L onto a sheet of foamiran cutter

We cut out the details according to the office.

The set contains 4 sizes of rose petals.
For one rose we prepared 5 petals of each size.
5 green sepals.
3-5 green leaves.
Here are blanks for several roses.

Now we need an iron.
Be careful when working with electrical devices. We worked at maximum temperature in linen mode. But you can start with a lower one. You will succeed, but the work will move more slowly.
Place the petal on the hot surface of the iron and wait for it to begin to change shape. The edge of the petal is rounded before our eyes.

While the foamiran is still hot, let’s give it the desired shape.


Let's heat the petal on the other side and give it a convex shape using a stack of balls.


The result is a simple petal.

And now let’s get a little rowdy.
Using a stack with an edge.
Let's pull the petal, pressing it against the hot iron.

Don't be upset if the petal breaks. It can be fixed.

We trim the edges with scissors, slightly cutting off the sharp corners.

Let's heat the petal and give it the desired shape.


You can also use a heated stack to give an additional bend to the petal.


Sepals.
We will make notches on the cut sepal blanks.


Cover the wire No. 28 with a piece of matte tracing paper.

Thanks to further actions, the sepals will thin out and come to life.
So: We place our device in the middle along the sepal.

We put everything together.

We iron our sandwich with an iron.

Let's expand.

The result is a sepal with a fold.

Let's heat the wide part of the sepals.

Roll it out into a stack with balls.
Don't forget that it is easier to shape warm material. After the foamiran has cooled, the shape of the part is preserved and can only be changed if it is heated again.

Leaves.
We make notches along the edge of the sheet.

To give the texture of the sheet, we use molds for modeling from Pion-online.
Foamiran cools down quite quickly. To get a good print, we need it to be hot or at least warm. Have time to apply the hot foam to the mold so that the middle vein is strictly in the middle of the sheet.
This is not an easy task!

We want to show you how we dealt with it.
From the same tracing paper we cut out a triangle whose height is slightly shorter than the length of the mold with the texture of a rose leaf.

Using a pencil, draw this line (the height of the triangle).

Apply the cut out rose leaf blank from foamiran to the tracing paper so that the line coincides with the middle of the leaf.

Iron it with an iron.

And while the foam has not cooled down, apply it to the texture.

This device will help you print a beautiful, even texture.


We remove the sheet from the tracing paper and use a heated presser with veins to make a depression on the sheet.

The rose preparations are ready.

Let's start assembling the rose inflorescence. We will have blooming flowers, so we do not use a special base for teardrop roses. But it can and should be used to create a bud. Using a glue gun we increase our inflorescence.
See photo.


We glue the sepals.

Leaves.
Wire No. 24. The sheet is glued to the wire using instant glue. The sheet is collected on tape.

Paint the edge of the leaf with oil paint.


The stem is made of clay from Pion-online.


The rose for the bouquet is ready.

For inspiration, a little more beauty made from the same faomiran, polymer clay and pollen.


We assemble a wreath from our preparations. It can be used as interior or wedding decoration, for photo sessions.
Attach each individual flower to a metal hoop with wire, alternating in a checkerboard pattern. Apply tape to hide the wire.

Another row of satin linen to hide all the flaws.

We attach the wreath to a wide-necked vase or put it on our head.
Work is done.
Well done!
We remind you that flowers made from foam are very light and are not afraid of water. They can be worn in rain and snow. But like any product self made they require careful handling.

Flowers, candles, some delicious wine and intimate conversation.
We don't need much!
Let your home always be warm and cozy!
Sincerely yours Pion-online and its craftswomen.

How often can you see beautiful artificial flowers that decorate various holidays and celebrations. Artificial jewelry is used for interior decoration, and they are also often used as costume jewelry. Creating flowers from foamiran is a whole direction in needlework. It is no coincidence that it has become so popular: this process is very exciting, and ready-made flowers are sometimes indistinguishable from real ones. Foamiran is often compared to plastic rubber. In this article we will look at what foamiran is and offer options for entertaining master classes.
Foamiran appeared on the market of materials for creativity and handicrafts a long time ago. Its name is consonant with the name of the manufacturer - “Foamlran”; it is often supplied to Russia from Iran. The material has gained popularity due to its unique properties: with slight heating, foamiran can be given absolutely any shape. At the same time, it is environmentally friendly. The material is also rich in color palette. All these characteristics made it so popular for creating flowers, jewelry and toys. He rightfully earned the love of many needlewomen. Foamiran can be purchased at art and craft stores. Online stores offer a large assortment at quite attractive prices, and they also deliver goods to any region. Craftswomen who have at least once created jewelry from foamiran know how easy and pleasant it is to work with it. The material is pliable, the products are bright and neat. So that even novice craftswomen can create charming flowers, we have made a selection of master classes. For clarity, step by step instructions with photo.
Types of foamiran
Marshmallow Silk Glitter Foamiran with flock Foamiran with a pattern Perforated Foamiran with adhesive base Textured Decorative Embossed VelvetGorgeous rose
You will need: foamiran red and Green colour, ruler, scissors, glue gun, iron, instant glue, foil, green and black pastels, tweezers, lighter, floral wire, tape, plastic mold sheet, stationery knife.
Master Class
- Cut 25 rectangles of red foamiran measuring 3x4 cm.
- Fold the rectangle in half and cut off the corners. Do this process with all the pieces.

- Heat the petal by holding it near the iron for 5 seconds, then stretch it in all directions so that the foamiran becomes thinner and twist the edge of the petal outward. Make a fold, pinch with tweezers and secure with a lighter. Repeat this process with all the blanks, forming petals.

- Prepare a rectangle of foil measuring 10x15 cm.
- Shape the foil into an oval shape and glue it to the end of the floral wire.
- Apply glue to the bottom of the petal and wrap it in foil.

- Glue the petals to form a rose.
- Wrap the wire with tape, securing it with glue at the beginning and end of the stem.
- Cut out 3 leaves from green foamiran.

- Cut out a square of green foamiran measuring 7x7 cm.
- Fold the square in half 2 times.
- Give a leaf shape at the edges where there are no folds, then unfold the sepal.

- Make small shavings with a stationery knife from black and green pastels, mix them and darken the edges of the sepals with a sponge.
- Warm up the leaves and press them onto the mold.
- Heat and mash the sepals to give them a realistic look.

- Glue the sepal to the base of the bud.
- Glue the leaves.
A gorgeous foamiran rose is ready!
Exquisite peony
You will need: foamiran light pink, dark pink and green, scissors, tape, acrylic paints yellow, green and pink, thick and thin floral wire, glue gun, thread, tassels, foam sponge, foil.
Master Class
- Take a close look at the pattern of the flower details presented below.

- Prepare foamiran and cut out the blanks according to the pattern: A – 10 light pink petals; B – 10 light pink and 5 dark pink petals; C – 10 light pink petals; D – 5 dark pink petals; E – 5 dark pink petals; Z – 3 green leaves; M – 6 green leaves; K and L – 5 green sepals each; F – 1 light pink blank in the shape of a sun.

- Tint the petals with pink paint.
- Draw the structure of the leaves using green paint.

- To give a realistic shape to the petals, take blanks A, B and C.
- Fold the petal into an accordion, twist and unfold. Do this process with all petals A, B and C.
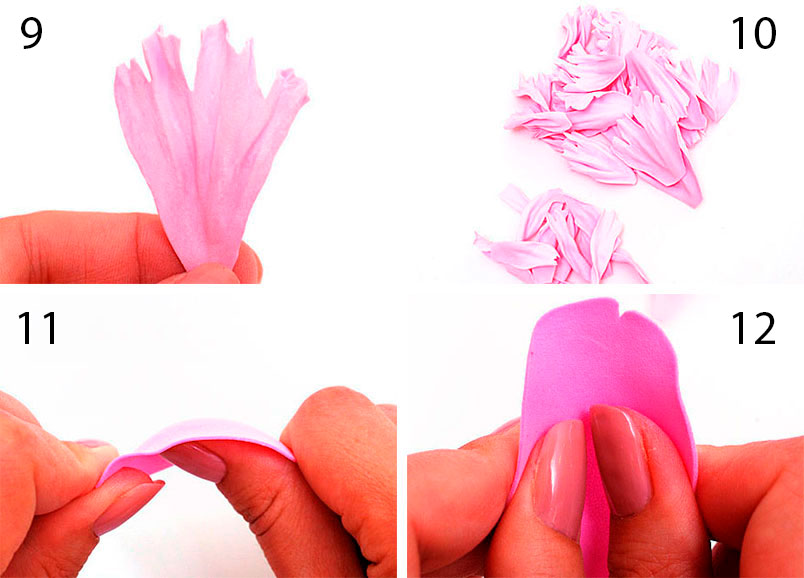
- Take petals D and E, then give each of them a concave shape. To do this, place thumb in the center of the petal and stretch the foamiran along the edges.

- Fold the sheet in half, then accordion-fold and unfold. The edges can be curled. Give a realistic look to each leaf in the same way.

- Roll out a circle of foil with a diameter of 1.5 - 2 cm.
- Make a small hole in the balls, fill them with hot glue and insert a thick wire as a stem.
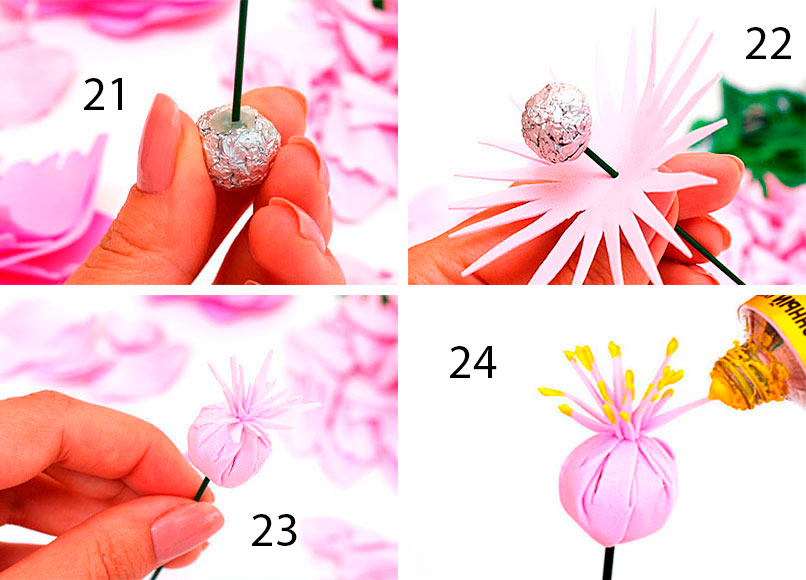
- Place the sun-shaped blank F onto the stem and tie the rays with thread.
- Paint the tips of the rays yellow to create the stamens.

- Glue 10 petals A with a glue gun. It is worth noting that the petals need to be glued in a circle, placing them in a checkerboard pattern.
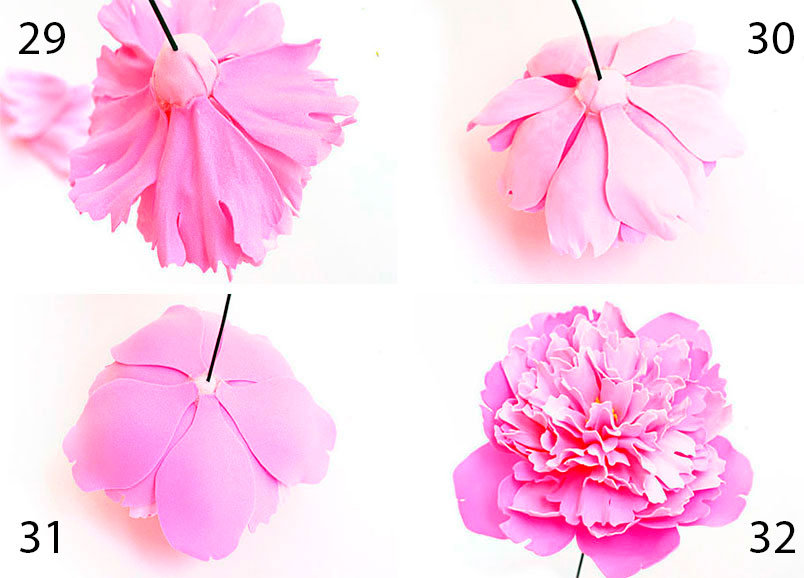
- Glue petals B, then C, D and E.
- Glue the sepals L and K.
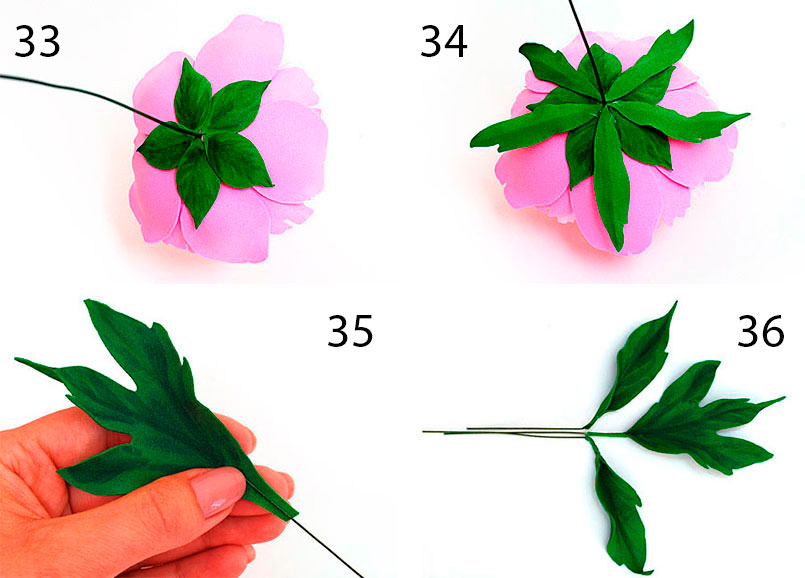
- Glue thin wire to all the leaves.
- Connect the leaves together and secure the tape with tape, making branches.

- Glue the branches to the stem.
Tulips
You will need: foamiran in bright colors, green foamiran, floral wire, dry pastel, wet wipes, tape, floral buds, glue, scissors, ruler, iron, cardboard, toothpick.
Master Class
- Draw a tulip petal 6 cm high and 3.5 cm wide in the center on the cardboard, then cut out the template.
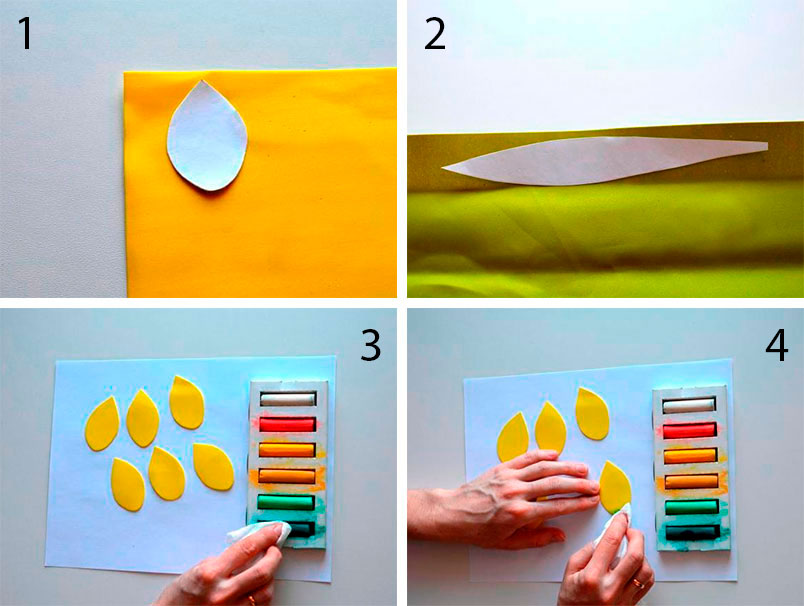
- Draw a tulip leaf 25 cm long on cardboard and 3.5 cm wide in the center, then cut out the template.
- Trace the petal template onto foamiran with a toothpick and cut out 6 petals.
- Trace the leaf template onto green foam paper with a toothpick and cut it out.
- Tint the petals and leaves of the future tulip using a damp cloth and dry pastel.

- Heat each petal by applying it to the iron, then give them a realistic shape by stretching them in width and length.
- Heat the tulip leaf and fold it in half lengthwise.
- Glue 3 petals to the flower bud, completely covering it.
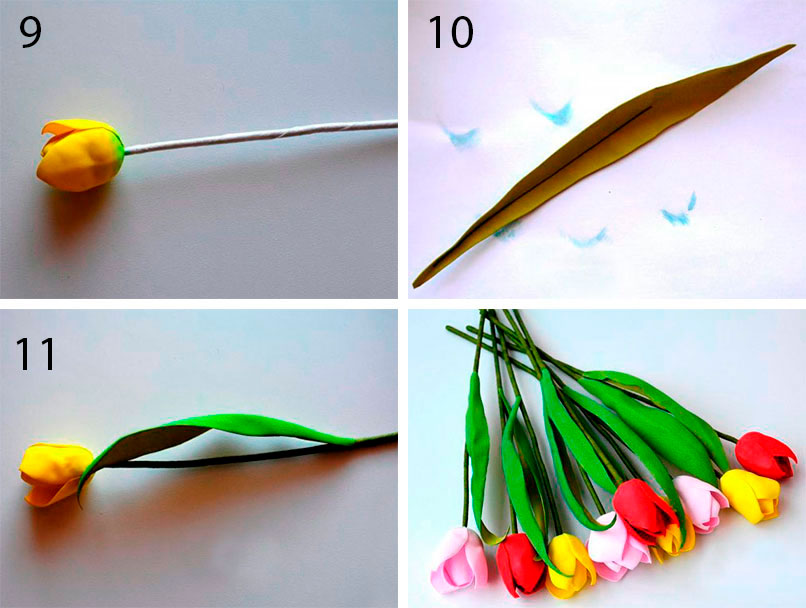
- Glue the remaining 3 petals, placing them in a checkerboard pattern.
- Glue a piece of floral wire into the leaf.
- Wrap the stem with tape and attach the leaf.
- Make a whole bouquet of tulips in the same way.
Foamiran tulips are ready!
creative flowers
You will need: textured foamiran in bright colors, glue stick, glue squares, cocktail tubes, figured hole punch (optional).
Master Class
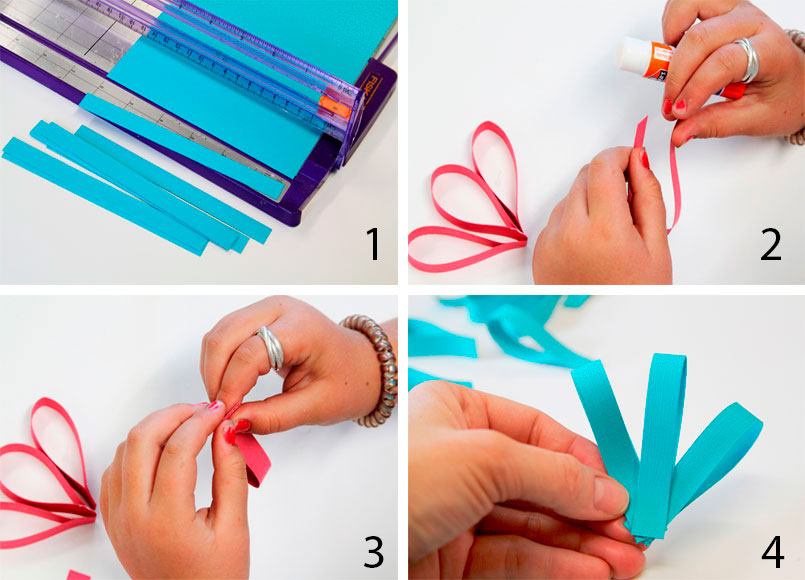
Creative foamiran flowers are ready! I recommend watching this video!
Chrysanthemum
You will need: glitter foamiran, scissors, glue gun, soft green wire.
Master Class

The orange foamiran chrysanthemum is ready!
Lily
Chamomile has long been considered a symbol of family. Despite its simplicity, it is a very sunny and bright flower. It is no coincidence that weddings are so often decorated with daisies. To easily create a charming daisy from foamiran, we suggest using step-by-step master class and photo.
You will need:
- white, yellow and green foamiran;
- sheet of cardboard;
- protractor;
- ruler;
- pencil;
- glue.
- thin stick for the stem or wire.
- iron or candle.
Master Class

Chamomile from foamiran is ready!
Tender rose
Rose is the queen of flowers. A flower beloved by many women can be made from foamiran; moreover, it will not wither and will please the eye for a long time.
You will need:
- green and pink foamiran;
- scissors;
- glue;
- a piece of foil;
- thick wire.
Using foamiran you can create a wide variety of flowers. Hydrangea and sunflower also turn out great. They are made approximately according to the same principle, the only difference is the color of the foamiran. We invite you to create a sunflower using our recommendations.
You will need:
- foamiran (white or yellow, black, green);
- thick paper;
- paints (can be acrylic);
- green floral ribbon.
- toothpick or wire.
Master Class

Today at the master class we will be growing a giant flower made of foamiran, namely a tea rose. The diameter of the rose was 65 cm. The height of the rose stem was 180-200 cm. Giants use such flowers for interior decoration, photo sessions, and for decorating festive halls and stages. I, but if desired, the pattern can be reduced, the number of petals increased and secured closer to each other. I’ll say right away that it takes a lot of material and time, so it’s better to practice assembling on a small rose, and only then start making a giant flower from foamiran.
This is what a giant growth rose should look like.
To create a growth giant tea room you will need:
- 0.5 sheets of green foamiran;
- 4 sheets of pink foamiran;
- 3 meters of metal-plastic pipe;
- instant glue and hot gun;
- green tape;
- a piece of tape;
- green corrugated paper;
- cardboard;
- stapler;
- 6-7 tubes from newspapers or cardboard.
Templates for a full-length rose flower

We take one sheet of foamiran and fold it in half twice, cut it into 4 squares measuring 35*30 cm, we will need 6 pieces. Therefore, we cut out 2 more squares from the second sheet.

We fold the 35*30 pieces in half and cut out petals from them.
 These are the petals we cut out.

From the rest of the second sheet of foamiran we cut off 5 cm and cut in half, we got 2 squares 30*30 cm. We will need 6 such squares. Therefore, we cut out 4 from the third sheet of foamiran.

From these squares we cut out petals of the same shape as the largest ones; these petals turn out to be 5 cm smaller.

We take 4 sheets of foamiran, divide it into three parts on the 60 cm side, we get rectangles of 20*70 cm, on the 70 cm side. We measure twice 26 cm each and cut it off. The result is rectangles 20*26 cm. 6 pieces and cut out petals of the same shape as the large ones.

These are the size petals we cut out.

This is what rose petals from foamiran look like when spread out.
Assembling a giant flower from foamiran: step-by-step photos

We begin to stretch the edges of the rose petals, as if making small waves. The largest petals, we retreat 10 cm from the bottom edge of the petals, then we begin to stretch the petals.

This is how we process all prepared three sizes of rose petals.

We take a square of cardboard 20*20 cm for the base of a life-size giant tea rose.

Then we round the edges of the square.

We take the petals and form folds in the lower part, securing them with a stapler. But of course you can use glue. I think for speed of formation we use a stapler.

We form the petals of the large petals of the first two rows in three folds.

We make two folds on the petals of the third row.

Having retreated five centimeters from the edge of the circle, we begin to glue the largest petals. Glue the petals in a circle, overlapping.

This is how we glued the largest petals of a full-sized tea rose.

We glue the second row of petals overlapping in a circle, in a checkerboard pattern in relation to the petals of the first row.

Then glue the third row of petals.

From the remains of foamiran we cut out petals measuring 12*15 cm, also 6 pieces.

We process the petals in the same way as large ones and make one fold at a time.

Glue the fourth row of petals.

From the scraps remaining when forming large petals, cut out 5 rows of the smallest 6 petals. I got small ones measuring 8*10 cm.

We process the small petals on an iron at silk-wool temperature, fold them like an accordion and rub them between our fingers, straighten them and make an indentation. Then we heat the edges of the petal on the edge of the iron and make waves.

Glue the fifth row of petals in a circle, overlapping.

From the remains of foamiran we form the middle, twisting it with a funnel.

Glue in the middle of the rose. The giant tea rose is ready. You can make a mount on the base of the rose and cover the cardboard base with sepals and hang the rose on the wall. But I will make a tea growth rose on a stem.

We roll paper or newspaper into tubes.

We take 6-7 pieces of twisted tubes from newspapers and insert them into a metal-plastic pipe. And we make a note of how many tubes went into the pipe.

Coat the tube mark well with glue.

Then we glue the prepared mount to the base of the rose and coat it well.

We put a metal-plastic tube on the glued mount. If you want the rose to be removable, leave it that way. If we do not remove the rose from the stem, we coat the tube with glue.

Take half a leaf of green foamiran to form a sepal.

Cut out 6-8 sepal petals. We make notches, fold it like an accordion and rub it between our fingers.

Glue the sepal petals in a circle, covering the base of the rose.

After the sepals have been formed, we begin processing the stem. To treat the stem, I will first use green corrugated paper, to save tape. Since the stem is white, we will need a lot of tape to process it, so that the stem does not show through, we will process the first row with corrugated paper.

Then we treat the stem with green tape.

This is the tall giant tea rose we got.
Foamiran is an ideal material for making artificial flowers. They can be used for interior decoration, wedding floristry, and creating unique accessories for women. This article will teach you how to make flowers from foamiran with your own hands.


Uncover Thomas
In order to create any flower from Thomas, you will need:
- Foamiran of various shades;
- Scissors, both regular and curly;
- Glue (hot-melt glue, moment or second glue);
- Iron;
- Wire or wooden toothpick;
- Foil;
- Any paint for tinting products (acrylic, oil, pastel);
- Tool for applying paint (brush, sponge);
- Molds (to create a realistic flower texture);
- Accessories (beads, rhinestones, stamens).
The photo shows all the materials needed to work with foamiran:

These tools and materials can be easily purchased at almost any craft store.
To create more complex flowers, such as ranunculus, peony and orchid, in addition to materials, you will need patterns. A pattern is a schematic representation of the parts of a future product, made of paper, cardboard and other materials. To create realistic products, needlewomen take real flowers and trace them on cardboard or paper, thus obtaining a unique pattern. It looks like this:

Each needlewoman will have her own pattern, because any flower that nature has created is unique. If you don’t have time to study botany, the easiest way is to resort to the experience of other needlewomen and use ready-made patterns to create your own product. Even if you use the same patterns all the time to create a particular flower, it will still be unique. Because when processing foamiran it is impossible to give all products the same shape, these are the features of this wonderful material. To use ready-made patterns in your work, you just need to transfer them to thick paper or cardboard and cut them out. It is very convenient to store cardboard blanks in signed envelopes. To transfer the pattern to the foamiran, simply trace the templates with a toothpick. Next, cut out the parts, and you can start working.
Below are several patterns for creating different colors:


Simple options
After selecting the scheme and preparing the material, you can start working directly. Making flowers from foma consists of the following steps:
- Transferring the pattern to foamiran;
- Cutting out parts;
- Tinting flower parts various types paints;
- Processing parts using an iron and hands, as well as molds;
- Direct assembly of the product.
It’s worth starting with simpler flowers, such as dandelion, aster, and crocus. To create them you don’t need any specific skills, just have required material at hand.
How to make simple flowers from foamiran can be seen in the selection of video tutorials below:
Making marin root
Let's look at the work with foamiran described in more detail using the example of creating a terry peony flower.
Tools and materials for work: foamiran in light pink and green colors, glue, scissors, dry pastel, toothpick, hair straightener.
Pattern:

Transfer the pattern onto the cardboard, then use a toothpick onto the foamiran. The easiest way to do this is to cut the fom into strips of the required height. Tint the petals of the first and second row on both sides with dry pastel (using a sponge or damp cloth) as shown in the photo:

The petals of the third and fourth rows must be tinted by 2/3:

For the petals of the fifth row, only 1/3 of the tinting is required. We make the core more saturated:

We trace the green leaves according to the template and use a toothpick to draw the veins:

After the tinting stage, you need to cut out all the details:

In this mk, foamiran is processed using a hair straightener. Heat the petals until their edges begin to curl inward. Roll the petal in a spiral, unfold it, and then carefully, so as not to tear the material, make a boat-shaped indentation in the middle. Repeat this operation with all petals:


The leaves also need to be heated on an iron and twirled between your fingers, so they will take on a more natural look:

The preparatory stage is completed, you can begin assembling the peony. Apply a drop of glue to the middle of the star-shaped part and fold it as shown in the photo:

Glue the first three petals (petals of the first row):

All subsequent petals are glued so that the petals of the next row are in the spaces between the petals of the previous row. There are 4 petals in the second and third rows. Next, as indicated on the pattern. You will get this terry peony:

Stick on green leaves:

1. JEWELRY IN THE FORM OF FLOWERS FROM FOAMIRAN FOR WOMEN’S ACCESSORIES
The previous series of articles on the site was devoted to the amazing kanzashi technique , with the help of which we learned to do handmade graceful flowers from satin ribbons. Hair accessories, decorated with crafts made from pieces of ribbons, stand out very effectively against the background of a stylish hairstyle. But there is material from which you can make gorgeous roses , peonies, gladioli, lilies and other flowers, almost like real ones!
This is foamiran. In this article you will find step by step lessons with photos, with the help of which even novice craftswomen can make different flowers from foam with their own hands. And visual video master classes will help you learn how to accurately give the desired shape to foamiran petals.
A homemade flower from this material will be , headband, hairpin, hair comb.
Headbands decorated with bright foam flowers, rhinestones, multi-colored feathers, and ribbon bows look especially stylish.
For women who prefer to wear long, flowing hair , we can recommend decorating your hair with ribbons in ethnic style, which can be decorated with small flowers and buds made of foam. For high styling you can choose ribbons or elastic bands decorated with large roses or peonies made from this decorative foam material. Watch master classes with which you can do amazing things beautiful roses made of plastic suede.
But compositions of several decorative flowers on a hair clip look especially stylish. The foam petals themselves can also be decorated with beads, rhinestones, beads and other decorative elements , which the craftswoman always has at hand.
Handmade products will always be highly valued. After all, you can make a women's accessory for every taste and it will be original, suitable for the style of clothing.
2. HOW TO SIMPLY AND QUICKLY MAKE A VERY BEAUTIFUL FLOWER FROM FOAMIRAN FOR A CLIP
Instructions for beginners:
Tools and materials for work: a sheet of foam (white, flesh or beige), 1 rhinestone, 8-12 beads, compass, metal ruler, wooden toothpick, nail scissors, iron, hot glue gun.
Stages of work:
On a sheet of foam you need to draw 2 circles with a diameter of 7 cm and 3 circles with a diameter of 5.5 cm using a compass. Carefully cut out these blanks;
Now take a toothpick and use a ruler to divide each circle into 4 equal parts. Then we divide each segment into two more equal parts. Then - again. In total, you will get 16 identical segments on each workpiece;
Insert a compass needle into the center of the workpiece (where all the lines intersect) and make a circle with a diameter of 2 cm. Using scissors, cut the workpiece along all the lines up to the central circle. The result was 16 petals of the future flower from foamiran. We form petals on each blank;
Now carefully round each petal with nail scissors;
Then you need to heat the iron (not very much) and attach each workpiece to the sole. After heat treatment, we tuck all the petals with our fingers so that the workpiece takes the form of a mushroom cap;
Flower assembly. Now we take a hot glue gun and glue smaller flowers (3 pieces) into each other, and then into flowers bigger size(2 pcs).
The multi-layer foamiran flower is ready!
It remains to decorate it a little by gluing a rhinestone in the middle, and on the outside - a bead on each petal. Collected and decorated flower can be glued to a hairpin (or sewn to a hair elastic, but for an elastic it is better to make three such flowers).

Photo of decoration with homemade flowers from Thomas.
3. SIMPLE MASTER CLASSES FOR BEGINNERS. WE CUT PETALS FROM FOAM AND GIVE THEM THE REQUIRED SHAPE
Master class 1:
HOW TO MAKE A BEAUTIFUL WHITE ROSE FROM FOAM AND PAINT THE FLOWER SEPALS WITH BURGUNDY POWDER. LESSON WITH PHOTOS OF WORK STAGES.
Master class 2:
TWO SIMPLE LESSONS FOR BEGINNERS WITH THE HELP OF WHICH YOU CAN EASILY MAKE A ROSETE AND A LILY FROM FOAM, GIVING THE REQUIRED SHAPE TO THE PETALS AND FOLDING THEM INTO ELEGANT DECORATIVE FLOWERS FOR HAIR DECORATIONS.
Master class 3:
WE DO IT WITH OUR OWN HANDS.
Master class 4:
YOU CAN MAKE HIBISCUS FROM FOAMIRAN. THIS AMAZING CRAFT WILL LOOK LIKE A REAL FLOWER! LOOK AT THE LESSON WITH PHOTO.
Master class 5:
MAKING A BEAUTIFUL ROSE