Complete work process sewing machine, regardless of experience with this device, is impossible without its correct settings, which are performed manually. So, let's consider in this material detailed diagrams how to properly thread a sewing machine.
General instructions for threading a sewing machine
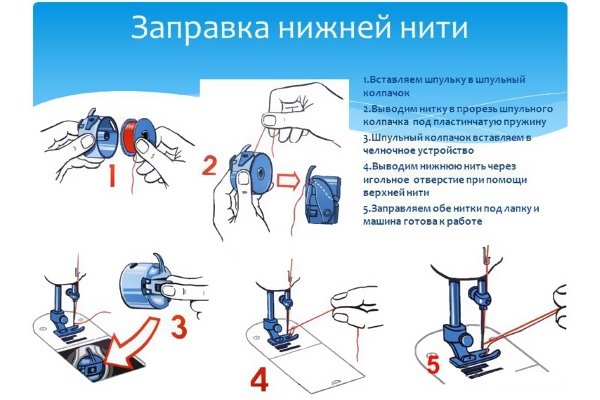
General instructions for threading a sewing machine look like this:
- Wind the thread you will be working with onto the bobbin and at the same stage put the top pin on the spool for the upper thread.
- Next comes the top threading of the sewing machine. There are usually instructions for this process on the body of the device. The upper thread is the one that extends from the spool into the eye of the needle. Before you thread the thread through the eye, you should raise the foot and set the needle so that it takes the position at the very top.
- Check thread tension. Modern devices have special tension regulators.
- After threading the upper thread, you can thread the lower thread. To do this, you need to turn off the drive (moss wheel) and insert the bobbin into place. After this, you need to turn on the wheel and spin it until there is enough thread on the bobbin.
- Insert the bobbin cap into the hook, making sure that the bobbin pin aligns with the slot in the hook. If everything is done correctly, you will hear a characteristic click.
- The thread must be brought out through the valve plate and closed. The upper and lower threads must be connected and pulled back behind the shoulder blade.
To check the correctness of the work done, you should spin the flywheel. After the needle rises and falls, a loop should form from the hole in the plate on the upper thread from the lower thread.
To understand how to thread a bobbin into a standard type sewing machine, we recommend watching a video tutorial that tells not only the sequence of actions, but also where the bobbin is located and what nuances you should pay attention to Special attention:
Correct threading order
This process will vary depending on the type of machine. Modern devices have detailed instructions, how to properly thread the threads into a sewing machine, and the devices themselves are designed in such a way that you can intuitively guess how to do everything. But with rotary type machines, difficulties arise, so we will present two instructions in detail:
Top threading
- Pass the thread from the spool through the mount near the device body.
- Pass the thread through the thread tension regulator and insert it into the compensation spring, which looks like a hook.
- Thread the thread through the hole in the thread guide, out through it and into the existing fastener, then into the eye of the needle.

Some machine models have a fork instead of a thread guide. IN in this case you just need to put the thread on this fork, and not thread it into the hole.
Threading the bobbin thread
- Wind the lower thread not on the spool, but on the bobbin.
- Insert the bobbin into the bobbin case, with the thread tucked under the spring plate.
- Check thread tension. A certain tension is set for the machine model.
How to thread a double needle?
If the machine performs a zigzag stitch, then a double needle can be installed in it. In this case, the threads will be threaded into the needles in exactly the same way as if it was done with one needle, the only difference is that an additional - second - spool will be required. In this case, both threads must pass through the same upper thread tensioner.
Instructions on how to thread two needles into the machine:
- The double needle is installed according to the same principle as a regular needle. The cut of the needle should be directed away from you, and the round side of the needle bulb itself should be directed towards you.
- The threads from both reels must be passed through all the thread guides, not forgetting about the upper thread tensioner. It should turn out that the lowest thread guides will separate them.
- The left thread must be threaded into the needle on the left, and the right thread, respectively, into the needle on the right. If the device has one thread guide, then the left thread must be passed through the thread guide, and the right thread next to it, tucked under the eye of the needle.
Using a double needle is not difficult, the main thing is to thread both upper threads correctly and also loosen their tension (in the bobbin itself). The lower thread will be used when sewing simultaneously with the upper thread, thereby forming a zigzag, so it is necessary to loosen the tension.

The twin needle makes it easier to perform a double finishing stitch on a machine, as well as to perform decorative finishing stitches with just one stitch of a double needle.
Manual sewing machine: how to thread
When setting manual typewriter It is important to choose the right needle and thread number for a particular type of fabric, as well as adjust the thread tension, otherwise the quality of the stitch will suffer. Otherwise, threading a manual sewing machine should not cause difficulties, as can be seen from the instructions for threading the Chaika machine:
- Turn the handle so that the mechanism that attracts the threads is at the top.
- Insert the needle into the holder until it stops. The flat side should be facing the rod that the foot is on.
- Use a screw to secure the needle.
- Place the spool of thread on the rod provided for this purpose.
- Pass the thread through the friction washer and thread guide.
- Insert the thread into the thread guide and secure it in the needle holder.
- Thread the thread through the eye of the needle (this will be the top thread).
Threading the bobbin thread:
- Wind the thread onto the bobbin.
- Insert the bobbin into the cap. The thread should be on the outside.
- Insert the cap back until you hear a characteristic click.
- To tighten the thread, you need to turn the handle of the tension machine.
- Tuck both threads (top and bottom) under the presser foot.
How to properly adjust thread tension:
- Use the screw located on the bobbin case. The tighter the screw is tightened, the tighter the thread.
- Adjust the tension using the regulator located at the lever that lifts the presser foot.

Some useful rules on using the Seagull machine:
- You cannot start stitching without a needle lowered under the presser foot in advance.
- The handle of the machine turns strictly towards itself; you cannot change the direction of rotation.
- To work on this machine, you need to choose fabrics that are suitable for all types of stitches, otherwise you can ruin not only the fabric, but also render your machine completely unusable.
Video: How to thread a Podolsk manual sewing machine?
Another old machine that my grandmothers had at home is a Podolsk brand device. Despite the fact that this model is old and manual, it is pleasant to work with it if you understand all its mechanisms and learn how to refuel, in which the following video will help:
To enjoy your work, and also to avoid problems during work, you should thoroughly study the instructions for threading the sewing machine, because not only the quality of the sewn product, but also the service life of the device will depend on this.
In contact with
Vidal's needle - mechanical facial cleansing tool. Cleanses the skin from acne, blackheads,...
Helps remove even deep closed comedones.
Most often used together with the Vidal loop.
What is the instrument?
The Vidal needle looks like a rod with a sharp tip.
The needle can be straight or bent 45 degrees depending on the model.
Also, some manufacturers produce a tool that has a needle on one side and a needle on the other.
This option is considered optimal, since manual cleaning can injure the skin. The loop gently cleanses the pores.
What is it for?
Tool used to facilitate cleaning. You need to carefully pierce the pimple or blackhead with a thin needle. After this, sebum comes out easily.

Manual cleaning results in red spots on the skin.
When extruding wounds are formed that take a long time to heal.
The needle helps to avoid these consequences.
You can learn how to properly use a Uno spoon at home from ours.
Important advice from the editors
If you want to improve the condition of your skin, you should pay special attention to the creams you use. A frightening figure - 97% of creams from well-known brands contain substances that poison our body. The main components due to which all the troubles on the labels are designated as methylparaben, propylparaben, ethylparaben, E214-E219. Parabens have a negative effect on the skin and can also cause hormonal imbalance. But the worst thing is that this nasty stuff gets into the liver, heart, lungs, accumulates in organs and can cause cancer. We advise you not to use products that contain these substances. Recently, experts from our editorial team conducted an analysis of natural creams, where the first place was taken by products from the company Mulsan Сosmetic - a leader in the production of completely natural cosmetics. All products are manufactured under strict quality control and certification systems. We recommend visiting the official online store mulsan.ru. If you doubt the naturalness of your cosmetics, check the expiration date; it should not exceed one year of storage.
Can it be used at home?
The Vidal needle is used for self-cleaning the skin. It is safe, so it can be used at home. The main condition is the composition of the tool. He must be made of medical steel, like any cosmetic accessories.
It is also important to note that the needle is used to remove large blackheads and deep comedones.
How to choose?

The main criterion is the composition. A high-quality instrument is made of medical steel.
It is also worth giving preference to a double-sided tool that has a tip in the form of a loop.
You can use it to gently squeeze out a pimple. Complex application These tools simplify the process of facial cleansing.
How to use it correctly?
First you need to prepare your face. The skin should be clean. You can do a cleansing clay mask. In addition, it is necessary disinfect instruments. Upon completion of the procedure, you need to carry out a number of skin care measures.
Step-by-step instructions for use:

Skin care after cleansing
After cleansing, it is necessary to disinfect and soothe the skin. It is recommended to make an alcohol compress.
If there is no alcohol, you can take vodka, Chlorhexidine, or any other disinfectant. Cut a mask from the bandage and soak it. Apply to skin. Leave for 15-20 minutes.

You can also use alcohol chamomile or calendula tincture. It is necessary to spot treat the skin.
The product is applied only to pimples. Leave for several hours or overnight.
No less effective. He has anti-inflammatory effect, kills pathogenic microbes. Prevents the formation of red spots after acne.
Contraindications and precautions
Owners of dry and sensitive skin The use of a Vidal needle is not recommended. After mechanical cleaning, small bruises may appear.
Also use with caution for rosacea. In some cases mechanical cleaning is contraindicated.
Hello, dear readers of the blog “site”. Today we'll talk about the delights sewing on a machine with a double needle.
How do you know if you can install a double needle on your machine? If your machine can sew zig-zag, then you can safely use a double needle. But before you purchase a double needle, you need to measure the size of the gap on the needle plate in order to know what the maximum distance can be between two needles.
How does the sewing process itself happen? Instead of one upper thread, two threads will pass through the tensioner; to do this, you need to install a holder for the second spool (must come with the machine) and thread the second upper thread in the same way as the first.
Using a double needle, you significantly increase your sewing capabilities and make it easier for you to process products with double finishing stitches. After all, most often a double needle is used for finishing pockets, on jeans, on shirts, and at the same time, for two perfectly even lines it is enough to make just one pass with a double needle. Saving time and effort is obvious).
How to sew with a double needle?

In order to sew comfortably with a double needle, you must not only thread the top two threads well, but also be sure to reduce the tension of the bottom thread in the bobbin, since the bottom thread will stretch on the wrong side of the fabric between both top threads. It is also necessary to loosen the tension of the upper threads a little in order to avoid tearing the upper threads from the tension.
If possible, use a thread that you will thread into the bobbin that is one number thinner than the top ones. This way you will create ideal conditions on a machine in order to get a high-quality stitch.
When installing the needle, make sure that the machine is in straight stitch mode so as not to accidentally break the double needle.
Double needles for Janome machine

Japanese sewing machines Janome, Juki and Brother and other modern models are equipped with two spool pins and paired thread guides. An additional pin for the coil is installed in a special hole on the body of the machine.
How to thread a double needle? 
We have already looked at how replace the needle And thread the sewing machine, but now we need to figure out how to install double needle.
The cut of the needle should be installed towards the back of the machine, and the round part of the needle flask should be directed towards itself. We pass the threads from both spools through the tensioner and through all the thread guides; the threads are separated only at the base of the upper part of the needle. Thread the right thread into the right needle, and the left thread into the left needle.
If you are installing a double needle on a Chaika machine, then pass the left thread through the lower thread guide, and simply pass the right thread next to it, since this model has one lower thread guide.
How to use a double needle?

Surely you already know that double needles differ in the distance between the needles, and the final appearance of the resulting stitch depends on this. Stitches made with double needles of different widths look completely different. This makes it possible to make various finishing stitches on clothes.
Most often, double needle stitching is used when hemming the bottom edge of items made from stretch fabrics, in decorative work, in finishing stitches on pockets and flaps, and in processing seams on jeans.
Twin needles can be of three types:
- Denim
- Stretch needles
- Metallized
When choosing a needle, proceed from the specific task assigned to you, but it is better, of course, to have several types of needles so as not to limit yourself and choose the best option.
Also, a double needle is in great demand in embroidery work, since a double needle is indispensable for creating parallel lines. And if you also “play” with the color of the threads and the width between the needles, you can get unexpected options with the effects of shadows from the threads, etc.
Watch also the video about the sizes, types and capabilities of double needles:
Needles for felting. Information for Beginners
Felting (felting) is quite popular among needlewomen today. Both adults and children make things and toys from wool. Woolen crafts bring warmth and joy, and what delight is the very fact that you are holding in your hands a real work of art, which just yesterday was a shapeless mass of fibers!
Let's talk about dry felting, when special needles are used. When working with wool using this technique, it is difficult to spoil the product. There is always the opportunity to correct: add or reduce volume, felt a part, remove excess.
Felting needles are sharp metal instruments with notches all over their surface. There are different types of needles, and each of them has its own scope and function.
What needles are needed for felting?
In general, you can felt a small toy with just one needle, any needle. The only question is how much time and effort you will spend on it, and what quality the product will turn out to be. Any craftswoman wants her hand-made miracles to be truly miracles, and their production not to turn into a grueling and monotonous process. Therefore, for work you will need several needles, differing in thickness and cross-sectional shape.
Types of needles for felting
The thickness of felting needles varies from thick (coarse) to thin. This parameter determines the needle number. The thicker it is, the lower the number. So, the coarsest needle has number 19, the thinnest – 42. Sometimes you can find the marking “No. 43”; this needle is called ultra-fine. The very beginning of the work is always done with a coarse needle, the main part of it is with a medium needle, and a fine needle is needed for final detailing and leveling the surface.
Needles can have a cross-section in the form:
- diamond
- triangle
- cone
- cylinder
- three-pointed star
- four-pointed star
The most popular of them are star-shaped and triangular.
This tool can also have straight and reverse cuts. Straight needles entangle the upper hairs deep into the product, bunching them up more tightly, while reverse needles, on the contrary, pull the lower hairs out from the depths. This way you can create a fur effect, which looks especially appropriate on animal figures. You can also use reverse needles to felt the surface in a hard-to-reach place - inside a fold, for example. Where it is difficult to reach, and even more so, to work with a straight needle. Using a reverse needle, they pass through the product and finalize the details.
How to choose needles for felting
You need to choose needles based on your goals. What are you going to roll? If these are smooth products of simple shape, then straight needles of thick, medium and thin are sufficient. If you plan to make a wool fluffy, you cannot do without a reverse needle.
Needles with a star cross-section fuse faster and more tightly than those with a triangular cross-section. Therefore, for bulky items it is better to prefer them. For small things this is not important. The “star” design is convenient for finishing – it will gently smooth out all the unevenness and will not leave any tell-tale holes on the surface.
How to use a felting needle
The felting needle can also be used by itself, holding the blunt end with your fingers, but this is not entirely convenient. It is best to fix it in a special holder with an ergonomic handle. This will speed up the felting process and allow you to work with greater comfort. Some needles are sold already in a holder.
Before work, it is necessary to prepare the surface on which the wool will be placed first, and then the product in the process of its creation. Many needlewomen use a foam sponge for this purpose.
It's cheap, but the disadvantages of the sponge outweigh its only advantage. You can pierce the sponge right through and either break the needle on the table, or (if the foam is on your lap) get injured. After a short time of use, small pieces of foam rubber begin to come off and stick to the product. Working in reverse, you can even accidentally dump them on him.
The best option would be to use a special felting brush with long, hard bristles and a dense base. And you will be safe, and the needles.
Happy crafting!
Attention! This article was written exclusively for the website www.happy-kids.ru. Full or partial reprinting of this article is prohibited.
Methods of using double needles for a sewing machine. Any sewing machine sews with a double needle - this is not a function of the machine itself, but of the needle that you insert. You need to thread 2 spools of thread on top, then insert the threads into 2 eyes of the needle and sew. Since there is 1 bobbin at the bottom, the bottom line looks zigzag, and the top line looks like 2 parallel lines. It turns out beautifully when the tension of the upper threads is slightly tightened, then the seam on the knitwear turns out to be convex.
When you get the hang of it, try threading two different colors of thread up and using a double needle to make a decorative stitch, it’s very beautiful! Just be careful at the beginning, some machines make such a mistake that the width of the decorative stitch goes the entire width of the foot and the second tail of the needle risks hitting the foot.
But! I would like to note that any machine can use double needles if the thread is inserted into the needle from the front. And now, I suggest you familiarize yourself with useful information on this topic, taken from various sources
Methods for using double needles for a sewing machine
The twin needle can be installed in any sewing machine that has a zigzag stitch. The main thing to pay attention to before buying a twin needle is the width of the needle plate hole. The distance between the needles should not be wider than this hole. How to sew and how to use a double needle? Just like you use one needle, only with two top threads, passing both threads through one tensioner.
Twin needle sewing increases the capabilities of your machine and makes decorative and finishing stitches easier. Using a double needle for knitwear makes it possible to imitate the stitching of a flat-stitch machine. A sewing double needle is indispensable when sewing clothes with double stitching. Finishing stitches on jeans, patch pockets, details men's shirts and so on. You can stitch evenly and neatly by sewing a seam with a double needle.
How to use a double needle
How to use a double needle? Just like with a regular needle, you just need to buy a suitable double needle for your model sewing machine and thread both upper threads into two needles at the same time. The bottom thread in the bobbin will be used by both top threads at the same time.
Twin needles are not suitable for all machines.


Double needles can sew different fabrics, but only in machines with a zigzag stitch; straight-stitch machines of the Podolskaya type are not intended for their use. The needle plate of these machines has one round hole, while the double needle requires a narrow and wide slot, which is used in zigzag stitch machines. In addition, additional thread guides and a stand for the second spool are required. If you are going to install a twin needle on your Chaika sewing machine, pay attention to how the needle is positioned in the hole when it is sewing a straight stitch. The needle should pass exactly in the center of the needle hole. If there is misalignment when using a double needle, it may break.
An additional creel is required for the second spool of thread.
Modern sewing machines Janome, Brother, Juki and many others have a creel for two spools of thread and paired thread feeders and thread guides, into which the upper threads are threaded separately.
Double needle installation
A double needle fits into any sewing machine, just like a regular needle. The flat of the needle (cut) should be directed back, away from you, and the round side should be directed towards you, forward. Each coil must have a separate pin (coil holder), sometimes an additional one is installed for this. If there is only one spool stand on the machine body, then a second one is included in the kit. The threads from the spools are passed through all the thread guides, including the upper thread tensioner, together, and only the lowest thread guides separate them into needles. The left thread is threaded into the left needle, the right thread into the right needle. If there is only one thread guide, like Chaika’s, then the left thread is passed through the thread guide, and the right one next to it, directly into the eye of the right needle.
What are they and their purpose


A double needle can have different distances between the needles - narrower, wider, and there are even triple needles. Different widths make it possible to choose the width of the finishing stitch and use it for design. The use of double needles is more intended for decorative seams that do not experience heavy loads.
Of course, it can be used to make finishing stitches on a pocket or flap shirt. But, we should not forget that to form a seam, a double needle uses only one thread - the bottom one, so such a seam will not be particularly strong. But, for example, for embroidering two or three parallel patterns at the same time, a double needle is simply irreplaceable. This pattern looks especially impressive if the threads are of different colors. Using double needles with a narrow gap between them, you can create an imitation of shadow in the design. Using narrow needles, I place threads on top of each other, creating a shadow effect. In addition to simple finishing stitches, double needles can be used for sewing on braid, performing elastic gathering, tucks and other operations.
Attention! Incorrectly selected double needles may break


When buying double needles in a store for your sewing machine, pay attention to the maximum width of the needle plate opening on your machine, or simply the width of the zigzag stitch on your machine. Incorrectly selected needles may break, hitting the needle plate.
In addition, before you start sewing with a double needle, watch the stitch type switch. The stitch should not be set to a zigzag or other needle offset, such as zipper stitching, etc. The double needle should only work in straight stitch mode. In any other mode, they will simply break on the needle plate of the sewing machine.
Use of double needles

Have you used twin needles on your sewing machine yet? Now you will find out how many decorative and other possibilities its use in creating clothes provides.
To use double needles you need:
front threading
the presence of a zigzag stitch in a sewing machine.
the distance between the needles should not exceed the maximum zigzag width of your machine!
Preparatory operations.
Install a double needle on your machine, just like a regular single needle.
If your machine has two spool holders, install the spools so that one spool thread unwinds clockwise and the other counterclockwise. This will prevent the threads from getting tangled when sewing.
If you don't have two thread guides, insert one thread into the thread guide and leave the other loose.
Thread the threads into the corresponding needles. The machine is ready to sew. I advise you to sew at minimum speed, this will also help prevent threads from tangling.
Decorative stitches (embroidery)
Does your machine have decorative stitches? Try using twin needles to embellish clothing with these stitches.

The double needle allows you to embroider two parallel designs at the same time. You can thread the upper threads in different colors.
If you use narrow needles 1.8 - 2.5 mm, the stitch patterns will overlap each other, creating a shadow effect.
For decorative stitches, use a needle size smaller than the maximum zigzag width on your machine!

Sew on the braid
Place a needle slightly smaller than the width of the braid into the needle holder and attach the satin stitch foot to the machine. This foot has a wide groove on the sole.
Set the machine controls to straight stitch and desired stitch length. Loosen the upper thread tension. Thread the ribbon through the needle hole of the foot (or under the foot).
Place the fabric under the foot, lower the needles into the fabric and sew. The braid is attached to the fabric on both sides at the same time.
Ruffles with elastic

Wind a thin sewing elastic band (like Hungarian) onto the bobbin. The upper threads must match the fabric and match the color.
Set the stitch length to 2-2.5 mm and sew with a straight stitch.
An elastic band tucked into the shuttle mechanism will create uniform gathers on thin fabric. Admire how the use of a similar technique decorated the blouse.

Relief tucks on fabric
For the following embellishments you will need a special foot for raised tucks. The foot has grooves on the sole into which the fabric is pulled during sewing, resulting in a raised fold.
Different pleat sizes require different presser feet. The wider and deeper the grooves, the more voluminous the relief can be obtained. Many parallel grooves on the foot allow you to lay reliefs that are even relative to each other.
The foot with 7 grooves is designed for small pintucks and is used on light fabrics.
A foot with 5 deep grooves is used for sewing on medium fabrics and allows you to make larger pintucks. This foot can also be used for sewing in cord.

To make reliefs on light fabrics, it is recommended to use needles with a width of 1.6 - 2 mm; on medium tissues, needles 2.5 - 3 mm; and needles 4 mm or more on medium and heavy fabrics.
When stitching pintucks, the upper thread tension regulator should be set to 7-9, that is, to the maximum.
When decorating fabric with reliefs, keep in mind that the consumption will be higher.

It is very important to perform the first tuck exactly, since the evenness of subsequent ones will depend on this. Therefore, draw the first line on the fabric and only then place a tuck along it.
It is advisable to first make reliefs on the larger part, then apply the pattern over the part and mark the cut lines.


For wide stitching of reliefs, use a quilting guide.
Reliefs can be both decorative and serve as darts.
See how you can decorate a summer blouse with raised tucks. Use embossed pintucks to decorate underwear, children's clothing, blouses, and summer tops.
Reliefs on fleece 
How much time do you spend knitting a sweater? Try knitting a sweater in one day using a double needle. Believe me, it's very simple and fast!
For such reliefs as in the photo, you will need fleece and a double needle of at least 5 mm. Such reliefs will look beautiful on velvet.
Reliefs with cord 
To sew in the cord, use a double needle of such a width (the distance between the needles) that the cord passes freely between the needles.
Install any foot suitable for sewing in cord: a foot for sewing on beads or a foot for large embossed tucks.

Using a chalk or disappearing marker, draw a straight or curly line on the fabric where you want to add cord trim.
Pin the end of the cord to the beginning of the line on the wrong side of the fabric.
Place the fabric with the cord under the foot, make sure that the cord fits exactly between the needles and start sewing with a straight stitch following the line drawn on the fabric.
This is what the “reliefs with cord” trim on a blouse looks like. And these figured reliefs are made on transparent fabric with a backing of cords in a contrasting color.
Sewing knitwear 
To sew knitwear, use special needles for sewing knitwear with a width of 4-5 mm.
In the photo, the hem was made with a 4 mm needle. A double straight stitch is visible on the front side, and a zigzag stitch on the back side, which allows for stretching. knitted fabric. This stitch imitates sewing on an overlocker.

Set your machine to the straight stitch and desired stitch length.
Fold the edge of the knitted product, lay a stitch along the front side at the same distance from the fold.
Carefully trim the seam allowance close to the zigzag.
Sample stitches using a double needle were made on a Janome sewing machine model My Excel 23X. This machine has a maximum zigzag width of 6.5 mm.
