As a rule, all children, under the guidance of teachers, make crafts for March 8th in kindergarten. The materials will be useful for children in the primary, secondary and preparatory groups of kindergarten.
However, if for some reason the baby does not become part of a large children's group, he can make a surprise at home if one of the elders helps him with this.
To create an impressive craft for mom with your own hands, you can turn any detail that is at hand into an original and beautiful souvenir or postcard.
Card with chamomile for March 8
For March 8th, you can make a charming card with daisies. We make the base of the card by folding a pink sheet of cardboard in half. Glue a green circle to the front of the card. To make daisy petals, we need thin strips of paper, which we twist with a stick or pencil.

Glue the twisted strips onto the green circle. We decorate the center of the circle with a twisted curl of yellow paper. We have the first daisy - the upper part of the future eight.

We frame the outline of the bottom of the figure eight with green leaves. Glue a small chamomile onto each of the leaves. We make small daisies in the same way as a large one, only we fold the paper strips in half. We complement the craft with yellow flowers. Postcard for March 8th - ready!

Postcard with a paper tulip
You can make a very beautiful postcard with a voluminous tulip from colored paper. Cut out a circle from yellow paper.

Fold the green paper in half and draw half a leaf on the fold. When cutting out, we get an even leaf with the center on the fold. For the postcard we need two leaves.

Fold a sheet of red cardboard in half - this is the base of the postcard. Cut out tulips from pink paper.

We fold the yellow circle around the edges. We glue the pink paper blanks together to form a three-dimensional tulip flower.

Glue green leaves and a tulip flower to the top of the yellow blank. We cut out a narrow strip of green paper, which we twist into a spiral. The green paper strip will curl into a graceful curl.

Glue the curl to the bouquet. Glue the bouquet onto a cardboard base. A postcard with a voluminous tulip for March 8 is ready!

Here is a postcard using the same technique, but made a little differently. The ribbon bow gives this card a special charm.

Bouquet with tulips for March 8
Flowers and tulip petals can be glued onto the paper parcel itself. We fold the bundle along the edges, forming a paper bouquet. We glue ribbons to the edges of the package and tie them with a bow. We got a simple and beautiful bouquet.

How many children there are, so many options for making a paper bouquet for March 8th. You can put together a real exhibition in honor of mothers!

Postcard with a picture for March 8
A stunning postcard for March 8th can be cut out of paper. Fold the album sheet three times. We cut out a figure eight on one of the parts, and cover the other two parts with a floral pattern.

We color the card in delicate pink and lilac tones.

After the paint has dried, we decorate the craft with patterns made with a silver helium pen. When all three parts are folded in front of us we will have a very beautiful postcard for March 8th!


 Postcard with "eight" (with a surprise)
 Crafts with the “eight” for March 8
The classic version of the craft for March 8th in kindergarten is a figure eight made of paper. We cut out the base of the craft with a stand from thick cardboard.

We glue the stand and decorate the figure eight with patterns and flowers.

Another craft for the smallest kids is the “Eight” applique. The teacher cuts out figure eights in advance and prepares decorations from thin paper. The kids’ task is to glue the decorations onto the figure eight, trying to do it neatly and evenly.
 Figure eight applique
 From ordinary and metallized cardboard you can make very simple but colorful crafts “Basket with tulips” and “Tulips applique”.
 Paper craft for March 8 “Basket with tulips”
 Crafts for March 8 with flowers and bouquets
You can glue together a luxurious spring bouquet from colored paper folded like an accordion.

Using green and red paper you can create a spectacular tulip applique.

The core of a button can also be made into paper flowers. Such a bouquet will become especially original if you place it in a voluminous palm. To do this, we outline our hand, cut it out, glue only the base, on top of it - flowers, which we cover on top with our fingers.

Using the same principle, you can make the entire picture out of paper. And if you glue the fingers first, the brush will turn the other side.

You can turn cotton pads into equally impressive calla lilies. We make the stem from a cocktail straw, the core from a cotton swab, one tip of which is painted yellow. We wrap the core with a cotton pad and the stem with a wide sheet of paper. The flower is ready!

You can make a whole bouquet out of kaal and corrugated paper.

You can make an original “dress for mom” bookmark from paper and ribbon.

Cocktail straws are great for using as stems and for creating paper flowers, which make a beautiful bouquet when wrapped in wrapping paper.


An incredibly beautiful craft for your beloved mother - “ “.

Postcards for March 8th to kindergarten
A very beautiful craft for March 8th can be a postcard decorated with a tulip using the origami technique.

Folded burgundy paper makes spectacular roses. By placing the roses on the heart we will get a wonderful postcard for March 8th.

A lovely card with a heart can be made from colored paper. We make the bottom part of the card, not forgetting to write a confession for our beloved mother.

We decorate the top part of the card, decorating it with lace and flowers.

We put a rivet or brad, allowing the card to open and close.
 Paper card "heart"
 Postcard for March 8 (with movable part)
A postcard with .

Heart with roses and ribbon
It’s very interesting to see a heart panel with roses. We fold the roses themselves using a stapler or glue according to the pattern.

Cut out a heart from red paper and make many holes around its perimeter. We insert the ribbon into the holes, processing the edge of the heart.

We glue the stems with leaves, as well as the roses themselves, to the heart, forming a festive bouquet. Glue a ribbon bow at the bottom. Panel with roses for March 8th - ready!

A very beautiful heart-shaped card can be made using the popular scrapbooking technique. The base of the card is a heart made from special textured paper with a print. The scrapbooking technique is characterized by volume and layering. Some of the card decorations you can find at home, and some you can buy in scrapbooking kits. Anything will do: figurines, flowers, ribbons, paper cutouts and pictures.

We place all the details of the craft on the base, trying to give the composition a finished, beautiful look. Scrapbooking postcard in the shape of a heart - ready!

There is another option for a luxurious postcard for March 8 using the scrapbooking technique. We make the base of the cardboard card. Cut out the front side from colored paper with a print. It should be 3-5 millimeters smaller than the cardboard base on each side.

Glue the ribbon along the card. We glue openwork paper figures, flowers and a congratulatory inscription to the front side. Some things you can cut out yourself, and some you can find in special scrapbooking kits. Postcard for March 8th - ready!

Craft for March 8th from corrugated paper
From paper and cardboard you can make a very impressive three-dimensional application for March 8th “flowers in a vase”. Cut out a vase from blue cardboard.

Glue flowers from corrugated paper.

 Application for March 8th “flowers in a vase”
 A very beautiful three-dimensional applique for March 8th is made from yellow corrugated paper. We form a flower bud from yellow paper.

The buds rolled from yellow paper are wrapped in green paper. Green paper is rolled into a thin tube. We get a flower and a stem.

The flower is complemented by green leaves and attached to a round cardboard base. Volume applique for March 8th - ready!

Bouquet of tulips made of corrugated paper
Another wonderful craft for March 8 made from corrugated paper is a bouquet of tulips. Let's start with one tulip. Cut a strip of yellow corrugated paper and twist it in the center. We fold both parts on one side.

We need a bunch of stamens on a wire (we fix them with adhesive tape). Roll a ball out of yellow paper. We put it on the wire.

We begin to wrap the ball with stamens with petals.

When the bud itself is ready, fix the green petals with adhesive tape.

Spring bouquet of tulips made of corrugated paper. Read the detailed master class.

You can make a three-dimensional card with a whole bouquet of flowers from corrugated paper.

Sweet crafts for March 8
The craft “bouquet of lollipops” looks interesting. Decorate the lollipops with paper flowers. We fix the sticks in a transparent plastic cup using plasticine. Those with a sweet tooth will surely enjoy crafts made from candies for March 8th. You can put paper flowers on lollipops and place them in a pot of plasticine.

You can use chocolate candies instead of lollipops for crafts. They will need to be pierced with a thin stick, which we will fix in the pot. We wrap the candies in corrugated paper and secure with glue. A luxurious bouquet of sweets for March 8th is ready!

It’s not at all difficult to make, and the result is tasty and beautiful. For a detailed master class, see ““.

Watch the video on how to make a beautiful bouquet of purple tulips candies
Craft for March 8 “Flower stand”
A very bright and interesting craft for March 8th is a “flower stand”. To make it, fold a green sheet of paper in half and make cuts of different lengths on it.

We glue the cut green leaf onto the base - an ordinary sheet of cardboard folded in half. We glue some of the protrusions onto the base, and bend some of the protrusions in the opposite direction (we do not apply glue to them).

Glue flowers onto the curved protrusions. We decorate the back and bottom of the craft with flowers, butterflies and congratulatory inscriptions.

Eight of ribbons - a gift for mothers and grandmothers
A very bright and beautiful craft for March 8th - a figure of eight made from ribbons. It is very easy to make, but looks very impressive and festive. First, cut out a figure eight from paper or cardboard.

We wrap the figure eight with pink ribbon of medium width “overlapping”. Fix the ribbon with glue.

When the entire figure eight is wrapped, we make a pendant loop in the upper part. From folded pieces of glued green and scarlet ribbons we get a festive bouquet. Eight of ribbons as a gift for mom - ready!

Bouquet of felt tulips for March 8
A very beautiful soft bouquet of tulips for March 8 can be made from felt. You can find a template for cutting out a tulip at the end of the article. For each flower, cut out two parts for the bud, two parts for the leaf and two parts for the stem. Sew the stem and bud
We sew together the parts of the leaf and sew it to the stem. We make several of these flowers. We made a charming spring bouquet for March 8th from felt!

You can make a beautiful bouquet of violets for March 8 from felt and thick drape. We make the pot stand from dense brown material rolled into a roll. Such flowers will never wither and will delight you for a very long time.

Craft for March 8 - painting from salt dough "Roses"
With the help of adults, you can make a very beautiful wall panel from salt dough. To do this, mix the dough with green and red paint. To prevent the dough from crumbling, add PVA glue when kneading. We prepare the base of the craft - a frame with thick cardboard. We start by making green leaves, which we glue onto cardboard.

We make narrow strips of red dough, which we then twist into buds.

We frame the buds with petals made of salt dough - we should get quite lush flowers. We leave the two buds as they are and glue them to the base in the same way, adding a small stem of green dough. We will get a wonderful picture with bright colorful flowers.

Ideas for crafts for March 8 from different materials.
Plasticine and a disk make a wonderful “Spring Rose” applique.

From a cardboard roll you can make very delicate, cute gift wrapping: Craft for March 8th from foam rubber
Another beautiful applique with a figure eight is made from painted pasta.

You can make a luxurious applique of red and white buttons as a gift for your mother on March 8th. We cut out the base for the vase from white paper. Decorate the vase with white or transparent buttons. We draw the branches with a black pen. We decorate the branches with red buttons. The bouquet looks interesting if the red buttons are of different sizes and shapes.

An incredibly beautiful and delicate craft for March 8, “a bouquet of daisies,” is made from a very unusual material - plastic bottles.

Drawing “Mom on March 8”
There will probably be talented artists among us who can draw a beautiful portrait for my mother. First, we make a pencil sketch.
Template for cutting out “card heart”
Crafts for March 8th in kindergarten reviews:
Mommy is beautifully drawn, but I will never draw it like that))) (Sasha)
We invite you to continue this wonderful tradition by making beautiful ones for March 8, 2019 with your children. From us - ideas, and from you - creative approach and diligent execution. Let's get started!

A very gentle postcard for March 8th made of paper: a mother bird hugs her chick. For this applique you will need cardboard, colored paper, scissors, glue and a template.


Beautiful 3D cards will be an original gift for mom on March 8th. How to make them - see just below in the video lesson using the example of a postcard with a unicorn.


The original version of postcards is an applique made from what is at hand: be it fresh flowers or pasta. By the way, you can invite the youngest children to make it with their own hands as a gift to their mother on March 8 -.

Made from many hearts. There is hardly anything more touching than this gift.

For such a postcard you will need thin strips of paper. They will need to be glued together, as shown in the picture, to make voluminous flowers.


An original postcard for March 8, in the center of which are children's photographs, will move your mother to tears.

Guess the riddle. What do mom and button have in common? Everything rests on them. That is why we propose making a postcard for March 8 from buttons.

To make this March 8th card as a gift to your mother, you do not need to have any special skills. Even a child can handle it. Cut out petals from colored paper and glue them onto cardboard.

Imagine your mother's surprise when she receives such a surprise in an envelope. In the first case, it is a postcard in the form of two palms, with a heart inside. And in the second there is a rainbow made of paper folded like an accordion. Add something touching and that’s it! Your DIY gift is ready!

You can make an unusual card for mom on March 8 using a hole punch and bright paper. The technique is as simple as possible; the most important thing is to find a hole punch at home. We buy yellow and blue paper and start creating.

You can please your mother with a culinary style card. Such a congratulation on March 8th will be very sweet. Motives can be different: from a jar of jam to a cupcake or a cup of coffee. We take cardboard, scissors, paints and let the magic begin.

Photo
www.handmadecharlotte.com
Making a postcard with a butterfly, a symbol of spring and rebirth, with your own hands is very simple.
First way. Draw a butterfly on paper, color it and cut it out. Fold it in the middle and glue it to the cardboard.
The second version of a postcard with a butterfly for March 8th. We trace the children's palms on paper, cut out the resulting shapes - these will be the wings of a butterfly. Then all that remains is to draw and cut out the body, head, and glue all the parts.

We are sure that you will have enough inspiration to improve these cards for mom on March 8th by adding something of your own.
Women's Day, March 8, is a holiday for beloved mothers and dear grandmothers, and every child knows about this. It is very important to teach young children to show their love and care for their loved ones. An excellent way to do this would be to make a homemade greeting card, which the child can present as a token of attention and a gift for the people most dear to him.
The greeting cards presented in our article are so simple that even a small child can handle making them if loving adults help him with this.
Children's cards for March 8
Children's card for March 8 “Flower Meadow”
 Colorful and voluminous homemade greeting card for March 8th. To make it you need: colored paper, scissors and glue.
 Fold a sheet of green paper in half. Make several cuts at the fold. Now bend and straighten the resulting strips (see photo).
 Cut out flower elements from colored paper: petals and leaves. Glue the flowers to the three-dimensional strips.
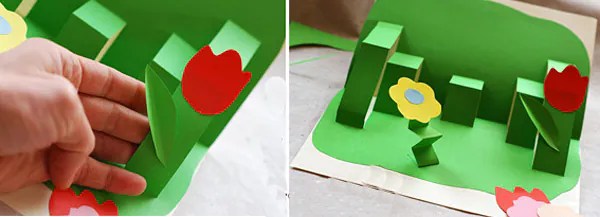 Try to choose the brightest colors for making flowers, then the card will turn out colorful and festive.
Children's card for March 8 “Flowers in a pot”
 To make this postcard, you will also need colored paper and a sheet of colored cardboard for the base of the future postcard.
 Invite your child to trace his palm on a piece of colored paper (green). Then carefully cut it out. A palm of green colored paper will serve as stems for future flowers. Now make multi-colored daisies from colored paper and glue them on each finger. Don't forget about the flower pot.
Glue the finished composition to the front side of the homemade postcard.
Children's card for March 8 “Bouquet of tulips”
 In order to get such an original greeting card, you need to learn how to make paper tulips. Master a simple technique and you will definitely succeed (see photo).


 Now that you know how to make paper tulips, you can decorate any card with them.


 Another option for a children’s card “Bouquet of Tulips” is to glue a child’s palm to the front side of a homemade card, and then put a bouquet of cute paper tulips in it.
Children's card for March 8 “Sweet palm”
 It is difficult for a small child to depict some complex drawings on the front side of a greeting card, which is why we suggest you make such a cute portrait of a woman from a child’s palm. And don’t forget to give the main character of the postcard a fashionable hairstyle, be sure to tie a bright bow on her.
Children's card for March 8 “Mimosa sprig”
 To make such a postcard you will need: a sheet of yellow and blue colored paper, a hole punch, glue and a green marker.
On a blue sheet of colored paper, you need to make a lot of neat round holes using a hole punch. Then glue a sheet of yellow paper on the back side, so you get yellow mimosa balls.
Now draw leaves and twigs with a green marker.
Children's card for March 8 “Bouquet of flowers”
 A very simple and beautiful card. Fold a sheet of green colored paper into a neat accordion. Then fold the accordion in half. Make colorful paper flowers and glue them to the fan.


Children's postcard for March 8 made of plasticine
 You can get original postcards for March 8 if you use plasticine. Draw a simple thematic design on the front side of the card, and then “decorate” it with plasticine.
 Below we offer you several templates for “decorating” with plasticine.


Everyone's favorite March holiday is coming very soon. A celebration of the beautiful female half of the world's population. On this day, every woman on earth is surrounded by the attention of men. Every woman is pleased to receive flowers, gifts, cards, congratulations from her beloved men. There is no need to buy expensive gifts in the store. It’s very nice when a gift is made with your own hands, with all your heart. This means that you need to start preparing for the holiday in advance in order to get everything done.
You can come up with and make many different interesting and original little things with your own hands. The most common and popular gift is a postcard. A colorful, bright postcard with a unique design, made with your own hands, with all your soul and love, will become the most pleasant and expensive gift.
In order to make a postcard you will need very little: paper, pencil, ruler, scissors, glue, a little imagination and patience.
Let's start with the simplest version of a greeting card. The process of making such a postcard will not take much time. To do this, take cardboard and some paper of different colors. We draw a simple figure eight on cardboard, choose the size individually. Next we cut it.
And then you need to show a little imagination, the eight needs to be decorated. We take multi-colored paper and cut out whatever we want: flowers, butterflies, hearts, and so on, and decorate the card. You can use rhinestones and beads for decoration. Everything depends only on you. Simple, fast, original, stylish.
If you have more free time and you can devote it to making a postcard, let’s complicate the task a little.

To do this, draw a flower pot of any shape on cardboard and cut it out.

Cardboard can be replaced with fabric, wallpaper, or something else, just show a little imagination.


The next step in the card making process is assembling the card. We connect all the parts together.


Then we decorate. Anything will be useful for this: beads, rhinestones, multi-colored ribbons, you can even use pieces of serpentine and much more. It's up to you. Go for it.

Handmade postcards always have a unique design. Currently, there are many different technologies for making postcards. Among this diversity, scrapbooking needs to be highlighted.
Postcards made using this technology are distinguished by a stylish and original design. Let's take a closer look at how to make a postcard using the scrapbooking technique.
The dimensions of the product can be completely different. We will make a postcard ten centimeters wide and eighteen centimeters high. First we need to prepare the base of our product. Take a sheet of watercolor paper and cut out a rectangle measuring eighteen by twenty centimeters. You can use stock card instead of watercolor paper. On the rectangle, mark the middle along the long side and draw a line with a knitting needle.

Now that we have prepared the base for our product, we need to make the front of the card. To do this, we will use a sheet of scrap paper for the backing, and as a background we will use a sheet of special, decorated paper. For us this is a sheet of paper with planks.
The size of the substrate is nine and a half centimeters by seventeen and a half centimeters. The size of the background sheet is nine by seventeen centimeters.


Then, the background sheet and backing sheet glued together must be glued to the front of the postcard.

To decorate our product, we will use a circle with flowers and an inscription. This will become the main, central element of our postcard.

Let's take scrap paper and trace the inner contour of our circle with flowers on this sheet.
On the other side of the sheet, you need to slightly lift the circle onto a layer of beer cardboard.

On the left side of the front of the card there will be a composition of flowers, so the frame needs to be slightly shifted to the right and glued. We retreat one centimeter to the right, two centimeters from above.
Now, after the frame has been glued, you need to prepare an original decoration of flowers and a spikelet. The decoration will be located to the left of the circle with flowers. It is better to divide large spikelets into several parts, this will be much more beautiful and will add volume to the composition. Let's place them between the flowers.

Let's start designing the postcard. It is necessary to prepare an inscription. Let it be a congratulation, a poem or a quote. Warm words of congratulations in verse can be found in this article: Congratulations on March 8 in verse
We choose what we like best. You can write the inscription on a beautiful small piece of paper or cut it out.
We place the prepared inscription on our postcard, but do not glue it. After we make the decoration and attach it to the card, we will glue the inscription. In the meantime, you can move it in any direction to arrange the flower arrangement as interesting as possible.

Let's take a couple of flowers, you can choose the largest of the prepared ones.

Add spikelets to the flowers for volume.


To the right of the inscription, you can place two small flowers to complete the composition. Under the flowers you can add a small amount of sisal, or some other element at your discretion. We fix the flowers on our frame.


Next, we’ll decorate our composition with a bow; the color can be any. We have a yellow bow. Let's diversify the composition with the help of a lace branch; it will add sophistication and tenderness. We connect the twig and the bow together with glue and add it to the overall composition.

To complete the composition, butterflies are needed. They can be cut out from old postcards, or downloaded from the Internet, or beautifully drawn on a separate sheet of thick paper. We will need several butterflies of different sizes.

Bend each butterfly in half lengthwise.

We place the butterflies on our card and secure them with glue.

Our next step is decorating the back of the card. For this we need a substrate. The dimensions of the substrate are nine and a half centimeters by seventeen and a half centimeters.
We use craft paper as the material. A small piece of scrap paper, you can add a colorful picture and a butterfly. On the backing we attach a piece of scrap paper, a drawing, if you decide to use it, and a butterfly. We attach the resulting composition to the base of the product.
The final stage of painstaking but pleasant work is fixing the inscription.
The postcard is ready.
Volumetric 3D postcard step by step technique.
A beautiful, bright 3D postcard, made with your own hands, a wonderful gift.
Let's take a sheet of white paper and prepare the base of our product. To do this, cut out a rectangle and choose the dimensions yourself. We bend it in half.
Let's take several sheets of different colors and cut out seven squares. The squares measure ten by ten centimeters. Each square must be folded in half twice. Then, you need to fold it in half diagonally to form a triangle. On the top of the triangle we draw a rounding and cut off the excess. Next, you need to straighten the part, you get a flower, repeat the same steps with each square. On each blank you need to cut off one petal and connect the remaining ones with glue, you will get a flower in the form of a cup.
You also need to prepare two leaves. Let's cut them out of green paper. We attach a small piece of double-sided tape to each leaf.
We connect flowers A, B, C to each other using small pieces of double-sided tape located on the petals. We attach flower G to flower A.
We connect flowers D, E with flowers B, B.
Then we attach flower G to flower G. We attach leaves to the flowers. The flower is ready.
Now that we have prepared our flower, we need to attach it to the base of our card. We place the flower on its side, place it inside the base and secure it. Carefully smooth out and fold the workpiece. Next, you need to open the blank, straighten the flower and secure it on the other inner side.
The postcard is ready. The front side can be decorated as you wish.
Original 3D postcard for mom and grandma.
The sweetest, kindest cards are made by our beloved children, and it doesn’t matter that sometimes the product is a little clumsily colored. They make cards from the bottom of their small but loving hearts, and this is more valuable than all the gifts in the world.
To make a postcard, you can use anything: multi-colored buttons of various shapes and sizes, pasta, rhinestones, beads, ribbons and other little things.
Take several sheets of cardboard of different colors. The white sheet needs to be folded in half. Next, turn the workpiece with the fold upward.
Let's prepare several circles of different colors and diameters. Let's say three circles with a diameter of three centimeters, the same number of things with a diameter of two centimeters and the same number of circles with a diameter of one centimeter.
Now you need to make a pocket. Let's prepare a rectangle from cardboard. We will make small allowances on three sides, about half a centimeter. We bend it and glue it onto our workpiece. It turned out to be a small pocket.
Our next step will be to prepare the stems for the flowers. To do this, take a sheet of green cardboard, cut out strips about three to four centimeters long and about half a centimeter wide. We glue our circles of different diameters to the stems. Insert the finished flowers into the pocket.
The gift is ready.
DIY postcard ideas for children - congratulations to mother and grandmother on March 8th.
Let's look at an interesting and simple example of a greeting card. Children will be able to make an interesting and original product on their own.
We will need very few simple materials. We will use cardboard, glue and paper of different colors.
We fold a sheet of cardboard in half, inside our blank we will place a small, beautiful congratulation. Next, we will prepare the details for the bouquets; for this we will need multi-colored sheets of paper.
Glue the finished flowers onto the blank. Any mother or grandmother will be very happy to receive such a congratulation.
It’s easy to find interesting gift models on the Internet and literature and make a lot of greeting cards with your own hands. This is the most expensive and unique gift.
March 8 is the main women's holiday. On this day, everyone will give mothers, grandmothers, sisters and friends cute gifts, crafts and, of course, postcards made of paper and cardboard, made with their own hands in kindergarten, school or at home. Look at what options for postcards are on our website, these are master classes from needlewomen and photographs sent by our readers to, including in 2019.
Master class by Zabava Polezhaeva. First we need to prepare the base for the postcard. To do this, cut out a rectangle from thick beige paper with a white pattern. From thinner paper, also beige, cut several strips 3 cm wide. Glue them together into one long strip. Then, using a figured hole punch, we decorate one longitudinal edge of the resulting strip with an openwork pattern. Then we paste this tape around the perimeter of the card. To contrast between the background of the card and the decorative paper braid, we will glue narrow strips of red paper - an impromptu ribbon.
While the base of the card dries, we will prepare the elements of the future decor. Let's prepare several cylindrical parts - these will be the centers of the flowers. They can be red, yellow or orange.

Cut paper of orange, yellow and pink colors into short pieces - 5-7 cm long. Let's cut them on one long side - you'll get a kind of fringe. Glue the resulting blanks around the centers of the flowers, and when the flowers dry, fluff their petals. In addition to flowers with centers, you also need to make several thinner flowers without centers, only from blanks with a fringed edge.

Using a simple device - markings on thick cardboard and pins - you need to prepare several leaves of green quilling paper.
 There should be several leaves, of different sizes and possibly different shades.
 When some of the elements have already been prepared, you can begin to design the postcard. To begin, draw a large number 8 in the central part of the card with a simple pencil. Glue the prepared flowers in the upper right and lower left parts. Chrysanthemums with centers - along the contour of the number, and without centers - around the last ones. After the flowers are glued, we complement the lower part of the figure eight with curved leaves, and the upper part with green paper outlines.
 As an additional decoration for the postcard, you can use beads, as well as shaped elements made from red cardboard using a shaped hole punch.
 Let's complement the card with green beads, as well as contrasting paper elements.
 From light green paper we will make several small (no more than 1 cm long) leaves, as well as curls, with which we will complement the postcard. You can also introduce a few curls of white paper. This will add airiness and tenderness to the work. In some places, pearl beads can be glued into the middle of the curls.
Using a thin simple pencil, write the words “C” and “March!” at the top left and bottom right of the postcard, so that the end result on the postcard reads “Happy March 8!”
 Use dark green quilling paper to write the lettering on the card. You can also glue multi-colored butterflies, and don’t forget to glue a cute bow made of burgundy paper in the upper left corner of our card.
 The postcard for March 8 is ready!
Interesting cards for mom can be made using threads, if the kindergarten teacher helps you cut out the desired template:

“To my beloved mother.” Boginskaya Polina.
Greeting card. A4 format, the background is made with wax crayons, flowers are made of foamiran, stems and leaves are made of napkins using a twisting method. Number made of colored cardboard and thread.

You can make an original children's card using multi-colored and openwork napkins:

“Bouquet for Mom.” Peskov Timofey.
The work is made of salt dough, colored paper, and a yogurt bottle. First we form flowers. We wait for the dough to dry and paint with gouache paints. Glue half a yogurt bottle onto colored cardboard and color it first. We arrange our flowers, add leaves cut from colored paper. Our card for mom is ready!

“Volume postcard for March 8 from foamiran.” Sycheva Polina, Storchak Marina.
Postcards for March 8 are modeled from foamiran, cardboard, ribbon, and rhinestones. For flowers, strips are cut and twisted into a bud. Then the postcard itself is modeled.


"Spring Bouquet". Dyatlov Dmitry.
The applique is made of colored paper, cotton pads and cotton swabs. Cut a cotton swab in half and paint it yellow. When it dries, insert it into the middle of a rolled-up cotton pad. This is a calla flower. We cut out elongated leaves and stems from colored paper. We form a bouquet and paste it onto a cardboard base. The spring bouquet for mom is ready!

Another version of a simple, but very dear to the heart of every mother, a postcard - from the palm of her beloved son or daughter.
“Postcard from March 8th.” Filoretov Kirill.
On white cardboard folded in half, trace the child’s hand and carefully cut it out. The applique was made using colored and velvet paper.

Beautiful card for a friend
For a friend, you can make a card not with flowers, but, for example, with dresses (see the master classes below).


An interesting alternative to postcards for March 8 could be the “Merry Chocolate Girls” option. Solovyova Lyudmila.
This is a chocolate bar packaged in festive packaging. The packaging is made of colored cardboard, the drawings are printed on a color printer.


Postcards made of plasticine
To make a beautiful and original card from plasticine, you need very little material, but the craft will be amazing if you put in a little diligence and effort. For example, using these, you will get the most beautiful postcards.


Cards in the shape of a heart
On this spring holiday, the main gift is flowers, and the symbol of love is a heart, so postcards from March 8th in the shape of a heart with flowers are the warmest and most sincere gift.

To make a postcard using the technique, you will need strips of double-sided colored paper and a tool (you can also use a thin knitting needle), and then everything depends on your imagination; for inspiration, you can watch master classes using these photos:


You can make an original postcard for your mother or grandmother by March 8; the highlight of this gift will be a hand-embroidered picture. Your family will be very touched by your care and will appreciate your skills. Especially if they taught you how to embroider.
How to decorate a postcard with embroidery -

Volume cards for March 8
And in this master class we will make a simple postcard for March 8 from colored paper. You can do it with your children. A postcard from March 8 is made from colored paper very quickly. But it turns out bright and beautiful.

To make a postcard we will need:
- Colored paper;
- White cardboard;
- Glue;
- Scissors;
- Ruler.
Let's start with the basics. Take white cardboard and bend the A4 piece of paper in half. To prevent the card from being too tall, you can trim it a little.
Now we need to cut 15 red stripes. We cut strips approximately 5-7 mm wide and 4 cm long. Instead of red paper, you can use any other bright and rich color. It is advisable that the paper be double-sided.
Next, you need to glue a petal from each strip. Fold the strip into a loop and glue it at the bottom. It turns out to be a petal. We do all this with the rest of the strips. Glue can be used with a pencil or PVA. But the fastest way to work is with hot glue. And it holds the parts together more reliably.

Then we will collect the flower. There will be 3 flowers in total on the card. And each has 5 petals. Glue the first flower to the card. First we glue 2 petals, then add 3 more. It turns out like this flower.

After this we glue 2 more flowers. The middle flower can be placed slightly higher than the others. This way the bouquet will look much better.
Now let's make the core. We will make it from yellow paper. But you can also take white paper.
Cut a strip 5-6 cm long and 5 mm wide. Then we will make frequent cuts along this strip. And with the help of scissors we bend the resulting cuts back a little.
 We twist the middle so that the cloves point to the sides. And secure it with glue.

Glue the hearts to the flowers. And take the green paper. We cut out thin stems for the flowers. And we also glue them to the postcard. So we formed a small bouquet of paper flowers.
 Now we will make 3 leaves. Fold the green paper. The fold is the middle of the leaf. Cut out the leaf. It should be slightly elongated.
Glue a couple of leaves at the bottom of the flowers and somewhere at the top. You can make more leaves.
Very voluminous cards can be made with such corrugated paper bouquets will take more time, but the result is worth it!
The following will help you make such beautiful cards:


Volumetric card with flowers and ribbons -

A charming postcard using the scrapbooking technique in the form of a window - master class

Postcards using origami technique
Postcards with dresses
What is a cocktail party?
This is a fun party for friends or colleagues on a special occasion or for no reason at all! Such a party can be bright, explosive and juicy!
But a cocktail dress should be original and stylish.
Today we will make a cocktail dress using the origami technique and decorate a postcard with it for March 8th.

Show master class
Here are the materials we will need for work:
- base for a postcard or a sheet of light-colored cardboard;
- brightly colored colored paper;
- scissors;
- ruler;
- pencil;
- glue;
- decorative ribbon for decoration.
First, we will make a blank for the dress from colored paper. To do this, use a pencil and a ruler to draw and then carefully cut out a 10*10 cm square.
Now carefully bend the resulting square in half and in half again.
 Next we make folds on each side. To do this, you need to fold the square twice along the central fold, first inward, then outward, as in the photo.
 Now we fold the workpiece as shown in the photo.
 To make the dress fluffy, you need to push the outer corners to the sides, carefully making small folds in the area of the central transverse fold.
 To design the neck line, mark 1/3 from the top point to the middle. Let's make a fold.
 Then we turn the resulting fold back and form the corners, as shown in the photo.
 Now you need to carefully bend the corners down.
 Then you should turn the resulting corners up and turn the workpiece over.
 Carefully bend the resulting corner to the wrong side, as shown in the photo.
 Now you need to mark the waist line. To do this, you need to make an accordion fold in the middle.
 In order for the dress to be fitted, you need to carefully bend 0.2-0.4 mm on the wrong side, as shown in the photo. Particular attention should be paid to the angles around the waist.
 Let's turn the workpiece over and make a bow on the upper part of the bodice.
To do this, we will rotate the small corners by 45 * and unfold the resulting diamonds so that we get the petals of a bow.
 The dress is ready!
All that remains is to design the front part of the card. To do this, we will use decorative tape. Cut the required amount of tape from it and glue it to one side of the card.
We prepare a congratulation and glue it. We position the dress and fix it with glue.
A bright dress for a party is ready!
This card will be a wonderful holiday gift.
Any woman will be pleased to receive such a congratulation!
We wish you success!
Master class “Blue dress” (postcard, origami)
I suggest using this wonderful dress as the basis for a greeting card. The card can be universal: Happy March 8, for mom, or just Happy Birthday. But the fact that it is intended for a girl or woman will be immediately obvious!

To make such a postcard with your own hands, we will need the following materials:
- blue cardboard or card base;
- blue and cyan colored paper;
- scissors;
- ruler;
- decorative tape; glue.
Show master class

Our dress will consist of two parts: a bodice and a skirt.
1. For the bodice we need to cut out a blue square with a side of 6-7 cm.
First you need to carefully mark, using a ruler and pencil, the middle of the square (vertical line). Now you need to fold each side of the square towards the middle. Let's look at the photo.

2. Then fold the resulting rectangle in half.
 3. Now we make sleeves on the bodice. To do this, bend the corners to the sides, as shown in the photo.
 4. Turn the workpiece over and fold it in half again.
 5. You should get a bodice detail like this. If you are doing this with a child, you can leave the bodice like this.
 6. But you can improve this element - outline the waist. To do this, you need to turn the workpiece over and bend the corners from the shoulder to the center, at a distance of 0.5-0.6 mm, as shown in the photo.