So March has arrived. What about real spring? Here in St. Petersburg, it’s still a month and a half away. So, the knitting needles and wool have not yet been put away, and there is still an opportunity to knit and wear knitted items this season. Even more so, the autumn weather is treacherous. When a ray of sun breaks through the clouds, you want to unwrap yourself and expose your face to it. And suddenly, a light breeze, fog and dampness. And in the morning... runny nose.
A scarf will help protect your neck from spring meteorological surprises. By the way, we recently discussed this important accessory on our website. And today I invite you to connect with your own hands on knitting needles scarf snood with a loop.
Scarf With loop - all advantages. Miniature, i.e. You can always take it off and put it in your handbag. Does not require long tying every day - “fasten and go”. And tie knitting needles it can be done in a few hours. Ideal for beginner knitters.
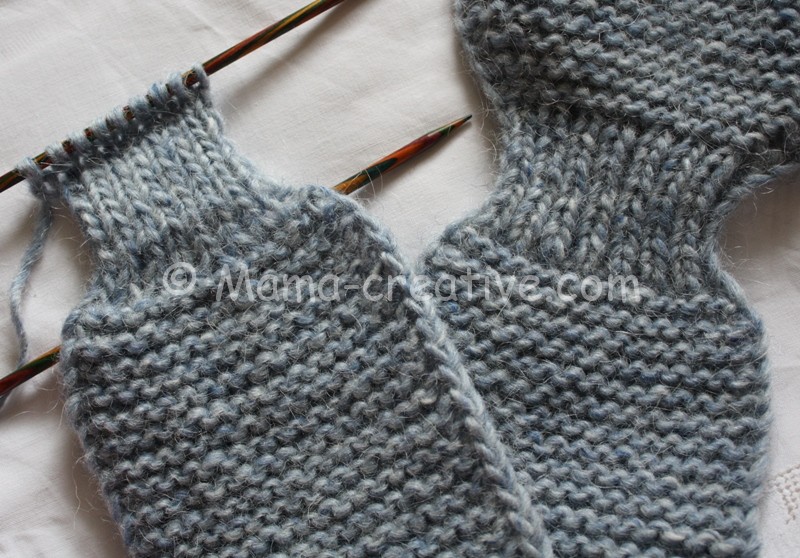
So, you will need: yarn and knitting needles of a suitable size. It is advisable, but not necessary, to also prepare knitting needles 1 size smaller. I used thick Icelandic wool with a density of 100 m per 100 g, knitting needles 4.5 and 3.5 mm. Knitting order: knit the end of the scarf in the form of a leaf in garter stitch, then make a taper with an elastic band, then the middle part in garter stitch, a loop in stocking stitch, and the second end of the scarf in the shape of a leaf.
1. We start knitting with two loops, gradually increasing their number to 24. We knit with facial loops on both sides - the so-called garter stitch. We make increments like this:
1st row - add 1 loop after the first edge loop and 1 more loop before the second edge loop;
We knit the 2nd row without increases

2. Having brought the number of loops in a row to 24, we knit 6-8 rows like this and begin to decrease

3. We also decrease two loops in a row: the first one after the edge one with a slant to the left, i.e. remove the second loop after the edge stitch without knitting, knit the third one and when transferring it to the right knitting needle, pull it through the unknitted loop


At the end of the same row, before the edge, decrease with a slope to the right, i.e. We knit the last two before the edge loop together with a knit stitch:

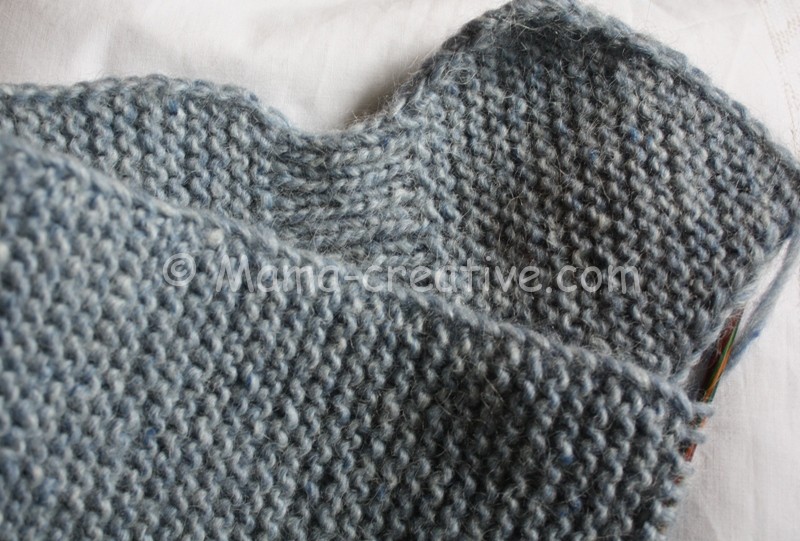
4. Decrease until 16 stitches remain. The end of our future scarf begins to resemble the shape of a leaf

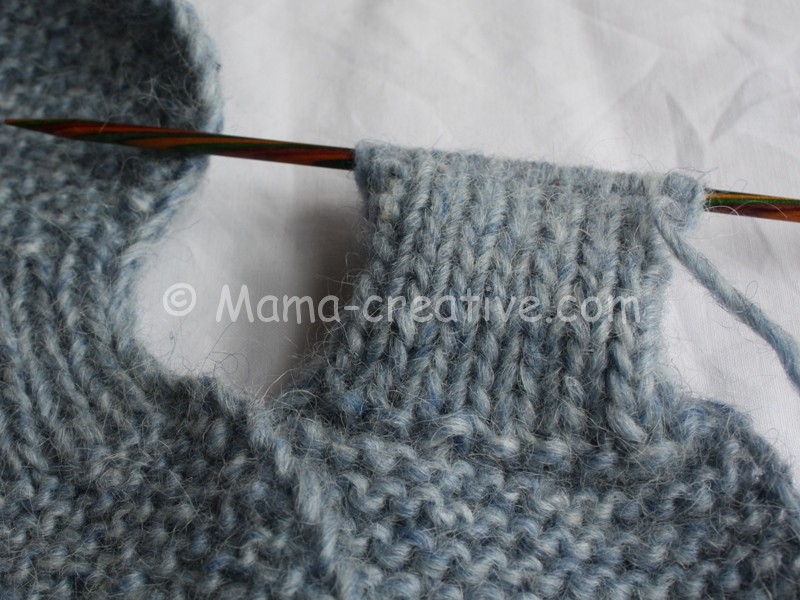
5. Transfer the loops to a thinner needle and knit 12 rows with an elastic band - 1 knit x 1 purl. The size of the knitting needles changes in order for the tightening effect to appear. You can knit on the same knitting needles, but more tightly.

6. After the elastic band, return the product to large knitting needles, add 2 loops (one at the beginning of the row, the second at the end) and knit the middle of the scarf.

7. The length of the middle part of the scarf depends on how you plan to wear it, if it’s directly on the neck - shorter, on the collar of outerwear - longer
8. Let’s start making the “loop” of our scarf. Decrease two loops. We spread the row on two knitting needles, alternating loops
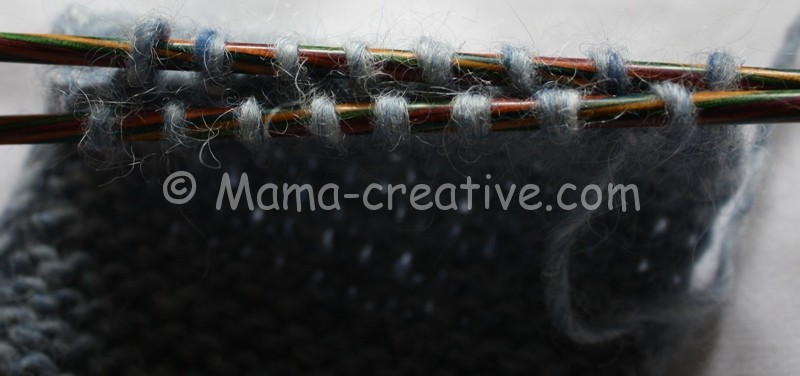
9. We knit stitches from the first knitting needle for 12 rows in stockinette stitch (1 row knit, 2 rows purl)
10. We knit loops from the second knitting needle in the same way.

11. We combine loops from two knitting needles onto one knitting needle, alternating
The first loop is from the first needle, the second loop is from the second, the third loop is from the first needle, etc.

It turned out to be a loop

12. We knit the second end of the scarf, for which we repeat the operations described in points 1 – 4, only in reverse order
Our scarf with clasp – loop ready. Knits on knitting needles within a few hours and will serve perfectly as a gift for mothers and girlfriends.

The clasp-loop of the scarf can be decorated with a brooch, emphasizing the uniqueness of the item made with your own hands. Scarf snood very practical, you can put it in your purse already zipped up and, in case of a sudden change in unreliable spring weather, quickly put it on, right over your coat.

A scarf with a clasp is also suitable for children. A long scarf tied over children's clothing is not only not very comfortable, but can even pose some danger - on a slide, for example, a child can get caught in it. A short, and even easily “unfastened” scarf will be very useful

Spring is a time of creativity. We hope our little handicraft tricks will help you.
Knitted scarves are absolute favorites in the wardrobe, from the smallest to the adult representative of humanity. Their variety is simply amazing: both dense; voluminous and thin; transformers and snoods; male and female. Popular accessories are knitted: knitting, crocheting and simply by hand, without the use of knitting tools. In our last article we told you in detail how to knit or girls, in this article we will tell you how to knit a scarf with knitting needles, with diagrams and descriptions. We will also take a closer look at the basic models for beginning needlewomen.
A classic accessory, knitted quite simply and shaped like a rectangle. Experienced craftswomen recommend that inexperienced needlewomen begin to hone their skills by knitting simple items, for example, a scarf. At the same time, take diagrams of simple patterns and only then move on to more complex designs. In this case, mastering the art of knitting will be interesting and will not end at the beginning, when beginners try to start knitting with very complex patterns and products. As a result, everything is abandoned, with the thought that this is a very difficult task.
Three simple patterns for knitting a scarf:
Method No. 1: Elastic band 2x2
The method is convenient and in demand, the product does not stretch when knitted in this way, retains its original appearance and, due to its volume, is quite warm. Suitable for winter accessory options.

Elastic pattern 2x2
Description of the circuit:
1 r: edge, *k2, p2* - repeat until the end of the row, finish the knit row, turn.
2 r: chrome, *p 2, knit 2* - repeat until the end of the row, finish the knit row, turn.
Alternate rows 1 and 2, to the required length of the product or according to the drawing.

Method number 2: Relief pattern
The pattern has a different name, it is also called “checkerboard”. It holds its shape well, looks beautiful and is quite easy to knit. In this option, the number of loops can be changed arbitrarily, then the shape of the chessboard will change, and accordingly the pattern will look different.

Checkerboard pattern
Description of the circuit:
The repeat consists of 6 loops, not counting the edge loops.
R: edge, *k3, p3* - to the end of the row, edge (knit), turn.
2 r: chrome, *above faces. P3, over P3* - to the end of the row, edge(s), turn.
Method No. 3: Relief pattern No. 2
This simple pattern will allow you to quickly master knitting and add another fashion accessory to your wardrobe.

Description of the circuit:
Rapport consists of 6 loops. The pattern consists of knit and purl stitches.
Row 1: edging, *P2, knit 4*, to the end of the row, edging, turn.
2 rows: edge, *4 purl, k2*, to the end of the row, edge, turn.
Knit the 3rd and 4th rows like the first two.
5 r: edge, *k2, p2, k2*, to the end of the row, edge, turn.
6 r: edging, * 2 purl, 2 knits, 2 venting *, to the end of the row, edging, turn.
Knit rows 7 and 8 like 5 and 6.
9 r: edge, *4 purl, k2*, to the end of the row, edge, turn.
10 r: edge, *k4, purl 2*, to the end of the row, edge, turn.
Rows 11 and 12 are the same as rows 9 and 10.
Now continue knitting starting from row 1, and finish pattern 12 next to it.
Simple scarf with pockets and fringe: diagram, description

An excellent model for beginner needlewomen. The accessory is knitted in simple garter stitch and is complemented by pockets and fringe. The pockets are made with a “braid” pattern, a diagram with a description of the work is below. Size of the finished product: width – 30 cm; length (without fringe) – 2 m 10 cm.
Materials used:
- Yarn (80% wool, 20% acrylic) – 300 g;
- Straight knitting needles No. 4;
- Additional knitting needle or pin (for braids) – 1 pc.;
- The needle is big.
Sample of the main fabric: 10x10 cm = 18p/34r.
Pocket pattern: 22p/28r.
Description of work:
We knit the main fabric according to the pattern:

The diagram shows that all front and back rows are knitted only with front loops.
On a working knitting needle, cast on the required number of loops, in our version = 50 pieces.
Knit with a 210 cm scarf pattern. The edge loops are counted separately and are always knitted at the end of each row with a purl loop. At the beginning of the row, the loop is removed onto a working needle.
Additional details are knitted according to the pattern:

Cast on 34 stitches and knit according to the “pocket diagram” pattern. We knit up to row 48 and bind off the loops. We knit the second pocket in the same way.
Cast on 34 stitches + 2 edge stitches on the knitting needles.
1 r: chrome, P3, k6, P2, K12, P2, K6, P3, chrome.
2 r: chrome, k3, p6, k2, p12, k2, p6, k3, chrome.
Rows 3 and 4: knit similarly to the first two.
5 r: chrome, knit 3, *slip 3 stitches onto an additional needle as knit stitches, knit the next three stitches and with extra stitches. knitting needles also knit 3*, knit 2. Remove 6 spokes for extra. knitting needle, knit the next 6 knits, then with aux. knitting needles 6 knits, 2 knits and repeat from * to * again, 3 knits, chrome.
In this simple way, following the pattern, knit the pocket to the desired height.
Knit the second part in the same way as the first.
We sew the pockets to the main fabric at a distance of 15 cm from the edge of the product and decorate the edges with fringe.
Fringe:
Cut the yarn into pieces of 40 cm. Fold 4 threads together, bend them in half and hook them into the edge hole, resulting in a loop. Then insert the ends into the loop and tighten. So, at a short distance from each other, decorate the product with tassels at both ends.
Moisten the finished product and dry it on a flat surface.
Two-color scarf knitted

A simple way to knit a two-color scarf will allow any mother to turn her baby into a fashionable person. For beginning needlewomen, this is a great option to practice your hand and learn how to knit even and identical knit stitches.
The size of one piece is 15 cm wide and 100 cm long. Product parameters can be changed depending on the age of the child.
Materials used:
- Yarn of two contrasting colors - 2 skeins of 50 g each;
- Knitting needles according to yarn size;
- Decorative buttons – 10 pcs. (5 pcs. for each thread color).
Description of work:
The product is knitted in garter stitch, first a strip of one color is made, then another.
Twist the parts together in the middle and connect the ends with buttons, as shown in the figure.
A fashionable accessory is ready to make your beloved baby stylish.
Stylish scarf with loop

Knitting an original scarf with knitting needles is not difficult; for this you need to purchase thick yarn and large knitting needles. The model is interesting because it has a loop that allows you to wear the scarf in several ways.
Material:
- The yarn is thick
- Straight knitting needles – 6 mm.
The main pattern of the fabric is 2x2 elastic (diagram attached).
Finished product size: 16 cm – height; 123 cm – length.
Progress:
Cast on 32 stitches on the knitting needles, two of them edge stitches. Knit according to the pattern:

Description of the circuit:
Row 1: *K2, P2* - to the end of the row.
2 r: *P2, k2* - to the end of the row.
When you have knitted 50 rows, remove 4 stitches on an additional needle (1 cro, k2, p1) and continue knitting only these four stitches according to the pattern. Knit a strip the width of the scarf, in our case it is 19 rows. Set the connected part aside.
We continue to knit the main fabric. Without knitting 4 loops to the end of the row, according to the drawing. Having raised the main fabric by 19 rows, we leave it. Now you need to knit the second loop from the remaining 4 loops.
We knit the strip to the total height and transfer all the loops to one working knitting needle. Knit the required number of rows to obtain the desired length. Close the loops.
Fasten the ends of all threads and hide them in knitting.
The original scarf with a loop is ready.
Super-voluminous scarf knitted from thick yarn

An extraordinary and outrageous look can be created with the help of a voluminous scarf that almost completely covers the entire figure. The accessory is extravagant and not everyone will dare to try it on their image. But wrapped in a soft and warm linen, everyone inside will feel cozy and comfortable.
The product knits quickly and easily. It will take a large amount of yarn, but it’s worth it, because in the end you will get a unique thing that can warm you up not only at work, but on long winter evenings at home.
A small detail, the loops when knitting must be even and identical, otherwise the product will look sloppy. To test your skill in making perfect loops, knit a sample and make sure that the fabric is uniform and without flaws.
Material used:
- Thick yarn (97m/170g) – 3 kg 400g;
- Knitting needles according to yarn size, 25mm.
Size of the finished product: width – 45 cm; length – 400 cm.
The main fabric is knitted in stockinette stitch.
Fold the yarn into 4 threads (according to the pattern in our knitting, 10 cm - 4 loops).
Progress:
Cast on 18 stitches and knit the first 4 rows in garter stitch (all stitches are knit). The edge loop is always knitted purlwise.
Knit 5 and subsequent rows according to the pattern:

Description of the circuit:
Purl rows are knitted with purl stitches.
Facial rows with facial loops.
Work in stockinette stitch the entire length of the piece and finish with 4 rows in garter stitch. Close the loops. Cut the thread.
Openwork scarf-pipe: diagrams, description

The openwork and delicate accessory has the shape of a cone, narrowed at the top. It is this solution that brings additional comfort while wearing it. The question arises how to knit such a beautiful work of art with your own hands. Answer: simple and easy if you follow the job description and look carefully at the diagrams.
Material:
- Yarn (100% alpaca, 50g/175m) – 2 skeins;
- Circular knitting needles 4mm and 4.5mm, line length 70 cm.
Finished product dimensions:
- Height – 45 cm; top circumference – 60 cm; below – 75 cm.
- According to the sample, pattern density: 10 cm x 20 loops.
Description of work:
Cast on 153 stitches on 4.5mm needles.
1 r: knit all the loops, close the knitting into a ring.
2 p: purl all loops.
3 r: all loops are knit.
Starting from the 4th row, we switch to an openwork pattern according to the diagrams:

We start knitting the pattern from pattern M1.
1 r: *k3, k2 together, k4, yo, k6, yo. K2tog, k2, yo, k2tog, k2, yo, k2tog, yo, k4, yo, k4, k2tog, k3* - repeat 4 times, end the row of knits with a loop.
Thus, according to the pattern, knit 4 rapports up. There are 137 loops in the work.
Change the needles to 4 mm and start knitting the M2 pattern. Also knit 4 rapports up.
We go to the last pattern M3 and knit 1 rapport up. There are 121 stitches on working needles.
Finish the work with three rows that you started knitting with. Close the loops. Break the thread.
Master class on snood knitting for beginners

A snood is a type of scarf that replaces two things in your wardrobe at once - a hat and a scarf. Therefore, having such a fashionable accessory, you can always remain fashionable and stylish. We knit a scarf with knitting needles for beginners, details in our MK.
Option No. 1: Snood made on circular knitting needles
Material:
- Yarn of your choice – 100 g;
- Knitting needles according to yarn size, line length 80 cm.
Description of work:
Cast on the knitting needles the required number of stitches, which must be calculated using the pre-knitted pattern. The main knitting will be knit stitches.

Purl the next row. In circular knitting, garter stitch is knitted this way. 1 row, knit, 1 row, purl.

Knit until you alternate rows until you reach the desired height.

In the last row, close the loops in any known way. This snood scarf was made using circular knitting needles.

Option No. 2: Snood knitted on straight knitting needles
The second option is a little easier to knit than the first. To make it, straight knitting needles are required, since knitting takes place in rotating rows. Garter stitch is used for the pattern. All rows are knitted with knit stitches only.
Description of work:
Cast on the required number of stitches on the knitting needles. Knit a row with facial loops. The edges are knitted with a purl loop.

Turn the product and continue knitting with facial loops. Original sectional dyeing of yarn will make the finished product beautiful, without any knitting tricks.

Knit the product to the desired length. Cast off the stitches of the last row. Now the narrow ends of the product need to be connected to each other. This can be done in two ways: with a hook or a needle, whichever is more convenient for you.

This is such a simple, but very fashionable accessory.

Video: Tutorial on knitting a snood for beginners
Amazing knitted scarf ideas
The variety of scarves never ceases to amaze. Let's look at several options for amazing products with diagrams and descriptions.
Snood scarf with intertwined stripes

This time too, the snood scarf with intertwined stripes amazes the imagination. Despite the fact that the design looks intricate, knitting such an accessory is not difficult. According to the description and video tutorial provided, even a not very experienced teacher can handle the product.
What you will need for work:
- Thick yarn – 150 g;
- Circular knitting needles No. 6, line length 70 cm;
- Tape measure;
- Markers;
- Extra knitting needles or pins for knitting.
Knitting density: 30 p x 24 cm.
Description of work:
If the yarn is not as thick as the knitting needles, then knit in two threads.
Cast on 30 stitches on a needle.
1st row: remove the edge stitch and knit the row completely with knit stitches, knit the edge stitch too, turn the product.
2 r: from the wrong side he also knits with facial loops.
Rows 3-6: knit with knit stitches.
Using markers, divide the product into 5 parts. It turns out there are 6 loops in each part. Now you need to knit each part separately.
We knit the edge stitch, like the other 5 knit stitches, up to the first marker, turn the work and knit it with purl stitches from the inside out. Turn. In this way, purl loops are knitted from the wrong side and knit loops are knitted on the front side. The length of the strip should be 20 cm.
Remove the finished strip onto a pin or auxiliary knitting needle.
We move on to knitting the second strip.
Attach the thread to the beginning of the second strip and knit 6 loops with knit stitches. Knit up in stockinette stitch for 20 cm.
Knit 5 identical parts.
Place all the loops on a working knitting needle, and connect the strips together with knots from the cut ends. We continue knitting from the wrong side.
We continue to knit in garter stitch for 50-60 cm.
Divide the fabric again into 5 parts of 6 loops each and repeat identical knitting of the first 5 strips.
After finishing making 20 centimeter strips, carefully remove each strip onto a separate pin. Now you need to intertwine the strips of the first part with the second in a checkerboard pattern. To do this, the first free strip must be placed under the first strip of the first part, then thrown over the second and placed under the third, thrown over the fourth and left under the heel.
Thus, it will continue to intertwine all the strips with each other.
After the weaving is completed, the loops that are on the pins must be transferred to the knitting needle. Now connect the strips together with the ends of the threads. And continue knitting the product in garter stitch for 6 rows. The first row after joining is considered zero. We close the loops.
Closing the loops:
Two stitches are knitted together, the loose one is thrown onto a working needle, and so on until the end of the row.
Fasten the thread and cut it.
Video: Detailed tutorial on knitting a snood
An effective and very charming scarf

We continue to amaze with unusual scarf patterns that are knitted very simply, but look incredibly beautiful and unique.
Materials:
- Yarn (60% mohair, 40% acrylic in 100g/500m) – 100g;
- Knitting needles No. 4, No. 3;
- Hook 2.5mm.
Description of work:
Cast on 44 stitches on the needles. Knit 8 rows in stocking stitch (knit row with knit stitches, purl row with purl stitches).
Row 9: knit 3, knit 16, knit 5, knit 16, knit 3, edging, turn.
10 r: edge, purl 3, 16 loops cast on a knitting needle, purl 5, purl 16, purl 3, edge turn.
Knit 8 rows in stockinette stitch and repeat rows 9 and 10. That is, make slits into the product every 8 rows.

We continue to knit the fabric to the required length.
Now you need to braid the loops on one side in the form of a braid (as shown in the figure), and secure the latter with thread.

On the other hand, leave it as slits.
The bottom can be decorated with fringe and a decorative button.
The scarf is ready.

A selection of diagrams with descriptions

Openwork blue scarf

Openwork women's snood

Warm scarf with pompoms

Beige snood knitting for beginners
As soon as the temperature begins to drop rapidly, we remember about warm clothes and take out boxes of winter shoes from the far shelves of our closet. Required attribute of the cold season- a cozy scarf. This item not only keeps you warm, but also serves as an accessory to your outerwear, be it a down jacket, a coat, or a parka jacket. Read on to learn about the types of scarves and how to knit such a wardrobe attribute with your own hands.
How to simply knit a beautiful scarf
The knitting process requires certain skills, but don’t worry if you’re picking up knitting needles for the first time in your life. Casting on and knitting stitches is not difficult at all. Due to constant repetition, the actions will very soon become automatic, and knitting will be carried out much faster. Having taken up knitting seriously, you will soon be able to make not only a scarf, but also other equally important items, such as mittens, baskets for the home or.
How to knit a snood scarf
A snood (collar) is not only a fashionable knitted scarf, but also a very good solution for keeping warm with the onset of the first cold weather. This item is universal and will fit perfectly with both a drape coat and a short jacket in a sporty style. Would you like to knit such a scarf yourself? Then arm yourself with knitting needles and follow the following steps.

For a scarf measuring 25 by 60 cm (folded) you will need:
- 300 g of yarn (approximately 50-60 m in 50 g);
- circular knitting needles 6 mm and 7 mm.
If you want the fabric to come out looser, just take larger diameter knitting needles. Also, the larger the knitting needles, the faster you will knit the product.
Instructions for knitting a snood:

This clamp is quite it’s possible to knit in a couple of free evenings, and it can serve you for quite a long time.
Knitting a scarf in the form of a collar
A collar scarf replaces the neck of a warm sweater. This solution is not only original and beautiful, but also practical.

You will need:
- Knitting needles. The diameter of the knitting needle and the thickness of the thread must match each other. It is better to start working with double needles, then replace them with circular ones. In this case, the scarf will turn out without seams and will have a more neat appearance.
- Threads. To make your scarf truly warm and pleasant to the touch, give preference to yarn that contains wool, cashmere, or both.
Before you start knitting the collar, you need to measure your neck circumference. You should add a couple more centimeters to these measurements so that the product can be worn comfortably.
The most suitable way to knit a neckline is a standard 2 by 2 rib.
This knitting will protect the scarf from stretching even after washing.
By the way, you should wash knitted items, especially woolen ones, by hand or in a machine, turning on a special mode and without spinning.
You determine the height of the neck for yourself. Usually it is no more than 20 cm. Next, knit according to the following instructions.


If you are proficient in crochet technology, you can tie the collar around the edge with a simple single crochet or a more complex openwork pattern. This will give the product a special highlight.
How to knit a men's scarf
A scarf knitted by caring hands is a wonderful gift for a man for the winter holidays. Such a gift will certainly be appreciated by your loved one, your dad, and your close friend. To knit a men's scarf with knitting needles, it is important to decide on a pattern. We bring to your attention a diagram with braids. This pattern is suitable for discreet conservatives and those who are not afraid to experiment with styles.


To knit a scarf measuring 24 by 188 cm, you will need:
- half-wool yarn (50% wool, 50% acrylic);
- knitting needles 7 mm;
- a couple of extra knitting needles.
On knitting needles with a diameter of 7 mm we cast on 52 loops. We knit a pattern of six crossed loops according to the diagram.

Once the knitting has reached 188cm in length, bind off the stitches to complete the last row of the scarf.
Knitting a baby scarf
It is especially important for us that our children do not freeze in bad weather. Therefore, we try to wrap our children warmly, and we wear knitted mittens and mittens for the little ones. Why not try knitting a children's scarf yourself, which will surely become your child's favorite item of clothing?
Scarf for girls
If you are looking for ideas on what kind of scarf you can knit for a girl, we offer you an interesting version of a fox scarf.

To knit this beauty, you will need:
- yarn of any color for the base of the fox;
- white yarn;
- black yarn;
- knitting needles;
- needle.
When everything is ready, you can start.
1. The beginning and end of the scarf will be white, so take white threads and cast on 28 loops.
You can add more if you want the scarf to be wide.
2. We knit a scarf in garter stitch, i.e. All rows will be front rows.
3. We knit all the loops except the last two - we knit them together, thus making a decrease. We continue this action until three loops remain. 
4. We knit two rows of the remaining loops and then begin to make additions: to each last loop in the row we add one more.
5. Insert a thread of the main color and knit approximately 5 cm.
6. We knit the main fabric with a classic 2 x 2 elastic band. We determine the length of the scarf ourselves. 
7. Then we knit 5 cm with facial loops again.
8. Now we have to tie the tail of our fox. We introduce a white thread and knit in decreasing order until three loops remain, as we did at first. 
9. The next stage is the ears. We knit two small triangles: cast on 12 loops and go in descending order, knit the last 3 loops together.
10. Assembling the muzzle: fold two large triangles along the contour of the colored thread. We do not sew the sides; they should form a loop. 
11. Sew on the ears, make eyes and a nose from black yarn. 
Putting a scarf on a child thread the chanterelle's tail through the loop in place of the muzzle. This original accessory can be worn with a hat or a knitted beret.
Scarf for boy
Boys are often very active and spend a lot of time outside at any time of the year. To keep your child warm even in the cold, knit him a beautiful winter accessory in the form of a scarf. And to ensure your child doesn’t freeze, it would be nice to knit a warm sweater or a knitted jacket with buttons to go with the scarf.

Useful videos about knitting
We have selected several visual master classes about knitting different types of scarves that may be useful for you.
Bright blue snood with English elastic band
The video shows all the stages of knitting a snood scarf from casting on loops to how to properly finish the product. Also here you will get tips on how to choose the right yarn for your future scarf and what you should pay attention to when caring for it in the future.
Snood with gradient
Those who prefer to look special at any time of the year will surely love this knitted snood with a fashionable ombre transition.
Snood "Mobius Loop"
The video tutorial demonstrates how to knit a snood using the Mobius strip principle. This product is knitted in the round and has no seams.
Men's scarf with a pattern
When choosing a pattern for knitting a men's scarf, we recommend that you familiarize yourself with an interesting pattern reminiscent of Christmas trees. Watch the video to learn how to knit it.
Children's scarf with double loop
If you wish, you can knit a double loop baby scarf for little ones. With such a cute accessory, your baby will feel warm and cozy in the stroller.
Knitting is one of the most useful skills, in addition, it is a great way to spend your free time profitably. Having learned to knit well, you can please your family by making a New Year's sweater, cute socks or for everyone. Having received a gift that you created with your own hands, your loved ones will feel care and warmth, because you put your soul into it.
It’s not difficult to knit a scarf, you might say. Take any wool, knit 1 knit, 1 purl loop or 1 row of knit stitches, 1 purl row. That's all. But we don't agree with you. Knitting scarves in such a simple way is a thing of the past. Nowadays, when the boom in handicrafts does not subside, but is just beginning to develop, craftswomen have come up with a large number of interesting and even sometimes very complex patterns for knitting scarves.
Varieties of knitted scarves
Let's start with the simplest patterns for knitting a scarf with knitting needles - this is an English elastic band, a two-color English elastic band. It looks like the same knit and purl stitches, but in fact the knitting is softer and more voluminous. Volumetric accessories are at the height of fashion. Large knitted hats, voluminous knitted scarves. This scarf knitting pattern is simple and on-trend. interesting selection for the site Large selection of openwork scarves
Knitted scarves can be knitted with braids or arans. You can’t come up with such a complex pattern on your own; in our opinion, Japanese patterns for knitting arans are very interesting. The problem here may be to understand the decoding of the diagram and symbols. The rest won't matter. Look for scarf patterns with knitting needles and braids and knit to your heart’s content.
Knitted openwork scarves. If you knit a wide, openwork and long scarf with knitting needles, you will get a stole. We also have a lot of stole patterns on our website; they are often knitted from thin fluffy threads: mohair or down.
Children's scarves knitted.
In children's scarves, the imagination of needlewomen ran wild. Children's scarves are knitted in the form of animals - foxes, dogs, mice and from individual motifs - scrambled eggs, strawberries, animal faces and decorated with pom-poms, embroidery, appliqués. You can knit a scarf on any theme.
Snoods - knitted scarves
This type of scarf differs from ordinary ones in that it is shaped like a ring. This scarf does not need to be tied; it is enough to wrap it around your neck 1-2 times. And the larger the knitted scarf is, the more fashionable it will be.
Knitted men's scarves
It turns out that there are also many interesting ideas for knitting a men's scarf. Men keep up with fashion and wear scarves with arans, scarves in the color of hats and even snoods. Knit a scarf for your beloved man, he will surely love it. And in order not to wander through the Internet in search of an interesting model, we have prepared for you a selection of knitted scarves that our readers knitted.
Knitted scarf, the work of our readers
Knitted scarf, models from magazines
Scarf knitting, video tutorials
Scarf - Accordion. Scarf knitting:
How to knit a children's scarf with knitting needles:
Double-sided knitting pattern for a scarf:
The first thing you can learn to knit is to knit a scarf. The product is straight, does not require additions or subtractions, and is knitted the same throughout. It turns out that the main thing is to know how to cast on loops with knitting needles and how to close the work with the same tool. As you master knitting scarves with knitting needles, you can come up with more complex patterns and make decorations: tassels, fringes, pompoms, openwork edges, etc. The beauty of knitting a scarf is that you don’t have to worry about making a mistake with the size. The width of the product can easily vary, but you generally set the length yourself and can determine it during the work process.
Where to start knitting a scarf for a beginner
To knit a regular scarf, it is not even necessary to first make a sample of the selected pattern. If the scarf turns out to be a little wider or narrower, it doesn’t matter. The main thing is to master the purl and knit stitches in order to make simple textured patterns. Complex texture - “arans” - is rarely used in knitting scarves. If you want to knit a scarf with just such a pattern, then you need to wear it for show, over a coat or jacket. You will have to make sure that the front side of the product is on top.
Openwork patterns are good to master for summer models. A lace scarf should be knitted using threads that do not contain wool, otherwise it will warm you up, which is inappropriate in the summer.
For the convenience of knitting a scarf, you should think about the choice of tools and raw materials. Your mood while knitting depends on the first, and the quality of the finished scarf depends on the second.
Selection of necessary raw materials and tools
Yarn should be used for work that is harmless: non-dying, non-biting, hypoallergenic. After all, the scarf comes into contact with your bare neck, rubbing against it. Acrylic threads do not cause allergies, so they are suitable for both adults and infants. Acrylic is not warm enough for winter. For cold weather, it is better to stock up on wool blend yarn. Well-twisted yarn is the best option: it has excellent springiness and does not break during knitting. The wear resistance of scarves will be high even with constant friction against the collar of a coat, down jacket or jacket. It is convenient to check the strength of the thread if you make a loop and pull it sharply. The thread did not break - the yarn is suitable for work.
Knitting needles for scarves are suitable for steel, polished. Any thread glides over them perfectly. It is better to take a wide scarf with knitting needles with a flexible connection, so as not to fear that the loops on the back of the tool will fall off. For a narrow scarf, knitting needles with stops along the non-working edges are perfect.
Choosing a knitting method
The more experienced the craftswoman, the more complex a scarf she can knit with knitting needles. For beginners, it is better to choose a simple pattern or limit yourself to garter stitch. It is as basic as stocking, but it is a double-sided option - a condition necessary for scarves.
A popular type of scarf is the snood, a circular product worn around the neck with a collar. It is used both as a scarf and as a headdress. To knit a snood scarf, you don’t have to work from the bottom up. The snood is knitted well in length and joined into a ring with a knitted seam. The knit stitch is another element that it is advisable for a beginner to master. To perform the technique you will need a gypsy or knitted needle.
How to knit a simple scarf with knitting needles
To make a regular scarf on knitting needles, cast on the required number of loops. We take out one knitting needle and start knitting a row of knit stitches with the second one. At the end, we remove the edge loop onto a working knitting needle, without knitting, so that the edge does not turn out loose. We turn the knitting and knit a row of facial loops again. And so on until the end of the scarf. The product, knitted according to the pattern, stretches perfectly in length. If you make sure that the height of the loops in each row is the same, you will get a uniform, beautiful fabric.
By alternating knit and purl stitches, you can get rib and millet patterns. The first pattern will come out if you knit it the way the loops look. If you arrange the front and back loops in a checkerboard pattern, you will get “millet” - a simple pattern with an interesting texture. “Elastic band” is usually not used in scarves because it turns out loose. More often it is replaced with a more convex “English elastic band”. This is the most common type of knitted scarf. This pattern is often used for snoods.
Patterns and descriptions of knitting a scarf with knitting needles
You can knit an interesting scarf with knitting needles if you master the technique of creating openwork patterns. For men's scarves, it is better to master dense patterns with an interesting texture. It’s good for a child to knit a scarf with knitting needles and make a couple of crocheted decorations for it. Children love scarves with pictures and inscriptions. This is an opportunity to learn knitting from threads of different colors.


A lightweight scarf for summer, impressive with its shimmering colors and airy patterns, and is not knitted on the bias. Its pattern is constructed in such a way that the pattern appears to be shifted diagonally. To complete it, you will have to master the techniques of knitting combined stitches with a slant to the left: remove the loop, as in knitting, then knit one or two (depending on the pattern) knit stitches, through which the previously removed loop is pulled. All yarn overs, joined stitches and knit stitches are worked in knit rows. On the wrong side of the scarf, knit all the loops purlwise.
Men's snood
The men's snood scarf looks impressive thanks to its dense embossed pattern, which a beginner can easily handle. Simply knit a snood scarf on large knitting needles with a flexible connection. We cast on 180 stitches and knit with needles No. 6 in a garter pattern for 6 rows. Next, we knit a row with knit stitches, taking other working needles - No. 7. The work will move completely to another tool, on which you need to knit another row with knit stitches.
- 1st row: 4 p., 1 p., 1 p., 1 p., 3 p. – repeat until the end (to the marker);
- 3rd row: 5 l, 1 p., 1 l., 1 p., 2 l. – and up to the marker;
- Row 5: P6, P1, P1, P1, P1. – and up to the marker;
- Row 7: 7 p., 1 p., 1 p., 1 p. – and up to the marker;
- Row 9: 1 p., 7 p., 1 p., 1 p. – and up to the marker;
- Row 11: 1 p., 1 p., 7 p., 1 p. – and up to the marker;
- Row 13: 1 p., 1 p., 1 p., 7 p. - and to the marker.

And so on according to the drawing. Even rows are knitted according to the principle of “how the stitches look.” A circular men's scarf should be finished with smaller knitting needles. They need to knit transitional front rows and 6 rows in garter stitch. When working in a circle, you should knit a scarf pattern by changing the loops from row to row from purl to knit. Next, you need to close the scarf with knitting needles No. 6.
Children's scarf for girls
You can knit a scarf for a girl quickly and easily. A little needlewoman herself is able to master this kind of knitting work. The techniques you will need to knit a simple children's scarf are knit and purl stitches. The pattern is “chess”.

We start knitting the scarf from the narrow side. We cast on a number of loops that is a multiple of four plus two edge stitches. First, knit 4 rows using garter stitch. We knit the first row, turn the work and knit the second row again. We simply remove the edge loops onto a working knitting needle when turning the knitting. Do this for two more rows.
- Row 1: purl 4, knit 4 – to the end of the row.
- Row 2 – how the loops look.
- 3 row = 1st row;
- 4 row = 2nd;
- With tight knitting, the height of the square will be equal to 6 rows by 4 loops, which means we knit two more rows according to the pattern, and then change the loops:
- Row 7: knit 4, purl 4 – to the end of the row.
- According to the drawing, we knit 5 more rows and go again to the formula of the 1st row.
The ornament turns out to be double-sided, similar to the cells of a chessboard. If the daughter’s mother is an experienced knitter, then she will be able to crochet or knit a decoration - anything from flowers to chess pieces - and sew it on a scarf.
Another double-sided pattern for a scarf is a diagonal. You need to do it with knitting needles at first in the same way as “chess”, but from the second row you need to follow the loops and move them by one. When rotating knitting, you need to take into account that every even row we move in the opposite direction, and the stripes must go strictly diagonally. This scarf is easy to knit, and you can decorate it with tassels, pom-poms or fringe. To finish the scarf with two large pompoms, one on each side, you need to start knitting by casting on stitches on cotton threads. At the end of the work, you need to decrease the loops symmetrically on both sides until 4 loops remain. Next, pull them together, knitting them with one loop. Release a long “tail” from the thread (about 20 cm). Return to the beginning of the scarf, unravel the cotton threads and knit the loose loops with the main needles. You need to knit the same decrease as at the other end, pulling the last 4 loops and releasing the “tail”.
Next, we make two cardboard rings or take special plastic blanks, choosing the desired diameter. We wrap it tightly with the thread that was used to knit the scarf, cut it along the outer circle and slightly move the rings apart. Take the end of the scarf thread and tie it tightly around the middle of the threads between the rings. Remove the rings and fluff the pompom. Let's do the same on the other side.
If you don’t have cardboard or blanks on hand, you can knit a scarf with tassels. The brush does not require any additional materials. The left hand (for left-handed people, the right hand) will do, with a thick layer of thread wrapped around it below the fingers. Next, with your free hand, we slide this skein onto your fingers, pass a “tail” between the middle and ring fingers and wrap it around the skein with your free hand. Carefully move the skein from the hand and fold it in half so that the “tail” remains in the middle. Next, you need to very tightly tie all the threads of the folded skein with a separate piece of thread so that the head of the tassel is formed. Trim the loose ends. We make the second tassel on the other side of the scarf.