Boat neck
To build a pattern of a bodice with a "boat" neck, we will use the drawing of the base of the dress of a semi-adjacent silhouette. And you build on the basis that you will use when cutting.
You can, for example, build this neckline on the basis of a bodice with a one-piece sleeve. Or make a template for the neck of the “boat”, which will always be at hand.
If you have not yet built a dress base pattern for yourself, you will need this drawing in the future when mastering the modeling of various types and styles of clothing.
Let's copy on a blank sheet of paper the back and shelf of the bodice of the base of the dress. There is no need to transfer all letters and auxiliary lines. Copy only those letters and lines that will be involved in the construction. Look at our drawing below and the situation will become clearer.
For further construction, we need a separate back and shelf.
shelf
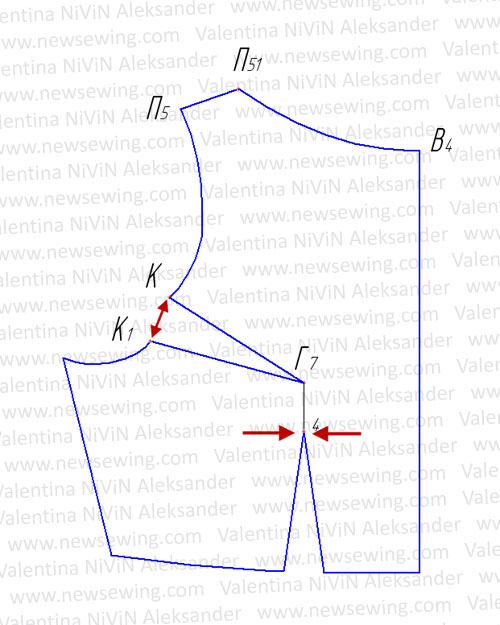
Let's start with the shelf.
At the time of construction, close the chest tuck and open it into a tuck at the waistline.
To do this, we connect the tops of the tucks (points G7 and 4) with a straight line and cut the shelf along this line. We close the chest tuck, combining points B9 and B7, thereby increasing the opening of the tuck on the waist line. See the picture below.

Rice. 2
From the point P5 to the right along the shoulder seam, set aside 5 cm and put the point P51.
We connect point P51 with a smooth curve to point B4 and get a new line neck front called "boat".

Rice. 3
As for the chest tuck, it must be returned to its original position, if the style of your product provides for this. But you must remember that this tuck can be placed anywhere on the shelf, adhering to the main rule: the top of the chest tuck should always remain in place (this is the G7 point).
You can see how to properly transfer a chest tuck in our section, where, as an example, we demonstrated several options for moving it.
In our example, we will open the tuck into the armhole. To do this, we put point K on the armhole line, the location of which determines the style of our product and connect this point with the top of the tuck, point G7.

Rice. four
We cut the shelf along the marked line and move it apart, returning the lower part of the bodice to its original position, aligning the sides of the segment from point G7 to point 4. See the figure below.
Rice. five
Do not forget to shorten the resulting tuck by 2 - 3 cm to achieve smoothness when processing the bulge in the chest area.
To do this, we shift the top of the tuck from the center by 2 - 3 cm and connect this top with straight lines to the ends of the tuck.

Rice. 6
Back
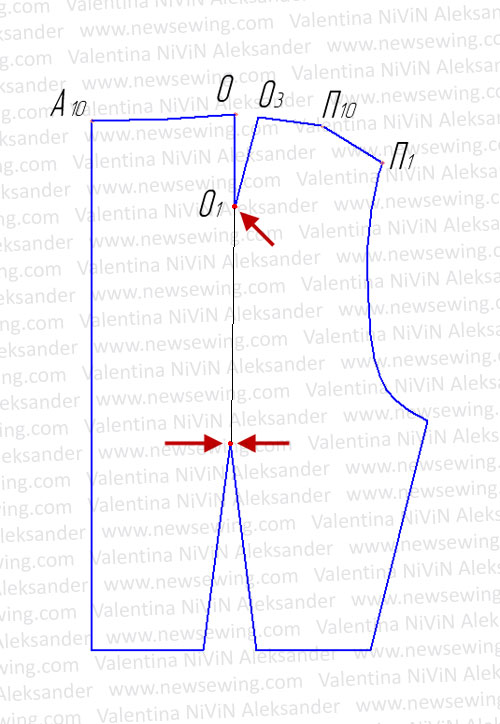
Here, too, everything is extremely simple. We take a drawing of the back.

Rice. 7
Just like on the shelf, for the time of construction we will close the shoulder tuck and move it to the tuck on the waist line.
Note
:
It is possible to move the tuck to another place for the duration of the construction, for example, to the armhole or to the line of the middle of the back.
The option we are demonstrating for moving the tuck is just an example. You can always proceed from your own considerations.
We connect the tops of the tucks with a straight line, these are points O1 and 1. We cut the back along this line and push it apart, combining the sides of the shoulder tuck. See the picture below.

Rice. 8
From the point P1 to the left along the shoulder seam, set aside 5 cm and put the point P10.
Set aside 1 cm from point A down and put point A10.
We connect points A10 and P10 with a smooth curve and get a new line neck backs called "boat".

Rice. nine
We return the tuck to its original position.
Rice. 10
This completes the build.
Note:
You can adjust the depth of the “boat” neckline yourself, guided by your tasks.
Given as an example, 5 cm, which we set aside from the edge of the shoulder, is a variable value, you can change it at your discretion.
The shape of the neckline is different. We will return to this topic in future articles.

Rice. eleven
Everything will work out for you!
Download in one file | turbobit | | |
The rights to this article belong exclusively to the author. Full or partial use of the materials of this article in electronic publications on the Internet is possible only if the following conditions are met:
Author information must be saved. In the title or at the end of the published reprint, the source www.website of the Internet resource "Sewing Master" with a direct, active, visible to the user, not closed from indexing by search engines hyperlink to this article should be indicated.
The publication of texts by newspapers, magazines or other replication outside the Internet is possible only with the written consent of the author.
(Size 46)
Sweater with long sleeves(fig. 40) is knitted from 650 g of white wool in stocking knit. To embroider the ornament, you need some light pink or lilac, dark pink, yellow, lilac, light green and dark green yarn. The knitting density horizontally is 2.2 loops per 1 cm, vertically - 3 rows per 1 cm.
The sweater pattern consists of five parts (Fig. 41): back, two sleeves, front and collar.
For knitting backrests Cast on 112 sts in a tight set and work 12 rows in stocking st. Then a 2 × 1 elastic band is made, lowering every 3rd loop to the initial row and raising it facial loop. After the elastic, the back is knitted according to the pattern.
For knitting sleeves Cast on 51 sts in a tight set and work 30 rows (10 cm) in stocking stitch. Rib 2x1 as on back and work 99 rows (33 cm) to underarm line, inc 1 st on both sides 9 times every 6 rows and 6 times every 5 rows. Then the okat is knitted, closing the loops according to the calculation. Leave loops for the width of the shoulder strap (see pattern) and, adding 1 loop on each side for the seam, knit it. The second sleeve is knitted in a mirror image.
For knitting front cast on 112 stitches and knit to the chest line, like a back, but 2 cm longer. The surplus is placed along the side seam when sewing the back and front parts at chest level. The loops of the armhole, neck and along the line of the shoulder strap are closed according to the calculation.
For knitting collar they pick up 28 loops with waste thread and, after knitting several rows, knit with stocking stitch 44 cm. Finish knitting with several rows of waste thread.
The details are steamed and embroidered according to the pattern (Fig. 42), given that 1 loop in the pattern is equal to 2 rows in height. Dissolve waste threads and sew the collar with a knitted seam. Sew details. The collar is sewn with a stitch on the pigtail.
Quite often, needlewomen have difficulty in calculating and knitting the neckline in models of their own composition. This is especially true for products with complex patterns. And often it turns out a completely uninteresting neckline, as they say, “neither mind nor heart” ... So the craftswomen are forced to knit all the same “square” or V-shaped neckline, as the simplest ones.
I will share with you my many years of experience and offer 3 very simple and effective options for knitting a neckline - a boat neckline, a deep oval neckline and a heart neckline.
It doesn't matter how you knit your blouse (or dress) - on knitting needles or on a machine. The trick I'm suggesting works great in both cases.
Let's start with the boat neckline.


The depth of the cutout on the shelf is standard for all sizes and is 7 cm. On the back - 2-3 cm.
The shoulder width in this case should be no more than 7-8 cm, otherwise the neckline will not look beautiful.
To get a beautiful “boat” line, you need to do simple calculations:
subtract 12 loops from the total number of neck loops - for example, 50 - 12 = 38. That is, you immediately need to close 38 loops (19 loops to the right and left of the center of your blouse).
Then complete the rounded edges of the "boat":
when knitting, you need to sequentially close the neckline 3, 2, 1 loops on both sides (12 loops in total - 6 on each side), and then knit the rest of the shoulder up in a straight line;
when knitting on a machine, the short row method is used, and the number of loops is the same - 3,2,1.
Deep oval neckline


The depth of this neckline is also standard for all sizes and is 20 cm. The width of the shoulder is 10-12 cm, depending on the size.
The principle of knitting is the same as in the previous case, i.e. the central part of the loops closes and then 6 loops are sequentially closed on both sides (3,2,1 loops). The only difference is the height of the notch.
Cutout "Heart"


I call this cutout shape "heart", but this is a rough name and you certainly won't get a clear heart shape. Yes, it is not necessary. And so beautiful and effective. In fact, this is a variant of the V-neck.
So, let's take a closer look.
Shoulder width - 10-12 cm, neckline depth - 20-22 cm.
Regardless of the number of neck loops and the depth of the cutout, the height of the "oblique" part should be approximately 1/3 of the total value. The main thing is that it is convenient for you to close the loops.
In our example, you need to close 20 loops, that is, close 2 loops 10 times in each even row (or through a row). Next, knit the shoulder in a straight line.
And at the end, "decorate the cake with a cherry." Here are simple but effective crochet patterns for tying the neck of your charming new blouse:

Creative success!
The shape of her neckline determines how the line of the chest, shoulders and neck will look. Boat neckline will visually expand the shoulders and emphasize the beautiful curve of the neck.
The boat neckline looks like a straight line.

Most often, the neck is knitted together with the main details of the back and front - this is a one-piece knitted collar.
We model the line of the neck of the back called the "boat".
As a basis, you can take any pattern.
Take for example the pattern of the basis from the article Ways to build patterns from different authors.
Or How do I make patterns.
And we draw a straight line from the shoulder.
But it should be remembered that this is a base pattern and the neckline is designed in it so that it passes strictly along the base of the neck.
If we draw the neck line clearly along the highest points of the shoulder, then the collar will, as it were, climb onto the neck. Therefore, you need to lower the neckline by 3 cm.
You can adjust the depth of the “boat” neckline yourself, guided by your tasks.
Given as an example, 3 cm, which we set aside from the edge of the shoulder, is a variable value, you can change it at your discretion.
For example, 5 cm. Let's designate it on the pattern.
The width of the strap can also be different.
The placket is usually knitted with an elastic band, but it is not necessarily possible to knit it with any other pattern that holds the edge - does not twist.
The bar can be knitted separately, then before we tie it only to the edge of the bar.
The strap is knitted separately and sewn to the main product.
But it is better to knit together with a shelf.
The same actions must be done with the pattern of the back.
You can not knit the bevels of the shoulder, then finishing knitting is just to close all the loops in a straight line.
What could be easier?
Now let's talk about secrets. Here, too, there is one little secret.
As a result of all the transformations with the pattern, it turns out that the back and front in the neck area are of equal length.
Very often it looks acceptable, and this is exactly what almost all magazines offer to knit. For beginners, I advise you not to bother and knit in this way.
But if you are not satisfied with the result and you have enough experience, then you can use the trick. The straight line of the neck of the "boat" in front - make it slightly concave - 2 cm.

Leave a straight line on the back.
Now a few models and ideas where and how this cutout can be used.
For example, here is a model
Here is the same “boat”, but the neck line is lowered quite low.
The line also captures part of the sleeve cutout.
The question arises immediately - How to determine at the sleeve how much cm to remove?
You need to measure how many cm from the bottom of the shoulder!
And you can tie the bar longer, and you get such a model.
Plank with an inflection.
Neck knitting is one of the most important points in the process of creating any sweater, jacket or dress. An inaccurately made, unevenly sewn or stretched neckline will spoil even a beautiful and original product. How to make it frame it, emphasizing only its merits? We will talk about this in today's master class! Our advice and step by step instructions will help you quickly and seamlessly learn to knit and process different kinds necks, and the finished thing will always look stylish and neat.
Option one: smooth edge
Such processing of the neck with knitting needles is universal: it is suitable for products for children, and for framing "adult" clothes.
To create it, knit all the cast-on loops in seven rows from l. P..
We turn the knitting inside out and gently, not tight, with the help of an overcast seam, sew the edge to the finished product.
From the wrong side of the inlay, it will look like this:
From the front side, the processing looks perfectly even.
Option two: decorative small zigzags
Another simple decorative neckline that even beginner craftswomen will be able to handle.
To begin with, we make seven rows of l. P..
The eighth row is done as follows: 2 l. p. vm. l..
Then we make a crochet, and again 2 liters. p.m., yarn over again, and so on until the end of this row.
Having reached the purl row, all the sts of the previous row should be knitted only with the purl ones.
Now we need another sp. as an auxiliary, on it we collect loops from a typesetting row.
Now the harness is folded in half along the pattern line. After that, the right sp. we capture the item from the far side ..
We put it on the joint, which is in front.
We knit from the front sp. 2 p.m. front (thrown and own). This will give us a row of small cloves.
This is how the processing from the inside should turn out:
Neck side:
Neck strapping: video master class
Option three: tying the neck with knitting needles using an inlay
This processing is the most popular and results in a solid neckline, so the binding is carried out with circular knitting needles.
On the side, along the neckline, we collect stitches from the row located under the hem.
On the okata, we pull them out with knitting needles from each subsequent p., But a row lower - in this way we smooth out the neckline.
Having reached the horizontal part, we draw out the loops from the hem with knitting needles. It is important to remember that, in order to avoid deformation of the cutout, you should skip every 5th loop.
Having finished the set of stitches along the entire length, we proceed to knitting in any usual way. You can, for example, do this with a 1 x 1 or 2 x 2 rubber band.
Option four: separate inlay (first method)
This processing is also universal for tying the necks of products for adults and children.
With ordinary knitting needles, we collect the number of stitches we need, then the “elastic band” for seven rows.
Now we compare two loops - from the inlay and from the cutout, we connect them using a free kettle seam.
We start it from the inside out, inserting the needle and thread immediately into the second loop, then we bring the needle out from top to bottom on reverse side through the first loop. Further, at the bottom we bring the needle into the third p., And from the front side to the wrong side into the second and further by analogy, thus connecting the frame and the cutout on both sides.
If we do everything right, the processing will look like this:
Neck with a kettle seam: video master class
Option five: a separate inlay (second method)
Another way to tie the neck separately.
We collect the required number of loops with knitting needles, then an elastic band 2 x 2.
Having made 7 rows in this way, we perform double knitting. We remove the first edge with knitting needles without knitting, yarn over, l. n. and so on until the end of the row.
In the next row, we remove those loops that are purl without knitting, always keep the thread in front.
Having reached the crochets of the previous row, we knit them with facial loops.
Flip knitting.
We continue further: reaching the crochets, we knit. from l. p., remove all other p. without knitting, always keep the thread in front. Having connected three more rows, we divide the knitting in half into 2 separate joint ventures. We close the loops on one of the sp. the way described above.
We smooth this part and the second one, which is still with open stitches, well. We put the parts one on top of the other and sew them with a stitch seam.
The part with open loops is sewn from the wrong side with the help of an overcast seam.
As a result, we get the following processing:
Option six: double inlay
We follow the smoothness of the lines.
After processing the part and making seams, we collect on circular sp. loops along the edge: we divide the edge into sections of 10 cm each, we collect sts at the rate of “number of sts + 3-4 sts”. Now alternate 2 l. n. and 2 and. item ("elastic band" 2 x 2) or 1 l. n. and 1 and. n. (“elastic band” 1 x 1), the number of sts is a multiple of four or, respectively, two.
Having connected the frame, freely close all the stitches, cut the thread, leaving a long tail. We fold the knitting in half, turn it inward and pin it with pins, sew the closed edge to the neckline.
Option seven: V-neckline (first method)
We start with a set of p., as shown in the photo below.
After a set of loops, you can start knitting an elastic band 1x1.
The height should be selected depending on the type of product.
Upon completion of work, all p. should be closed as l. n. On the cape, we sew the edges with a thread with a needle.
Option eight: V-neck (second method)
We carry out a set of loops in the usual way starting from the side of the shoulder.
In a circle we knit one row l. p., mark the corner p.. Then we continue, alternating l. p. and i. n., corners should account for persons. p., if necessary, here you can add or subtract additional p..
In all rows of gum, we remove the corner and previous stitches together, as with faces. knitting, and knit the next stitch with the front one and stretch the removed stitches through it..
We make an inlay of the width we need and close the loops. Corner reductions are performed as when fixing the eyelets.
Tenth variation: with inlay and Italian edge
We start, like a double inlay, but for the elastic we knit 1 x 1, alternate l. p. and i. P..
In the last 4 pp. take sp. half size down and length. knit the neckline.
In the first of the last 4 pp. every l. we remove the item, as in the case of persons. elm., and we stretch the thread for p..
I. p. as well as. P..
In sl. r., each and. we remove the item, as with the worn out. elm., and stretch the thread in front of p..
L. p. as l. P..
Once again, rep. these two r. and fix p. last. R..
Variation eleventh: processing "boat" with an elastic band
We process the neck with an elastic band. A scheme is being made-the basis of the back, on which we draw another line and a finishing plank, 6 cm wide. The scheme of the front is similar.
We knit the front and back "squares" to the finishing plank, then - an elastic band 1 x 1 or 2 x 2 for 3 cm, changing the joint number. through every 2-3 p. from larger to smaller, now change sp. from a smaller number to a larger one at the same intervals. We complete the bar several. R. auxiliary. n. and, without closing p. p., remove knitting from the sp..
We do the same with the front part, then we sew them over the shoulders, fold the plank in half, baste, then the “boat” is sewn with a stitch seam to the wrong side of the product.
Variation twelfth: "boat" stocking stitch
A product diagram is made, on which we draw a new cutout line and a plank of 2.5 cm.
Upon completion of the main work, knit. 2.5 cm stocking knit., then several. R. auxiliary thread, we do not close the item, we remove the work from the cn. and make the front. The swept boat is sewn with a kettle seam, without passing the needle on the faces. side of the product - we capture only half the thickness of the thread.
Closing the neck loops: video master class
We will be glad if today's lesson will help you in your work. Smooth loops!