Interesting idea For New Year's decor windows DIY reusable snowflake stickers made from PVA glue. Making such snowflakes is no more difficult than cutting them out of paper. PVA snowflake stickers turn out transparent when dry, which means that during the day they do not block the view from the window, and in the evening they flicker and are illuminated beautifully.
How to make snowflakes from PVA glue on windows
For New Year's snowflake stickers you will need:
- stencils for drawing
- clear files or other plastic base
- PVA glue
- syringe without needle
- tassel
- glitter or glitter nail polish
Snowflake stencils should be placed in files and a thick layer of PVA glue should be outlined over the transparent film. The most convenient way to do this is by drawing glue into a syringe.

Note: It is better to take designs for stencils without many small “internal” parts and rather large ones, since the glue spreads a little and you can get a solid transparent spot instead of an elegant pattern. Next, if desired, you can sprinkle the stickers with glitter.

We put the drawings in a safe place to dry. After drying, the PVA glue becomes transparent and can be easily removed from the sheet. Now all that remains is to carefully paste the homemade stickers on the New Year's window. If they don’t stick well to the window, lightly wet the snowflake with water.

Note:
It doesn’t matter if the picture is blurred in some place while drawing; after drying, it can be easily “corrected” with scissors. PVA glue is easy to cut when dry. For the same reason, it’s not scary if the baby goes beyond the edges of the picture when coloring the sticker or smearing the glue - all the excess will be cut off.
Snowflake stencils


Before the New Year, windows are painted in kindergartens. Perhaps the patterns on the glass are not quite your style... Mom has exquisite taste, and it’s not easy to wash all this beauty later. But there are at least two reasons to turn a blind eye to how “beautiful” it is: children simply adore this and Santa Claus certainly won’t fly past your window (well, he likes all that stuff...). And one more thing: we offer you original ideas, so painters, dip your brushes and have fun!
Source: Shutterstock
Once upon a time they painted on windows with toothpaste, but here magic happens! So, take gouache (it is also easy to wash) with glitter or special stickers - and go ahead! And, yes, about windows: follow safety precautions! By the way, take a break for tea, and when you return, you will find a gift on the windowsill with the inscription: “Impressive! Keep it up!"
Ideas for gifts that “landed” on the windowsill:
- Can of artificial snow
- Socks with toes
- Glowing plasticine

Source: giphy.com
Assignment for parents:
A child under 3-4 years old will probably want to continue the “banquet” on the walls... The ideal option is to attach sheets of whatman paper around the perimeter of the apartment so that the child can draw plenty of pictures. Isn't there such a possibility? Designate a specific place where you can do this. This is a “disgrace” from the point of view of the grandmother and the neat mother useful thing from the point of view of psychologists. And even necessary for the development of creativity, a sense of the significance of one’s own “I”... Thus, the child tells the world: “I am!” If you already forbid drawing on the walls, then immediately show where you can turn around.
Assignment for the child:
Together with mom and dad, decorate the window so that Santa Claus will never fly past! We have prepared 8 for you best ideas that will help create a fabulous atmosphere in your home. Don’t waste time - start pleasant chores now.
Snowflakes made from PVA glue
For New Year's snowflake stickers you will need:
- stencils for drawing
- transparent files
- PVA glue
- syringe without needle
- tassel

The huge advantage of such snowflakes is that PVA glue is non-toxic, so you can make as many of them as you like. In addition, such stickers turn out to be transparent, which means that during the day they do not block the view from the window, and in the evening they are beautifully illuminated and flicker.
PVA snowflakes can be used several times: they are easily removed and glued back, and do not fall off the window. And if you decorate them with colored sparkles on top, the window will turn out simply fabulous!
How to make snowflake stickers from PVA with your own hands, watch the video instructions:
- After you have drawn the snowflakes, put them to dry in a place where no one will touch them.
- When the stickers are dry, remove them from the sheet and stick them on your New Year's window.
- If the snowflakes become a little blurred during the drying process, do not worry: this can be corrected with nail scissors, cutting off the uneven edges.
Paper snowflakes
This method of decorating New Year's windows has already been proven over the years, but that doesn't mean it's boring! The pattern of paper snowflakes can always be varied, and to create them you only need scissors, napkins (or White paper), thin tape and imagination.

Source: Instagram @yuli_palna
You don’t have to cut out just snowflakes from paper: you and your child can create a whole fairy-tale composition on the window! Take white A4 sheets and cut out houses, Christmas trees, a month, stars, animals from paper!

Source: Instagram @katagera
Certainly, Small child will not be able to cut out very complex patterns and snowflakes of bizarre shapes. Start with simple patterns, and if your little one gets it right, show him how to complicate the drawing!
We offer several of the most simple options snowflakes for children:
Garland on the window
If you don't like peeling tape off your windows after the holidays, you can decorate it with a beautiful New Year's garland. For example, use the same snowflakes, but string them on a fishing line and attach them to the cornice.

Source: themissidea.blogspot.ru
You can cut out stars or Christmas trees from old newspapers and magazines or colored double-sided paper and hang them on a thread from the curtain rod or curtains.

Source: Instagram @mamavkurse
A more colorful option would be to use a large driftwood on which you can hang various garlands. Such a decoration will look very beautiful in the kitchen and make its interior very festive.
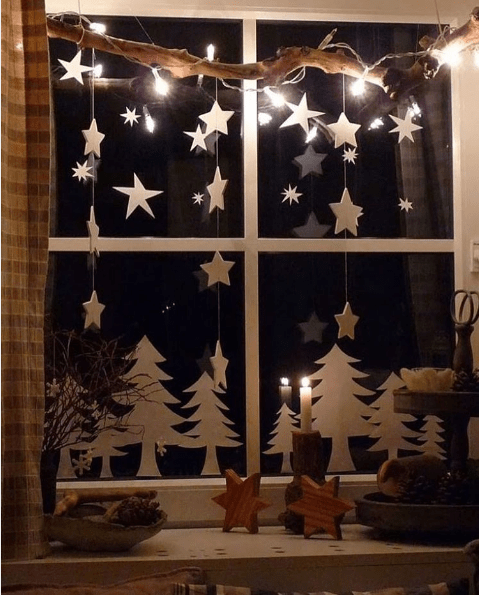
Source: Instagram @all4mammy
You can also use children's New Year's crafts or drawings as decoration. Simply stretch a rope along the window, secure its ends to push pins and hang any decor that fits into your interior on small wooden clothespins.

Source: plus.google.com
Decoupage technique
Window decoration using the decoupage technique looks no less beautiful. To do this you just need to buy New Year's napkins(you can just use white ones), cut out beautiful patterns and stick it to the window. In this case, you do not need to use decoupage glue; it will be enough to make a thick sugar syrup and apply it with a large brush on top of the napkins. The pattern will last!

HOMEMADE SNOWFLAKES FOR WINDOWS FROM PVA GLUE Using ordinary PVA glue, you can create beautiful window stickers. A huge plus is that you can involve children in the process, since PVA is completely non-toxic, comes off easily, and if applied without sparing, it is not fragile, and such stickers can be used many times. The stickers are transparent. Due to this, during the day they do not interfere with the view of the street, and in the evening they are beautifully illuminated by street lights and flicker “icy”. You can decorate the stickers with sparkles, then they will turn out colorful and shiny. So, the manufacturing process. We print a sheet with a stencil in advance, insert it into the multifora (file), place it on a hard surface, it is better to take PVA glue with a dispenser or pour it into a syringe and apply a pattern on top of the film/multifor/file. The stencils must be placed in a multi-form and a thick layer of PVA glue should be outlined over the transparent film. The most convenient way to do this is by drawing glue into a syringe. Make sure that the glue is not applied flatly, but rather in a thick enough layer: even a very thin pattern can be removed from the film without breaking, but if desired, it will be more difficult to remove it from the window. That is, the thicker the PVA layer, the more convenient it is to use such a “sticker”. Next, we put our drawing in a safe place to dry for 24 hours or overnight, and after they dry (the glue will become completely transparent), we remove our sticker from the film - it comes off very easily. Apply it carefully to the glass and smooth it out. Nuances: It is better to take drawings without many small “internal” details and rather large ones, since the glue spreads a little and you can get a solid transparent spot instead of an elegant pattern. Ideally, these should be completely filled in shapes, like Christmas trees, balls, etc. This is especially true when working with children. If necessary, the stained glass window can be easily removed from the window, you just need to slightly pick it up with your fingernail and carefully separate it from the glass, BUT, if you have previously ventilated the room or your window is very frozen, the thin pictures will break. In this case, you need to wait for the window to warm up. The same thing happens if you added glitter glue to PVA or painted over the sticker - it becomes more fragile. It happens that the sticker sticks too well to the window: try moistening it with a damp cloth and wait a few minutes. PVA is done on water based, so the easiest way is to “soak” it with water. If the sticker begins to stick poorly to the glass, just moisten it a little from the inside (pass it over a wet cloth), and it will stick perfectly again. It doesn’t matter if the picture is “blurred” in some place; after drying, it can be easily “corrected” with scissors; PVA is easily cut in a dried state. For the same reason, it’s not scary if the baby goes beyond the edges of the picture when coloring the sticker or smearing the glue, all the excess will be cut off. You can mix glitter and a little paint into the glue, but do not overdo it - the stained glass may become more brittle. You can also sprinkle glitter on the finished drawing and make small “stains” of paint.
And festive paraphernalia always helps us to plunge into its fabulous atmosphere - a Christmas tree, shimmering garlands, sparkling balls and other beauty. In this master class, I will tell you how to quickly and easily make a snowflake from glue with your own hands, which will decorate your New Year's interior.
Glue snowflakes: materials for making
Snowflakes made from glue are easy to make and look very beautiful. Their main advantage is that they can be given any shape, size, color and texture. As a result, you will have an original and exclusive Christmas decoration. And you will undoubtedly enjoy the creative process.
In order to make a snowflake we will need the following materials:
- Glue gun and sticks for it.
- PVA glue.
- Baking parchment.
- Sequins (can be any color and size).
- Snowflake stencils.
- Brush.
- Narrow satin ribbon.
How to make a snowflake from hot glue
Step one: cut a piece of parchment and place it on top of the stencil of snowflakes you like.

Step two: heat up the glue gun and use it to draw a snowflake on the parchment along the contour of the stencil.

If you don’t have a glue gun on hand, the snowflake frame can be made from regular PVA. The only thing is that it will take much longer to dry, and the snowflake will not be very voluminous. Although this can be easily corrected if, before applying glitter, the first layer is made of ordinary table salt.
Step three: wait until the glue dries thoroughly. This takes approximately 15 minutes. Afterwards, carefully separate the frame of the snowflake from the paper.

Step four: remove the thin cobwebs that formed during the work process. This is what happened in the end.

Step five: move on to decorating the snowflake. Using a brush, apply PVA glue, one by one, to each segment. And immediately sprinkle it with glitter. I used white, silver and blue. This needs to be done on both sides. Then let the glue dry a little.


Step six: tie a satin ribbon to the resulting snowflake and decorate your Christmas tree.

Using this principle you can make a lot of snowflakes in uniform style. They are perfect for creating New Year's compositions - wreaths from fir branches, and other crafts.
We congratulate you on the upcoming holidays and wish you creative success in the New Year!
Unconventional technique for drawing Snowflakes in kindergarten
"Snowflakes - cold ones." Performing work using PVA glue and bulk material.
Shishlakova Elena Yuryevna, teacher of the highest category, Ostrogozhsky Preschool Educational Institution of Higher Education Center for Psychological, Pedagogical, Medical and social assistance children preschool age", Ostrogozhsk, Voronezh region.
Description: This master class is intended for preschool children, teachers additional education, preschool teachers and creative people.
Target: drawing snowflakes using PVA glue and bulk material.
Tasks:
- teach children to make drawings using PVA glue, applying glue from a tube to the lines of the pattern;
- to form emotional responsiveness to the beauty of winter nature;
- develop hand-eye coordination, attention, perseverance;
- cultivate accuracy in working with glue and bulk materials (sugar).
Equipment:
- white cardboard;
- pencil (plain or blue);
- ruler;
- PVA glue;
- bulk material (sugar).

M. Mishakova
Snowflakes are dancing:
They fly, they spin,
In the sun
On a frosty day they turn silver.
Openwork dresses, carved scarves...
A magical winter miracle - snowflakes.
Tiny ice crystals of intricate, unique shapes that every winter generously gives us - that's what snowflakes are. The mystery of this amazing miracle of nature has long attracted inquiring minds.
Snowflakes are formed from water evaporation. Tiny droplets of low temperature and humidity condense high in the clouds. They encounter specks of dust floating in the air and join them. Thus, what snowflakes are made of are dust particles (crystal nuclei) and small ice particles that gradually grow around each of them. As the future snowflake sinks to the ground, more and more ice crystals join it, while maintaining its distinct hexagonal shape. Convex areas of the crystal grow faster. Colliding with supercooled droplets along the way, the snowflake continues to grow. Having reached a critical mass, it falls down to the ground.

Safety precautions when working with PVA glue.
1. Work carefully, trying not to drip glue.
2. Try not to get the glue on your clothes, face, or especially your eyes.
3. If glue gets into your eyes, rinse them well with water.
4. After work, close the glue tightly and put it away.
5. Wash your hands after work.
Stages of work execution.

Draw snowflakes on a sheet of paper.

Apply PVA glue from a tube over the drawn snowflakes, drawing each line. Children easily do this work and they do it quite neatly.

After the snowflake is completely drawn with glue, we cover it with sugar. I decided to use sugar as a more gentle material, because... Children always like to taste everything, and it’s better to let the sugar crumble than the salt.

When the snowflakes are well covered with sugar, you can immediately shake the sugar onto the tray, because The sugar begins to melt and spread.
This is how snowflakes turn out.


To give snowflakes a brighter color, you can use paints. To do this, when we shake off the excess sugar, carefully paint the snowflakes with a brush, or use a pipette to apply droplets of paint onto the rays of the snowflakes.
This is the result.

You can experiment with different backgrounds.


But I like the white background better.
Works completed by my students!


Thank you for your attention! I wish creative success to you and your students!