The holiday is just around the corner, so we offer you gift wrapping ideas for New Year 2020.
Every year, the design of a New Year's surprise ranks far from the last place. Individuality can emphasize the value of a gift.
And it’s more pleasant to receive a surprise not in a store-bought package, but in one that has its own “zest.”
Current trends 2020


Currently, the following areas of gift wrapping have become very popular:
- Eco-style;
- Minimalism;
- Eclecticism and futurism.
When wrapping a holiday gift in an ecological style, natural tools are used - natural shades, different textures and nothing artificial.
Often they use craft paper, tied with a bow made from ordinary rope, decorated with natural elements - flowers, pine cones, fir branches.


Minimalism is rigor and restraint. There should be a single thought here - simplicity.
When decorating, a minimum of elements is used, for example, the gift is wrapped in ordinary paper, and a small tag indicating the name of the recipient acts as decoration. 

Futurism and eclecticism are suitable for those who like to combine several directions at the same time.
This could use a fancy satin ribbon bow and paper decoration, or a fabric box with a small decorative pin.


So, in order for the surprise design to be unforgettable and fashionable, you need to apply style and be attentive. The initial result depends on the quality.

Original boxes in hand-made style

The most popular method of presenting a holiday gift is a cardboard box. It's very easy to do:
- You can find a template on the Internet or draw it yourself on a piece of cardboard.
- Cut the workpiece and assemble it according to the lines on the diagram.
- Glue the box where necessary. It is better to use double-sided tape, as it does not leave marks or smudges.
- Decorate the box. If used decorative stickers, it is recommended to glue them before assembly. Dry the box and you can put in a surprise.


Such a box can be of absolutely any shape, for example, a pyramid or even candy. Let's look at the process of making candy. For this you will need:
- Colored cardboard;
- Pencil and ruler;
- Stationery knife;
- Sample;
- Glue;
- Thread.

So, in order:
- Let's transfer the candy stencil onto the cardboard.
- Cut along the contour lines, make slits stationery knife.
- Press firmly along the folds with a ruler to create a crease.
- Place a surprise in the center of the workpiece and wrap it up.
- Tie neat bows at the twisting points.
You can also make a box in the shape of a piece of birthday cake. To do this, you will need a thick colored canvas or thin cardboard, a ruler, a pencil and glue. You won’t spend more than 30 minutes making it.

Transfer the template to paper of the color you like. Cut out the blanks and bend along the marked lines. Glue the box together, then start decorating.
Beautifully wrapped
We know how to make boxes, all we have to do is learn how to beautifully seal the gift with our own hands.

You can limit yourself to just a box, or you can make something interesting. The packaging should look neat - all cuts are smooth without traces of glue (as mentioned earlier, you must use double-sided tape). She must completely hide the surprise. Don't forget about the name card - this is the part of the decor that always catches your eye.
Sequential packaging steps:
- The box is wrapped in paper and the places where it needs to be cut are marked. Trim, leaving a margin of a couple of centimeters.
- Tape the long edges on both sides.
- Fold the short edges into a trapezoid and glue with double-sided tape.
- Do the same on the opposite side.

This is a classic wrap, then let’s look at the packaging in the shape of a Christmas tree:
- Place the surprise closer to the edge of the paper.
- We bend the bottom edge of the paper, enveloping the gift.
- Then we bend the sides to the ends.
- You will get various valves in the form of triangles.
- They are folded in such a way as if a pigtail is being braided.
- We glue the upper triangle with tape and decorate the packaging.
Let's look at a few more original ideas for presenting holiday gifts.

This year, polka dot print is considered very fashionable, why not make it yourself on gift wrapping? It's incredibly simple:
- Prepare a pencil with an eraser on the back side and white paint (by the way, the print can be in the shape of a heart, and the color of the print can be red or any color of your choice);
- Dip the rubber band into the paint;
- Make an imprint on gift paper. Continue applying the pattern in random order.


Paper feathers
A simple paper design, decorated with feathers, acquires style and originality. Feathers are also made from sheets of old books or wallpaper.

Glitter and chic


By replacing the usual craft paper and decorating it with glitter, the result will be very unusual. Artificial fir branches and name tags are used for decoration.

Laurel wreath
Craft boxes decorated with laurel wreaths look very unusual and original. For fixation, use a regular rope.
Spruce branches
This type of gift presentation is suitable for people with delicate taste. The gift, wrapped in black wrapping paper and decorated with fir branches, looks very festive.

“Winter” drawings The box is wrapped in black wrapping paper and pictures with a winter or holiday theme are drawn on it with a white marker or corrector.
It looks extremely unusual.


Banks
Presents in glass jars. A small amount of cotton wool, hay or polystyrene is placed at the bottom of the cans. The necks of the jars are decorated with ribbons, bows, tags or sweet candies.
Looks very interesting next option: cut out a stencil of the symbol of the year, stick it on a jar, paint it in the color you like and peel off the stencil. The result will be a bright jar with a picture of a dog.

This packaging is perfect for lollipops. You can glue a small figurine of the symbol of the year to the lid and decorate it.
Textile
The fabric design looks more than unusual. 
This is a combination of style and home comfort. Surely in every closet there is a piece of unnecessary fabric.
Knitted material is more suitable. And it won’t be difficult for needlewomen to knit a small piece for decoration.
Unusual packages
An unnecessary or damaged book will be an original way to seal a surprise. The finished bags can be decorated with a piece of lace or sparkles. Secure the bag in the original way with a regular clothespin.


If your gift doesn't fit the box, put it in a cute bag.


You can also assemble the gift yourself into a beautiful box.


Star
Paper stars are very original way presentation of New Year's surprise. Plain and kraft paper is used for creation. You will also need minimal sewing skills.
A star template of the required size is cut out of paper, and a gift is placed in the center.

New Year's tinsel is used to create the volume of the star. Next, the paper layers are stitched together.

Burlap packaging
Burlap is a combination of originality and style. Everything is done very simply. The gift box is wrapped in burlap and secured satin ribbons or bows.
You can also make bags of different sizes from burlap and put surprises in them.

The smell of the holiday
There is nothing more original than giving a gift with a festive scent that will smell fragrant even after the New Year. To do this you will need a mixture of aromatic herbs (basil, thyme, rosemary and others), a piece of fabric and glue.
You need to cut a piece out of the fabric and lay out the herbs. You can either collect it in a bag or stick it to a gift box.

Packaging for children
New Year - family celebration. But children value gifts most of all. For children, you can cut out various New Year's animals.
You can make a snowman using a plastic plate, ribbons and buttons and attach it to a gift box. It looks very original. You can make Christmas trees or snowflakes from the tubes. 

You can also decorate the box with some flat figurine. Can be made from fabric Christmas balls, stars, garlands and so on.


It would be very original to attach edible cookies to the gift. Children will enjoy it even more.


A child will love a New Year's gift wrapped in a boot or stocking. You can buy it in a store or sew it yourself. Decorate with beads, snowflakes and small holiday snowflakes.


So, the article discusses a large number of gift wrapping ideas for the New Year. To make it you will need available materials and a little time. The result will be an original and stylish gift that will delight friends, family and relatives.
Any gift wrapped with your own hands looks elegant and unusual.
New Year is a magical time for both children and adults, because everyone loves to receive gifts, regardless of age or profession. Some people prefer practical gifts, some to make their soul happy, while others like the financial equivalent of attention. However, any New Year's gift requires colorful and bright packaging. Otherwise, what is the holiday atmosphere like?
Modern styles in New Year's packaging
You can wrap a gift both in the store and at home. At the same time, it is not necessary to have special skills. This is especially true if there are a lot of presents: it is much more economical to purchase a roll of wrapping paper and ribbon to decorate them beautifully for all family members and friends.
At the same time, you can fully demonstrate your creativity and imagination.

Red, green, gold and silver colors remain relevant for New Year's gift packaging. But you shouldn’t stop only at them. The color can be any if the ornament contains the symbols of the New Year.

They look very interesting creative packaging in Eco-style from plain brown paper and even from newspapers. The main element of such a composition is decoration. This could be an unusual bow, rough burlap, linen ribbon or natural materials.

As decorative elements you can use spruce or pine branches, cones, simple twine, branches with berries.


Check or stripe is also relevant.

Decor in Retro style looks very unusual; it gives the gift a touch of solidity.


And here . Pastel colors and soft shapes are used here.

Can be used for decoration artificial materials, they can be purchased at the store for . These are artificial berries, Christmas trees, flowers and branches.


Materials for scrapbooking will also come in handy - you can use paper cuttings and stamps with New Year's symbols.

You can decorate a gift and sign it by hanging a label like this on it.

On the eve of the upcoming holiday, you should think about what gifts you can please your friends and loved ones. An excellent solution would be handmade candy gifts for the New Year 2018. Sweets will please everyone and will complement the numerous decorations in the house, maintaining the appropriate atmosphere.
First of all, in New Year's Eve You can’t do without the foamy splashes of champagne accompanied by the loud chimes. However, the bottle will not look so monotonous and will create a real sensation if presented in appropriate packaging. For example, by disguising it as a tropical fruit - pineapple, one of the favorite treats on festive table this time of year.
To create such a gift, in addition to a bottle of champagne, you will need:
- candies in golden wrappers, approximately 70-90 pieces;
- aspidistra ribbon (can be purchased at a florist store);
- a little sisal fiber to taste;
- glue gun
You can take more sweets by offering them to guests for tea. If you don't have a glue gun at home, superglue can replace it, but it's worth buying several.

First you need to remove the tails. They should not be cut off. It is enough to bend them to the back of the candy and place them on hot glue. You must work extremely carefully, as you can get burned.

Don't apply a lot of glue. Excess of it will give the gift an untidy appearance, in addition, the candies may melt. After bending the tails, it is recommended to give them time to dry, and then put the candies in the refrigerator so that they do not lose their shape and do not flow, because in the future you will need to apply hot glue to them again.

As shown in photo 4, a drop of glue should be applied to the very tip. For convenience, you can iron the candy with a pencil, but do not put too much pressure on it so as not to flatten it.

When the preparations are finished, you can start decorating the bottle. Approximately in the center reverse side You need to apply glue to the candy, and before it hardens, press it to the bottle. It is recommended to start from the bottom, leaving no gaps between the sweets. To hide all the glue protrusions, you can add sisal fibers. They will also make the pineapple look more natural.


Photo 8 clearly shows which part of the bottle should be left untouched. Using yellow sisal, all the gaps between the sweets are filled. This stage is not necessary, but it will give the gift a more elegant look.

Then the tape is cut into pieces of approximately the same length. Instead of tape, you can use corrugated paper or other materials to your taste. The edges of each segment should be sharpened.

It is recommended to start gluing the leaves from the very top, in the center of the cork, gradually moving down towards the candies. The top of the lush pineapple tail is formed from four pieces of ribbon. Next, it is pasted over with four more sheets, spreading them in different directions and adding splendor.


At the next stage, glue the neck, covering it with sheets. It will take about seven tiers to convey realistic foliage. You shouldn't do more, otherwise it will look too bulky.


To finish, you can tie the neck with light sisal or make a bow with red ribbon to soften the transition from greenery to treats. At this point, the New Year's surprise gift is ready.

Christmas tree made of candies
The next original and easy-to-make sweet gift will be a small Christmas tree. This is an excellent solution, because such a tree will not fall off, will retain its appearance and will be pleasing to the eye even after the end of the holiday week.

To create such a beauty you will need:
- thick cardboard for the cone;
- candies in golden or any other wrappers;
- thread with beads of the same or contrasting color;
- PVA glue or other glue at your discretion;
- thin double-sided tape;
- scissors.
It is worth noting that this master class will not require them; however, thanks to the example in photo 16, you can more easily determine the desired diameter of the tree.

At the first stage, a blank for the cone is cut out. You can purchase a ready-made foam plastic cone in the store or pre-cut the base from paper, and then attach it to the cardboard and cut along the contour, thus reducing the risk of spoiling or carelessly bending the material.

You should not make a cone out of paper, as it will not support the weight of the sweets. After rolling up the cardboard, secure it with glue at the edges and leave to dry for a while.

Then, using double-sided tape, paste the resulting figure with candies. IN in this case they have a pyramidal shape, but you can choose the most ordinary sweets and glue them onto one of the tails of the wrapper. It is important to place the sweet treats evenly, starting at the very bottom of the cone and gradually working your way up to the top.


Since the cone is pointed towards the top, with each new tier you add, you should reduce the number of candies by 2-3. IN last row There will only be 5-6 candies left, but less is possible. The main thing is that the tree does not look bulky.


The top of the Christmas tree is traditionally decorated with a star. You can use one of the elements of the Christmas tree garland, buy a ready-made figurine, or cut it out of cardboard, paint it with varnish, acrylic, or wrap it in foil.

Upon completion, a string of beads is pulled between the rows of candies, securing it in places with glue. Additional decorations are selected at your discretion. This concludes the master class.


Sweet Christmas tree with tinsel
As an alternative, you can consider sweet Christmas tree, decorated with green tinsel. This gift will be a wonderful decoration for your home, leaving behind expensive artificial trees.

To create you will need:
- cardboard or thick paper;
- tinsel (one turn should be enough);
- thin double-sided tape;
- regular tape or glue;
- oblong sweets in multi-colored wrappers;
- scissors.
Based on the previous master class, you need to cut and glue a cone from cardboard. Its edges are secured with glue or tape.

Then, along the very edge of the base of the cone, a strip of tinsel is glued using double-sided tape. To ensure that it holds well, it is recommended to iron it several times with your fingers, pressing it against the cardboard, and then fluff it slightly. Next, a new strip of candy tape is placed on top of the tinsel tier.

They are attached to the very tip of the wrapper. The main thing is that in the end the layer with sweets slightly, but not completely, covers part of the greenery. Sweet treats are placed as close to each other as possible to fit as many as possible, but as mentioned earlier, with each new tier their number will decrease.

The tinsel should be glued so that it covers the tails by which the candies are hung. In this way, holes can be avoided. There can be 5-6 such tiers in total. For additional fixation, you can grab the candies on top with regular tape. Upon completion, 3-4 candies are glued to the top and wrapped in tinsel. At this point the Christmas tree is ready.

In general, you can make various sweet gifts for the New Year 2018 with your own hands. Having mastered the technique of creating amazing animal figures from sweets, you can surprise your friends by giving them a gift in the form of the patron of the coming year.
For example, this funny dog. It can be based on either a cone or a cylinder. Paws and other additional parts are formed from candies and glued to a ready-made base. She can also hold some kind of bag or box.

The most desired New Year's treat for children will be a sleigh with chocolate Santa Claus, because they are 100% made from delicacies that can be eaten. If previous gifts could serve as excellent decorative elements, then this gift should first be tried out.

For this set you will need:
- striped candies as skis;
- a large chocolate bar or a set of chocolate sticks;
- chocolate slices in wrappers or bulk candies;
- Santa Claus figurine;
- wide decorative ribbon;
- ready-made bow for decorating gifts;
- glue gun or double-sided tape.
You can use any other treats that your child will definitely like. The top of the sleigh can also be topped with a chocolate surprise egg. This will surely make the baby happy.

First you need to create the base of the sled. To do this, the lollipops are placed with the curved ends up, and a chocolate bar is placed on top of them. In this master class, all the elements are placed on hot glue, but it will be much easier for the child to take the desired treat if it is glued with double-sided tape. It doesn't grab the treats as tightly, thus reducing the risk of damaging them when trying to peel them off.

At the next stage, sweets are smoothed over the chocolate. They should be smoothed out like a pyramid, reducing the number by one with each tier until a small mound is formed. The most delicious candy is placed on top of it.


At the last stage, the sleigh is tied with a ribbon, a bow is glued on top and Santa Claus is placed in front. In this case, two pieces of tape were used. First, their ends were glued together, and then the tapes themselves were glued together in the center.

If desired, you can place it in the center of the sleigh chocolate egg with a surprise. To do this, you should lay out stable high sides of the chocolates along the edges of the chocolate bar, and then place an egg there and fill the sleigh with various gifts. In this case, a ribbon with a bow will be inappropriate. A sweet figurine of a puppy can keep Santa Claus company.
Bouquet of sweets
As New Year's gifts You can make several delicate bouquets from sweets with your own hands for dear women, to please your mothers, grandmothers, girlfriends and daughters.

To create you will need:
- several round sweets with or without golden wrapping;
- corrugated paper of two colors to taste;
- several pieces of wire depending on the number of colors and their sizes;
- decorative wrapping paper (as needed);
- scissors large and small;
- Golden thread;
- glue gun

The first step is to wrap the candies. For example, if they turned out to be from a set. Regular foil will do for this, or you can purchase decorative paper. The photo shows how to properly wrap the candy. It is important to pull the thread tight.


Then cut out two squares from pink paper, fold them in half vertically and smooth one corner a little with scissors almost to the middle. Thus, the basis for the bud was obtained.


At the next stage, the candy is carefully placed in the center of the workpiece and the edges are folded, placing one on top of the other. The bud is fixed with a thread.


After this, the workpiece is applied to the bud and everything is grabbed with a glue gun. You should not use too much hot glue, as too much will ruin the whole impression of the flower.


All that remains is to plant the flower on a piece of wire and use a thin strip of corrugated paper give it its final look.


Making your own gifts can be challenging at first, but with patience and practice you can achieve truly impressive results. Making sweet gifts and other New Year's attributes can be a wonderful hobby and a start to self-development in the field of handicrafts.
Watch the video on how to make a bouquet of sweets:
A universal selection of gift ideas for any occasion and occasion. Surprise your friends and loved ones! ;)
Greetings to all of you, dear audience. Holidays never end for us all our lives - as soon as Someone’s Birthday has passed, the New Year has already arrived, and then there are other winter-spring holidays... And for each of them we give gifts that we want to present at least interestingly. And what if not a DIY gift box will help with this?
I myself really like to congratulate my relatives in an original way. It’s very nice to see the smiles of those you congratulate. And cute boxes always contribute to this! After all, they are the first thing that catches your eye when presenting a gift.
How to make a gift box with your own hands
Gift packaging can be very diverse. But there is one rule - the cardboard or paper from which you want to make a box must be of the required quality. Classic in this sense children's cardboard Not all fit.
Where can I get such cardboard or paper? First of all, in specialized stores for creativity or even scrapbooking separately. It’s good if there is such a store in the city, you say, but what if you don’t have one at hand or the prices are sky-high?
These leaves will be enough for you to make small souvenir boxes (for jewelry, sweets, toys, etc.). Your family will appreciate it
And now I suggest you proceed to the actual detailed photo master classes, which will also include a diagram for creating each individual box.
Master classes on creating boxes from cardboard and paper
Small boxes
First of all, I want to give you 5 designs with very cute patterns that will make this wonderful packaging:

The first one has red roses. If you want to impress your lover, then she is definitely for you.
Principles of working with templates:
- Print the layout you like on thick paper.
- Cut out the future box along the contour and cut in those places where there are straight lines (focus on the light scans - the location of the lines is the same everywhere).
- Fold the box along the dotted lines and glue it so that the parts with semicircular ends lie between the other two and the round ends point up.
- That's it, all that remains is to bend the lid properly.


And again roses, but more delicate.

And now there are two options for Birthdays - candies with balls and lollipops.


Large rectangular
This is perfect for large gifts (for example, wall clocks). You will need specialized binding cardboard to make the box really convenient. By the way, binding cardboard can also be purchased in specialized stores or on Ali.
The incision sites are marked in orange. The lid can be made the same way, but with slightly larger dimensions (2-3 mm).

For a man
If the gift is intended for a man, then I suggest choosing one of the following options.
Simple shapes are on trend - this is proven by the following 4 templates for creating strict, classic boxes. For these you will again need thick cardboard.


If the gift is intended for a loved one, then there should be more than enough romance ^^ There are butterflies, hearts, and all kinds of declarations of love. They can be made from thick cardboard or thick paper.


Heart
Heart boxes are very popular because you can use them to express your feelings. Or admit them


Cake
Are you getting ready for a party where everyone will need to be given a little surprise? Or maybe a wedding is planned? In both cases, cardboard pieces of cake will come to the rescue.
A beautiful and clear diagram is suitable for both the bottom and the lid.

Paper boxes
Boxes don't always need to be dense - sometimes it's enough just to create beautiful picture. Then I suggest you use this convenient scheme of 6 different packages:

If you are going to a child’s party (or maybe you want to please your child), then make him a cute box in the shape of an animal.

Give such a boot to happy parents. Follow the traditions: pink for girls, blue for boys.

Boxes for the New Year
The mood can be created not only with the help of gifts) Just look at these 8 lovely boxes, each of which can also be a great New Year's decoration
This is especially necessary if for some reason there is no New Year's tree. The main thing in this packaging is to trim the edges beautifully and neatly.
Snowflake
Of course, this box itself is wonderful, but the silver paint on the tips of the snowflakes can add some zest.
Tip: Give something in this package to a girl who loves Frozen.

Bag
For giving a gift - one of the simplest options.

Box of sweets
For all lovers of beautiful New Year's favors and quick handmade items! Take a plastic cup with a smooth surface, cut the edge and cut the edge.
Fold the cut pieces inward so that they cling to each other. Place some goodies inside and cover the top with something cute.

Another option for candy packaging is a donut. It is a little more labor-intensive, but more effective.

And, of course, the candy itself.

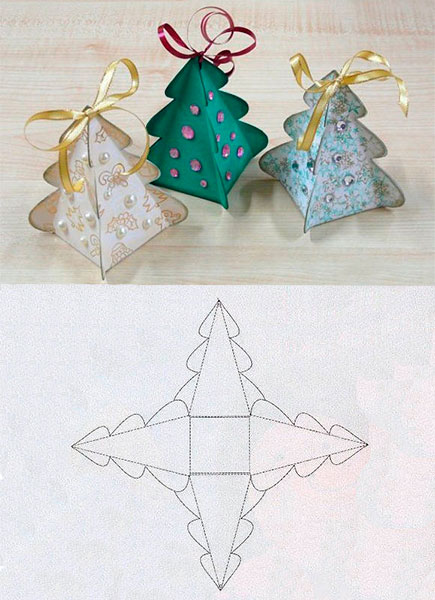
A slightly more modest pyramid from which you can build a geometric Christmas tree. 
A few more boxes
Finally, there are 3 more boxes for you that did not fit into the previous groups.


How to decorate a box with your own hands
The design of the box can be very diverse - from simple shapes in the form of birds and hearts to intricate flowers and bows. I will write more about box decor in the future - don’t miss it.
In the meantime, subscribe and comment - see you soon!
Sincerely, Anastasia Skoracheva