Every year we want Christmas tree looked unusual, not like before. But you won’t buy more and more toys every year. And in such cases, handmade crafts come to our aid. It's simple, fast, and cheap. Right now we invite you to get acquainted with the technique of making toys from wire.

You will need:
- flexible wire, possibly in different colors;
- a variety of beads, bugles, beads and any pebbles that were left over from your other projects. The more varied the beads are, the better;
- inflatable balls, in the amount of 1 ball for one toy.

Step 1:
First of all, inflate small balls; they should be similar in size to regular New Year's toys. Although, of course, do everything at your own discretion.
Step 2:
Your children will be excellent helpers in creating such jewelry, because you need to string a lot of beads on a wire; at 5-7 years old this seems very exciting. You and your assistants cut about 1 meter from a coil of wire and put pebbles on this piece in a random order. To begin with, take about 40-50 beads (calculation for large beads), for beads the consumption will be twice as much.

Step 3:
Next, we form a frame of wire around the inflatable ball, as the meridians encircle the globe and then in the transverse direction, as you want. Be sure to remember to add beads to your “parallels” and “meridians” in such quantities as you think is appropriate. You regulate the density of the stones both by the number of beads and the amount of wire.

Step 4:
When you have wound the required number of turns of wire, we begin to make a fastening and a loop so that the toy can be hung somewhere. This is done very simply - in a place that can be considered the top, we weave something like a hook from the remains of the wire. And since we are working with wire, this will not be difficult at all.
The finished hook.

Step 5:
To complete your toy, simply puncture the inflatable ball, which can be easily reached through the openwork design. The final touches to your work will be a simple distribution of beads around the entire perimeter of the toy.
This is what the finished toys look like. As you can see, this is a truly unusual decoration that will delight you for many New Years.

We would like to draw your attention to the fact that such cute jewelry is very fragile and easily deformed, which means that they must be handled with extreme care. Don't drop them, and just hold them carefully in your hands. But even if you accidentally crush the toy, it can be easily corrected.
The new review collected examples of wonderful ideas that you can implement in your home on the eve of the holiday. Each of these methods will make the atmosphere even more festive, surprise guests and loved ones, and also change the atmosphere.
1. “At the edge of the forest”

A fantastic Christmas tree decoration that can be made from a reel of tape, a few wooden figures, corrugated cardboard, braid, texture paste and a glue gun.
2. Garland in a bottle

Old garlands will be absolutely the new kind, if you place them in empty glass bottles. They will look especially impressive in bottles made of dark glass or transparent, but decorated with an interesting design. Garlands in bottles can be used to decorate the space under the Christmas tree, a festive table, or the windowsill of a living room or kitchen.
3. Snowman

Winter does not always please us with clean snow and the opportunity to build a snowman. However, if you stock up on white disposable cups, glue and colored paper, you can invite the children to “make” a snowman at home. The process of creating such a figurine will delight children, and ready product, will be a wonderful holiday decoration for the room.
Video bonus:
4. Funny cards

Print out several templates with different New Year's pictures, buy cardboard, glue, decorative paper and any other accessories you like at a craft store and start creating unique, colorful cards and pictures that you can use to please your loved ones or decorate your home. Rest assured, the process of making such cards will charge you with positivity and give you a festive mood.
5. Drawings on the window

Armed with toothpaste, stencils, foam rubber and toothpicks, invite the children to create beautiful New Year's pictures on the windows. Such decor will not require much effort or expense, and charming New Year's pictures created by yourself will delight you throughout the holidays.
Video bonus:
6. Dried citruses

Citrus slices can make original, stylish, bright and fragrant Christmas decorations. To do this, orange, lemon, grapefruit and lime should be cut into slices, placed on a baking sheet lined with baking paper, and placed in the oven for four to five hours to dry at a temperature of 50-60 degrees. When the slices have cooled, simply attach straightened paper clips to them and hang the resulting decorations on the Christmas tree.
Video bonus:
7. Mini Christmas trees

You can decorate the tables and window sills of your apartment with original mini-Christmas trees made from branches and colored paper.
8. New Year's wreath

From a thin wire hanger and old Christmas balls you can make an original New Year's wreath that will become a wonderful decoration for your front or interior door.
Video bonus:
9. Garland

The bulbs of an old, boring garland can be decorated with simple tennis balls, which will allow it to shine with a completely new light.
10. Spruce branch

A fluffy branch of a live spruce, decorated with beautiful balls and suspended from the ceiling, will become an original and fragrant decoration of any space.
11. Paper ball

From stripes decorative paper, glue and a few beads can be made unique Christmas balls, which will be a good alternative to expensive toys and truly stylish decoration green beauty.
12. Candlestick

From carefully peeled orange peel, you can make a spectacular and fragrant candlestick, which will become a wonderful decoration. festive table and fill the apartment with a magical smell.
13. Bear

Old boring Christmas balls can be turned into cute teddy bear toys. To do this, decorate them with small pieces of cotton wool, rolled into the shape of a head, paws and tail.
14. Wire decoration

From thin wire you can make a magnificent wreath in the now popular geometric style. And to make the decoration look even better, decorate part of it with dry or artificial leaves painted gold.
15. Snowman figures

Funny snowman figures that can be made from a pair of unnecessary socks, cereal, fabric and a small amount of accessories. Such toys will certainly delight children and decorate the space near the Christmas tree.
Video bonus:
16. Colored cones

A few small colored pompoms, glue, and golden strings will turn the pine cone into an unusual Christmas tree decoration.
17. Cockerels

The remains of any dense fabric, a small amount of cereal, pieces of red and yellow felt and minimal sewing skills will allow you to acquire original figurines of cockerels, which will certainly attract good luck to your home.
Continuing the theme, making it even better.
On the eve of the New Year, everyone begins to fuss, think and fantasize about how to beautifully and festively decorate their home and garden. A Christmas tree alone is not enough for people living in the 21st century. I want something interesting and exciting. One option to create magic at home is to make an LED figure. In our article we will tell you how this can be done as simply and quickly as possible.


New Year's glowing compositions, photo


DIY New Year's street figures with lighting, ideas on how to do it

Your home and garden can turn into a magical land if you put in some effort and use your imagination. Whatever idea you have in your head, the procedure for implementing it will always be the same:
- First you need to think over a sketch of the street figures, accurately measure each of its elements in order to purchase the required amount of durolite. It is better to always take it with a reserve.
- Make a pattern based on the sketch. This is a regular frame made of wire or any other durable material to which you will attach durolight.
- We attach durolight to the finished frame. You can use regular zip ties for this.
- The last stage is the most difficult - you need to connect the backlight. To do this, use the photo instructions below:


Now we will present you with several ideas for decorating your garden plot with luminous figures:
- If you want to decorate a facade or lamppost, it is best to use LED consoles (made of durable aluminum frames). You can make figurines of decorated Christmas trees and install them on the roof:

- If you don’t have a lot of time to decorate the frame with durolite, then you can use the “Glowing Curtain” garland. For example, balls or the same snowman will look very beautiful:

- Houses that are simply decorated with neon cords in the corners look very elegant. There is no need to waste time on making an aluminum frame, and the decor will turn out fabulous:

- If you know how to create figures from ice, then make sure that inside each figure you can insert non-heating garlands with hermetically mounted diodes. They will revive any ice statue:

DIY glowing New Year's deer step by step:

The deer is already a symbol of the New Year, because it is he who carries Santa Claus’s sleigh and stops at every house to main character the holiday gave a gift to everyone who was waiting for it. You can make a deer as a decorative element in several ways:
made of wire
- Prepare a photo or drawing of a deer on paper. This is an important step that will help you calculate the correct proportions of the future figure:

- Prepare a stiff wire from which you can make a stable frame for the deer. It should not sag when finished.
- We cover the finished frame with thin wire so that the middle of the figure can also be decorated with a garland:

acrylic deer
- First, you need to twist the frame of a deer from thick wire. The first thing to do is the hind legs, which rise up to the belly, and from the belly move into the front legs. From the front legs the wire is stretched to the deer's neck, and from the neck to the head. From the head, the wire is pulled along the spine to the hind legs, from which you need to leave another small piece of wire to make the tail:

- We wrap and stuff the resulting frame inside with polyethylene. To prevent it from falling off anywhere, you need to wrap it with tape on top:

- Next, antlers are made from wire and attached to the deer’s head:


- We wrap the horns with polyethylene and tape according to the same principle as the body:

You will only need to attach duralight or any garland to the finished figure and you will have a gorgeous glowing deer that will decorate not only your garden plot, but also your home interior.
backlight made of duralight
Everything is very simple here, because duralight is the most flexible and flexible lighting option:
- Sketch a deer on paper.
- Attach duralight to it and make the correct cuts.
- To secure the sections together and get a solid figure, you just need to use plastic components - heat it, bend the duralight in the desired position and fix it.

Glowing deer on the window, step-by-step guide with photos

- Take the deer template, cut it out and place it on the window to trace. You will have a circuit to which you will attach the LED strip:

- Carefully attach one edge of the garland to the selected area of the deer's outline, and then circle it around the entire deer, gradually securing the garland with tape.
DIY glowing balls, ideas with explanations and photos

There are several options for how to make a ball:
- Try to make a uniform and neat ball from the wire so that it has the same number of edges on which the LED strip will be attached.
- Use thin wire mesh, which is usually used to fence aviaries or chicken coops.
Let's look at the last option in detail, because, in our opinion, it is simpler and the result is more accurate:
- First prepare required material and tools for work (mesh, several garlands, pliers with wire cutters and a tape measure and gloves):

- Cut a square from the mesh, fold it into an envelope and twist all the parts so that they do not come apart from each other:

- Those places where sharp pieces of the mesh remain must be screwed to the mesh itself so that you do not get hurt during the work:

- Attach a garland to the finished ball by wrapping it around each element of the metal ball:

DIY glowing cubes, step by step with photos

- Take 6 pieces of plexiglass and sand it down.
- Fasten each piece together to form a cube, but in the process gradually glue a neon cord on each side inside the cube. Leave a hole in one corner through which you can pull one end of the cord to connect it to the mains or battery.

Glass can be colored and of any size. It all depends on the decor idea that you come up with for yourself.
Near the Christmas tree decorated with garlands, place a glowing snowman on one side and a gift box on the other. The box can be made from the cube we described above.
Idea No. 2:

Next to the Christmas tree, you can simply make a huge dome ball with a hole for the entrance. You can put a gazebo or just a bench in it to spend wonderful winter evenings there in a romantic atmosphere.
DIY New Year's glowing snowman, step by step with photos

A glowing snowman can be made not only from duralight, but also in another equally interesting way, using disposable cups:

Make another such structure, place it inside each LED garlands, and then fasten them together with a stapler. Decorate the snowman so that it has buttons and a nose. You can use any stationery for this and more:

We create the magic of the holiday ourselves, so don’t expect pleasant surprises from someone, create them yourself with pleasure! Let our tips and recommendations help you out in everyday life, helping you make your holiday unforgettable!
Video: “LED figures”
We use unnecessary things...
A hanger on which clothes are returned from dry cleaning...
The hand did not rise to throw away such a good wire.
New Year is coming. Making stars.
Need to:
Metal hanger (1 piece per star)
Thin tinsel (Auchan – 19 RUR)
Gold threads (can be replaced with rain)
Beads
Pliers
We take a hanger. And we disconnect it (we need a hook, so we leave it).
Further long part We mark the “hangers” into segments from the place where the hook is twisted with a permanent felt-tip pen. I had 5 cm. Of course, if the segments are larger, then the star will be larger (if only there was enough wire) 
Then we form it in such a way that the initial and final segments meet freely. The wire is thick and therefore it is quite difficult to do this.
We bite off what is unnecessary. 
When the segments more or less come together, we simply fix them together with ordinary thin tape. 
Then we take the tinsel and begin to diligently wrap it around the base. The initial tail of the tinsel was secured with a loop, the final tail was folded under the twist of the hook and secured with super glue. 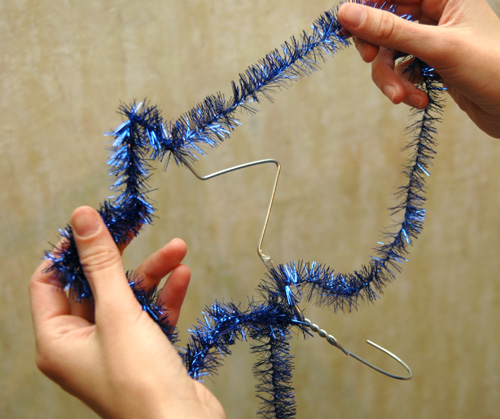
All. The star is ready. 
It is very convenient to hang on all sorts of doors, cabinets and other wide things. 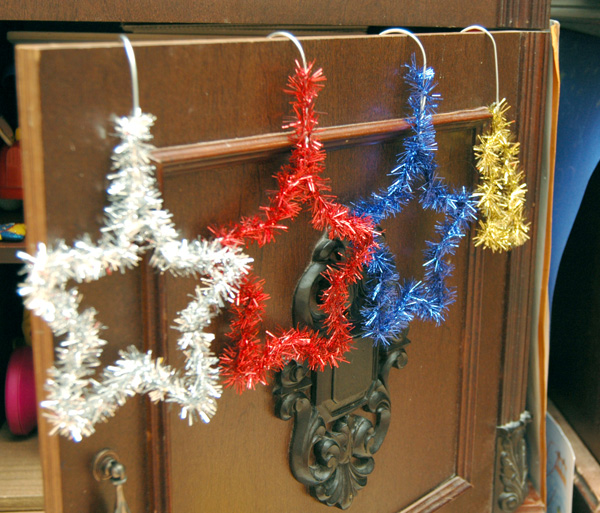
You can make Christmas trees from the leftovers. 
Well, if you want some kind of uniqueness, then you can make a drawing inside, or whatever your heart desires/your imagination draws/your hands draw. 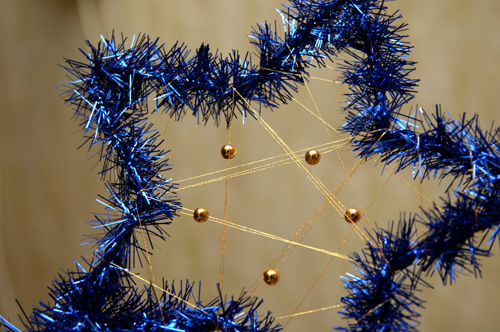

Decorating a home for the New Year is often associated with something costly and time consuming. But there is another way - to remember hygge, simplicity and comfort. Today I want to offer a very fast New Year's decor, inspired by minimalism and Scandinavia.
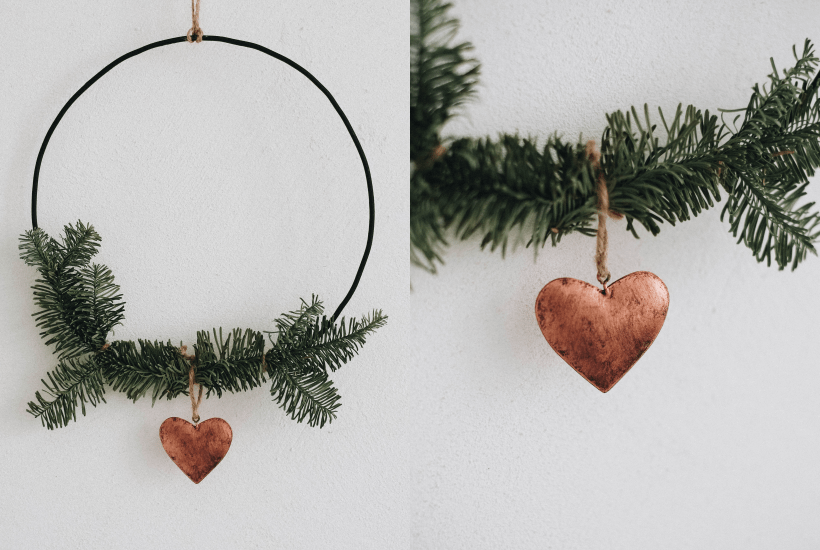
Sometimes all we need is some wire and some spruce branches. But even in such a simple decor there is room to use your imagination. After all, you can hang any decorations on the branches: from copper stars to your favorite Christmas toys from childhood.
Wire jewelry - materials and tools
Time spent - 30 minutes. We will need:
- single-core aluminum cable - about 3 meters
- pliers
- wire cutters
- black acrylic
- paint brush
- fir branches
- hot melt glue or Moment
- pruner
- linen twine
- new Year decoration taste.
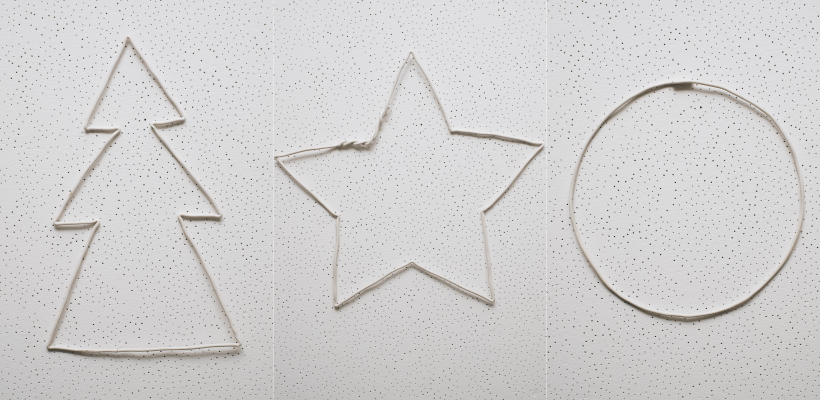
DIY wire decorations - work progress
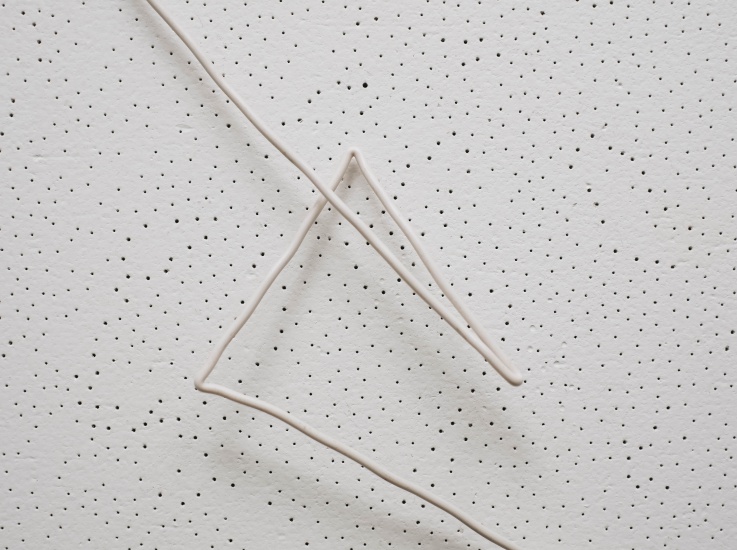
To make this Scandinavian style wire Christmas decor, I used medium hard aluminum cable. It should bend well, but at the same time keep its shape. Typically, the cable is black or white. You can paint it any color with acrylic paint.
Decorations in the shape of a Christmas tree and a star required 110 cm of wire, the rest went to the ball.
1. It may seem like you just need to form a wire decoration, but there is a secret. So that the decor is correct form and looked finished, each corner needs to be clamped with pliers.
To do this, you simply fold the wire in half and squeeze. And so with every corner. Only then can the decoration be formed.


To make it easier to repeat the shape of a Christmas tree or star, you can print them on a sheet of paper and lay them out using a stencil. For the ball, use a plate or saucer.
2. If the junction of the ends of the wire is on the side where the spruce branches will be, you can simply twist them. If it doesn’t work out, like in my Christmas tree, just cut off the excess wire and glue the ends together with hot glue or transparent Moment.
3. Paint the blanks with acrylic black or any color that best suits your interior and mood. To make the paint dry faster, dry it with a hairdryer.

4. Use pruning shears to cut off small spruce branches and tie them to wire Christmas decorations with linen twine. Can be glued with hot glue.
5. Add decor to taste and hang it.

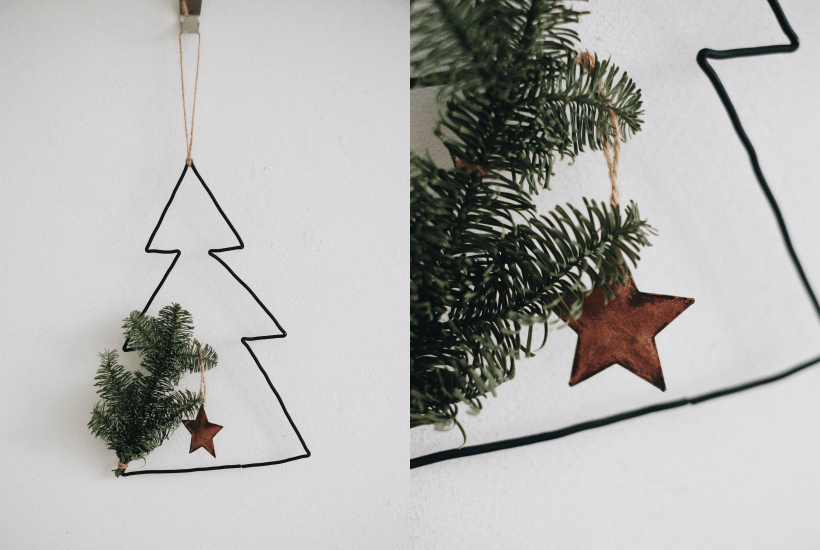

Just 30 minutes, 5 simple steps - and your DIY wire Christmas decorations are ready!
Best,