If in the previous article dedicated to the New Year, we talked about this, then today’s issue will be devoted to the production New Year's wreaths. Today I invite you to get acquainted with 7 different master classes on this topic.
I assure you that you will be surprised how easy and simple it is to make a wreath for the New Year yourself, rather than buying ready-made and expensive ones in the store. In addition to the fact that you will save, you will also spend a couple of hours with your children doing this activity (of course, if you have any). In any case, you will be pleased at least that you made this beauty yourself.
The most interesting thing is that you can use anything to make a wreath, the main thing is to have imagination and a little imagination. In this article we will look at the most common options for New Year (Christmas) attributes.
But, as far as I know, this is not all, and not even half, but some small part of all the options for making this symbol of the New Year that exist. But the point is not that, but that you and I learn how to make the simplest wreaths. And then, if you like it and everything works out, you will be able to fantasize and experiment with new types of inventions, which will please yourself and your loved ones.
Well, now, let's start our review.
DIY New Year's wreath made from newspaper tubes
The first option is not a wreath, but a basis for it. That is, I first want to show you how you can make a good and reliable ring with your own hands that will serve you for many years. Now they sell ready-made bases for wreaths in stores, but their cost is far from small.
That is why it is better to do it yourself, especially since it is not so difficult. Of course, you will have to put in a little effort, but the result is worth it. We will use newspaper tubes as the material. You can easily find how to make and paint them on the Internet.
And here we will examine the question of how to make a wreath, that is, the basis for a wreath from newspaper tubes. Since the manufacturing process is quite difficult and tedious to describe step by step, and you can also get confused, I suggest you watch a short video in which everything is described, shown and told in detail. Enjoy watching!
I hope that you understand everything and that you have no questions on this topic. Now let's continue with the main topic.
We make wreaths from pine cones with our own hands
For this version of the New Year's wreath, any cones from any tree will suit us. If you don’t have pine trees, then you can safely take others into account. This will not make the view worse, and it may even turn out better.

In this version we will make artificial Christmas tree branches from paper. If you don’t want to tinker for a long time, then you can easily get by with purchased ones.
We will need:
- bumps
- cardboard
- baking paper (newspaper)
- A4 paper
- acrylic paint (green)
- copper wire
- Super glue
- ribbon and beads for decoration
How to do:
1. Cut out a “donut” from cardboard of any size you like. To do this, draw circles on cardboard and cut it out.

2. Using adhesive tape, glue baking paper or old newspaper to the resulting frame.

Before gluing, the paper must be thoroughly crumpled so that it becomes voluminous.
3. The result is a blank like the one in the photo below.

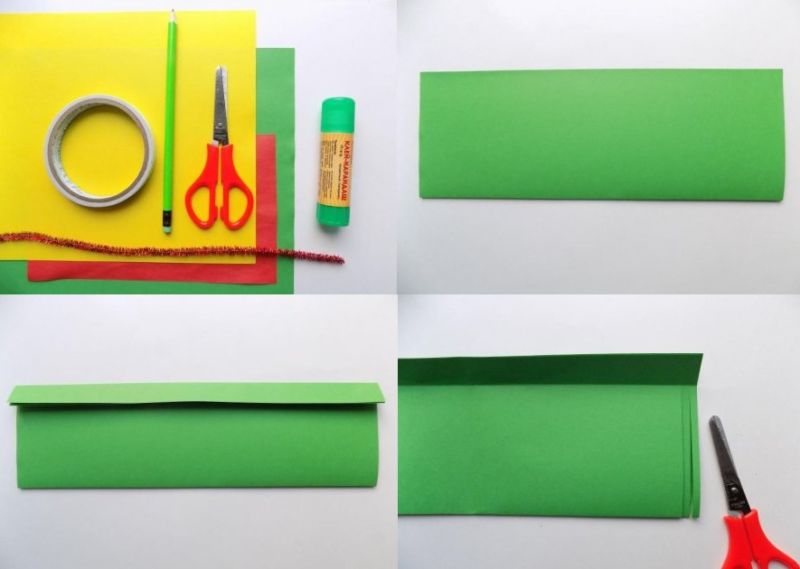
4. Now we paint the A4 sheet green on both sides and let it dry.

5. After that, cut it into strips 3-4 cm wide and move on to the next step.

6. We need to make a fringe from the strips. To do this, we fold the painted strips in several layers and make frequent cuts, approximately 2/3 of the width.

7. Carefully open it so that the workpiece does not tear.


9. We put it on the paper fringe and begin to wrap the wire in paper, gradually going down.

10. Let's fluff it up a little and get a branch like this.

11. Having made several of these branches, you can collect larger branches by connecting them together.

12. Now we glue the cones with the resulting Christmas tree branches to the base of the wreath.
For beauty, several cones can be painted red, which is what we did.
13. Decorate the finished wreath with beads and tie a ribbon.

That's all! Ready. As you can see, everything is quite easy and simple. And in the end we got such a beautiful, festive wreath on New Year and Christmas.
Wreaths made from burlap and wine corks
The wreath that I want to offer you now will look very good in the kitchen. In addition to corks and burlap, we will use bay leaves, allspice, cinnamon tubes and various nuts. The result is a very fragrant wreath that will fill your kitchen with its aroma.

How to do:
1. First, as always, let's make the base. You can make it from ordinary newspaper, twist it and connect the ends with glue or paper tape. You can also use the first option described in this article.

2. We wrap the workpiece with burlap or decorative mesh, as in our case. Use a glue gun to glue it to the base of the wreath.

3. Now it's time for wine corks. We paste them around the entire perimeter of the future wreath.

4. Let's make a loop from ribbon or some kind of rope. It also needs to be glued with a glue gun, and the free ends should be wrapped around the entire surface of the workpiece.

5. Decorate the wreath with nuts (almonds or walnuts), placing them on glue.

The more nuts, cinnamon and bay leaves, the more festive and beautiful the finished product will look.
6. Next come cinnamon sticks.

7. Our composition will be completed with bay leaves and allspice.

Ready. How do you like this idea?
Making a wreath for the New Year 2019 from beads
People who weave all kinds of bead products know that anything can be made from it. So the New Year's wreath is no exception. It will take a little time and skill, and in the end you will get a very beautiful product that can be hung anywhere. Let's try to do it.

We will need:
- green beads
- copper wire
- aluminum wire (noodle)
- ribbon
- beads
- glue gun
How to do:
1. First of all, we need to weave Christmas tree branches from beads. To do this, thread as many beads as possible onto the copper wire.

2. Count out the beads, approximately 12-15 pieces, and make a loop.

3. Twist the wire 3-4 turns.

4. We carry out steps 2 and 3 until we reach the required length.

5. Now we wrap the aluminum wire with green tape and glue the end with a glue gun.

6. We wind the “needles” of beads onto this wire in a circle.

7. Connect both ends of the wire, giving round shape. We wrap the joint with red tape and glue it.

8. We also form a bow from the red ribbon and glue it to the wreath.

9. K finished product glue red beads.

10. We thread golden beads into copper wire and wrap it around the wreath.
That's the whole process. Agree that it turned out very beautiful.
Master class on making a wreath from foamiran:
Another video on making one of the main attributes of the New Year. Let's watch and learn. Enjoy watching!
How to make a wreath from Christmas balls?
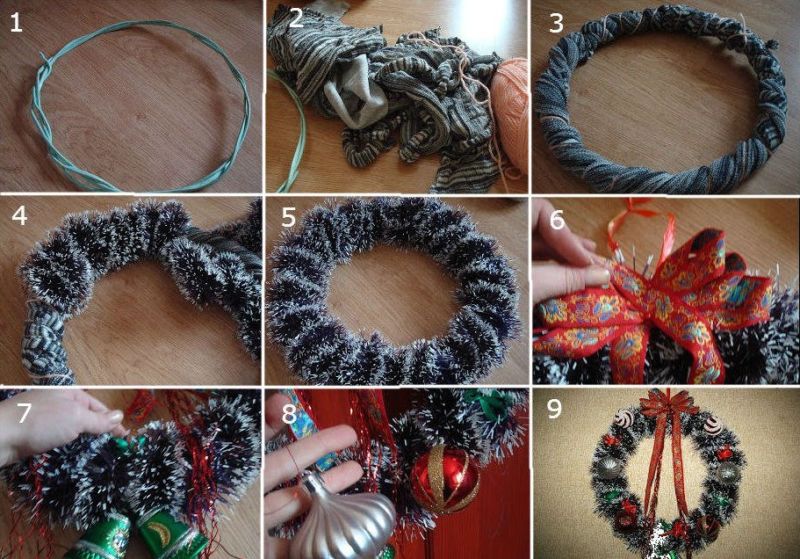
A very beautiful and bright wreath can be made from the balls with which we usually decorate the Christmas tree. It's very simple and quick way. But the result is simply stunning. A few balls, Christmas tree tinsel, a cardboard base and glue - that's all we need. And of course good mood and a confident attitude.

We will need:
- cardboard base (donut)
- Christmas balls
- tinsel
- ribbon
How to do:
1. Distribute the balls over the cardboard base and glue them with glue.

Leave a small gap between the balls so you can decorate the wreath with tinsel.
2. We wrap tinsel around the wreath.

3. Glue a ribbon bow.

4. You can hang a couple of balls on the finished wreath.

This creativity takes very little time, but it turns out very beautifully.
Step-by-step instructions for making a felt wreath
Did you know that you can make more than just toys from felt? As you probably already guessed, now we will try to make a Christmas wreath, which will contain elements. made from this material, namely felt flowers. Let's be patient and get started.

We will need:
- wreath base
- sackcloth
- felt (red and white)
- pine branches (live or artificial)
- bumps
- beads
- ribbon
- glue gun
How to do:
1. You know how to make the base, so I won’t describe the process, but will immediately move on to the next step.
2. Using glue, glue the burlap tape to the base.

3. Let's start decorating. Let's make flowers from felt.
4. We cut out flowers using a stencil. We need to cut out one whole shape and 5 separate petals, as in the photo below.

5. We sew the lower part of each petal, forming a recess and sew it to the main flower.

6. We do the same with the remaining petals and sew them together.

7. Glue a bead into the middle of the flower.
8. Glue the finished flowers to the base of the wreath with a glue gun.


10. Attach gold ribbons.

11. The edges of the flowers can be painted white to give them a more finished look.

12. And finally, glue the pine cones and decorate the wreath with a ribbon bow.

Door wreath made of pine cones and Christmas balls
The last option would be a New Year's wreath, assembled from various cones and balls, as well as some other elements that will complement the picture with their presence. This wreath looks very good anywhere, but we will hang it on the door.
Agree that when it comes to New Year's wreaths, you immediately imagine front door on which he hangs. So why not make it and hang it exactly where it looks best?

We will need:
- the basis
- tinsel
- bumps
- Christmas balls
- walnuts
- large beads
How to do:
1. We wrap the base of the wreath with tinsel, distributing it evenly over the entire surface.

2. Glue the cones in a chaotic order.

The edges of some pine cones can be painted White color. It will look more beautiful this way.
3. Now it's time for the balls. We also glue them over the entire surface.

4. And the last decorative elements are nuts.

5. Use white paint to slightly tint all the components of the wreath.

6. If desired, add white and silver beads.

7. Sprinkle with artificial snow and hang on the door.

That's all. It turned out very cool and festively beautiful.
That's all I have for today. It's up to you. Happy creativity! I will be waiting for your feedback on what and how you did it. Thank you for your time and attention.
Good day!
Do you want to decorate your apartment with something beautiful and magnificent? Certainly! Then, how about a wreath, which is usually hung over the door on New Year's or the bright holiday of Christmas. This type of room decoration will always remind you of the holiday and create an atmosphere of comfort and warmth.
My children and I usually decorate the house, and a must-have attribute is a bunch of, well, .
Well, let's not waste time, let's create wreaths, because this activity will give you a lot of positive emotions, and besides, you won’t need to buy such a craft again in the store.
Take these ideas and create! All the most interesting things await everyone ahead. Good luck!
There are a great many ideas for making such a craft, as it turns out. Let's look at a couple of them that I managed to find. Take thick cardboard and cut out a wheel from it. Then wrap it under wrapping paper or cloth.
Then make little bags from music paper or colored paper and decorate the rim (glue it to the blank).

Any New Year's silhouette, such as a twig or bow, will add completeness.

From such a soft foam plastic or polystyrene tube, you can first make a circle, and then decorate it, wrap it around cotton fabric. Then tie it with tinsel or use feathers.


And in the middle hang a snowflake made of plywood or

For children kindergarten or schools, I suggest considering the option of wire and any fabric. Twist the wire into a ring, and then tie strips of fabric of different colors onto it.


You can take a regular satin ribbon and tie bows.


And now, another treasure from chenille wire. This can be purchased at a fixed price or in the department for handicrafts and creativity.


Another option is to make the wreath glow, imagine how cool it will look, like...
Wreaths for the New Year from all sorts of things: 15 ideas
I would also like to show you ideas that may lead you to your next masterpieces. I really liked the wreaths made from balloons, as well as from dry twigs and candied fruits.


But here’s an interesting craft made from pop food, we came up with it, thanks to the authors for the new product!

Here in this one we see pine cones and other artificial fruits. It turns out that the wreath was woven from ordinary newspaper, and then they simply hid it in organza and wrapped it in tinsel.

The next work is made of dry twigs and decorated with balls and a bow.

In addition, you can use candles, although in this case the wreath cannot be hung, but simply placed on the table and used as a candlestick.

Decoration in the form of a wreath made of fir cones (detailed master class)
I offer another new product that you can easily build yourself from available materials. Take a look at the photo, I’m sure you have all this in your home, especially now when winter is in full swing.

First decide on the size of the wreath, then draw a circle on cardboard and another one on it, cut out this shape, in the form of a ring.

Then tie the ring with tinsel, glue the pine cones and tie bows.

Do this all using a glue gun or regular glue. Balls and plastic houses will also fit beautifully if you glue them to the product.

Then wrap it with masking tape and plain paper.

So that the wreath becomes voluminous and, as it were, lush.


Cut the leaf into strips.


Fold each strip several times and make frequent cuts.

Fold the flexible wire in half and begin to put the workpiece on it, so that you get a twig.

Insert the wire into the strip.


Make the required number of such branches, for example 5-6 pieces. And use them to decorate a ring.

Glue the pine cones in a circle and tie a bow.

Here's another example, use it:


New Year's wreath made of felt + patterns
An unusual work may be a product using regular fabric. Felt or foamiran works well here. The fact is that these particular species do not crumble and are easily cut with scissors, just what you need!
Take any round base with a hole inside, as shown here:

This is what our heroine created, and what about you? Share in the comments.

Or you can cut the felt into circles, then fold each one in half and in half again and secure with a needle, and then stick it on the polystyrene foam base.


In addition, you can decorate wreaths with flowers, because any holiday, even Christmas or New Year is no exception, does not cancel this attribute.

Take the base again and wrap it with burlap or linen cloth.


Afterwards, sew each petal with a thread, as if making a recess, and then sew them to the flower.

This is what the output should look like.


And then they ate it with live twigs.

And of course, satin or decorative ribbons and cones.

Christmas wreath made of knitted yarn
When I wrote this article, I had no idea that such a product could be created. It turns out you can make it from balls, take a look.


Next job, so snowy. A white woolen thread is taken and wrapped around a flat “steel”.

1. Wrap the threads tightly around the cardboard blank so that there are no gaps.

2. You can also make pompoms from threads or take ready-made balls.

3. Then secure them with glue or a gun to a wool ring.

4. Be sure to get small artificial Christmas trees. They will fit perfectly into the craft.

5. And also use beads or beads.

6. Hang it already finished work on a ribbon or thread, a tinsel, and then a craft on the door.

Making wreaths from Christmas balls at home
Now let's move on to making another product, take a wire to work with and twist it into a circle, but make another loop, like a hanger. To make it convenient to hang such a wreath somewhere.

Now use your imagination and decorate the wire with tinsel and balls. Glue all components with glue using a hot gun. Or, if there are holes on the balls of the required diameter, then simply pass them through the wire.

You don’t even have to glue the balls, but simply use threads and tie them to the workpiece.

This is such a charm, you can make it multi-colored.

And for completeness, use a bow that you tie where the loop is where you will hang the craft. Hide it.)


Here is another work, also exclusively red; it is this color that should prevail in such works in the first place.


Festive wreaths made of tinsel and candies
Another one interesting idea make a craft using edible things. After all, the candies are always brightly packaged and sparkle, so I think that you will also like this beauty. Well, cut the stencil out of the cardboard again. Glue the tape and fold it into a loop.

Then rewind the sample with tinsel and secure the end with glue. Glue the candies to the cardboard, that is, their ends.


Here are a few more works, perhaps you will like them more.
You can design the product using a regular embroidery hoop.

New Year's wreath on the door made of fir branches
Anyone can make a wreath from real twigs; imagine the smell that will waft through the apartment. I found a couple of photo instructions that will help you easily figure out something similar. Good luck!


Master class on how to make a Christmas wreath from newspaper tubes
If you want to make another masterpiece, and also from unusual material. Namely, from tubes, but not plastic, but paper. Imagine, it’s hard to believe, but now it’s possible to do such things. Moreover, you will need old newspapers.

We will need:
- many newspapers
- PVA glue and moment
- stain or brown gouache
- thin wire
- thread
- bottle
- knitting needles
- decorative tape
- beads
- scissors
Stages:
1. Twist tubes from newspapers, use a knitting needle for this, treat the joint with glue. Then place them like shown in the picture and start weaving.

2. To complete the craft, you need to take a jar, like a tall flask, suitable for varnish or juice, and wrap it in a spiral.

3. You need to do it this way, take the first tube and bend it like this:

4. Afterwards, bend the adjacent one and place the next one, and so on until you have assembled the entire product.

5. Gradually raise the jar.

6. This is how the blank turned out, quite long.

7. Twist the resulting workpiece into a circle and connect the ends with wire. And then use stain or paint.

8. Thread the blue ribbon and glue on the beads.

There are still questions, then take a look at this video, maybe there won’t be any more. Make such beauty out of paper vine. Good luck!
Beautiful New Year's craft from foamiran
Next, I suggest you familiarize yourself with another product, which is made from quite simple material like foamiran. Turn on the view button and watch, the author shows and tells at the same time. It turns out beautiful and cool!
Step-by-step instructions for making wreaths for the New Year 2019 from paper
Probably the most common souvenir for children will be a wreath made from disposable tableware and a child’s paper hands. Or simply use a plate to draw a circle on paper and cut it out with scissors, and glue the images of handles onto it.

The following strip work:

If you want a more voluminous wreath, then take this product as a basis.

Or take advantage of this master class.


New Year themed beaded wreath for beginners
Those who are fond of beadwork in their life know that beads can be used to create not only toys, but also any decor. And here in in this case the wreath is no exception. Try to create such a wonder.

We will need:
- green or light green beads
- aluminum wire
- green decorative ribbon
- beads
- glue gun
Stages:
1. Take a long and flexible wire and put beads on it.

2. Then count fifteen pieces and roll the wire into a ring.

3. Then twist the wire four turns. You and I did something similar when we were collecting, remember? In this way, assemble a long branch from loops.

4. The chain should be as long as you want; the larger it is, the more voluminous the work will be.

5. Now take a thicker wire, for example aluminum, and tie it with green cloth or ribbon. And wind a bead blank around it in a spiral.

6. Connect the ends of the product with glue from a gun.

7. Now decorate with beads and bows.

8. What a delight it turned out, it looks like it came from a store, but I think it’s even better!

Here is another similar option. Don't miss it if you want to master this technique.
This is where I end the post, I hope you liked all the works and it was not in vain that you came to this page. Create wreaths for the New Year or Christmas and delight your loved ones with such beauty! See you soon and bye everyone.
Today, many families have adopted the Western tradition of decorating the apartment for... New Year's holiday This decor always looks great and lifts your spirits. There are many options for creating wreaths. A similar decoration can be made from living branches: juniper, ordinary twigs, pine, cypress, oak, spruce. But sometimes it is created from quite unexpected materials. Of course, such decor can be easily purchased in a store. But it’s much more interesting to create a wreath of branches with your own hands. In this case, you can create truly unique and festive decor.
History of tradition
Before we consider how to make a wreath of branches with our own hands, let's find out who came up with the idea of creating such a decor.
Hamburg resident Johann Hinrich Wichern was the first to decorate his home with such an element. He took in children from impoverished families. During Lent, the children constantly pestered their mentor with the question: when will the long-awaited Christmas come?
To make it easier for children to count down the days until the holiday, Johann made a wreath. This item was made from a wooden wheel. It was decorated with 19 small red candles and 4 large white ones. Every day one candle was lit on the wreath: if it was weekdays, then a red one, and if it was a Sunday, then a large white one.
The locals really liked this wreath, and they quickly adopted the tradition. This is how this amazing Christmas attribute has survived to this day.
Traditional wreath decorations
If you decide to make a New Year's wreath from branches with your own hands, then feel free to use all your imagination. You can create a unique decoration from any available materials. There are many amazing ideas for making this decor.

However, if you want to follow traditions, then you need to familiarize yourself with some recommendations. First, let's look at the color scheme.
The traditional palette of a Christmas wreath is the following shades:
- green;
- white;
- red;
- gold.
What is used for decoration?
When planning to make your own twig wreath, consider what decorations you will use.
Most often used for Christmas attribute:
- Cones (pine, spruce). Natural decor looks impressive. Sometimes the cones are sprayed with a golden or silver spray.
- Berries. The most popular are viburnum, rowan, and rose hips. The wreath can be decorated with fresh or dry twigs with berries.
- Nuts, fruits. Dried pieces of lemons, oranges, and tangerines look original. Any variety of nuts can be used for the wreath. Twisted (dry) orange peel can be a wonderful decoration.
- Spices. An incredible aroma will be provided by dried cloves and cinnamon sticks.
- Sweets. You can even decorate the wreath with cookies and candies.
- Bows, ribbons. Traditionally, Christmas attributes were decorated with plain red bows. Today, striped and checkered ribbons are used for decoration.
- Little ones Christmas decorations. Special charm Your wreath will be given small bells, birds, stars, snowmen, angels, and balls. In addition, decorate it with Christmas tree tinsel and beads.
- Candles. This decor is suitable only for those wreaths that are placed on a horizontal hard surface.

There are a few more little secrets that you can take into account when making a New Year's wreath from branches with your own hands:
- If you want the next year to bring you prosperity, attach a coin to your wreath.
- A small horseshoe will bring prosperity.
- And to catch your luck, decorate the wreath with the symbol of the coming year.
Frame making
Having prepared all the necessary elements, we will begin to create a wreath of branches with our own hands. The master class will help with this.
The New Year's wreath must be very durable. That is why you should carefully approach the manufacture of the frame.
Such an element can be created in several ways:
- twist the vine and secure it carefully;
- crumple newspapers, give them the shape of a ring, and tie them on top with threads;
- use an old watering hose;
- tie bird cherry, buckthorn;
- cut a circle out of cardboard (make a smaller hole inside);
- use a hose from under an old vacuum cleaner;
- use disposable plate, in the middle of which cut a round hole;
- purchase a ready-made foam ring;
- Apply dry grass, shape it into a ring and tie it tightly with thread.
- make a circle out of wire (you can use an old wire hanger).
Decorating the frame
We continue to consider how to make a wreath from branches with your own hands.

So, you have a finished frame. The next stage is decorating it with branches. You can use live pine needles. Pine branches are perfect; spruce branches look more elegant.
If you want your creation to last a long time, then make an artificial wreath from branches with your own hands. You can use this decor next year, slightly diluting the composition with new elements. You can find an old artificial Christmas tree in almost every home. Don't rush to throw it away. After all, you can make an excellent New Year's wreath with your own hands from fir branches. It is in no way inferior in beauty to its counterpart created from living elements.
To decorate the frame, you need to cut branches. It is very convenient to perform this action using pruning shears.
The branches are attached with an overlap. The lush part should cover the wood of the previous one. In addition, arrange the branches so that the frame is not visible. Strong threads can be used for fastening. An excellent solution is to use wire. This will allow all elements to be firmly secured.
As you can see, making a New Year's wreath with your own hands from fir branches (both live and artificial) is a simple task.

Fastening decorative elements
So, now you know how to make a regular wreath from spruce branches with your own hands. But it needs to be decorated. Here you can fully express your imagination. Any decor can be used.
However, the next question that you will encounter when making your own Christmas wreath from branches is how to attach the elements.
- Any branches are always secured with an overlap. They should be tightly wrapped with threads or wire.
- You can easily glue chestnuts, acorns, cones, nuts, bows to the surface with superglue.
- Christmas balls can be attached with wire, passing it through the pendant hat. Secure it around the base of the wreath. In addition, Christmas tree decorations can also be glued to the base of the wreath with superglue.
- You can wrap the wreath with ribbons and tie them into bows. If it is necessary to secure the strip firmly, then it is glued to the base wreath.

Attaching decor to the door
So you have made a wonderful DIY Christmas wreath from branches! But now a new question has arisen: how to attach this masterpiece to the door?
There are several ways:
- Make two wreaths of exactly the same weight. Take a long ribbon. Tie one end to the wrong side of the first wreath, and attach the other to another Christmas attribute. Throw the ribbon over the door. The first wreath will be on the outside of the door, and the other will be on the inside. Secure the tape at the top with masking tape. Nobody will see him anyway.
- If your door has a peephole, you can secure your masterpiece as follows. Take a strong fishing line and tie or glue it to the wrong side of the wreath. Throw this structure over the door, approximately as described above. But the second end of the fishing line should be secured around
- A fairly simple method of fastening is to use suction cup hangers. They can be purchased at a hardware store. With these hangers you can easily attach the wreath to the door. If your decor is light, then you can get by with two pieces. It is recommended to hang the wreath by the top and bottom.
- You can use double-sided tape. This is the easiest and best option. One side of the tape is glued to the back of the wreath. Then you need to remove the protective film and secure the product to the door.

Conclusion
Now you know how to create a unique wreath from branches with your own hands. And don’t forget that you need to prepare for the New Year’s holiday in advance. In this case, you will have time to adequately decorate your home.
Before guests arrive, everyone cleans up the house and hangs decorations. And among all the garlands, candles and gifts, of course, the Christmas wreath occupies a special place. It can be hung on a door or wall, or placed in the center of the dining table.
In stores on the eve of the holidays you can see a large selection of wreaths of various designs: with ribbons, balls, candles. But to make it truly special and unique, and also cost much less, make it yourself. How to make a Christmas wreath with your own hands? Very simple! 
Here you will find 5 step-by-step master classes on making a Christmas wreath. Choose which one you like best: from balls, spruce, pine, pine cones or even mesh.
First, let's look at how to make a traditional Christmas wreath from spruce, which can then be mounted on the front or interior door.

Tools:
- straw wreath mold (optional size),
- balls (must match the size of the wreath: as the base of the wreath increases, the size of the toys also increases),
- decorations in the form of branches with red and zloty beads, a red ribbon for a bow, Pine cones(big and small),
- spruce branches (thin so that they are easy to bend),
- several other branches (for example, pine),
- scissors, floral wire (preferably green),
- red and gold decorative flowers (three pieces each).

Lay everything out on the table and get to work.

TIP: You can make this form yourself from dry grass and cling film. Additionally wrapped with tape.
Step-by-step production
STEP 1: Making a base from branches


- First, make a base of pine branches. Lay them out in the same direction, e.g. counterclock-wise, let the ends of the branches be on the right, and lay the soft tops of the branches to the left side. Attach them to a straw wreath, tie around with floral wire, tie down to the base.
- Continue adding more branches around the shape.
- Look, are there any empty seats left?, fill in all the gaps with smaller branches.
- So far he looks a little disheveled and sloppy. Wrap a little more wire around to tie down any large branches that are sticking out. The wire should be hidden behind the branches. Now you have a uniform, lush wreath - the foundation for further work.
Step 2: Decorate the wreath


- Now add a few other branches (in the same direction as the pine ones), distributing them evenly throughout the wreath.
- Attach a red bow. You can do without it, then the look will be more festive.
- You can add small pine cones if there were none on the branches themselves.
- The distribution of colors should be symmetrical(so that it doesn’t turn out that all the red decorations are in one place, otherwise it will look like a red spot). Divide the wreath into 4 parts, one of them has a bow, and the other three add a branch with red beads.
In principle, it already looks good and you can leave it like that, you can finish it.
IDEA: Or hang the wreath first in this form, and after a week add decorations, this way the wreath will definitely not get boring during the holidays
Step 3: Add More Decorations

- For contrast, attach several branches with gold beads.
- Attach the pine cones: wrap the floral wire around the pine cone close to its base and attach it to the wreath, securing it well in place. Make sure the wire is visible, as less as possible. You can also stop at this point, or continue adding balls.
- Attach three balls, taking into account the same conventional division of the wreath into four parts
- Add three red and three gold decorative flowers.
You did it! It turned out to be a wonderful Christmas wreath, all that remains is to attach it to the door to delight yourself and your neighbors!
How to make an Advent Wreath

Following the workflow just described, you can also create an Advent Wreath.
According to tradition, there are four candles on it: the first one was lit 4 weeks before Christmas, each subsequent Sunday one more was lit, so it was visible how the holiday was approaching.
Now a wreath of this type can be made with for traditional reasons and for decorative purposes. In any case, it will help create a festive atmosphere.
So, let's get to work:

- We create the base of the wreath from the branches, add small pine cones, as in the previous case.
- Fasten with hot glue gun candle holders(preferably with sharp pins at the bottom to insert into the wreath between the branches, but ordinary ones will do too), insert candles into them.
- We decorate the wreath with large cones and decorative flowers (two each in red and gold).
ATTENTION! Do not leave such a wreath unattended with lit candles!
Master class No. 2: Balloon wreath
To make such a wreath, you most likely won’t even have to go to the store for materials. After all iron clothes hanger and Christmas balls Almost everyone has it. So choose a time to work and get going!
You will need:
- 1 wire hanger, christmas balls red (the quantity depends on the size of the balls you have at home),
- pliers, wire cutters (optional),
- bow ribbon,
- pine or Christmas tree branches (or garland),
- wire or strong thread (preferably green).

Step by step execution:

Step 1:
- Use pliers to give the hanger a round look. Don't worry if it's not perfectly level, the balls will cover all the unevenness.
- Unscrew the hanger, that is, disconnect it at the attachment point under the hook.
Step 2: 
- Place the balls on the wire. If the end is too sharp or uneven, cut it with pliers. Once all the balls have been strung, bend the hook with pliers to secure the circle.
- There is no need to hang the balls on top near the hook, since there will be ribbon and pine branches in this place.
Step 3:
- Attach branches to the top of the wreath on both sides of the hook (tie them with wire or thread).
- Make a ribbon bow and attach it under the hook.
- All is ready! There’s even a hook right away, all you have to do is hang it!
Master class No. 3: Pine cone wreath
A Christmas wreath made of pine cones is very simple to make, but its main advantage is that it is stored for a long time and does not fall off, unlike a spruce wreath. It can be sent for storage until next New Year.

Materials:
- Dry cones from 30 or more pieces, depending on the diameter of the wreath
- The base for the wreath (if you don’t have one ready like the photo, cut out a torus from thick cardboard)
- Glue gun.
- Decor at your discretion.
Work order:
Stage 1: Laying the first circle
- Using a glue gun, we attach the cones to the inside of the Torus or circle.
- Inside is best attach smaller cones.
- The distance between the cones is 1-2 cm. They should not be attached closer. Maybe even 3-4 cm.


Stage 2:
We do the same thing, but on the outside of the circle with larger cones. Distances between them - 3-4 cm. They should lie freely - not overlap each other.

Stage 3:
- And now fill the middle row- he seems to should be on top internal and external row. You can attach the cones not vertically upward, but slightly pointing them in different directions, filling the voids.
- We decorate with sprigs of berries or live spruce.


TIP: If you add a garland on top, it will be even more spectacular!

Master class No. 4: From pine branches
“Simple and tasteful” is the most suitable phrase for this method of production. Christmas greenery and minimal decorations. but nevertheless, when you look at the door with such a wreath, it immediately becomes clear that there is a truly festive atmosphere here!


Materials:
- wreath mold made of thick wire,
- greenery (real or artificial pine branches, other conifers are also suitable),
- cones, wire (for tying branches),
- glue gun,
- small bells,
- ribbon for bow.
ATTENTION! When choosing the length of the wire form, keep in mind that after attaching the branches, the wreath will increase several times in size.
Manufacturing stages:
- Take a few pine branches and Attach them to the form using wire. First fix the ends of the branches, then wrap them around the wire several times, wrap them with wire. Wrap the entire base in this manner.
- Make another ball of twigs on top of the previous one, in the same way. You should get a uniform coniferous wreath.
- Attach some pine cones.
- Add 3-4 bells golden or silver color to create festive mood. Attach with a glue gun.
- Make a ribbon bow and attach it to the wreath.
Every time you open the door, you will hear the quiet ringing of bells and understand that the holiday is in the air around you!
Master class No. 5: Wreath made of decorative mesh
With such a wreath you will definitely surprise all your neighbors! This colored hemisphere will not leave anyone indifferent; just looking at it will make you smile and have a sweet anticipation of the holiday!

Materials:
- round wire wreath base,
- decorative mesh in rolls about 50 cm wide (several colors, compatible with each other),
- fluffy decorative wire.

TIP: If you don’t have such a base for a wreath, then you can cut it out of thick cardboard with a torus thickness of -10-15 cm. Then attaching the mesh can be done using a needle and thread or a glue gun.
Manufacturing stages:
Step 1:


- Cut off approximately 25-30 cm mesh and roll it into a roll. Squeeze in the center with your fingers. To make it more convenient, you can take someone as an assistant to hold the packages.
- You will need a lot of these rolls, they don't have to be exactly the same length.
Step 2:

- Group rolls together 4 each, connecting the centers and tying them in this place with fluffy wire. Leave the ends of the wire for attachment to the base.
- Tie each such part to the base of the wreath(the remaining ends of the wire). They should be close to each other, leaving no free space.
- Continue until the entire space is filled.


Ready! It turned out very colorful and festive! If desired, you can hang a toy on the wreath so that it is in the center. But be careful not to overdo it, so that it doesn’t turn out to be “too much”, because everywhere you need to know when to stop.

Wreath ideas
Finally, I would like to point out that here are some ideas for making wreaths. And, in fact, there are a lot of them! After all, it’s worth replacing a small part, making your own amendment, and you’ll get a new unique copy! Turn on your imagination and create! Involve the whole family in this process to make the process even more interesting and enjoyable!
Merry Christmas!!!


Designer wreaths 2019
In 2019, vertical wreaths are coming into fashion; they are mounted not on the wall, but on the ceiling, like a pendant. The principle of assembling the wreath is the same as described above. BUT
- You can place candles on top of them.
- Add hanging elements
There is no limit to fantasy. The main thing is that there is somewhere to hang it on the ceiling! If your chandelier is not very good, then you can just place it under it.


On the eve of a holiday, you always want to treat yourself to something interesting. Why not make a New Year's wreath with your own hands? This is a cute decoration traditional for Catholic Christians, is actively taking root in our country. The doors of offices, government agencies and residential buildings are increasingly decorated with exquisite and colorful wreaths, which add festive charm to the room.
The traditional Christmas wreath was made from fir branches and vertically placed large white candles, each of which was lit 4, 3, 2 and 1 week before Christmas. The circle is the globe, the candles are the cardinal directions; green color symbolizes life.
Today, the wreath has noticeably changed, it has new decorative elements, and the variety of materials is pleasantly amazing! In this article we will teach you how to make a New Year's wreath with your own hands and demonstrate detailed master class . And not even alone.
 How to make a decoration such as a New Year or Christmas wreath, you can see in the photo or watch a video master class. To begin with, we will tell you how to make a wreath from live fir branches step by step - a traditional decoration that usually hang on the door.

- Take a thick wire and use it to make a frame for your future wreath.
 2. Form small bundles of spruce or pine branches and begin tying the wire with them.
 3. Move in an exact circle to fill the entire space with branches.
 4. When the wreath is ready, decorate it with ribbons and New Year's toys.
And that's pretty simple and original way making a wreath from Christmas balls.

 1. Take a regular wire hanger and bend it to form a circle.
 2. Separate the ends of the hanger so you can string the balls onto it.
 3. Prepare the balls: it’s better to take different shapes and textures, in one color scheme. For such a wreath you will need about 80 balls.
 4. String the balls so that they are located tightly to each other. If necessary, secure the balls with super glue.
 5. Connect the ends of the hanger after you have put all the balls on.
 6. Decorate the hook with red ribbon.
 7. Do lush bow
 8. Secure it with ribbon and tie it to the wreath.
Christmas wreath: ideas for original decor
 So you found out 2 most popular ways making wreaths for decoration New Year's interior. However, if you think that this is the end of the New Year's variety, you are mistaken. There are an incredible number of ideas To make a New Year's wreath with your own hands, there are also various videos. We have selected only a few options. We are sure you will be surprised. So, you can make a New Year’s wreath:
- from cones;
- from candies;
- made of felt or felt;
- made of foamiran (or plastic suede);
- from tinsel;
- made of straw;
- from burlap;
- from twigs and vines.
 Like this "sweet" wreath may appear at your home. Agree - beautiful and tasty! And you only need a few materials - an ordinary hanger and a couple of kilograms of inexpensive sweets.

 And this is another great idea - and such a wreath can be used for several years. Purchase a wreath base and a couple of meters of felt fabric from the store. Cut out circles of the same diameter from felt. Form fabric flowers using bobby pins. We decorate it, make a loop and hang it on the door.
 Excellent the basis for the wreath will be an old hoop. You can also cut out a circle from thick cardboard and decorate it with tinsel.
 Very stylish looks like a Christmas wreath made of burlap.
Making a Christmas wreath from scrap materials
 Today, for making a wreath you can find a whole range of unusual and extraordinary ideas. What can I say, some dreamers have learned to make Christmas wreaths from scrap materials: clothespins, socks, buttons, plastic bottles, egg trays and even from food. Yes, for example, you can make a base from branches or straw and attach slices of oven-dried oranges to it. Also gained unprecedented popularity macaroni wreaths. In general, see for yourself, your imagination will help you figure it out.