First, we make a Christmas wreath with our own hands from the simplest, brightest and most festive materials at hand, which are found in abundance in every modern home. Let's try to make a Christmas wreath from balls with our own hands, for this you will need enough a large number of data Christmas tree decorations. But they are now inexpensive and are offered for sale in a large assortment. Making a Christmas wreath with your own hands can be combined with communication with children; it is worth actively involving them in such work.
Materials:
- foam base;
- Christmas balls;
- beads;
- decorative dragonflies and butterflies;
- ribbon;
- knitwear
Progress
Cut a strip 2-3 cm wide from knitted fabric and decorate the foam base.
Prepare the Christmas balls for work. Using pliers, remove the protruding part from the ball.
Heat the glue gun to the desired temperature. Glue the balls onto the base, try to glue them tightly, without gaps.
Decorate the wreath with beads, decorative dragonflies and a butterfly. Use leftover beads to make a wreath pendant.
Make a bow from the mesh tape and glue it to the wreath.


Adviсe:
Use balls of the same color, but different in size, with different surfaces (shiny, matte, mirror, etc.). Then the wreath will look brighter and more impressive.
A wreath in combination with a decor of pine cones and balls painted in the same color will look no less beautiful.

You can make beautiful DIY Christmas wreaths from the most ordinary balls of thread that are lying around idle in the handicraft bins. All you have to do is show your imagination and an unusual decorative element will decorate your home. In order to make a Christmas wreath from threads with your own hands, you just need to follow the instructions in the master class below.

Christmas wreath made of threads in the photo
Materials:
- corrugated cardboard base;
- a piece of knitted fabric;
- threads of various colors and textures;
- small red New Year's balls;
- satin ribbon;
- beads
Progress
Cut two circles of the same diameter from corrugated cardboard and make a hole in the center.
Please note: there are longitudinal stripes on the corrugated cardboard; glue the circles together so that the stripes on the first base are perpendicular to the stripes on the second. This is necessary for greater strength of the base and so that the cardboard does not bend along these strips under the weight of the decor.
Cut a strip of fabric approximately 5-6 cm wide and 2 m long.
It is convenient to use knitwear to decorate the base, since the edges of the knitwear practically do not fray.
Wrap the cardboard circle, placing one layer on top of the other, and glue the tip of the fabric to the base.
Wrap many balls of different sizes from threads. Balls can be made in one of the following ways:
as a base you can use small foam balls, which are sold in craft stores;
or take a piece of newspaper, crumple it and wind threads around it until a ball of the correct round shape is formed.
Heat the glue gun to the desired temperature and begin gluing the balls to the base. You can move in a circle, clockwise, gradually filling the space of the base, or in a chaotic order, glue first the large balls, then the medium and small ones. You need to make sure that there is no free space left, so try to glue the balls tightly enough to each other.
The remaining unfilled areas of the base can be masked with Christmas balls, gluing them on top of the balls.
Wrap decorative beads around the wreath; secure the ends of the beads with glue on the back side.
Use the same beads to make a pendant for a wreath.
Make a bow out of wide braid, glue to the beads.
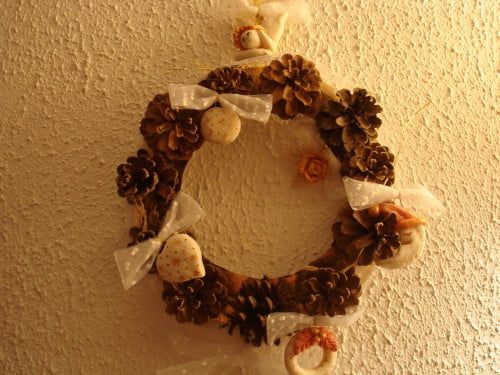
In order to make a Christmas wreath from pine cones with your own hands, you need to stock up on this in advance natural materials. On New Year's Eve in December it is very difficult to get them. Therefore, the idea of making such a New Year's Christmas wreath with your own hands is more suitable for thrifty people.

Christmas wreath made of pine cones in the photo
Materials:
- foam base;
- Pine cones;
- silver paint in a can;
- gray satin ribbon;
- glue gun;
- silver mesh fabric;
- silver cord.
Progress
Decorate the foam base with a satin ribbon.
Secure the end of the tape with glue.
Glue the cones, moving in a circle. Thus, you need to fill out the entire base. Try to place the cones as close to each other as possible.
Paint the finished wreath with silver paint from a can. Let the paint dry.
Attention! Paint only in a well-ventilated area!
Cut several wide strips from the silver mesh. Tie the strips into a bow and glue them to the wreath. The bows must be placed at the same distance from each other, symmetrically.
Before guests arrive, everyone cleans up the house and hangs decorations. And among all the garlands, candles and gifts, of course, the Christmas wreath occupies a special place. It can be hung on a door or wall, or placed in the center of the dining table.
In stores on the eve of the holidays you can see a large selection of wreaths of various designs: with ribbons, balls, candles. But to make it truly special and unique, and also cost much less, make it yourself. How to make a Christmas wreath with your own hands? Very simple! 
Here you will find 5 step-by-step master classes on making a Christmas wreath. Choose which one you like best: from balls, spruce, pine, pine cones or even mesh.
First, let's look at how to make a traditional Christmas wreath from spruce, which can then be mounted on the front or interior door.

Tools:
- straw wreath mold (optional size),
- balls (must match the size of the wreath: as the base of the wreath increases, the size of the toys also increases),
- decorations in the form of branches with red and zloty beads, a red ribbon for a bow, pine cones (large and small),
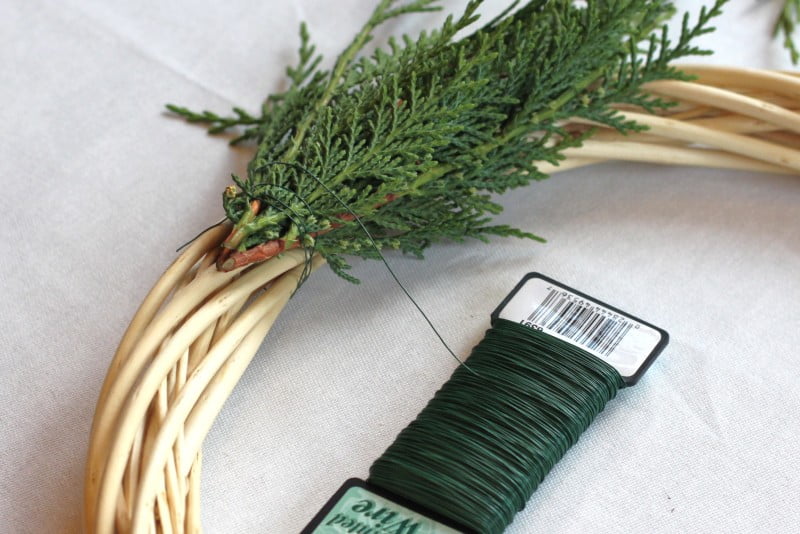
- spruce branches (thin so that they are easy to bend),
- several other branches (for example, pine),
- scissors, floral wire (preferably green),
- red and gold decorative flowers (three pieces each).

Lay everything out on the table and get to work.

TIP: You can make this form yourself from dry grass and cling film. Additionally wrapped with tape.
Step-by-step production
STEP 1: Making a base from branches


- First, make a base of pine branches. Lay them out in the same direction, e.g. counterclock-wise, let the ends of the branches be on the right, and lay the soft tops of the branches to the left side. Attach them to a straw wreath, tie around with floral wire, tie down to the base.
- Continue adding more branches around the shape.
- Look, are there any empty seats left?, fill in all the gaps with smaller branches.
- So far he looks a little disheveled and sloppy. Wrap a little more wire around to tie down any large branches that are sticking out. The wire should be hidden behind the branches. Now you have a uniform, lush wreath - the foundation for further work.
Step 2: Decorate the wreath


- Now add a few other sprigs (in the same direction as the pine ones), distributing them evenly throughout the wreath.
- Attach a red bow. You can do without it, then the look will be more festive.
- You can add small pine cones if there were none on the branches themselves.
- The distribution of colors should be symmetrical(so that it doesn’t turn out that all the red decorations are in one place, otherwise it will look like a red spot). Divide the wreath into 4 parts, one of them has a bow, and the other three add a branch with red beads.
In principle, it already looks good and you can leave it like that, you can finish it.
IDEA: Or hang the wreath first in this form, and after a week add decorations, this way the wreath will definitely not get boring during the holidays
Step 3: Add More Decorations

- For contrast, attach several branches with gold beads.
- Attach the pine cones: wrap the floral wire around the pine cone close to its base and attach it to the wreath, securing it well in place. Make sure the wire is visible, as less as possible. You can also stop at this point, or continue adding balls.
- Attach three balls, taking into account the same conventional division of the wreath into four parts
- Add three red and three gold decorative flowers.
You did it! It turned out to be a wonderful Christmas wreath, all that remains is to attach it to the door to delight yourself and your neighbors!
How to make an Advent Wreath

Following the workflow just described, you can also create an Advent Wreath.
According to tradition, there are four candles on it: the first one was lit 4 weeks before Christmas, each subsequent Sunday one more was lit, so it was visible how the holiday was approaching.
Now a wreath of this type can be made with for traditional reasons and for decorative purposes. In any case, it will help create a festive atmosphere.
So, let's get to work:

- We create the base of the wreath from the branches, add small pine cones, as in the previous case.
- Fasten with hot glue gun candle holders(preferably with sharp pins at the bottom to insert into the wreath between the branches, but ordinary ones will do too), insert candles into them.
- We decorate the wreath with large cones and decorative flowers (two each in red and gold).
ATTENTION! Do not leave such a wreath unattended with lit candles!
Master class No. 2: Balloon wreath
To make such a wreath, you most likely won’t even have to go to the store for materials. After all iron clothes hanger and Christmas balls Almost everyone has it. So choose a time to work and get going!
You will need:
- 1 wire hanger, red Christmas balls (the number depends on the size of the balls you have at home),
- pliers, wire cutters (optional),
- bow ribbon,
- pine or Christmas tree branches (or garland),
- wire or strong thread (preferably green).

Step by step execution:

Step 1:
- Use pliers to give the hanger a round look. Don't worry if it's not perfectly level, the balls will cover all the unevenness.
- Unscrew the hanger, that is, disconnect it at the attachment point under the hook.
Step 2: 
- Place the balls on the wire. If the end is too sharp or uneven, cut it with pliers. Once all the balls have been strung, bend the hook with pliers to secure the circle.
- There is no need to hang the balls on top near the hook, since there will be ribbon and pine branches in this place.
Step 3:
- Attach branches to the top of the wreath on both sides of the hook (tie them with wire or thread).
- Make a ribbon bow and attach it under the hook.
- All is ready! There’s even a hook right away, all you have to do is hang it!
Master class No. 3: Pine cone wreath
A Christmas wreath made of pine cones is very simple to make, but its main advantage is that it is stored for a long time and does not fall off, unlike a spruce wreath. It can be sent for storage until next New Year.

Materials:
- Dry cones from 30 or more pieces, depending on the diameter of the wreath
- The base for the wreath (if you don’t have one ready like the photo, cut out a torus from thick cardboard)
- Glue gun.
- Decor at your discretion.
Work order:
Stage 1: Laying the first circle
- Using a glue gun, attach the cones to the inside of the Torus or circle.
- Inside is best attach smaller cones.
- The distance between the cones is 1-2 cm. They should not be attached closer. Maybe even 3-4 cm.


Stage 2:
We do the same thing, but on the outside of the circle with larger cones. Distances between them - 3-4 cm. They should lie freely - not overlap each other.

Stage 3:
- And now fill the middle row- he seems to should be on top internal and external row. You can attach the cones not vertically upward, but slightly pointing them in different directions, filling the voids.
- We decorate with sprigs of berries or live spruce.


TIP: If you add a garland on top, it will be even more spectacular!

Master class No. 4: From pine branches
“Simple and tasteful” is the most suitable phrase for this method of production. Christmas greenery and minimal decorations. but nevertheless, when you look at the door with such a wreath, it immediately becomes clear that there is a truly festive atmosphere here!


Materials:
- wreath mold made of thick wire,
- greenery (real or artificial pine branches, other conifers are also suitable),
- cones, wire (for tying branches),
- glue gun,
- small bells,
- ribbon for bow.
ATTENTION! When choosing the length of the wire form, keep in mind that after attaching the branches, the wreath will increase several times in size.
Manufacturing stages:
- Take a few pine branches and Attach them to the form using wire. First fix the ends of the branches, then wrap them around the wire several times, wrap them with wire. Wrap the entire base in this manner.
- Make another ball of twigs on top of the previous one, in the same way. You should get a uniform coniferous wreath.
- Attach some pine cones.
- Add 3-4 bells golden or silver color to create festive mood. Attach with a glue gun.
- Make a ribbon bow and attach it to the wreath.
Every time you open the door, you will hear the quiet ringing of bells and understand that the holiday is in the air around you!
Master class No. 5: Wreath made of decorative mesh
You will definitely surprise all your neighbors with this wreath! This colored hemisphere will not leave anyone indifferent; just looking at it will make you smile and have a sweet anticipation of the holiday!

Materials:
- round wire wreath base,
- decorative mesh in rolls about 50 cm wide (several colors, compatible with each other),
- fluffy decorative wire.

TIP: If you don’t have such a base for a wreath, then you can cut it out of thick cardboard with a torus thickness of -10-15 cm. Then attaching the mesh can be done using a needle and thread or a glue gun.
Manufacturing stages:
Step 1:


- Cut off approximately 25-30 cm mesh and roll it into a roll. Squeeze in the center with your fingers. To make it more convenient, you can take someone as an assistant to hold the packages.
- You will need a lot of these rolls, they don't have to be exactly the same length.
Step 2:

- Group rolls together 4 each, connecting the centers and tying them in this place with fluffy wire. Leave the ends of the wire for attachment to the base.
- Tie each such part to the base of the wreath(the remaining ends of the wire). They should be close to each other, leaving no free space.
- Continue until the entire space is filled.


Ready! It turned out very colorful and festive! If desired, you can hang a toy on the wreath so that it is in the center. But be careful not to overdo it, so that it doesn’t turn out to be “too much”, because everywhere you need to know when to stop.

Wreath ideas
Finally, I would like to point out that here are some ideas for making wreaths. And, in fact, there are a lot of them! After all, it’s worth replacing a small part, making your own amendment, and you’ll get a new unique copy! Turn on your imagination and create! Involve the whole family in this process to make the process even more interesting and enjoyable!
Merry Christmas!!!


Designer wreaths 2019
In 2019, vertical wreaths are coming into fashion; they are mounted not on the wall, but on the ceiling, like a pendant. The principle of assembling the wreath is the same as described above. BUT
- You can place candles on top of them.
- Add hanging elements
There is no limit to fantasy. The main thing is that there is somewhere to hang it on the ceiling! If your chandelier is not very good, then you can just place it under it.


It's December - which means... New Year's mood has already captured everyone who expects magic and joyful events in winter. To fill everything around with the holiday spirit, everyone strives to surround themselves, one of which is a Christmas wreath.
How did the tradition of decorating a house with wreaths come about?
Decorating your home this way is enough ancient tradition , which came from Western countries. It is worth noting that Christmas wreaths on Russian doors only recently looked quite exotic.

The idea of creation belongs to Johann Wichern, who lived in Hamburg. He was wealthy enough that he could afford to help orphans. The kids looked forward to Christmas and constantly asked their caregiver when it would come. Then Johann decided to give them a small gift - taking an old cart wheel and placing 16 candles on it, he hung it on the door. 12 candles were red and not very large, and the remaining 4 were much larger and white. Every morning, Johann and the kids lit one red candle, and on Sunday one white candle was lit. The result was a kind of calendar that allowed us to count down the time until the long-awaited holiday.

Wreath- It is not simple symbol of Christmas and New Year, it is also a kind of amulet for the house, which protects all its inhabitants, brings happiness and prosperity. The round shape of the wreath symbolizes endless life, green color- good health, and small candles represent the warmth of the family hearth.

How to make a frame for a wreath?
Can serve as a basis tree or metal wire, and coniferous branches and even paper. The strength of the entire structure itself and its durability depend on the choice of base. So, the classic base can be straw, vines, willow twigs and even old wheel rim. If this is not at hand, ordinary metal wire will also be a good basis for a Christmas decoration. Another option - unnecessary wires(for example, an old extension cord), which must be tightly twisted together. If you don’t know how to make a Christmas wreath with your own hands, the photos will help you understand the basic principle of operation.


Small piece of old hose, thick cardboard, as well as pieces of old newspaper rolled up together and fastened with wire, as well as fabric in the form of a roller filled with cotton wool or padding polyester - all this and much more can serve as an excellent basis for an advent wreath.

How to decorate a Christmas wreath?
For decoration you can use classic ones - Christmas balls, tinsel, artificial candles and small figurines of angels. However, the symbol hearth and home and the approaching magic deserves more imagination, so it’s worth making a little effort to ensure that every detail of this New Year's miracle was of particular interest.

Textile
Bright ribbons of red, green, gold and silver will decorate the Christmas wreath and give it a festive look. If desired, you can complement the composition with a bow made of beautiful fabric.

Cones
This decorative element was given by nature itself. To make the cones look brighter and more attractive, you can cover them with silver paint.

Needles
Coniferous or pine branches can be replaced with thuja or juniper paws. The decorative jewelry store sells artificial fir legs - in this case, the wreath will last for several years.

Berries
Juicy and beautiful berries will remind you that autumn is already over, and frosts and snow are ahead. They pair well with both thatch and green spruce feet.

Flowers
Fresh flowers on wreaths are very rare, as they quickly fade. But recently, stabilized plants have appeared that can be included even in the most complex compositions. If you do not have such elements on hand, then replace them with dried flowers.

Yarn
An original way to decorate a wreath is to add to it knitted jewelry or pompoms made from yarn. Stylish and unusual.

Candies
What can please children more than sweets? Candy in a bright wrapper makes a great decoration, but can quickly disappear from the base.

Paper
Decorations can also be made from plain craft paper. Flowers, animal figures or New Year's motifs - it all depends on your imagination.

Leaves
Dried leaves will perfectly complement a wreath that reminds you of the end of this year. This composition will be complemented by cinnamon sticks and dried fruits.

DIY Christmas wreath: step-by-step instructions
How to make a Christmas wreath with your own hands step by step? Such a decoration will not only delight the eyes of others, but also exude an extraordinary aroma - another symbol of the approaching holiday. However, there is a small disadvantage - sooner or later the needles will begin to fall off.

Required materials and tools:
- strong and flexible wire (from 2 to 4 meters);
- threads;
- neat branches of real spruce (can be replaced with juniper, thuja branches, etc.);
- liquid nails or glue;
- cones, colorful ribbons;
- candies and nuts;
- bunches of rowan or viburnum.

First you need to make a wire frame. To do this, you need to wind it in a circle of suitable diameter and fasten it together.
After this, you can start decorating the green base. All elements can be secured either with glue or by wrapping them with wire to the base.
Advent wreath: photo


How to make a Christmas wreath with your own hands: video
Any holiday, especially New Year and Christmas, require careful preparation. This is not only buying gifts for family and friends, a festive feast and a Christmas tree with a bright garland. You need to create a festive atmosphere in your home and . And for this we begin to decorate our home from the very threshold. Today we will make a New Year's wreath with our own hands. And we will definitely attach what we get to front door. And then decide for yourself, outside or inside!
First you need to think about which materials Your New Year's wreath will be made. Believe me, the choice can be quite wide. Namely:
- a traditional wreath made of thuja or conifer branches with the addition of various decorations
- from natural cones
- from New Year's toys
- from tinsel
- organza
- from artificial materials imitating the branches of coniferous trees
- from feathers!
This article will discuss options for making a festive wreath from all of the above materials.
You need to start making a festive wreath from natural branches of coniferous plants by preparing everyone necessary materials and tools. A tools you will need simple ones:
- scissors
- wire cutters
- glue gun and glue sticks

Materials you may need:
- branches of thuja or coniferous tree - spruce, pine, cedar
- wreath base
- strong and not too thin threads or twine
- thin, flexible wire
- glue "Moment Crystal"
- Christmas decorations
- serpentine and tinsel
- gift paper and gift bows
- organza
- feather boa

Making a wreath is impossible without a base on which it will be attached. Therefore, first of all we choose her in order to form a New Year's wreath. Read on to find out which base to choose for your craft.

When the basis for the New Year's wreath has already been chosen, we begin to make the wreath itself. To do this, take one or two small branches of thuja or ephedra and tie them tightly to the base. We secure the thread so that it does not unwind. Next, we sequentially apply the following branches and secure them again. And so we move over the entire surface of the base until it is completely covered with branches and you get a wreath.
The size of the wreath directly depends on the size of the base. For a wreath made from natural branches of coniferous trees, choose a solid base, as the weight of the wreath is impressive.

Such wreaths made from natural materials can be decorated with cones and clusters of autumn berries: viburnum, black and red rowan. Of course, such a wreath will not last long: the berries will wither and wrinkle, and the needles will begin to fall off. Therefore, if you want your New Year's wreath to be more durable, replace natural ingredients to artificial ones.

Artificial elements often look no worse than natural ones.

How to make a wreath from pine or cedar branches, watch this video.
Needless to say, now everything can be bought in stores. But a wreath made by yourself will still be better, even if, due to inexperience, you make it a little “disheveled.” Handmade in such things is always highly appreciated.

Of course, you often want to decorate a New Year’s wreath with everyone at once. But you shouldn't be too zealous. There must be moderation in everything. Choose something from your existing home:
- small Christmas toys
- small “gifts” made of foil
- bumps
- bows
- ribbons
- artificial flowers
- nuts
- candies and so on...

Decorate a wreath with pine cones - simple, affordable and, perhaps, correct option. If you took natural branches for the wreath, then pine cones and matting are what you need for decoration.

Natural pine cones also make very beautiful Christmas wreaths. To make them you will need mainly pine cones. But spruce and smaller alder trees will not be superfluous.

Watch the master class in this video and you can easily make a wreath of pine cones with your own hands.
If you don’t have the time or desire to make the wreath voluminous and large, make a simple version - stick the pine cones in one row on a cardboard hoop, add some decorations. You will get a very nice wreath.
In my opinion, of course, the most beautiful New Year's wreaths are made from pine cones with the addition of berry branches.

If you want something unusual, spray paint the fir branches and cones in the color you like. For example, in blue.

Silver color has always been the embodiment of crisp snow in the cold, fresh air and winter holiday. Nothing changed! Everything goes on!

Another video on this topic.
A wreath of coniferous or thuja branches can decorate not only a door or wall, but also a chandelier!

In addition to a New Year's wreath from pine cones or branches, you can quickly make a wreath from organza and Christmas tree balls. To do this, take the organza to which you will tie and simply tie large bows around it. Organza is a fairly stiff material and holds its shape well. Bright balls can be glued or tied to the base of the wreath.

Imagine and come up with a look his New Year's wreath. Decorate it with something unusual, like pretty feathers!

If you do not use natural materials in an organza wreath, then the wreath can decorate your home for a long time.

Doesn’t this “Santa Claus” cheer you up?

Elegant and yet impressive looking feather wreaths. To make them, they use ready-made feather scarves (also called boas) and Christmas tree balls.

New Year's feather wreaths are something romantic and at the same time delightful. Suitable for dreamy and pure natures.

All this is good when you can buy what you need in stores for the holidays. But it’s another matter when you want to do something similar (and maybe even better) with your own hands. When preparing for the holidays, a pre-holiday mood settles in the house, creating that same atmosphere of home where you want to return. If you feel a craving for creativity during the New Year's Eve, do not suppress this impulse within yourself, but give yourself the opportunity to translate this desire into something significant. For example, do it yourself New Year's wreath from Christmas decorations .

You can probably imagine how many different compositions can be assembled from Christmas tree balls! But it can also be a wreath of the most different toys that are at home. Or you can collect only cold (or warm) shades for your craft.

To make a wreath from Christmas tree decorations, you can use any kind and stick balls or icicles on it. Or you can string as many toys on a strong wire as will fit on it. To make the wreath more voluminous, glue the remaining balls with hot glue.

Tinsel wreath can be made quite quickly. We wrap a foam or cardboard base with tinsel and decorate it with a Christmas poinsettia flower. Add figures and beads that you can find at home.

A tinsel wreath does not require a strong and reliable frame. A simple cardboard hoop will be enough.

Use the advice of those who have already made New Year's wreaths with their own hands.