Such three-dimensional figures can be made of any shape, they can be multi-colored, they can be decorated with beads or lace and made beautiful inscription. In such an unusual box you can store jewelry or all sorts of women's little things.
Many fathers and mothers are wondering how to best in an accessible way Explain this or that question to the child. When a child grows up, the time comes to explain to him complex geometric shapes - cube, sphere, etc. It is much easier to show these figures to a child. To give the child three-dimensional models geometric shapes, they need to be made from something.
The most convenient and easiest to make is paper crafts in the origami style.

There are many different shapes that people have learned to make from paper and not necessarily geometric ones. It can be volumetric hearts, which you can use as decorations for Valentine's Day or stars that will complement the decor in the nursery.
Volumetric paper figures: diagrams of geometric shapes
Creating three-dimensional geometric shapes is not only exciting, but also useful. The child learns to think spatially, which is very necessary.
The simplest way to make a three-dimensional geometric figure is to print the templates and cut along the dotted line, then glue them according to the instructions.
But you can also make such figures yourself. To do this you will need: cardboard, colored or White paper, pencil, ruler, scissors and glue.

How to make a paper cube:
- On a piece of paper, draw 4 identical squares with sides 4 cm in a row in a row.
- From the second square, up and down, draw an identical square. You should get a pattern of 6 squares in the form of a cross.
- On the protruding squares, draw valves in the form of trapezoids (width no more than 0.7 cm).
- Cut out a template - a future sample for working with cardboard or other thick paper.
- Bend the figure along the drawn lines, coat the small trapezoid flaps with glue and connect all sides together.
If desired, each side of the cube can be covered with colored paper. And if one side with the flap is not fixed with glue, you will end up with a small box that can be used as gift wrapping.
Amusing volumetric paper animals: toys for kids
Children love to cut out, glue, and draw - such activities broaden the child’s horizons, develop attentiveness and perseverance. Using ready-made diagrams on the Internet or in creative magazines, schoolchildren can create different animal figures.

Glue volumetric figures quite simple:
- Having chosen the desired animal, you need to print the diagram.
- Cut out the parts according to the template, leaving a small margin for gluing.
- Make folds along the line and glue the figure.
You can make easy crafts yourself. A bear, a fox, a dog, a cat, a bee - all these animals will be made using identical technology.
Whatever craft you make, you need to let it dry completely. If you handle wet glue with your hand, you can leave dirty fingerprints on the paper.
To create a simple craft, you will need white and green paper, scissors, and glue.
DIY little bunny toy:
- Two strips 3 cm wide and 10 and 7 cm long;
- Two semicircles in the shape of ears;
- Two eyes (blanks);
- A free-form green piece of paper for the “grass.”
Fold the strips and glue the ends together. You should get two wide rings. Glue a larger ring on a green piece of grass - the body of a bunny, and glue the head onto it. Attach the ears evenly to the back of the head. Draw or glue ready-made eyes, make a mouth - the bunny is ready.
Do-it-yourself three-dimensional paintings from toilet paper: master class
Any creative work is inextricably linked with extraordinary thinking. Crafts made from improvised materials help both children and adults look at these things from a different angle.
Volumetric pictures from toilet paper not very well known in ordinary circles. But where there is room for creative thinking, there is always something new and interesting.

To create a picture you will need:
- Toilet paper;
- PVA glue;
- Thick cardboard;
- Gouache;
- Brushes 2-3 pcs. different sizes;
- Acrylic varnish;
- Glue container;
- Pencil.
The way you work with paper depends on its appearance. Before gluing the paper onto the cardboard, you need to soak it well.
How to make a three-dimensional picture from toilet paper:
- It is better to cover the cardboard with one or several layers of soaked paper. To do this, apply a thin and even layer of PVA glue to the cardboard and then apply a strip of paper. After drying, we have a ready-made base for the painting.
- Let's draw a tree.
- Take glue into a bowl and dilute it a little with water.
- To create a tree trunk, the most in a convenient way will twist the soaked paper into a spiral. Lay it out according to the pattern of the tree trunk and its branches.
- To create tree leaves, a suitable method is to layer many small pieces of paper. Twist small pieces into paper balls, soak in glue and lay out according to the template. This will give the tree volume and, of course, make the picture clearer due to the difference in textures.
The finished picture can be inserted into a regular wooden frame without glass.
The painting should be painted on dry paper.
For coloring it is better to use gouache. Ordinary watercolor paint will not lay down in a dense layer on the paper and will show through. For paint, use a high-quality brush that will not disintegrate.
Original do-it-yourself voluminous paper birds: origami patterns
With a little practice, you can create complex and interesting three-dimensional paper shapes with your own hands. You need to start with the simplest shapes that can be printed, cut and glued.

The origami technique is not as easy as folding according to a ready-made template, but it is very interesting. It happens without cutting.
This work with origami involves the use square sheet paper that must be pre-cut.
Do-it-yourself volumetric owl: working with paper
- We bend a sheet of paper 40x40 cm diagonally, unbend it and bend it along the second diagonal.
- We turn the sheet over with the curves facing up and fold it in half towards itself.
- Unbend and bend in half again from left to right. We fold the sheet along these folds into a square and place it in front of us in the form of a diamond.
- We bend the lower edges towards the center, forming two triangles. We bend the upper triangle and unbend it back.
- Unfold the side triangles and open the bottom corner. Turn the craft over and also open the bottom corner.
- We bend the upper half of the top layer in half “towards ourselves”.
- In the same way, bend the upper half of the second layer back.
- We bend the side edges of the top layer, forming 2 triangles. We bend the bottom layer back in the same way.
- Fold the right half of the top layer in half to the left. Turn over and repeat the action.
- At the same time, we turn the left half to the right and pull the lower part up - we get a wing.
- Bend the left half to the right - onto the wing, and back half we bring it forward. We make the second wing identical to the first.
- We bend the top corner down and form the head. Turn the product over.
- We cut the corners on the sides and lift up the resulting triangles. Turn it over.
- We make a cut in the lower corner, and from the top layer we bend triangles to the side—the owl’s feet. Your bird is ready!
The owl will work out white, it can be decorated. For drawing, use watercolors, gouache or a regular felt-tip pen.
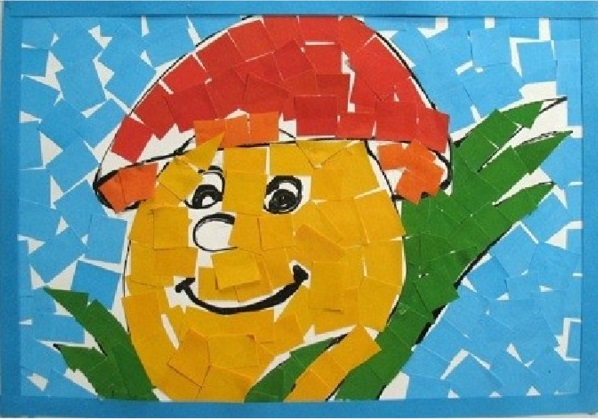
Volumetric paper applique: templates and pictures from lumps of paper
It is also interesting to be creative with small children. A very popular type of needlework for kids is creating pictures from lumps of colored paper. This work is quite easy, but at the same time painstaking, because you have to work with small pieces of paper.

Working with paper balls develops the motor skills of the fingers, which determines the development of the baby’s speech and his further mental development.
For work we will need - colored cardboard, thin colored paper (ideally napkins), glue, pencil.
When working, it is important not to forget about alternating colors, because the picture should be bright and colorful.
Before you start creating a picture, you need to draw simple toy figures on a sheet of cardboard. It could be a doll, a car, a butterfly or a whole house.
To make a picture from lumps, you need to cut a napkin into many small squares. Crush each piece with your hands, dip it in glue and apply it to the drawing, forming a three-dimensional picture.
Simple three-dimensional paper crafts for children: how to surprise a child
Will help pass the cold winter evenings creative work with your children. Every kid wants to have toy furniture that can be made from ordinary paper and cardboard.

Armed good mood, you need to use your imagination. Take a couple of sheets of cardboard, scissors, glue, plastic bottle, paint and openwork ribbon - with the help of these simple things you can create a beautiful table for a doll.
DIY doll table:
- Prepare materials. Cut off part of the bottle from the neck to 12-15 centimeters. Cut 2 ovals from cardboard - the future shape of the table.
- Glue 1 oval onto the neck of the bottle. Paint the bottle any color and wait until it dries.
- Glue the openwork to the rim of the oval and glue the 2nd oval on top.
The finished table can be decorated with beads and flowers and used as decoration.
In addition to the table, you can make a whole set of furniture - chairs, a bed, an armchair. If you can’t draw the details manually, you can find ready-made diagrams on the Internet. It is very easy to cut out various volumetric crafts.
Master class: three-dimensional paper crafts (video)
Looking at these crafts, it’s hard to believe that everything can be done with your own hands from the simplest material of paper. Kids can make light appliqués, while older children will be interested in voluminous crafts that will become a good gift for any holiday. The main thing in this creativity is accuracy and perseverance, only then will all the crafts turn out beautiful and interesting.
Origami are paper figures that belong to Japanese art and have existed in it for more than one century. Even in ancient times, monks used paper figurines to decorate temples and its halls, as well as to use them for religious purposes (carrying out rituals).
Every inexperienced master can make origami out of paper with his own hands, but the main criterion is perseverance and precision of movements. Today you will understand that you don’t need to be an ace to make these products beautifully.

Origami tools
The main attention should be paid to the choice of paper for crafts. For origami, office, hard paper of different types is suitable. color range. It is suitable for any scheme, both simple and complex.

To secure the paper, you need to purchase a glue stick or PVA glue. Other types of glue are also suitable, the best option would be those that do not leave marks, and if they do, they can be easily removed.

Buy paints in spray cans to give the desired shade to products made from gray or plain white paper.
A cutter is suitable for straightening the edges of origami, but do not forget to be careful with it.

Also, to create toys you need rulers and pencils for drawing diagrams. To add creativity and originality to your origami, you can decorate it with beads, bugles, rhinestones, and ribbons.

Varieties of paper figures
In addition to the classic look, there are many different alternative types:
- Classic simple origami - those who first decided to make paper figures should start with it. Example of this style There is a figurine of a crane.
- Origami from modules is more complicated than the first type. Several parts (modules) must be connected by simple folding. The product lasts quite a long time.
- Aerogami - paper airplane figures.
- Kirigami - creating figures using scissors. For example, postcards.
- Kusudami – volumetric origami, parts of the product are connected to each other using threads and glue. The shape of the figurine often resembles a large ball. This type was often used to decorate the entrance to the temple.
Paper cranes
It is a classic type of origami. There is a legend among the people that if you make a thousand cranes, then what your heart wants will come true.

Let's take a closer look at how to make this wonderful figurine.
- Having folded the sheet diagonally, we cut off the unnecessary paper so that a sheet resembling a triangle remains.
- We bend it again. There should be 2 triangles. From the resulting triangle, straightening it, we make a square. We perform the same procedure on the other side.
- We hold it so that the edges are on top and bend them strictly towards the center.
- We also bend the upper triangle. And immediately we straighten the fold, we get an outline.
- We bend the corner that is lower than the rest horizontally.
- We make a rhombus (we align the edges to the center of the side). We perform the same maneuvers with the other side.
- To form the neck, take the lower part and begin to bend it where the inner contour is. Using the same method, we make the tail of the crane.
- Where the neck is, we bend the beginning, so we get a beak.
- We fold its wings using a small angle bend.
If desired, the crane can be painted or taken directly colored paper. The origami crane is ready.

Rose using origami technique
More attractive and easier for most beginners and origami masters alike are origami flowers. A common figurine is a paper rose.

Let's consider step by step instructions and a photo of this origami:
- Take colored paper, preferably red, fold it in half, then fold it again.
- We open the layer of paper that is at the top a little so that we get a swollen top.
- Turn it over to the other side and repeat the action described in the previous paragraph.
- Take the corners and bend them to the top corner.
- We bend the triangle that soon turns out in half until an outline appears.
- Open the triangle by pulling both corners down.
- Holding the pockets by the top, fold them down.
- We do points 4 to 7 on the other side.
- We bend the top corner.
- We unfold the lower part like a book.
- We bulge so that we get 2 triangles.
- Turn the product over.
- We carefully bend the lower right square from the top to the bottom edge (strictly diagonally).
- Turning 180̊ and doing point 13.
- We grab the walls of the origami with our fingers and, without fear, rotate it 360° until we see the resulting petals.

Paper swan
This technique is more complex than others since it uses a method modular origami. In order to make a three-dimensional swan, you need:
- Make approximately 460 triangles from white paper and 1 red one for the beak.
- We insert the corners of two triangles into the pocket of the third.
- Let's add two more. We put all the corners in the pocket.
- We make three such rows. You need to take about 30 modules for each row. We close the circle.
- Insert blanks for the next two rows.
- We press the center so that it slowly turns out.
- With all this, we turn the edges up.
- We make the rows further, but do not forget about the checkerboard order of the modules.
- In row 7 we make modules for the wings. We attach 12 blanks, making a gap for 2 corners, and attach the same number of blanks. In the remaining places we make the swan's tail and neck.
- In the 8th row for wings, the number of blanks becomes 1 less.
- We do this with subsequent rows, until last row There won't be 1 module left.
- We make the tail by reducing the pieces by one in each row.
- We assemble the neck from 10-12 modules, and the head from one red blank. We create the neck by gradually arching it.
- When the neck is ready, we assemble it together with the body.

DIY origami photo


Note!


Note!


There are many fun ways to fill time, but appliqué from geometric shapes will be one of the most entertaining hobbies because it allows you to create real masterpieces of art. Afterwards, it will be possible to decorate the interior of the home, creating a special atmosphere for relaxation or performing household chores.
Applications made from colored paper have gained great popularity in preschool and school educational institutions. It allows you to comprehensively develop a child’s skills, improving his basic abilities:
- motor skills;
- thinking;
- fantasy;
- dexterity;
- accuracy and others.
Types of applications
Depending on the type of projects or paper crafts created, this hobby can be divided into 2 types:

What can you make from geometric shapes from colored paper?
There is no single standard, as well as a program for teaching children, how to make various applications from colored paper, because each person’s imagination is very different.

The main task is to develop all the basic skills in them. In most cases, the teacher independently decides what pictures the children will make or gives them the opportunity to independently choose what they want to do. This is how not only motor skills develop, but also thinking, as the child chooses the character he likes.
Simple compositions
First, simple flat figures are mastered. For example, a train applique would be a great option for boys. It can be composed of several regular geometric figures, which will be cut out by the teacher or the child himself, depending on age.

Children begin to hold scissors confidently in their hands only at the age of 5-6, and they cannot cut out complex figures. correct form in first grade. In fact, it all depends on the child’s development, his activity and abilities. That's why a train would be a great start.
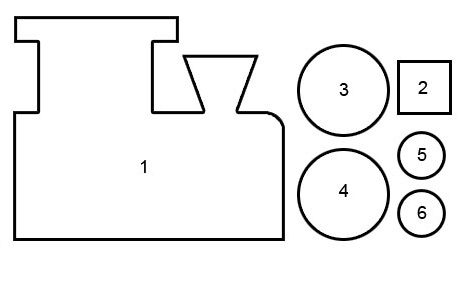
It will require:
- 3 rectangles of different colors and sizes. 1 will become a platform, 1 – a driver’s cabin, 1 – a water tank;
- the semicircle will be the front of the tank;
- an inverted isosceles triangle can become an exhaust pipe;
- a pair of circles - wheels;
- a long rectangle - a rod for eccentric connection of wheels.
The child learns from the presented materials to fold an image on a sheet of paper, spread glue evenly, and evenly combine the parts together. Fine motor skills, thinking, and imagination develop if you invite him to make a train without an example.
Another fairly simple version of a paper masterpiece is a bird applique. It will require one large circle for the body, a couple of semicircles for the wings, several small triangles for the legs and beak.

You can create pictures of various animals from geometric shapes, letting your child think for himself which one he can make.
Volumetric applique made of colored quilling paper
After developing the skills of creating flat compositions, they proceed to volumetric applications from colored paper. Such crafts will be more difficult to master, so they are used in teaching for older children. For example, in group 4 kindergarten or 1st grade. Guys with good abilities can be assigned to a circle.

In the first stages, it is better to master simpler volumetric compositions. For example, a house applique with cutting templates like a good option. The wall may be flat, but the windows, roof and exhaust pipe may be protruding.

The method of adding volume is used differently. Paper parts can be bent, or they can be glued on an additional leg onto a background of the same dimensions, creating a 3D effect with a shadow.
Butterfly applique is one of simple options, which many children can master, even when making a composition in volume.

To do this, you can cut out 2 identical parts. Glue one completely, and bend the second in half and glue it in the center. This is how you get wings. The head is formed from a circle, and the body from a strip.
Volumetric compositions from simple figures
For younger children, you can suggest making an applique from circles of colored paper. From them, if you have some imagination, both flat compositions on a white sheet and three-dimensional ones are made.

With circles, abstract thinking will develop well if you invite the child to complete an arbitrary picture.
When children's imagination is already somewhat developed, they move on to more complex tasks. For example, mosaic applique is a good option for further development of skills.
Give your student a set of cuttings of different or the same shape so that he can come up with a composition on his own. If there are enough colors, you can get quite colorful pictures.
Cutting templates
If you don’t know where to start with your child’s development, then use a ready-made bunny template for appliqué or other animals.


There are many interesting sets with which you can comprehensively develop children's skills. In any case, all applications contribute to the formation of such qualities as:
- figurative and spatial thinking;
- perseverance;
- endurance;
- fantasy;
- manual dexterity and motor skills;
- accuracy.
As you reach a new level, the tasks for creating compositions can become more complex.
Creating crafts with your own hands is interesting not only for children, but also for adults. However, a sufficient number of models have been invented for adults, which differ in the complexity of execution and the time spent on their creation. Recently, adults and children have become interested in creating complex geometric shapes. This type of figure includes the icosahedron, which is a regular polygon and is one of the Platonic solids - regular polyhedra. This figure has 20 triangular faces (equilateral triangles), 30 edges and 12 vertices, which are the junction of 5 edges. Assembling a correct icosahedron from paper is quite difficult, but interesting. If you are passionate about origami, then making a paper icosahedron with your own hands will not be difficult for you. Make it from colored corrugated paper, foil, wrapping paper for flowers. Using a variety of materials, you can add even more great beauty and spectacularity to its icosahedron. Everything depends only on the imagination of its creator and the available material on the table.
 |
 |
 |
 |
 |
 |
We offer you several options for icosahedron developments, which can be printed, transferred to thick paper and cardboard, bent along the lines and glued.
How to make an icosahedron from paper: diagram
In order to assemble an icosahedron from a sheet of paper or cardboard, you must first prepare the following materials:
- icosahedron layout;
- PVA glue;
- scissors;
- ruler.


When creating an icosahedron, it is important to reverse Special attention on the process of bending all the parts: in order to bend the paper evenly, you can use a regular ruler.
It is noteworthy that the icosahedron can also be found in everyday life. For example, in the shape of a truncated icosahedron (a polyhedron consisting of 12 pentagons and 20 hexagons of regular shape) soccer ball. This is especially visible if you color the resulting icosahedron in black and white, like the ball itself.
You can make such a soccer ball yourself by first printing out a scan of a truncated icosahedron in 2 copies:

Creating an icosahedron with your own hands is an interesting process that requires thoughtfulness, patience and large quantity paper. However, the result obtained in the end will be pleasing to the eye for a long time. The icosahedron can be given to a child to play with if he has already reached the age of three. By playing with such a complex geometric figure, he will develop not only imaginative thinking and spatial skills, but also get acquainted with the world of geometry. If an adult decides to create an icosahedron on his own, then such a creative process of constructing an icosahedron will allow him to pass the time and also show off to his loved ones his ability to create complex shapes.

Now everyone can work with paper. Even if you don’t have colored paper at hand, you can always take newspapers or glossy magazines. This will not make the craft any worse, but you can see that the texture of the paper is different from the usual one and the figures will take on a non-standard color.
What can you make from paper? Almost any figure, all you need is some imagination. But if things are not going well with imagination, then the Internet is replete with a huge number of proposals. Paper is now an easily accessible material. It’s easy and convenient to work with, and most importantly interesting. Most often, of course, children are interested in paper crafts.
For children's thinking, crafts are not so simple, but due to their mystery, they arouse such interest. Everyone has had cases in childhood when a friend showed how he made something out of paper, for example, a cracker, and everyone immediately tries to repeat after him and have the same toy.
Working with paper is also useful. This hobby develops imagination, intelligence, and trains fine motor skills. The child's spatial thinking begins to work.

To arouse a child's interest in paper crafts, you need to invite him to fold one light figure of his choice.
The most interesting and simple paper figures:
- Ship;
- Pinwheel;
- Frog;
- Firecracker;
- Airplane.
It won’t take much time to make such toys, one might say. This will be interesting to any schoolchild, and even to a toddler, if parents make a figurine with him.
There are more complex figures; they will appeal to those who have certain skills and have not lost interest in origami after the first airplane. For example: croaking frog, homing pigeon, swan, tulip, lily. These products will be much more difficult for you, but that makes them no less interesting.
DIY paper figures: diagrams, templates and their purpose
There are many different patterns and patterns that you can use to easily assemble almost any paper craft. It doesn’t require much work, just download the template, print it, cut it and glue it.
A template is also called a product, following the example of which the same one can be made. For example, a template made of thick cardboard will make it possible to trace the part on paper, and then cut it out and glue it.

This way you can avoid printing a lot of identical parts, but simply cut one out of cardboard and then trace it. This template is useful if, for example, you need to place many identical parts on one sheet of paper to create three-dimensional figures. This includes saving materials and developing useful skills in children.
This method is especially often used in schools and out-of-school institutions, in various circles. The leader or teacher simply hands out templates, and the children are already busy making raw materials for future crafts.
The scheme includes not only an inventory of details, but also step-by-step fulfillment of the conditions to achieve the final goal. As a rule, paper diagrams explain what needs to be folded where, where to fold and what to cut. This is quite important when working with voluminous paper crafts.
Interesting paper figures for children: crafts from stripes
The quilling technique is easy for older children to understand, and what to do with kids in order to develop their creativity and train their thinking. In addition to various applications and paintings from napkins, you can teach your child to make beautiful three-dimensional paper figures.
When working with crafts, the child learns geometry and gets to know geometric shapes with his own eyes.
You can make a lot out of strips of colored paper unusual crafts. To do this, you will need consumables - 2 different sheets of paper, scissors and glue.

Paper caterpillar:
- Cut 4-5 strips of paper 3-4 cm wide, 8-10 cm long. One strip should be a different color (future head).
- Roll into circles and glue the ends together. Do this for all the stripes.
- Glue the circles together, imitating a caterpillar. You can draw eyes on your head with a marker, or you can cut out small circles and stick them on.
- Cut out a leaf from dark green cardboard on which the caterpillar will sit. It should be bigger than our craft.
- Place the caterpillar on the leaf using glue.
Using a similar technology you can make a bee, a bunny, a cat, a dog. Your child will love working with bright paper and creating interesting crafts.
Various paper figures: a child discovers the world
It would seem that it could be simpler than cutting out some figure from paper, for example a triangle. What is simple for an adult is not so simple for a child. And yet, is it worth doing? Of course it's worth it. There will always be benefits and applications for this.

Your child is just learning to explore the world. First of all, he tastes everything, then learns to identify everything by touch, and then only visually. During this period, it is very useful to show the child various figures (square, triangle, circle, oval) using an example simple crafts. This is how he studies them and learns new things. The parents cut it out - the child learned.
Making applications will also help the child develop. Not worth cutting small parts or too difficult to understand.
Don't leave your baby unattended, let him take part. Over time, you can try letting him try to cut something out himself. In the first stages, do not forget about safety.
Subsequently, add gluing and folding elements to the cutting process. Make crafts more complex. For example, in the first stages a butterfly can be cut out of colored paper. In the future, you can make a butterfly by creating a corrugated one from colored paper by folding it into an accordion. Such a butterfly can decorate the interior of a nursery and become a source of pride for your child.
Three-dimensional figures will develop thinking and also add an element of complexity. These can be either geometric figures or, for example, hearts and stars. A particularly important and striking event should be the cutting out of snowflakes on New Year's Eve. When cutting out parts, pay attention to the child's accuracy.
Which paper figures should be cut out for children?
Your baby develops every day, learns new words and learns to do something new. To help your baby develop, you can study geometric shapes with him.

Where to begin:
- The simplest and most memorable figure is a circle. You can make several circles of different diameters so that the child understands that the name of the figure does not change depending on the size. You can walk around the apartment and visually show the round figures.
- Then square, triangle, etc.
- When the child has learned all the basic figures, you can ask him to make a little man or a house from the cut out parts - such a task will develop the child’s logic. These details can be used to create an applique – your child’s first painting.
Save your baby's first application; someday he will be interested to look at the fruits of his creativity.
As he grows, the figures may become more complex. These can be figures of animals, birds or things around us.
During this period, the child is interested in everything bright and colorful. You can fit creative activities into your daily routine, it will be both fun and useful. Allow your child to fantasize and create unusual and interesting crafts.
Master class: DIY paper figures (video)
Paper figures help a child explore the things that surround him, find out their shape and size. Using simple geometric shapes as an example, a child can learn to create the first applications, which can become an impetus for the development of his creative potential in the future.