It’s easy to sew a beautiful cockerel for the New Year and Easter. It can be given as a gift, used as an interior toy, or hung on a Christmas tree, on a wall, or on a bag. And for sewing, the craftswoman will need a rooster pattern from fabric.
Tilde toys are a charming home decoration
The things in this technique are easy to do. You just need to remember a few important rules.
- The toys are made from natural fabrics: linen, cotton, fleece.
- For the body and face (muzzle, head), it is best to use plain material.
- Clothes are made from fabric of any color, but it is preferable to use fabric with a small pattern.
- The seam of the halves of the product should run through the middle of the face or muzzle, crossing the nose.
- Tild dolls are traditionally made tanned using dry blush, powder, coffee, cocoa, and finely ground pencil lead to color the fabric. Sometimes masters even apply watercolor paint or gouache with a brush to already ready product. Animals that are made according to the canons of making dolls look original: tanned cockerels, hares, elephants are touching with their resemblance to tildes-bathers.
Uncover the tilde rooster
The most important thing, without which a tilde rooster will not work, is the pattern. Having chosen the most suitable one, it should be transferred to paper, polyethylene or cardboard. Then you need to carefully cut out each piece separately with scissors.
If for some reason the size of a fabric rooster pattern does not suit the master, he can transfer the pattern to graph paper, and then, using a grid, draw the templates on a different scale.
Considered here interesting option interior toys. It should turn out tanned, as bathers are usually made, a tilde rooster. The pattern in the article is given in full size, but it can be enlarged if desired. The drawing shows patterns for cutting the clothes of the leader of a chicken flock.
It should be remembered that all parts must have an allowance of 2-3 millimeters for seams. You can sew either by hand or by machine. To stuff the toy, you need to leave a hole in the most inconspicuous place, which is then sewn up manually with a hidden seam.
Attic toy "cockerel"
If the fabric is boiled in coffee, tea or coated with a mixture of instant coffee with cocoa powder and PVA glue before cutting, it will not only acquire a pleasant tan color, but will also retain an amazing aroma. Additionally, you can add cinnamon or vanilla to this paste. A toy sewn from the resulting material will not only decorate the interior, but also exude a pleasant smell of coffee, just as happens with toys made using the attic technique.
For sewing, the same fabric from which it is made using the tilde toy technique, that is, close to the human figure, is suitable. You'll get this cool little guy with a bird's head and wings, but with wide hips and standing on long straight legs.
To give the toy stability, before sewing on the legs and feet, wooden kebabs are inserted into the legs from below, piercing the filling. The skewers should stick into the body of the rooster and go 4-5 cm inside. You can use them not just one for each leg, but two or even three. The excess is broken off, leaving protruding ends 5-6 millimeters long for attachment to the foot.
In order for the cockerel to stand firmly on its feet, the feet can not be sewn from fabric, but molded from polymer clay, salt dough or plaster. The not yet completely dry feet are pricked onto the protruding ends of the skewers and the toy is left in a warm place. Such a rooster will be able to stand. If the feet are made of fabric, then the cockerel will need support. It will need to be leaned against something.

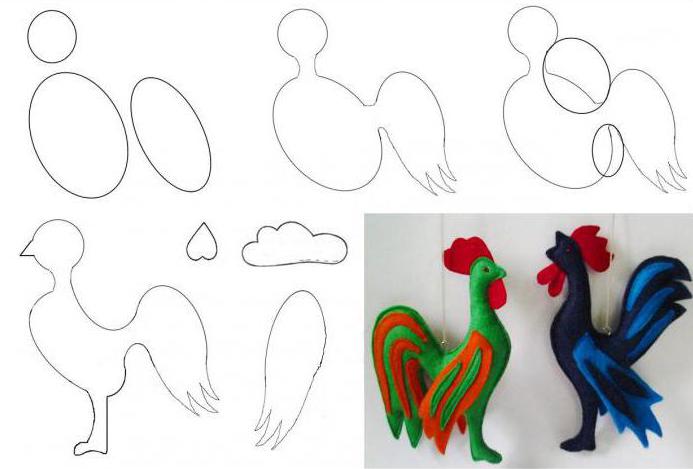
Usually such cockerels are dressed up in clothes. Attached here is a pattern of a rooster made of fabric using the technique of sewing a tilde toy - it is shaded in blue.
Sitting cockerel - the easiest option
But you can make a bird that looks very much like a real one. The easiest way to sew is a soft toy in the shape of a sitting cockerel. Even an inexperienced craftswoman can end up with a rooster that looks very much like a living one. of this type in the drawing above is shaded in red.
Cheerful cockerel sewn from felt
Stuffed soft toys have always been popular with children and delight adults. A patient craftsman who wields a needle and scissors may well end up with a funny creative rooster from felt.

The pattern is given in actual size. The first picture shows only part of the cutting templates, the next one shows the remaining patterns.

Master Class. Rooster pattern
Anyone can make toys with their own hands. This is a fun and rewarding activity. For those who like to dress up Christmas tree crafts made with your own hands, you will probably like the option - a felt rooster.
The pattern of a bright decoration can not only be taken from any sources, but also constructed independently. To create it you don’t even need to have the talent of an artist. Easy enough to do step-by-step recommendations of this master class.
- A circle is drawn with the same diameter as the head of the future toy rooster.
- An oval is located slightly lower and inclined. It will be the body of the bird.
- A little to the side of the body oval, another oval is drawn. The tail of the cockerel will be formed from it.
- Smooth concave lines connect the head and body, forming a neck.
- The oval of the tail is also connected to the body of the rooster.
- The lower part of the outer oval is decorated with several pointed corners - these are the ends of the tail feathers.
- Using an oval, draw a notch on the back of the bird.
- Another oval will help make the area under the tail rounder.
- The lower abdomen is drawn with a smooth line, making it lean. You can again use the oval, drawing it at the desired angle and selecting the required size so that the rooster’s chest protrudes forward - the keel.
- Anyone can easily draw a bird's beak and legs, even without drawing skills.
- The wing has the shape of an oval with pointed feather corners. It is drawn in the same way as the tail of a rooster.
- All that remains is to draw the patterns for the comb and beard.
That's all. The pattern for the felt toy is ready!
On New Year 2017 as New Year's gifts. Svetlana named this family the Goroshkins (and, by the way, they also have a new addition coming), but you will name your rooster and hen yourself!

To complete the work of creating New Year's gifts rooster and hen you will need:
- flax for the main parts of the rooster and chicken;
- red silk fabric;
- fabric for clothing;
- fabric marker or pencil;
- filler (here - synthetic fluff);
- needle, tinting (shades are possible), buttons for clothes, curly scissors.
New Year's gifts for 2017 rooster and hen master class:
- We print it on an A4 sheet, in this case the rooster and hen will be about 35 cm tall.

2. Now we transfer the pattern to the fabric. It can be not only linen (cotton, for example).
3. At the end of the work, we will tint the beak and legs in the required colors. But it would be possible to cut them out immediately from fabrics of the corresponding colors. We cut out the comb and beard from red silk.
4. We sew all the parts, not forgetting the places for turning and filling.

5. Using curly scissors, cut out the cut details.

6. Turn it inside out and fill the New Year’s cockerel.

7. A few tricks when creating the paws of a cockerel and a hen. First you need to estimate the approximate size of the paw (required!). Now you should iron a small piece of fabric as in the photo below.

Now you need to fold the fabric so that the bent strips match and sew. You will end up with a sewn piece of fabric with an ironed seam. Afterwards, apply the paw pattern so that the dotted line is clearly on the seam (see photo).

Now we outline and stitch the legs (without leaving any holes).

Cut it out.

And then we rip the transverse seam and turn the foot inside out.
 Let's fill it up.


11.Now we sew a comb and beard on the cockerel and send him to the stylist.)
12. So, clothes.
In the photo you see the prepared fabric. This is what the author wanted - to make a combined version. The fabric was thin, so the author glued it.

13. Here is the pattern for the overalls.

Let's cut it out.

Now you need to stitch along the white line.

Sew on the bib.

Fold and sew along the white line (see photo).
 Sew the side seams and turn them inside out. This is what happened.

We sew buttons, braid and straps (already on the rooster's suit).


Now we will sew the mummy according to the same pattern. She will be in a dress and pantaloons. Knickers are easy to make from baby sock and ribbons.

It is better to sew the pantaloons and sew on the braid directly on the toy.
 The dress pattern is here:

Decorate the image of the chicken to your taste. I have these beads:


I forgot to say: tint the beak and paws using ordinary shadows.
14. Using a testicle pattern of six segments, sew testicles for our couple:


Like these ones New Year's gifts - rooster and hen in tilde style We got it in the end.
5 amazing options for how to sew a rooster with your own handsI suggest that all needlewomen sew a rooster out of fabric with their own hands. Why him? Because the coming one a year will pass under the auspices of the Red or Fire Rooster. This is what the Chinese calendar promises.
Those needlewomen who have never sewn textile toys will need an interesting pattern of a rooster made of fabric to create an original symbol of the year 2017. As well as a step-by-step description of this process. This is what we will talk about.
What materials to choose and how to sew a rooster with your own hands
Everyone knows that this bird is motley and bright. Therefore, all materials for making a rooster with your own hands from fabric must meet these requirements.
For stuffing, cotton wool or padding polyester is useful. Since a fabric cockerel rests on soft legs, it will have to be placed on a horizontal surface. But you can “teach” him to stand if you insert a rigid frame made of thick wire inside his paws and body.
DIY fabric rooster patterns
First you need to choose suitable option. For the toy suggested above, this pattern option is suitable.

If you want to make the symbol of the year so that it looks more like a living thing, then you will need pieces of fur of different shades. Then the faux fur will imitate the feathers of a bird. By the way, the pattern of a rooster made of fabric may be different. For example this one.

But simply choosing them on the Internet is not enough. If you print them out, they will appear small. As a result, the toys will become very tiny. To enlarge the patterns of fabric cockerels, you will need to open the saved file in any graphic editor. In it, increase the image size. Then print it out on several sheets of paper. All that remains is to put them together to use in fabric work.
To do this, they must be transferred to cardboard.
This will make it easier to attach patterns to the fabric.
Step-by-step instructions on how to sew a rooster with your own hands:
Trace the details, leaving seam allowance. It should be at least 1.5 cm, and preferably 2 cm. Be sure to pay attention to the fact that the paired parts of the rooster are made of various types fabrics must be outlined on the same material. Moreover, every second detail must certainly be turned upside down so that it turns out to be a mirror image.
Cut out all the details.
Sew the pattern pieces together in pairs from the wrong side. Here you should leave a gap of a few centimeters so that the piece can be turned out and stuffed. It is better to leave this gap on an inconspicuous part.
Turn them inside out and fill them with filler, except for the under-eye area. Sew up the gaps.

All that remains is to connect all the parts with each other. You can make the wings movable. To do this, they need to be fastened with buttons of a suitable color and size. This is how you can make various cockerels from fabric with your own hands.

The eyes of this symbol of the year can be sewn from pieces of fabric or round buttons that match the color. Someone recommends drawing the eyes of a rooster. Then you will need gel pens. And you can fix the drawing using transparent acrylic varnish from a can.


The second version of the cockerel made of fur fabric
This toy requires a rigid frame throughout the entire figure. It should extend from the paws to the head and tail. The beginning of production is similar to what was described earlier.
The differences are noticeable at the stage of joining the pieces of the body, since the pattern of the fabric cockerel is not formed by whole parts. First, from the wrong side, you need to sew the parts of the breast with the abdomen and torso. Then turn the workpiece right side out.
Now it's time to sew the two halves of the head together, leaving a gap for the stuffing. Do the same with the wings.
Insert a wire frame inside the body, from which leave leads for the parts of the tail and legs. You can simply pierce the fabric with wires for the tail.
Give volume to the body and head, that is, fill them with filler. Sew them together. There is no need to fill the wings. If desired, cardboard can be inserted into them to make them more rigid. Sew the wings along the top to the body.
Connect the two parts of the beard and beak.
Secure them in their places on the toy.
The tail of this rooster is formed by simple strips of fabric, which are sewn along one side. To avoid the difficulty of turning parts inside out, they should be sewn right side out right away.
Place them on the wire coming from the body. Sew them on. There are paws left. It is recommended to simply cover them with a suitable soft material over a durable frame. To complete the production of the “Cockerel” toy, you need to decorate the eyes.

Toy options
Those needlewomen who want variety will find other types of patterns useful. For example, if you have several suitable pieces of felt, you will get a bright felt rooster with your own hands, save the pattern.

Please note that the dotted lines on the pieces indicate extra stitching. It is necessary to give expressiveness to a felt rooster.
The toy will be unusual and cute if the pattern of the rooster made from fabric is like this.

And who said that a fabric rooster should be a simple toy? We offer you a product that is suitable for interior decoration. The following pattern will be useful for this.

based on materials from http:/www.dom-v-sadu.ru/vykrojka-petuxa-iz-tkani/
Made in the spirit of primitivism, and sewing it is very simple.
Tilda the rooster has a nice tanned cinnamon-colored body, a comb, beak, beard and suit. The master class on sewing a rooster is short and relatively simple.
We will need:
- thick linen fabric in the color of coffee with milk, or cinnamon, or dark sand
- fabric in a lighter shade, for the beak of the comb and beard
- fabric for suit
- holofiber (you can also use cotton wool, but it will not provide optimal elasticity)
- sewing thread
- tilde makeup cosmetics
A master class on sewing any tilde doll begins with the need for a pattern. You can search for it online, and we, in turn, have attached our version.

Carefully transfer the details onto the fabric. A pattern on the Internet is unlikely to give you an idea of the size you need, so when you print it out, estimate the real scale of the rooster’s outline.
Steam the details of the tilde's future body with an iron. Carefully stitch each part - by hand or on a machine, whichever is more convenient. Don't forget to leave a gap for stuffing with holofiber.
Stuff the parts with filler and carefully sew up the hidden hole using a blind stitch.
IMPORTANT: Special attention give small details- head, comb, paws. Filling them correctly with holofiber is a piece of jewelry work.

Assembling the body is perhaps the simplest thing this master class can boast of. The wings and legs can be “attached” to buttons so that the body parts are movable.

Use cosmetics or paints to paint the eyes and blush of the rooster.
The master class continues: you still need to sew a suit. This is simpler since it does not require stuffing with holofiber. The pattern is very simple and is usually a jumpsuit. In addition, you can sew it yourself or buy small decorative details - hearts, beads, pockets. They look great on any tilde doll.

A funny cockerel, sewn from fabric using the Tilda technique, is an original soft toy that will complement the interior of your home and will be received with a bang by children of all ages. The master class on sewing a Tilda Rooster doll, the pattern of which is located below, is simple and easy to understand, so if you do not have sewing skills, you will certainly cope with the task. The Tilda cockerel will fill your home with comfort; in addition, the toy can serve as an excellent gift for the Rooster 2029, so you won’t go wrong if you decide to sew such a cockerel.
How to sew a cockerel from fabric: DIY Tilda doll
To sew a tilde rooster we will need the following materials:
- cotton fabric - calico or chintz;
- fabric with a pattern;
- sewing threads;
- tailor's needle;
- scissors;
- a simple pencil;
- acrylic paints for fabric;
- art brush;
- holofiber;
- waxed cord;
- buttons 2 pcs.

We will transfer all the details onto fabric in the required quantity.

Use scissors to cut out all the details, not forgetting the seam allowances.

On sewing machine We sew all the parts together, leaving small holes for stuffing.

We stuff the body of the cockerel with holofiber.

On the legs in the middle we tie a knot approximately in the middle.

We sew the lower part of the body using a needle and thread and insert the legs on both sides, sewing them to the body.

We sew the comb on the top of the head.

We fill the paws with holofiber.

We sew each paw to the legs using hidden stitches when sewing.

We stuff the beard and beak with toy stuffing.

We sew up the holes with hidden stitches.

We sew the beak to the front side of the head, and sew a beard just below the beak.
|
|


We also fill the wings with holofiber, sew up the hole with hidden stitches and sew them on both sides of the body, using buttons for fastening.

This is how we get the cockerel.

Now let's start designing it. We arm ourselves for this acrylic paints Using fabric and a brush, we begin to paint the beak, beard and comb with red paint.

We color the paws orange.

Take a thin brush and paint eyes in the form of dots with black paint.

While the paint dries, let's sew some clothes for our cockerel.

Let's cut out the shorts on colored fabric.
|
|


First, we hem the bottom of each pant leg.


We turn one pant leg right side out and insert it into the other leg and sew along the seat line.


The shorts are ready. We dress up our tilde rooster, tie the lace with bows so that the shorts don’t fall off.

The tilde rooster is ready.

