Friends, today we will return to the basics... we will figure out how to crochet a double chain... I here from time to time conduct an audit on the blog and find out what I haven’t written about yet... So, today is the day when I discovered my mistake...
Away from the broad masses remained a double chain of air loops...They knitted a single one, but not a double one... Not in order! But this is a very useful crochet technique.
Let's look at how this is done...
Double chain of air loops - how to knit
1. Make the initial loop by unwinding the long tail from the ball - we will need it for knitting. We arrange the threads as shown in the photo below, namely, the working thread on top, the tail on the bottom...2. Insert a hook under the tail...  and loop it over the hook... on the hook there is the initial loop plus the yarn over.
 ....and pull it through the yarn over and loop on the hook...on the hook there is again one loop.
  repeat the operation))) Insert the hook under the “tail” thread from top to bottom
  throw it on the hook
  grab the working thread
 we continue in the same spirit... The result is a double braid made of air loops,
  which can be used very well as a lace, for example, for booties or for some other products, for example. as a finishing element))) Can you tie the lace differently... how? see article ""
In addition, many advise using a similar technique to start knitting a product, that is, like a cast-on chain, referring to the fact that with such a cast-on, the edge of the fabric does not tighten... I don’t know... I myself have never used a double braid made of air loops for these purposes, By the way, we need to correct this oversight too - try it)))
For those who are more comfortable learning from video lessons, I made a short video on how to crochet a double chain using air loops... The video, of course, is so-so... but how old we are - someday I’ll learn how to make films too))) Now look what I was filming here)))
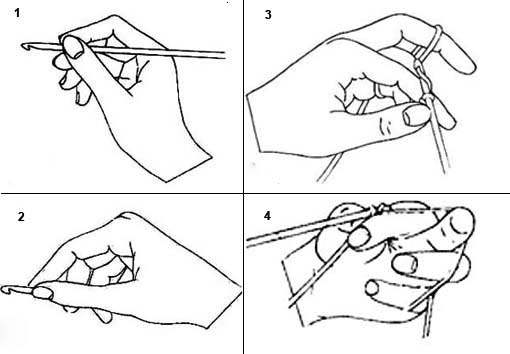
Knitting begins with the first loop. Hold the hook in your right hand with your thumb and forefinger. Place your middle finger next to your index finger; they should hold the loops on the hook (Fig. 2). IN left hand take the thread from the ball, throw it over your index finger with the free end towards you (Fig. 3), holding it with your thumb and middle finger.
Insert the hook from left to right under the thread (Fig. 4) and turn it 180° clockwise, catch the thread on the index finger from below, i.e. counterclockwise and pull through the loop on the hook. This is how the first loop was formed (Fig. 5).
Working loop on the hook. Pick up the thread on your index finger in the above manner and pull it through the working loop, forming a new loop under the hook. Loops knitted in this way are called air loops. The cast-on row is performed with a chain of air loops. A brief course for beginners can also be found in the article: Crochet course for beginners or in the questions and answers section:How to knit an air loop?
When you start knitting, you can cast on a chain of air loops one loop more than the calculated number. In the future, the first loop should be removed or tightened.
It is more convenient to work if you hold the hook so that the planes of the head and the sliding loop are mutually perpendicular.
Friends, any knitting begins with a loop. Crochet is no exception. To start crocheting any pattern, you first need to cast on the loops for it, and for this you just need to know how this is done. The main crochet technique is an air loop and a chain of air loops. Without them, it is impossible to knit any pattern in principle. Therefore, let's first figure out how to crochet air loops and see why, how and where these loops and chains of them are used.
For work we will need:
- Any yarn. But it is better if the thread is even, not very thin and light in color. It's just more convenient and simpler. For example, Krokha yarn is perfect for learning
- Hook. For now, I will not give you advice on how to choose a hook... this is a big and not entirely clear topic for a separate conversation... Just read the recommendations on the label of the yarn you have chosen and use them. For the “Krokha” thread I propose, hooks No. 3 or 4 are well suited
So... let's start practicing
Take the hook in your hand. How to take it? Yes, whatever suits you! You can, like ballpoint pen or a pencil, or you can hold it like a spoon in infancy, or like a knife. By the way, there is a lot of controversy about this on the Internet, like how to hold a hook correctly?...
Attention! Answer!
You need to hold the hook in such a way that it is convenient and comfortable for you - and this is the only correct way.
For example, I hold this instrument differently...
This way and that - it all depends on what and from what threads I knit... By the way, it very often happens that in the process of knitting the same product I change the grip of the hook, just for the sake of convenience...
Therefore, try holding it in different ways and you will definitely find the option that suits you.
How to crochet air loops - a guide for beginners and those interested
- We take the hook in the right hand, and the left end of the thread from the ball
Attention! Just remember... The thread coming from the ball is called the working thread in knitting

For your information! The first loop we just knitted is just the beginning of knitting, it is not taken into account (not counted) when counting the number of loops... i.e. tied and forgotten... we start counting from the next loop.

How to crochet air loops, I hope you understand... we continue further...

For example, we knitted 10 loops, which means a chain of ten loops.
Knit 50 loops for training, i.e. repeat the action described above 50 times and you will get a chain of 50 VP (chain loops). You can link more if you wish... 
- To “close” or complete the knitting, it is enough to make another air loop with a crochet, but pull it out longer than usual, cut it and pull up the tip... By the way, we will use this closing technique to finish crocheting always and everywhere.
If you need to see visually how to crochet air loops, then this video will help you :)
How are air loops designated in crochet patterns?
It’s no secret that a significant part of needlewomen use patterns when crocheting...
If you want to thoroughly master crocheting, then learning to read patterns is a must...
Each knitting element corresponds to a specific symbol, and it happens that there is more than one...
For example, air loops and chains of them, which we knitted today, can be presented in the diagrams in the form of dots, arcs, circles (both hollow and filled) or small ovals (both hollow and filled)
Let's see examples:
- Dots, small circles, ovals in the diagram are simple air loops (chains) or lifting loops - they need to be counted before starting knitting, unless, of course, they have already been counted by the author of the diagram


What are chain stitches used for in crochet?
Friends, if you were looking for information on the topic of how to crochet air loops, then it is quite logical to assume that you need it for some reason.
For example, you want to knit something, and we have already said that any product, be it clothing, a toy, a napkin, a simple pattern or something else, crocheted starts with air loops...
Epilogue
Friends, I'm ending this...
Today we figured out how to crochet chain stitches, knitted a chain of chain stitches, looked at how and where these irreplaceable stitches are used and how they are indicated in the diagrams.
In the near future, we will begin to get acquainted with other, no less important, elements - various columns.
Crochet air loop- This is the basic knitting technique. If you need to tie openwork tunic for the summer then main element This air loop crochet.
Air loops are used to create openwork patterns. An air loop is indispensable and when climbing to higher rows, such an air loop is called.
It is used in most products as a base, as well as to create airy motifs.
From the lesson you will learn how to knit an air loop And how to cast air loops to form a chain of air loops.
Crochet lessons for beginners - a chain of air loops
To perform the first air loop, you must use the initial loop from the previous lesson: ""
1. Here is ours first crochet stitch from the previous lesson

3. Pull the working thread through the loop on the hook. This first air loop

4. Now let's master the diagrams))) In the diagram, the air loop is reflected in a circle. Some descriptions may be different, but these are mostly foreign ones.
5. Grab the working thread and pull it through the loop on the hook - this second air loop

Several air loops following each other are called chain of air loops

7. In the diagram, the chain of air loops will look like this
Basic crochet stitches
I love to knit, especially crochet. Give your friends, relatives, good people knitted crafts- great pleasure.
It’s nice to watch how a person rejoices, how he turns into a child and his eyes glow with tenderness.
Don’t know how to crochet or even hold it in your hand correctly? So we will study. Take a hook and yarn in your hands about one and a half to two times thinner than a crochet hook.
It is best to train on yarn that is not twisted into several threads, so that it does not cling to the hook, because this is very annoying. If something doesn’t work out, be stubborn - undo the knitting and start again.
Or set it aside for a while and knit again until you get the hang of it. And everything will definitely work out.
When knitting the loops, do not tighten too much, because the most important thing for you is to understand the knitting technique.
About crochet
Starting Crochet
How to hold it correctly crochet hook in hand? I will answer - how convenient. You can hold it like a pencil or as you usually take something in your hand. (Fig. 1 and Fig. 2)
The left hand should hold the product while knitting and control the thread tension. Use the index finger of your left hand to support the thread, and the middle finger to knit. (Fig. 3)
To maintain a slight tension on the thread, you can wrap the thread around the fingers of your left hand. (Fig. 4)

First crochet stitch
We begin to master the types of loops from the chain. Almost every crochet starts with making a chain, which consists of so-called air loops.
- Place the thread on the index finger of your left hand and hold it with your thumb and middle finger.
- With your right hand, place the hook under the thread and turn it clockwise in a circle and hold the resulting loop with a large and index finger.
- The loop should not fit tightly to the hook, then it can be adjusted.
- Hook the working thread and tighten it into a loop.
- The first loop must be pulled together - hold the thread with your thumb and forefinger, and lift the hook and loop slightly up.
- Then slightly stretch the working thread and the beginning of the thread with your fingers.
Everything takes a long time to write, but it’s done quickly. So, the first air loop is ready. Throw the thread over the crochet hook or hold the thread still and maneuver the crochet hook.
Pull the yarn through to form a new loop without compressing the previous loop. Repeat knitting until the desired length of the product.

Crochet chain
Knit several links of the chain, then move the hook onto the index finger of your left hand. It will be easier if you use your index finger right hand hold the loop that is on the crochet hook.
The starting loop is not included in the count of the number of loops in the chain. To count the loops, you need to turn the chain over to the left side of the knitting and count backwards, without the loop that is on the crochet hook.
Double chain

Double chain
These types of loops strengthen the initial edge of the product. The double chain is looser and makes it possible to make the edge of the product more elastic without much effort, and can also serve as decor (cord).
Do the following:
- Knit a chain of two air loops (Fig. 1) Insert the hook into the first air loop cast on. Grab and pull the working thread towards you.
- There are two loops on the hook. Pull the working yarn through two loops on the hook. (Fig.2)
Insert the hook into the left loop of the previous pair of loops, pull the thread and knit both loops together. (Fig.3) - Then repeat knitting until the desired length.

The final row of the product
Insert the crochet hook into the second loop, grab the thread and pull it through the loop of the chain (Fig. 1). Repeat to the end of the row for each loop of the chain (Fig. 2)
Different types of loops
To avoid repetition, each point will begin like this: knit a chain of 15–20 chain stitches. For the experiment, you need to knit several rows, and to move to the next row, knit several loops of the chain for lifting and turn the product to the opposite side.
The following types of loops are present in the knitting descriptions.
Half single crochet (connecting loop)

Half double crochet
Insert the crochet hook into the second loop of the chain from the hook, grab the working thread and pull it through both loops on the hook at once. Continue to the end of the row, one lifting loop.
Single crochet
Insert the crochet hook into the second loop of the hook chain, grab the working thread and pull it through the first loop. Grab the thread again and pull it through two loops.
Continue knitting into each loop of the chain until the end of the row, using two air loops for lifting.
Half double crochet

Half double crochet
This type of loop creates a dense fabric with pronounced horizontal rows. For knitting:
- Throw the thread over the hook and insert it into the third loop of the chain from the hook side (Fig. 1). Pull out the working thread (Fig. 2)
- Then make a second yarn over and pull the thread through all three loops on the crochet hook (Fig. 3)
Double crochet

Double crochet
Double crochets, these types of loops, are taller than regular double crochets. The hook grabs the working thread and pulls it through as follows:
- Thread the thread over the crochet hook and pull the thread through the fourth loop from the hook side.
- There are three loops on the hook, yarn over and pull the thread through two loops on the hook, then yarn over again and knit two loops on the hook.
- The result is a double crochet.
- Next, repeat on each loop of the chain, four air loops for lifting.
Double crochet stitch

Double crochet stitch
Types of loops with two crochets are even higher than the previous loops. For knitting:
- Make two yarn overs and pull the thread through the fifth loop of the chain, counting from the hook.
- Grab the working thread and pull it through this loop.
- There are two loops and two yarn overs on the hook.
- They are knitted like this: grab the working thread with a hook, pull it through the loop and the first yarn over, grab the working thread again and pull through the loop and the second yarn over, grab the thread for the last time and pull through the remaining 2 loops.
- Repeat in each loop of the chain, five air loops for lifting.
Double crochet stitch

Double crochet stitch
Types of loops with three yarn overs are often found in the description of knitting flowers, blankets... The fabric turns out to be loose, with gaps. For knitting:
- Make three yarn overs on the hook and insert it into the sixth loop of the chain from the hook (Fig. 1).
- Grab the thread and pull out a new loop. There are now five loops on the hook (Fig. 2).
- Repeat the following action three times: grab the thread and knit 2 loops together.
- After the first time there are four loops on the hook, the second time there are three loops, the third time there are two loops (Fig. 2-3).
- Grab the thread again and knit two loops together (Fig. 4-5).
Continue knitting a row of double crochets into each loop of the chain. At the end of the row, knit six lifting chain stitches, turn the fabric over and continue knitting.
Columns with N crochets(where N is an integer) are performed similarly to double or triple crochet stitches. The more yarn overs, the higher the row.
Knit loops in pairs until one loop remains on the hook. When turning the fabric, the number of lifting loops is equal to the number of yarn overs plus two.
Embossed double crochet stitch (Figure 1)
The types of relief knitting stitches create a very interesting fabric. Try knitting the fabric with alternating knit and purl relief stitches.

Embossed crochet posts
For knitting knit stitches:
- Throw the thread over the hook and insert it under the “body” of the column of the previous row from right to left from the front side of the fabric and pull out the loop.
And throw the thread on again and knit 2 last stitches on hook.
Embossed purl double crochet (Figure 2)
Knit like this:
- Throw the thread over the hook and insert it under the “body” of the column of the previous row from right to left from the wrong side of the fabric and pull the loop to the wrong side.
- Yarn over again and pull it through the loop and yarn over on the hook.
- Throw the thread over again and knit the last 2 loops on the hook.

Lush column “bump”
A lush column of . The fabric made from such stitches has a convex surface. To link:
- Yarn over and pull out a loop of the required length from the loop of the previous row, pull the thread through two loops on the hook - there are two loops on the hook.
- Complete the first step - there are three loops on the hook.
- Repeat the first step - there are four loops on the hook, pull the thread through these four loops. Knit one loop to secure.
Lush double crochet stitch knit similarly to the previous one.
Yarn over and pull out a loop of the required length from the loop of the previous row, *pull the thread through two loops on the hook* repeat twice - there are two loops on the hook.
How to knit picot

How to knit picot
Pico is such a small mullet, a growth on knitting, such a decoration.
- On the part during knitting, knit a chain of three air loops.
- Insert the hook through two loops of the column from which the knitting of the chain began; There are three loops on the hook.
- Pick up the working yarn and pull it through these three loops on the hook.
Rachy step

Step for finishing products
Knit the Rachy step from left to right, so you need to hold the product with the front side facing you and start knitting:
- Insert the hook away from you under both half-loops of the previous row.
- Grab the working thread with your hook and pull it out. There are 2 loops on the hook.
- Yarn over.
- Knit all the loops in one step.
Long loops
You can learn more about knitting long loops on a ruler. An example of long loops is also the beard of Santa Claus.

Long loops
Knit a chain of air loops of the required length and two rows of single crochets, on which long loops will then be knitted. Knitting description:
1 row: on the second loop of the chain from the hook, tie a sc; The next loops are the so-called “Long loops”.
To knit a long loop, work a single crochet, but pull the loop on the hook up 1-2 cm.
Remove the hook from the loop and thumb With your left hand, press the elongated loop down onto the knitting.
At the base of this loop two stripes in the form of an equal sign are visible. These are the threads of the double crochet (point 1).
Insert the hook under these two threads and into the hole at the beginning of knitting the column, and use the working thread to knit all three loops together.
Knit like this until the end of the row on each base loop.
2nd row: ch, to the end of the row sbn.
3rd row: knit as the first row, but at the beginning of the ch row.
Repeat knitting stitches as described.
Very often knitting intersects with French knot embroidery. More details, with sequential pictures, can be found. Or look at the photo below and read the description.

1. Bring the needle and thread to the right side of the fabric.
2. Wrap the thread around the tip of the needle three to four times.
3. Poke the needle through the fabric near the entry point, holding the thread tightly in your fingers.
4. Pull the needle out from the wrong side and secure the thread.
Download a book on crochet in Russian and continue to improve your knowledge.
The main business of your life
Any trifle can become a problem.
You just have to firmly believe
There is no more important matter.
And then neither cold nor heat will bother you,
Choking with delight,