Summer hats
Kerchief
Option 1:

Cut from white cotton fabric scarf, process all edges with any overlock stitch or overlock stitch. Sew openwork braid to the long edge.
Option 2: (approximately for a one-year-old child) 
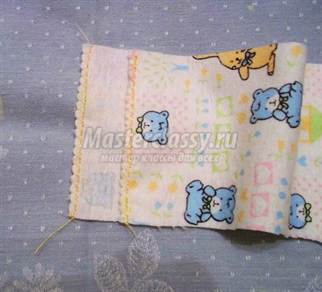
Cut out a scarf and 60 cm of edging tape from white cotton fabric. Sew the long edges of the scarf. Sew openwork braid to the front edge of the scarf. Along the bottom edge, make a fold 0.75 cm wide approximately in the middle of the right and left halves. Sew an edging strip to the bottom edge of the scarf, and decorate the free ends of the strip as ties.
Option 3:
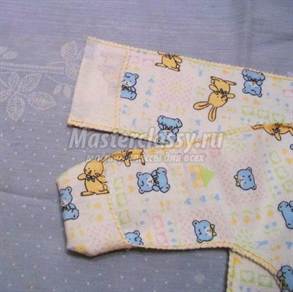
headscarf with visor

Patterns are already given with allowances.
Cut out one rectangular piece, two visor pieces, edging tape 80 cm long and a strip for ties 60 cm long and 3 cm wide. Fold the strip for ties in half, fold the edges inward by 0.5 cm and stitch along the edge. Fold the rectangular piece from the short edges to the wrong side by 0.3 cm, then by 0.7 cm and stitch. Fold one of the long edges to the wrong side by 0.5 cm, then by 1.5 cm and stitch along the edge of the first hem. Insert a strip of ties into the resulting hole.
Place the two parts of the visor together with the wrong side inward and trim the outer edge with edging tape. Place the rectangular piece and the visor together, wrong sides together, aligning the middle of the inner edge of the visor with the middle of the raw edge of the rectangular piece. Sew them together. Sew 80 cm long edging tape along the entire raw edge of the rectangular piece, leaving 15 cm ties on the sides. Unscrew the visor and stitch it to the edging tape.
Panama
Children's Panama hat made of 6 wedges.
Children's Panama hat consists of wedges and brims.
Wedges. We draw a rectangle ABCD, the length of which is 15 cm (the height of the bottom of the Panama hat), and the width is 1/3 (the semicircle of the head + 1-2 cm allowance for loose fitting). For example, if the semicircle of the head is 24.5 cm, then the width of the original rectangle will be (24.5 + 1) / 3 = 8.5 cm.
Divide side AB in half. We divide sides AD, BC into parts in a ratio of 2:1. We connect the resulting points with smooth lines.

The bottom of a Panama hat usually consists of four to six wedges. However, the number of wedges can be changed as desired or depending on the style. In this case, to determine the width of one wedge, you need to divide the size of the entire head circumference by the desired number of wedges.
Fields. To construct a drawing of a pattern for the brim of a Panama hat, we draw a rectangle, the length of which is equal to the semicircle of the head, that is, in our example, 25.5 cm, and the width is 4-6 cm. We divide the rectangle along its length into 10 equal parts and cut along the intended lines, without cutting into 0.5 cm to the end. To obtain the desired pattern for the fields of the flared style, the fields need to be flared, that is, moved apart along the cut lines to equal distances. The greater the distance, the greater the flare. 

Cut out 6 wedge pieces, making seam allowances of 0.5 - 0.75 cm. Overcast them. Open out 2 pieces of the brim with a fold, not forgetting the 0.5 cm seam allowance. Sew the wedge pieces together to form the bottom of the Panama hat.
Sew the side seam of the Panama brim. Place the brim of the Panama hat with the wrong sides together, stitch them together along the outer edge, and sew on the piping. Align the wrong side of the bottom of the Panama hat with the bottom of the brim of the Panama hat and stitch the details along the edge at a distance of 0.5 cm. Fold the inner edge of the top brim of the Panama hat to the wrong side by 0.5 cm and stitch it to the bottom, hiding the previous seam inside.
Similarly, you can sew a Panama hat from 4 wedges.
Cap
The bottom of the cap is built similarly to the bottom of a Panama hat, and to build a visor, we build a visor on 3-5 parts of the Panama brim

Sometimes, in order to be able to adjust the volume of the bottom of the cap, the back wedge of the bottom is slightly changed. A deep cutout is made on it, and the edges of the bottom of the cutout are connected with an elastic band covered with the material from which the cap is sewn.

or you can sew such a cap with ties at the back

Mittens
For the little ones, mittens are sewn without fingers, like little bags.
To do this, place the baby’s straightened palm on a piece of paper, lightly connect all the fingers and draw the outline of the mitten around the baby’s hand. You can outline it a little more freely.
Cut out 2 pieces of mittens from fleece or other warm soft material plus 0.5 cm seam allowances, and also cut out 1 piece of cuff from knitted material with dimensions: 5 cm in height (this is with seam allowance) and a length equal to double the width of the bottom of the mitten minus 1 cm.
Fold the cuff right side inward and sew a side seam. Place the two mitten pieces with right sides facing inward and stitch along the rounded edge. Fold the cuff with the mitten right sides together, stitch the cuff, turn it to the wrong side, turn it under and stitch it to the stitching seam.
If the cuff stretches too much, then inside the cuff, which we have turned out to be double, you can insert a loose elastic band. 
or you can sew elongated mittens without a cuff by sewing a loose elastic band at the wrist level.

Mike
(height 80-84)
The T-shirt must be made from natural material, for example knitted fabric made from 100% cotton. To do this, you can use your old T-shirts, T-shirts, if you are sure that they are made of cotton.

Cut out the front and back pieces, adding seam allowances:
0.5 cm - on the sides, 1.5 cm - at the bottom, 0.75 cm - along the hem of the sleeve and neckline.
Cut out two edging trims for the sleeve cap, 30 cm long and 3 cm wide, and one edging trim for the neckline, 47 cm long and 3 cm wide.
To stitch parts, use a narrow zigzag stitch or a special elastic stitch, choosing a fairly thin needle.
Sew one shoulder seam of the shirt. Sew the trim along the neckline. Sew the second shoulder seam, stitching the edges of the trim as well. Sew piping along the edges of the sleeve. Sew the side seams. Fold the bottom of the shirt under and sew with an elastic stitch.
Blouse
As soon as the child begins to actively move, the vest becomes uncomfortable. It is replaced by either a blouse with a tie in front, or a blouse with buttons or buttons.

Are you sewing a blouse for summer or winter, with short sleeves or long, the child sleeps on his back or always strives to sleep on his tummy, which blouse is most convenient for you to put on your baby - these and many other reasons will help you choose the pattern of the most comfortable blouse.
The choice of fabric, the color of the fabric, the pattern, the shape of the buttons will determine the purpose of the blouse - at home, for sleeping, for walking, etc.
Sewing blouses for children under 1 year of age is distinguished by the smallest number of seams so as not to irritate the child’s skin.
For children's undershirts, the following sizes are taken:
We build a right angle with the vertex - point A. We put the length of the vest down - point B. From point A to the right we put the width of the vest and put point C. From point B we draw a horizontal line to the right. From point C downwards - a vertical line. The intersection of lines is point D.
We build a line separating the front from the back. From point A we set aside a segment equal to half the distance AC plus 0.5 cm and place point E (the back is slightly wider than the front). From point E we draw a line down.
Shoulder line: from point A downwards we lay down 1/10 AC - point F. From point F to the right we draw a horizontal line to straight line CD.
Armhole depth: down from point A we lay a segment equal to half the distance AC minus 1.5 cm. From the resulting point G we draw a horizontal line until it intersects with the line CD.
Back neck: from point A we lay off a segment to the right equal to 1/3 of the distance AE plus 1 cm and place point H. From point A we lay off a segment equal to ½ of the distance AF. We connect the resulting point with a smooth line to point H.
Back shoulder cut line: we connect point H with the point of intersection of the vertical line E with the horizontal line F. From the intersection point we put 1.5 cm to the left along an inclined line and mark it with point I. HI is the length of the shoulder section of the back.
Back armhole line: we build an auxiliary line IK, where K is the intersection point of the vertical line E and the horizontal line G. We connect points I and K with a smooth line, deepening the line to the bottom left by about 1.5 cm in relation to the auxiliary line. The result is an armhole line.
The vertical line AB is the line of the middle of the back.
Front neck line: to the left of point C we lay off a segment equal to AH minus 0.5 cm - point L. From point C we lay off a segment of the same length. And connect the resulting point with a slightly concave line to point L.
Front shoulder length: from the point of intersection of the horizontal line F with the vertical line E, we lay off 1 cm vertically. We connect this point with an inclined point to point L. Along this line we lay off a segment LM equal in value to HI to the right.
Front armhole line: we build an auxiliary dotted line MK. Then we connect these points with a line deviating 1.5 cm to the right from the auxiliary inclined line, thus forming an armhole line.
The vertical line CD is the line of the middle of the front.

Construction of a sleeve pattern.
In the middle of the upper part of the sheet we draw a right angle with the vertex at point A.
The length of the sleeve: From point A downwards we lay taken measurements sleeve length and place point B. From point B, draw a horizontal line to the right. From point A, we lay off the width of the sleeve to the right and designate the resulting point - point C. From point C, we lower the perpendicular to the intersection with the horizontal B - point D. From point C, we lay down a segment equal to 1/3 AC. We connect the resulting point E with an inclined dotted line to point A. The cuff line of the sleeve is obtained by connecting point A to point E with a smooth line deviating upward from the auxiliary line by 1.5 cm.
Sleeve seam line: from point D to the left horizontally measure 2.5 cm and place a dot. We connect this point with point E - this will be the seam line of the sleeve.
To obtain a complete sleeve pattern, fold a sheet of paper in half along line AB and cut out the pattern along the contour lines. We straighten the paper along the fold line.
The resulting pattern can be used in different ways.
To sew a vest with ties at the front of the neck, cut it out as follows:

To sew a T-shirt, the length of the sleeves is reduced, the back and front parts are cut out separately, and fasteners are made on one or both shoulders. Little children really don’t like it when they wear blouses with a narrow neck. In addition, in children under one year old, the volume of the head is almost equal to the volume of the chest.

To sew a blouse with a fastener with buttons or snaps along the front of the neck, cut it out as follows:
Let's add a one-piece fastener bar to the front halves. To do this, on the front pattern we continue to the right both the neck depth line and the horizontal line D by about 5 cm (1.5 cm for the fastener, and 3.5 cm for the hem of the placket). We connect the resulting points with a segment. The dotted line indicates the fold line of the plank.
In this case, you can sew cuffs to the sleeves. Then, while sleeping, the child’s sleeves will not constantly be pulled up. And the child will be warmer.
And one more feature - children grow very quickly, and a blouse with cuffs can be sewn to grow slightly (by 1-2 cm), and the cuffs will hold the sleeve in the right place.

This pattern can be used to sew a dress with a clasp on the back for a girl. To do this, the length of the pattern of the front and back parts is reduced by about 8 cm, if desired, the length of the sleeve is reduced, and the sleeve can be made wider. The fastener bar goes from the middle of the front to the middle of the back. To build the middle back strip, we continue to the left horizontally, both the neckline line and the horizontal line B, 3-5 cm beyond the vertical line AB. We connect the points obtained from the continuation of these lines with a vertical line, thus obtaining a bar in the middle of the back. We cut out the skirt of the dress in the form of a rectangle with sides 23-28 cm in height and width, which is 1.3 - 1.5 times greater than the width of the laid out dress bodice pattern.


And now we offer several ready-made patterns.
Pattern of a blouse with a one-piece front and back.
The blouse is sewn wide enough so that the baby’s arms can then be threaded into the sleeves.

Cut out one piece each for the front and back. Cut out one edging trim for the neckline, 60 cm long and 2.5 cm wide, and one edging trim for finishing the edge of the front cut, 17 cm long and 2.5 cm wide.
Depending on the sensitivity of the baby’s skin, the seams are made on the front or back side.
Sew the trim along the edge of the cut onto the front piece. Sew shoulder seams. Sew the edging strip along the edge of the neckline along with the ties. Sew the side seams. Overcast the edges of the side and shoulder seams. Hem or stitch the bottom of the vest.
T-shirt pattern: height approximately 64-74 cm (6-10 months)

You can sew a T-shirt from fabric such as cotton jersey. Parts made from such fabric are sewn down using a narrow zigzag stitch or a special elastic stitch.
Cut out one piece each for the front and back, adding 0.5 cm seam and hem allowances (2 cm for the bottom, 1.7 cm for the sleeves), as well as a 30 cm long and 3 cm wide neckline. 0.5 cm.
Overcast the top edge of the clasp allowance. Fold the one-piece facing of the seam allowance for the back clasp in half, turning it to the wrong side. Loops will be made on it. Turn the one-piece facing of the front fastener to the wrong side. Buttons will be sewn to it. Sew fasteners at a distance of 2.5 cm from the fold of the facing. Sew the second shoulder seam (which is without a fastener). Fold the binding to the neckline with right sides, stitch the binding, turn it to the wrong side, turn it under and stitch it to the stitching seam.
Place the front and back fastener pieces on top of each other so that the front and back shoulder lines match. Sew on the sleeves. Sew sleeve seams and side seams.
Turn the hem allowances for the bottom of the T-shirt and the bottom of the sleeves to the wrong side and stitch with a double needle.
Pattern of a blouse with buttons: two sizes from 4 to 7 months (in brackets from 7 to 12 months)

Cut out one part of the front and back, two parts of the sleeves, adding 0.5 cm seam allowance and hem allowance (bottom - 2 cm, sleeves 1.7 cm - if cuffs are not sewn on). Neck allowance - 0.5 cm.
Overcast the leading edge of the clasp allowance. Turn the one-piece strip for the front fastener to the wrong side by 2 cm. You can stitch the fasteners at a distance of 1.5 cm from the fold of the strap, so that later during ironing the strap does not constantly roll into a tube.
Sew shoulder seams. Fold the cuffs with the wrong side inward along the fold line, place them along the bottom of the sleeve, slightly stretching the edge of the cuff and gathering the bottom of the sleeve, and stitch. Sew on the sleeves. Sew sleeve seams and side seams. Sew on the collar. Sew the seams.
Turn the hem allowance for the bottom of the blouse to the wrong side and stitch.
Make loops and sew on buttons.
Kangaroo bag for carrying a baby
What you should pay attention to when sewing a kangaroo bag:
The straps - belt tapes - should be wide enough so that they do not cut the shoulders when worn for a long time;
The straps on the back must cross, which will distribute the load evenly across the entire back;
It is necessary to have a special belt, which can be adjusted to your figure and clothing (winter, summer) using special buckles.
For sewing, you need foam rubber 1.5 cm thick, a strong belt tape 3.5 cm wide and 5 meters long, braid for edging the edges, raincoat fabric, cotton fabric to match the main fabric, strong threads, a strong zipper 15 cm, 3 ribbon length adjusters and 3 lobster buckles.
If you have an overweight child, then you can increase the width of the kangaroo pouch by 2-3 cm along the dotted lines. 
Cut out one piece each from foam rubber, raincoat fabric and thick cotton fabric to match it. Place the three pieces together, with the fabric right sides facing out. Sew the pieces together along the entire edge at a distance of approximately 0.5 cm. Sew piping along the edge. Sew a 15 cm long zipper into the slit.
The horizontal stripe in the middle indicates the place where the belt tape is attached to attach the baby carrier to the belt of the person carrying the child. The long length of the belt straps is justified by the fact that the kangaroo can be used both in summer and winter by adjusting the length of the straps around the waist.
Sew the belt tapes as shown in the picture, tucking the cut edges of the tapes inward and sewing all the seams 2-3 times for greater reliability. 
For sewing, use strong threads. Turn the bottom of the backpack inside out, aligning the side edges of the backpack end-to-end at the waist. Sew a belt over the edges aligned at the waist, thus stitching the edges together.
Sliders
Based on the romper pattern, you can sew dungarees from warm fabric such as fleece, jersey, etc. It is still convenient to dress your baby in rompers while sleeping or while walking. When sewing them, stretch the fabric slightly so that the seams will not tear, or use an elastic stitch.

Pattern of rompers up to 11-12 months (height up to 74 cm)

Add a 0.75cm seam allowance.
Cut out one piece each of the back half, the front half, the gusset and two foot pieces.
Sew one side of the gusset to the front half. Sew the crotch stitch by sewing the other side of the gusset at the same time. Sew the side seams, starting from the top edge, and sew on the feet.
Sew an edging strip along the top edge of the sliders, taking the top edge of the rompers inside the edging strip as much as possible. At the same time, do not tighten the edging tape too much. As a type of seam, you can use a narrow zigzag stitch or a special elastic stitch.
Sew ties approximately 15 cm long.
When sewing the ties for the rompers, be sure to keep the fabric taut. Then the seams on the ties will not tear quickly.
When adding seam allowances, do not add a small seam allowance to the top of the rompers where the binding is sewn. The edging tape should grip the edge as much as possible so as not to come off during intensive use.
Romper with buttons (height 64-70 cm)

Add a 0.75cm seam allowance to the pattern.
Sew along the top of the bottom of the front half of the sliders at a distance of 0.5 cm and 0.75 cm. Then we tighten the stitches to the width of the top of the front half, evenly distributing the gathering, and sew to the top of the front half. Sew one side of the gusset to the front half. Sew the crotch stitch by sewing the other side of the gusset at the same time. Sew the side seams. Connect the feet to the toes and stitch to the sliders, slightly gathering the sliders along the toe. Finish the edges of the seams. Sew edging tape along the top edge of the sliders. Make loops on the front of the sliders on the straps, and sew buttons to the back of the slider.
Panties
I would like to immediately write about some observations from personal experience:
Firstly, underpants for boys and girls differ in width. Even panties of the same size for boys are sewn a little wider. Boys behave more calmly in loose pants, although all children should not have a tight elastic band on their pants - they also need to get used to the new type of clothing. In addition, it is better to insert a wide elastic band first.
Secondly, if your child often fidgets at night, and the room is cold, if you want to immediately sew the pants a little longer, but so that they do not fall off the legs, then sew cuffs made of elastic fabric to the bottom of the legs. The cuffs will not allow the bottom of the panties to rise up or slide down the leg.
Thirdly, in order not to spend a long time searching for the front and back of your panties, sew a small piece of fabric inside the panties along the back seam.
Depending on the choice of fabric, its density and the type of cuffs (decorative, functional, etc.) based on the same pattern, you can sew various models of panties.

Pattern of knitted pants - underwear.
Available in 3 sizes: height 62-68, 68-74, 74-80.

Add seam allowances: 3 cm on the waistband (for the elastic) and on the bottom of the pants, 0.5 - 0.7 cm on the remaining seams. To have fewer seams, you can combine the front and back halves along the side seam and cut them out in one piece.
The upper part of the panties is not sewn short, because... Depending on the preferences of the parents, babies are dressed in either cloth diapers, or diapers, huggies, etc.
Due to this, the lower part of the pants may be too long. In this case, select the required length of the panties, fold the bottom of the panties over it and stitch. As the child grows, the length can be increased.
Pattern of outer panties –
looser fit, because panties are worn over underwear or diapers
For 2 sizes: height 62-68, 74-80.

Add seam allowances: 1.5 cm - 2 cm on the waistband (for the elastic), 1 cm on the bottom of the pants, 0.5 - 0.7 cm on the remaining seams.
If you want to sew the pockets, do it first, before sewing the side and crotch seams.
The pant bottom facings are sewn to the right side of the pant bottom. The facings are cut out from a material of a different color to match the main one. To do this, sew together the details of the panties separately and the facings of the back and front halves separately. Then fold the wrong side of the panties with the front side of the facing, attach them, turn them inside out, place the front side of the facing over the front side of the panties and stitch (optional, if desired) at a distance of 0.3 - 0.5 cm along the bottom edge. The upper edge of the facing is folded inward by 0.8 - 1 cm and stitched on top of the trouser legs to the front side at a distance of 0.5 cm from the edge. The top edge of the panties at the waist is folded 0.5 cm, and then another 1.5 cm and stitched along the edge of the first hem. An elastic band is inserted inside. Sew raw seams.
Pants with straps
You can also sew these pants with straps. You will get semi-overalls. The patterns for the front and back halves of the panties are similar to the previous one. Add seam allowances of 0.75 cm for the straps and 1 cm for the front.

It will be more comfortable for the baby if the front part is also located on the back - there will be fewer irregularities.
Cut out 4 front pieces, two strap pieces, two belt pieces 4.5 cm wide (this includes allowances) with a length equal to the width of the top of the panties, including one-piece fasteners.
Fold the straps in half lengthwise with the right sides facing inward, stitch the side and top seams at a distance of 0.75 cm from the edge. Make notches in the corners, turn the part inside out, and iron it. Now you can topstitch at a distance of 0.3 cm on both long sides and one short side.
Place the two front pieces right sides together and sew the top and side seams. Sew the other two front pieces in the same manner, while stitching the open sides of the betel nuts to the top edge. Fold the right side of the front with the right side of the waistband inward along the bottom edge of the front and stitch. Sew the inside of the waistband in the same way. Sew the upper part of the waistband that protrudes beyond the boundaries of the front pieces.
Sew the outer side edges of the panties. Place the back and front halves of the panties with the right sides facing inward and sew the front and back center seams. Fold the right side of the waistband over the right side of the top of the front of the panties and stitch. Sew the inside of the waistband.
Tuck the waistband along the side seam with the one-piece clasp of the front half of the panties and sew along the edge. This is where the buttonholes will be made. Fold the one-piece fastener on the back half along the dotted line and stitch along the edge of the fold at a distance of 0.5 cm.
Then sew step and side seams up to the level of the fasteners.
Similarly to the previous panties, sew the facing to the bottom. Sew the edges.
With love,
We invite you to visit our websites on children's topics:
http:// topotukh. people. ru- Patterns of clothes for babies, useful tips, games.
http://4 child. moy. su- Cartoons, children's games, films, books for children, audio books, flash games.
http :// topotukh. people. ru– Clothing patterns for children up to one year old
I know that a mother on maternity leave can be overwhelmed with chores, but from my own experience, I recommend taking a break from household chores and finding time to learn something new. This saves me from postpartum depression, when everything is just diapers and clinics. If you are attracted to handicrafts, and you have mastered the simplest operations on your sewing machine, then in today’s master class on sewing for beginners, I will teach you how to sew a blouse for your baby using a ready-made pattern for children under 1 year old. It took me exactly an hour and a half to sew - while my son was sleeping, you can still take your time and break the work into stages.
To sew a blouse for a baby you will need:
- knitwear - 40 cm.
- thread - 1 spool
- scissors, tailor's pins, sewing machine
Blouse patterns for children under 1 year old
There are many ways to get free patterns for kids, today I will share two of them with you. The fastest and most proven method is to rip apart an existing item that has become unusable and sew it together.
1. I take a worn blouse, cut it into pattern parts: front, back, sleeve


If you do not have suitable clothes that can be used for patterns, then you can download free patterns for blouses for children in sizes 62 - 92 from the link. The pattern is given in real size, you need to print it on A4 sheets and glue it together.
How to sew a blouse for a baby
In order to sew a blouse to my size, I will need good stretchy knitwear, 80 cm was enough for me, I even had enough left for panties.
2. I bend the parts of the shelf and back in half and place them on the fold of the fabric. I fix it on the fabric with tailor's pins.

3. I cut out four parts with 1 cm allowances from the edge: front, back and two sleeves.

4. Along the neck line on the front and back parts, I bend the fabric inward by 1 cm. I fix it with tailor’s pins. I do the same on the bottom of the sleeves.

5. I sew on the overlocker along the edges with a flat seam. If you don't have a serger, use a zigzag stitch on your sewing machine to overcast the edges. Then fold the fabric inward 1 cm and sew a regular straight stitch.

6. Using tailor's pins, I assemble the front, back and sleeves along the armhole line, as shown in the photo.

7. Using a sewing machine, I connect the parts with a straight stitch, keeping 1 cm from the edge of the fabric. I overlock the edges with an overlocker. Can be replaced with a zigzag stitch.

8. First, I fix the line of the side cut and sleeves with pins, then I sew it on a sewing machine, without removing the pins 1 cm from the edge. I'm basting.

9. I turn it inside out and process the bottom line as in step 5. Ready! As you can see, I didn’t stop at just one copy, but sewed as many as three blouses for my baby. When I ran out of fabric, I took my boring T-shirts and recut them. I think it turned out great, especially since children get things dirty quickly - and it doesn’t hurt to have a couple of T-shirts in reserve!

Any future mommy wants her newborn baby to be the most beautiful. Today, children's clothing manufacturers never tire of surprising us with new products. But sometimes they are not available to every family, and you don’t want to be different from others. One option is to sew clothes from a pattern for newborns. We bring to your attention several instructive master classes on making things for kids. They are easy to understand even for a schoolchild who has no sewing skills. Let's get started.
Light vest
To sew a vest you will need the following materials:
- A piece of rectangular fabric measuring 40*86 cm;
- Pattern.
In this case, there is no need to leave additional distance, since all seams will be located exclusively on the front side.
The photo shows that the pattern itself is not difficult to understand. You can sew any type of vest with it - with or without scratches.
We bend the fabric in half and lay out the finished patterns on it, as shown in the photo. The back must be solid, this fact should not be forgotten. Let's outline the details.

We cut them out, as you can see, there are only three parts.

Using an overlocker or a zig-zag stitch, we process the edges of the sleeves.
Turn the fabric left for scratches right side out and iron it.

Fold the pieces and sew the seams of the shoulders and sides. You can also do it with a zig-zag seam.


We turn out the scratches as they should be.
The life-size vest is ready. This product can be decorated with applique or embroidery (at your request).

Cute cap
Let's look at how to sew a cap on small child. For sewing you will need:
- A piece of fabric 40 cm * 30 cm;
- Bias binding 125 cm.
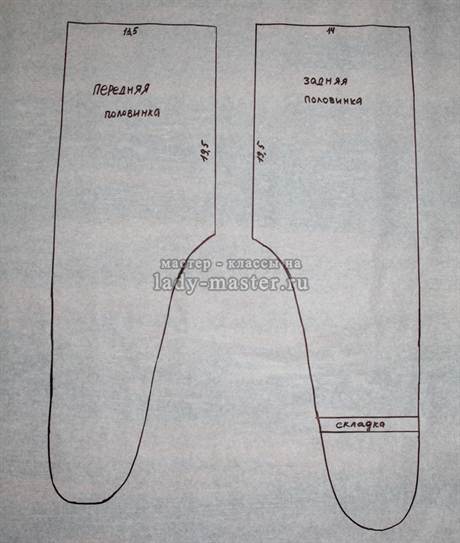
Cut out the pattern shown below.


We put the details on a piece of fabric and trace them. We cut out, it is necessary to mark the front and back edges.

We process the front edge. We turn it half a centimeter on the front side, then turn it half a centimeter again and iron it. Machine stitching. Or you can trim it with bias tape.


Then you need to sew on the back of the head. It is recommended to sew temporary stitches on the inside first. Then we sew the bias tape with the same stitches. Then we machine stitch it.


Please note that the ends of the binding must be soldered.
We process the bottom of the cap. The bias tape must be sewn so that the ties of the cap are formed. How long they will be is up to you. The ties must be the same.

The cap is ready!
Master class No. 3
The third master class suggests sewing rompers for a newborn.
When sewing you will need the following materials and tools:
- Children's knitwear as the base fabric;
- Fabric for elastic;
- Sewing pins;
- Cutting scissors;
- Paper pattern;
- Sewing machines.
Let's get to work.
The pattern is presented below. It can be printed or transferred to paper with the measurements you need. Cut out the details.
Fold the purchased fabric in half with the right side inward. The threads of the lobes should be located along the entire piece of fabric. Using chalk, you need to transfer the pattern details onto the fabric.
Do not forget about the additional distance, which should be one centimeter.
Cut out the outlined parts. We cut out a strip from the fabric for the elastic, the dimensions of which will be as follows: width - 25 cm, length - 42 cm.

There is a line on the pattern where it says “fold”, so you need to fix it on the fabric with a pin.

We fold the front and back of the sliders with their front sides facing each other. We make the cuts even and sew with a machine stitch, side and step media in a single line. The seams themselves must be sewn with a zigzag stitch.

The strip from which we will make the elastic must be rolled into a ring so that the front part remains inside. We sew and turn inside out. The seam is made on the wrong side.

The sewn parts of the sliders must be inserted into the wrong side of the elastic. Match the elastic seam with one of the side seams. The cut must be made even.

We stitch the elastic band to the sliders with a machine, do not forget to stretch it a little.

The resulting seam must be overcast.

Iron all seams finished product. The rompers for the newborn are ready!

Envelope for baby
Let's look at how to make an envelope for a baby; in another way, this type of product can also be called “ sleeping bag" It will be very convenient for the baby not only to be outside, but also to sleep at home in the cool season.
This product will have three layers: the inner one, which consists of fleece fabric, the second layer is thin padding polyester (you don’t need to use it if you don’t need an insulated model), and the outer layer will be raincoat fabric (this can also be any fabric you want ).
First, let's determine what size the envelope will be. We will make the following size - 80 cm * 70 cm.
Sewing process:
- On all three types of fabric we cut out rectangles measuring 82 cm * 72 cm. Two centimeters each for processing the seams.
- Next we make a pocket. The pocket must be cut out of fleece fabric, the size of which will be 40 cm * 25 cm. But we are making a double pocket, its size will be 40 cm * 50 cm. The pocket will be processed in the future with bias tape, so there is no need for additional distance for processing the cuts.
- The pocket blank must be folded in half, then we get a rectangle.
- We stitch with a machine line two centimeters from the fold, where we will insert the elastic. Next, insert the elastic band, but in no case tighten it too much so that the baby is comfortable. We fasten the elastic on both sides.
For the hardworking - a bright light burns through life, for the lazy - a dim candle
Children's dresses - sew them yourself quickly and easily! Part 1
Hello, dear mothers, I’m starting a series of articles on sewing children's dresses. The motto of these articles will be “Down with complex drawings and intricate calculations of patterns”.
Many people are put off by complex patterns, taking measurements, and various mathematical calculations, especially if you weren’t very familiar with geometry and drawing at school.
My goal is to explain everything in such a way that even mothers who do not have a mathematical mind can sew clothes for their children.
I will show you how to sew beautiful children's dresses yourself - I will tell you everything in as much detail and in an accessible language as possible, without resorting to abstruse tailoring terms.
For each dress, I will draw picture diagrams on which I will try to show step by step the sewing of a children's dress, starting from creating a pattern to working with fabric. Even those who do not have sewing skills and sewing machine, will be able to please their daughter with a new thing, sewn by her mother’s loving hands.
So let's get started!
A simple one-piece dress is the basis of all dresses
Let's start with a simple one-piece dress. I will tell you and show you how to make a pattern for a one-piece children's dress, and then use this one pattern to sew all these dresses.

Yes, yes, having only one pattern, we will sew many different ones in the future. beautiful models children's dresses. Let's get started...
Drawing a pattern
As I promised, there won’t be anything super complicated. Open the closet with your baby's clothes and find a T-shirt that fits her just right(that is, not tight or large, but more or less in size).
This T-shirt will serve as our assistant when creating a pattern for a future dress.
We also need a sheet of paper of such a size that the pattern of our future dress will fit on it - for this I use a tube of unnecessary old wallpaper (if you don’t have old ones, buy a tube of the cheapest wallpaper in the store - this roll will be enough for you to make many patterns, like a child , and to yourself).
We unfold a sheet of wallpaper on the floor with the wrong side up (so that the pattern does not distract from the pattern), press the edges with something, so that he doesn’t bend and crawl on the floor(I press my husband with dumbbells or thick books). We place a straightened (pre-ironed) T-shirt on top and trace the outline of the T-shirt with a pencil. They circled it - that’s it, we don’t need the T-shirt anymore.

Note! If you don't have a sleeveless T-shirt, but there is only a T-shirt with sleeves, don’t worry, it will also fit. When you trace the T-shirt, use a pin to trace the armholes through the sleeve of the T-shirt. Along the entire armhole seam, make pin holes through the T-shirt and the underlying paper. For this purpose, it is better to spread the paper not on a hard surface, but on the carpet - this will make it easier to pierce holes. And then, along this holey line, draw the outline of the armholes with a marker (the armholes are the opening for the arms).
And now on top of these T-shirt outlines we will draw our pattern
The contours of the drawn T-shirt will greatly facilitate the creation of the pattern. They will help us depict a proportional silhouette of the dress, where we do not need to calculate the length of the shoulder, the width under the bust, the length of the armhole (the armhole is a hole for the arm) - all this will already be on the drawn T-shirt. We look at the picture above. We outlined the T-shirt (Fig. 1), and drew a dress along the contour of the T-shirt (Fig. 2).
Please note 3 points:
- The shoulders of the dress should be slightly sloping
- the bottom of the dress is not a straight line, but rounded
- the lateral lines from the armpits downwards slightly diverge to the sides (like a trapezoid)
There's another one here important note:
For those who doubt whether a pattern drawn in this way will suit your child, there is a simple tailoring way to check. This method will also allow you to draw any shape of armholes (arm holes) on your dress. The contours of the armhole and neckline do not have to be the same in shape as the T-shirt. You can choose any shape and depth of armholes and neckline. There is only 2 rules, subject to which the drawn pattern will ideally suit your child.
The dress has 2 important parameters that determine whether the dress will be true to size to your child. They are shown in the picture below:
1st parameter is the width of the dress along the axillary line (value A)
The 2nd parameter is the size of the armhole from the axillary line to the shoulder (value B)

To do this, you only need to take one measurement - half-circumference of baby's chest - take a centimeter and wrap it around the chest at its most convex part and remember the number (this will be the value girth chest), and now divide this figure by 2 (this will be the value half-girth chest).
Now look at the picture - it says how to calculate quantities A and B
For example, girth the chest of my two-year-old daughter (height 85 cm, weight 11 kg) - 50 cm. So to get half girth– 50 divided in half = 25 cm.
Dimension A = 25 cm + 6 cm = 31 cm.
That is, the dress I drew should have a width from armpit to armpit of 31 cm. Then it will fit in size - it will not be tight - since these additional 6 cm are added precisely for the loose fit of the dress.
And if you want a dress to grow a little, then add not 6 cm, but 7-8 cm. Size B = 25 cm: 4 + 7 = 6 cm2 mm + 7 = 13 cm2 mm(these millimeters can be safely ignored). That is, if the height of the drawn armhole is 13 cm, this armhole will be perfect for my baby.
That's all, observing these 2 simple rules, we will always have a dress pattern that is the right size for our baby. And no complicated drawings.
So, we drew the outlines of our future dress. Now make seam allowances— we stepped back 2 cm from the contours of the dress and drew it again with a thick, bright marker (Fig. 3 in the first diagram). These will be the final contours of the dress with allowances for the side and shoulder seams, at the bottom an allowance for the hem and an allowance for finishing the armholes and neckline.
(By the way, there are tailoring standards here: an allowance of 1.5-2 cm for the side and shoulder seams, 1-1.5 cm for the armhole and neckline, 4-6 cm for the hem). But I’m just looking at the fabric - if it frays a lot on the cut, then it’s better to make a larger allowance, otherwise while you’re sewing and trying on, half of the allowance will turn into fringe.
And also, when you draw a dress, don’t be upset if yours is a little crooked- one shoulder is more sloped than the other or the left armhole is not shaped like the right. This is not important, since we will transfer to fabric only one half drawn pattern (left or right - whichever one came out more beautiful) - and when cutting, the dress detail will turn out to be absolutely symmetrical.
Now you will understand everything...

Divide the pattern in half to get one shelf
In order for the dress part to end up symmetrical (that is, the left and right sides of the part are the same), we only need one half of the resulting pattern.
To do this, fold the cut out pattern in half - approximately shoulder to shoulder, armpit to armpit (approximately, because if you drew it crookedly, then the shoulders and armpits of the left and right halves may not completely coincide when folded).
Added and received fold line(Fig. 2), which runs right through the middle of the dress, and along this line you need to cut the pattern in order to end up with only one half of it (the shelf - as tailors call it - left or right, whichever one you have is more beautiful and even) - Fig. 3.
The pattern is ready. It would seem that everything is simple, and so it is.
Transfer the pattern to fabric and sew
We have in our hands a pattern for one shelf (left or right) and now we need to transfer it to fabric and cut out the detail of the back and dress.
The resulting shelf pattern was first placed on one side of the fabric - outlined in chalk (Fig. 4), then turned over in mirror image with the other side (moving the central midline of the shelf to the similar line just drawn in chalk) (Fig. 5) - and also outlined. And the result is an absolutely symmetrical finished part of the front or back of the future dress.
By the way, if you don’t have a chalk, you can use a colored pencil or sharpen a regular piece of soap with a knife (light soap draws well on colored fabric); it’s great to draw on white fabric with children’s colored wax crayons.
We cut out exactly the same part for the back. Yes, many dresses (especially summer ones) have exactly the same front and back details. But you can draw a back pattern that is different from the front pattern, it will take you 2 minutes. Read below
Back pattern and its differences
Usually, classic pattern of the front and back of the product differ from each other in the depth of the neckline and armholes(armholes are holes for the arms).

As you can see in the picture above, the armholes and front neckline are more curved inward, that is, deeper (blue outline), and at the back they are less deep(red outline).
And if you look at the photographs of the dresses at the beginning of the article, you will notice the difference in the neckline and armholes of the front and back.
Having examined many ready-made children's dresses in the store, I came to the conclusion that few dresses have a difference in the cut of the back and front armholes. That is, the armholes of the back and front coincide for the most part sleeveless dresses. And dresses with sleeves The back armholes are less deep than the front armholes - as in our diagram above). As a rule, there is a difference in the depth of the neck, but not always.
Conclusion: for children summer dresses without sleeves, identical armholes and identical necklines at the front and back are absolutely acceptable. For children's dresses with sleeves, we make the back armholes less deep.
You are your own creators and artists of the future dress. As you draw, so it will be - in any case, you will succeed Nice dress, do not worry.
Sew the front and back together
Now (Fig. 6) we place both parts on top of each other with the front sides inward and manually connect the side and shoulder seams with coarse stitches.
We try it on and, if everything is good, we sew these seams on a machine, after which we pull out this rough thread (for those who do not have a machine, you can simply go to a clothing repair center or an atelier; sewing a couple of seams will cost you $1).
We bend the edge of the hem and either sew it on a machine or hand-baste it with hidden stitches (ask your mother or grandmother - she will show you how).
Now you need tidy up the neckline and armholes(Fig. 7). You can simply fold the edges inward and stitch. Or you can buy braid or bias tape and use it to cover the neckline - this is done in most children's dresses.
Baby undershirts
Pattern of a thin vest
Pattern of a vest with closed sleeves

Pattern of a vest with a one-piece front and back

Pattern of a blouse with buttons: two sizes from 4 to 7 months (in brackets from 7 to 12 months)

Cut out one part of the front and back, two parts of the sleeves, adding 0.5 cm seam allowance and hem allowance (bottom - 2 cm, sleeves 1.7 cm - if cuffs are not sewn on). Neck allowance - 0.5 cm.
Overcast the leading edge of the clasp allowance. Turn the one-piece strip for the front fastener to the wrong side by 2 cm. You can stitch the fasteners at a distance of 1.5 cm from the fold of the strap, so that later during ironing the strap does not constantly roll into a tube.
Sew shoulder seams. Fold the cuffs with the wrong side inward along the fold line, place them along the bottom of the sleeve, slightly stretching the edge of the cuff and gathering the bottom of the sleeve, and stitch. Sew on the sleeves. Sew sleeve seams and side seams. Sew on the collar. Sew the seams.
Turn the hem allowance for the bottom of the blouse to the wrong side and stitch.
Make loops and sew on buttons.
T-shirt pattern: height approximately 64-74 cm (6-10 months)

You can sew a T-shirt from fabric such as cotton jersey. Parts made from such fabric are sewn down using a narrow zigzag stitch or a special elastic stitch.
Cut out one piece each for the front and back, adding 0.5 cm seam and hem allowances (2 cm for the bottom, 1.7 cm for the sleeves), as well as a 30 cm long and 3 cm wide neckline. 0.5 cm.
Overcast the top edge of the clasp allowance. Fold the one-piece facing of the seam allowance for the back clasp in half, turning it to the wrong side. Loops will be made on it. Turn the one-piece facing of the front fastener to the wrong side. Buttons will be sewn to it. Sew fasteners at a distance of 2.5 cm from the fold of the facing. Sew the second shoulder seam (which is without a fastener). Fold the binding to the neckline with right sides, stitch the binding, turn it to the wrong side, turn it under and stitch it to the stitching seam.
Place the front and back fastener pieces on top of each other so that the front and back shoulder lines match. Sew on the sleeves. Sew sleeve seams and side seams.
Turn the hem allowances for the bottom of the T-shirt and the bottom of the sleeves to the wrong side and stitch with a double needle.
Blouse
As soon as the child begins to actively move, the vest becomes uncomfortable. It is replaced by either a blouse with a tie in front, or a blouse with buttons or buttons.

You are sewing a blouse for summer or winter, with short or long sleeves, the child sleeps on his back or always tries to sleep on his tummy, which blouse is most convenient for you to put on your baby - these and many other reasons will help you choose the pattern of the most comfortable blouse.
The choice of fabric, the color of the fabric, the pattern, the shape of the buttons will determine the purpose of the blouse - at home, for sleeping, for walking, etc.
Sewing blouses for children under 1 year of age is distinguished by the smallest number of seams so as not to irritate the child’s skin.
For children's undershirts, the following sizes are taken:

We build a right angle with the vertex - point A. We put the length of the vest down - point B. From point A to the right we put the width of the vest and put point C. From point B we draw a horizontal line to the right. From point C downwards - a vertical line. The intersection of lines is point D.
We build a line separating the front from the back. From point A we set aside a segment equal to half the distance AC plus 0.5 cm and place point E (the back is slightly wider than the front). From point E we draw a line down.
Shoulder line: from point A downwards we lay down 1/10 AC - point F. From point F to the right we draw a horizontal line to straight line CD.
Armhole depth: down from point A we lay a segment equal to half the distance AC minus 1.5 cm. From the resulting point G we draw a horizontal line until it intersects with the line CD.
Back neck: from point A we lay off a segment to the right equal to 1/3 of the distance AE plus 1 cm and place point H. From point A we lay off a segment equal to ½ of the distance AF. We connect the resulting point with a smooth line to point H.
Back shoulder cut line: we connect point H with the point of intersection of the vertical line E with the horizontal line F. From the intersection point we put 1.5 cm to the left along an inclined line and mark it with point I. HI is the length of the shoulder section of the back.
Back armhole line: we build an auxiliary line IK, where K is the intersection point of the vertical line E and the horizontal line G. We connect points I and K with a smooth line, deepening the line to the bottom left by about 1.5 cm in relation to the auxiliary line. The result is an armhole line.
The vertical line AB is the line of the middle of the back.
Front neck line: to the left of point C we lay a segment equal to AH minus 0.5 cm - point L. From point C we lay a segment of the same length. And connect the resulting point with a slightly concave line to point L.
Front shoulder length: from the point of intersection of the horizontal line F with the vertical line E, we lay off 1 cm vertically. We connect this point with an inclined point to point L. Along this line we lay off a segment LM equal in value to HI to the right.
Front armhole line: we build an auxiliary dotted line MK. Then we connect these points with a line deviating 1.5 cm to the right from the auxiliary inclined line, thus forming an armhole line.
The vertical line CD is the line of the middle of the front.

Construction of a sleeve pattern.
In the middle of the upper part of the sheet we draw a right angle with the vertex at point A.

The length of the sleeve: From point A, we put down the sleeve length measurement we took and put point B. From point B, draw a horizontal line to the right. From point A, we lay off the width of the sleeve to the right and designate the resulting point - point C. From point C, we lower the perpendicular to the intersection with the horizontal line B - point D. From point C, we lay down a segment equal to 1/3 AC. We connect the resulting point E with an inclined dotted line to point A. The cuff line of the sleeve is obtained by connecting point A to point E with a smooth line deviating upward from the auxiliary line by 1.5 cm.
Sleeve seam line: from point D to the left horizontally measure 2.5 cm and place a dot. We connect this point with point E - this will be the seam line of the sleeve.
To obtain a complete sleeve pattern, fold a sheet of paper in half along line AB and cut out the pattern along the contour lines. We straighten the paper along the fold line.
The resulting pattern can be used in different ways.
To sew a vest with ties at the front of the neck, cut it out as follows:

To sew a T-shirt, the length of the sleeves is reduced, the back and front parts are cut out separately, and fasteners are made on one or both shoulders. Little children really don’t like it when they wear blouses with a narrow neck. In addition, in children under one year old, the volume of the head is almost equal to the volume of the chest.

To sew a blouse with a fastener with buttons or snaps along the front of the neck, cut it out as follows:
Let's add a one-piece fastener bar to the front halves. To do this, on the front pattern we continue to the right both the neck depth line and the horizontal line D by about 5 cm (1.5 cm for the fastener, and 3.5 cm for the hem of the placket). We connect the resulting points with a segment. The dotted line indicates the fold line of the plank.
In this case, you can sew cuffs to the sleeves. Then, while sleeping, the child’s sleeves will not constantly be pulled up. And the child will be warmer.
And one more feature - children grow very quickly, and a blouse with cuffs can be sewn to grow slightly (by 1-2 cm), and the cuffs will hold the sleeve in the right place.

This pattern can be used to sew a dress with a clasp on the back for a girl. To do this, the length of the pattern of the front and back parts is reduced by about 8 cm, if desired, the length of the sleeve is reduced, and the sleeve can be made wider. The fastener bar goes from the middle of the front to the middle of the back. To build the middle back strip, we continue to the left horizontally, both the neckline line and the horizontal line B, 3-5 cm beyond the vertical line AB. We connect the points obtained from the continuation of these lines with a vertical line, thus obtaining a bar in the middle of the back. We cut out the skirt of the dress in the form of a rectangle with sides 23-28 cm in height and width, which is 1.3 - 1.5 times greater than the width of the laid out dress bodice pattern.

Mike (height 80-84)
The T-shirt must be sewn from natural material, for example from 100% cotton knitted fabric. To do this, you can use your old T-shirts, T-shirts, if you are sure that they are made of cotton.

Cut out the front and back pieces, adding seam allowances:
0.5 cm - on the sides, 1.5 cm - at the bottom, 0.75 cm - along the sleeve hem and neckline.
Cut out two edging trims for the sleeve cap, 30 cm long and 3 cm wide, and one edging trim for the neckline, 47 cm long and 3 cm wide.
To stitch parts, use a narrow zigzag stitch or a special elastic stitch, choosing a fairly thin needle.
Sew one shoulder seam of the shirt. Sew the trim along the neckline. Sew the second shoulder seam, stitching the edges of the trim as well. Sew piping along the edges of the sleeve. Sew the side seams. Fold the bottom of the shirt under and sew with an elastic stitch.