Comfortable knitted pullover with Bat sleeves, made with knitting stitches.
Description is given for size S (M, L, XL). Bust 80 (90, 100, 110). Back length 53 (55, 57, 59) cm.
To knit a pullover you will need 10 (11, 11, 12) skeins of yarn (100% merino wool, 115 m/50 g); straight knitting needles 4 mm and circular knitting needles 4 mm 40 cm long, circular knitting needles 5 mm long 100 cm, auxiliary knitting needle, stitch holders, knitting yoke.
Knitting density: 19 p. and 25 r. = 10x10 cm in stockinette stitch using 5 mm needles.
 Conventions.
2/1 IL - remove 2 p. for auxiliary. knitting needle before work, purl 1, then knit 2. with aux. knitting needles
2/1 IP - remove 1 p. for auxiliary. knitting needles at work, k2, then p1. with aux. knitting needles
2/1 LL - remove 2 p. for auxiliary. knitting needle before work, knit 1, then knit 2. with aux. knitting needles
2/1 LP - remove 1 p. for auxiliary. knitting needle at work, knit 2, then knit 1. with aux. knitting needles

Back.
On long circular needles 5 mm, cast on 100 (110, 120, 130) sts. Do not join in a circle. Knit 6 rows with rib knit 1, purl 1. Finish on a purl row.
Track. R. (RS): P48 (53, 58, 63), then k4, then purl stitches to end of row.
Track. R. (IS): knit 48 (53, 58, 63), then purl 4, then facial loops to the end of the row.
The last 2 rows form the main stitch. Work 0 (2, 2, 2) rows as established.
Formation of sleeves.
Track. R. Increments (RS): 1 p., from 1 p. knit 2 p., then according to the pattern up to 3 last stitches, from 1 p. knit 2 p., 2 p.
Repeat increases in every 4th row 0 (2, 6, 9) more times, then in every 2nd row another 47 (43, 37, 32) times = 196 (202, 208, 214) sts. Next, knit straight until the height of the piece is 51.5 (53.5, 55.5, 57.5) cm from the start of work. Finish on a purl row.
Formation of the neck.
Track. R. (RS): Purl 84 (86, 89, 91), transfer next 28 (30, 30, 32) center stitches to holder, attach second ball and purl row.
Next, knit both sides simultaneously from different balls. Cast off 2 stitches on both sides of the neckline in each even row twice, then loosely bind off (or transfer to a auxiliary thread) the remaining 80 (82, 85, 87) stitches on both sides.
 Before.
Start and knit as a back to a height of 30.5 (30.5, 33.5, 33.5) cm from the beginning of work. Finish on a purl row. Next, continue forming the sleeves and at the same time perform the central triangle as follows:
Track. R. (RS): purl up to one loop before the 1st knit stitch of the row, then 2/1 SP, then 2/1 IL, then purl stitches to the end.
Track. R. (RS): Purl up to one stitch before the 1st knit stitch of the row, then 2/1 RS, then P2. and 2/1 LL, purl the row.
Track. R. (LS): knit according to the pattern.
Track. R. (RS): purl up to one loop before the 1st knit stitch of the row, then 2/1 knit, k1, p2, k1, then 2/1 kl, purl the row.
Track. R. (IS): knit according to the pattern.
Track. R. (RS): purl up to one loop before the 1st knit stitch of the row, then 2/1 IP, k2, p2, k2, then 2/1 IL, purl the row.
Track. R. (IS): knit according to the pattern.
Track. R. (RS): purl to one loop before the 1st knit stitch of the row, then 2/1 IP, P1, K2, P2, K2, P1, then 2/1 IL, finish purl row.
Continue forming the center triangle as established, working a 2x2 rib from the transferred stitches. When the height of the part reaches 44.5 (45.5, 4.5, 49) cm from the start of work, begin forming the front neckline.
Track. R. (RS): knit according to the pattern 89 (91, 94, 96) sts, transfer 18 (20, 20, 22) central loops to the holder, attach another ball and finish the row.
Next, knit both sides simultaneously from different balls. Cast off 4 loops on both sides of the neckline in each even row 1 time, then 2 loops 1 time and 1 loop 3 times. Next, knit straight and at the same time complete the formation of the central triangle, when 11 stripes of purl stitch (2 purl loops in each strip) are completed. Finish the front fabric at a height of 53 (55, 57, 59) cm in the purl row. Cast off loosely (or transfer to auxiliary thread) remaining 80 (82, 85, 87) stitches.
Completion.
Perform WTO. From the wrong side, sew the shoulder seams of the sleeves (or bind off the loops of both parts with auxiliary threads using three knitting needles).
Neck trim.
From the front side, on short 4 mm circular needles, knit 28 (30, 30, 32) sts from the back neck holder, then knit 5 stitches along the left back neckline, then 22 (24, 24, 26) stitches along the left neckline front, then rib knit 18 (20, 20, 22) stitches from the front neck holder, then pick up and knit 22 (24, 24, 26) stitches along the right front neckline, then 5 stitches along the right back neckline = 100 (108, 108, 116) sts. Join in a circle and knit as follows:
Only for size S: 1 p., *2 knit., 2 p.; repeat until the last 3 stitches of the circle, k2, p1.
Only for sizes M and L: P2, *K2, P2; repeat from * to the last 2 stitches of the circle, k2.
Only for size XL: k1, p2, *k2, p2; repeat from * to last stitch of round, k1.
Knit 2 more circles in this way and close the loops according to the pattern.
Cuffs.
From the front side, pick up on 4 mm needles and knit 48 (52, 56, 56) stitches along the edge of the sleeve. Knit 19 cm with an elastic band, knit 2, purl 2. and close the loops according to the pattern in the front row.
Sew side seams and sleeve seams with cuffs.
Based on the description of the pullover, you can knit a sleeveless vest by adding fewer loops for the sleeves.
 Note! The rules of the Domosedka club prohibit the posting of site materials on third-party resources in their entirety. Only an announcement (short description), photo and direct link to the source are allowed. For personal use, you can print any page. Seal sign on top.
The material was prepared and retold from in English Homebody.
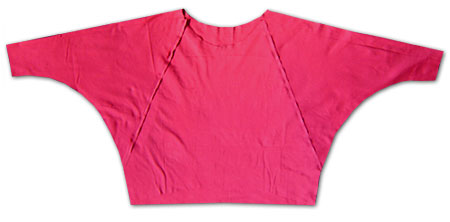
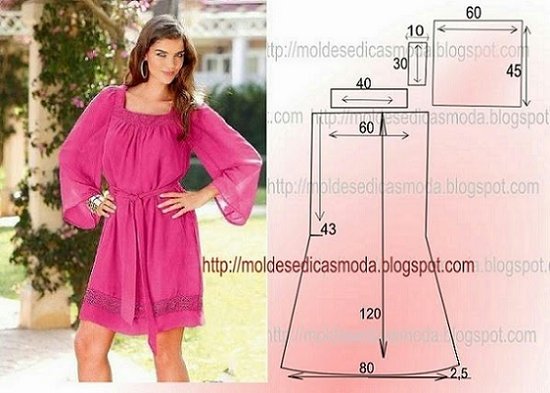
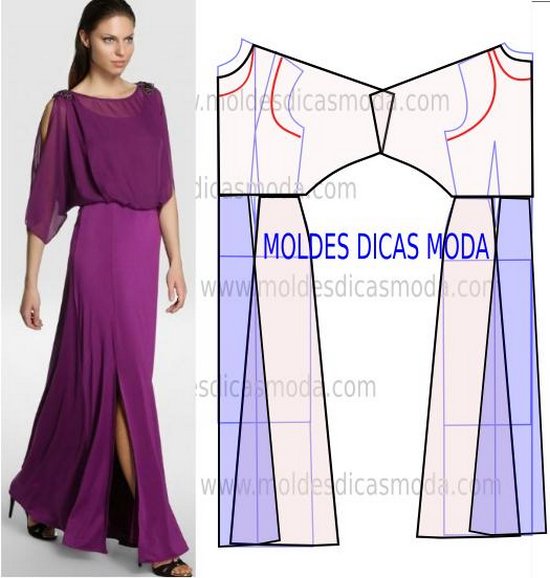
Tags:To sew a comfortable and fashionable blouse is our task. Blouse with sleeve « bat"Great for both slender girls and plump ladies. The sleeve in this model can be different lengths. The long sleeve tapers closer to the wrist, making the arms appear fragile and feminine. Fuller ladies will appreciate this style, as it makes it possible to hide extra pounds.
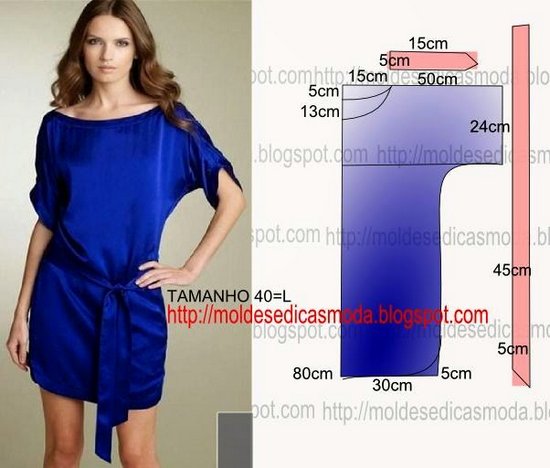
A blouse made of blue jersey is very useful in cool weather. Here the blouse has a knitted insert; you can replace it with a belt.

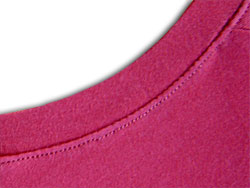
We will sew it ourselves, with our own hands. Our pattern will help you in your work. Thanks to this style, the product does not restrict movement and is very comfortable to wear. Long sleeves without cuffs, boat neckline. This style looks great on a blouse.

The pattern is made for size 44, you will need to replace the measurements for your size. We talked about how to take measurements. The construction starts from the upper left corner. After we have drawn the angle, we then set aside the values indicated in the drawing (for size 44). This is how we build the foundation. Here is the pattern for the model with long sleeve, but you can leave this length or make it shorter. Also with length - you can make a tunic or even a dress. If this pattern is complicated for you, you can make it using a simplified version.
Pattern No. 2
For sewing a fashionable blouse, the sleeves of which are made in the “bat” style,
required: knitted fabric 1.5 m wide and a length equal to two lengths of the jacket plus 40 centimeters for the hem, belt at the bottom of the blouse and on the sleeve cuffs.

The cuffs are made of rectangular fabric, the height of which is 14 centimeters and the length of the wrist circumference, taking into account a seam allowance of 6 centimeters.
The tied belt is made of fabric 1.7 m long (if the hip volume is 100 cm) or 1.5 m long (if the hip volume is up to 100 cm). The height of the fabric for the belt is 14 centimeters. Please note that the pattern posted here does not include seam allowance, so do not forget to add 2 centimeters for the neckline hem and 1 centimeter for the seam allowance.

For the summer it is better to use light, better natural materials: linen, cotton. Chiffon looks great. In such blouses you will feel comfortable and feminine. For cooler weather, knitwear, cashmere, and velor are suitable. This model does not have a collar. Instead of a collar, jewelry is used here. The sleeve length can be different, usually it is ¾, this is the type of blouse that looks more romantic.
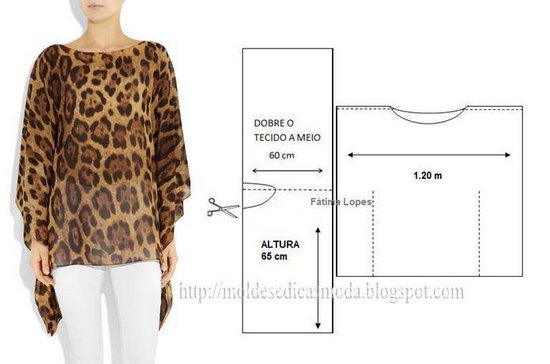
Pattern No. 3
This pattern is for short sleeve. Summer option. Easy to cut and not difficult to sew. Even a novice dressmaker can handle it.

Clothes with bat sleeves look great on any figure. A large cutout in the side seam and wide sleeves perfectly hide small imperfections in the waist area and make the image more interesting and even mysterious.
In today’s article I offer several options for products with dolman sleeves:
- The first is a pullover with an extended hem at the back,
- Second - Master class: how to sew a bat dress without a pattern,
- Third - drawings of patterns for blouses and tunics with batwing sleeves with calculations for each size.
Pullover pattern with dolman sleeves
To sew a pullover you will need:
- Wool fabric 2.3 m * 1.4 m,
- Fabric on cuffs and neckline.
- Threads, scissors and pattern.
You can download the pullover patterns below. There are 5 sizes in the PDF file: XS = red, pink = S, Blue = M, L = Turquoise, Green = XL, XXL = ocher. Size chart below.

Download the file, print it in full size (100%), glue the sheets together and cut out the pattern.
Transfer the paper pattern onto the fabric. And start sewing.
Step 1. Sew on the sleeves one by one.

Step 2. Process the neck.
Step 3: Finish the cuffs.

Step 4. Process the bottom of the product.
How to sew a tunic with a batwing sleeve: master class
Take your favorite blouse as a sample, for example a logsleeve or a pullover that fits in size. Fold it in half and place it on the paper. Bend the sleeve a little, as shown in the photo.
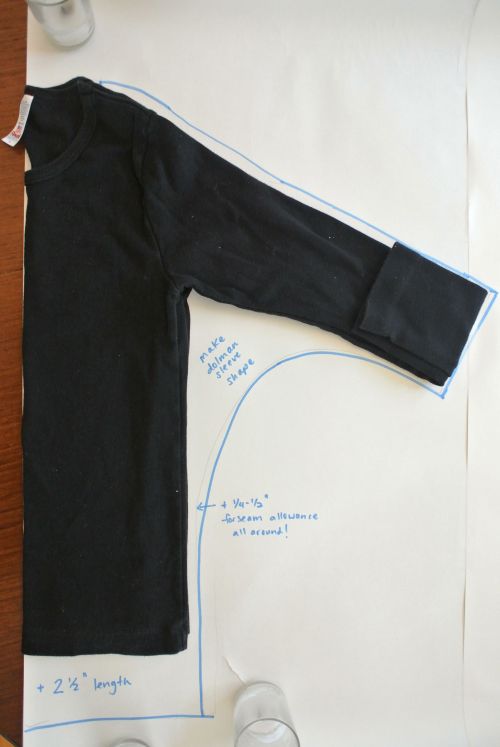
Then simply outline the top of the product, and draw the batwing sleeve at the bottom. Extend the products slightly downward. Be sure to make indents for seam allowances.

Transfer the pattern to the fabric and cut out. Sew the seams on the sleeves, as well as the side and shoulder seams.


Measure the width of the bottom and sleeves. Prepare strips of fabric of the appropriate width, as shown in the photo.


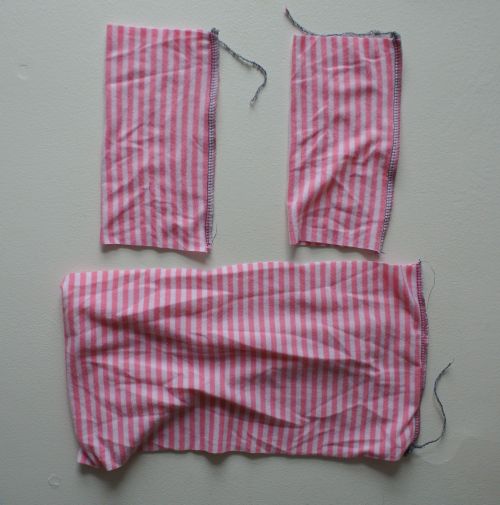
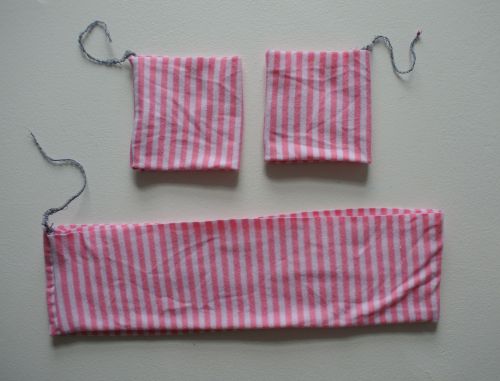
Sew the cuffs and bottom of the tunic.


How to sew a blouse, dress, tunic with batwing sleeves: patterns
From the materials presented above it is clear that sewing clothes with wide sleeves is not at all difficult. Here are some more tunic and blouse ideas. Calculations on the patterns are given for Portuguese sizes (tamanho - size), size tables are attached.


Bat blouse pattern

Bat blouse pattern


Bat tunic pattern
Bat dress pattern
Bat blouse pattern

Bat tunic pattern

Bat tunic pattern

Pattern for a dress "bat"Pattern for a dress "bat"

Bat dress pattern
Modeling a bat dress based on " "

The dolman sleeve jumper from the designers Lana Grossa is made with a mesh pattern. It is decorated with a central panel with a diamond pattern and a patent elastic band.
Design by Lana Grossa
(translation from English made for the website www.site)
European size 36/38 (40/42, 44/46)
Description given for smaller size. The differences for large sizes. When one size is given, it applies to all.
Materials
Yarn Lana Grossa Portofino (60% cotton, 40% polyamide) 115 m/50 g 650 (700, 750) g (color Lilac (col. 8) in the photo).
Straight knitting needles 3.5, 4 and 4.5 mm, circular 4 mm long 40 cm, additional knitting needle for braids
Rib: k1, p1.
“Waffle” pattern (stitches should be a multiple of 3 + 2 stitches). Knit according to pattern 3. The front rows are indicated on the right; on the wrong side, knit all the loops and yarn overs with purl loops. First knit the pattern before the first arrow, then 3 stitches between the repeat arrows, finish the pattern with loops after the second arrow. Repeat row 1-4.
Pattern “Rhombuses” (performed on 21 loops according to scheme 1). The facial rows are indicated on the right. On the wrong side of the loops, knit the way they look. Repeat rows 1-28.
Patent elastic (knitted on an odd number of loops) according to pattern 2. The front rows are indicated on the right, the purl rows on the left. Repeat repeat 2 rows. Count the loop and yarn over as 1 stitch.
Knitting density
Using 4.5 mm needles, 16 sts and 26 rows = 10 x 10 cm in Waffle pattern; 21 stitches and 26 rows in Diamond pattern = 9 x 10 cm; 20 stitches and 31 rows = 10 x 10 cm patent rib.

Description
The sweater is knitted in one piece over the shoulders, starting from the bottom edge of the front.
Using 4mm needles, cast on 97 (103, 109) sts for front.
Next row (IS):
For sizes 36/38 and 44/46, knit stitch, purl 1, * knit 1, purl 1; repeat from * last stitch, chrome stitch.
For sizes 40/42, knit stitch, k1, * purl 1, k1; repeat from * to last stitch, chrome stitch.
Work in rib as set at 5cm, evenly increase 8 stitches on last purl row = 105 (111, 117) stitches.
Note: The last purl row of the rib is shown below in Chart 1.
Switch to 4.5 mm knitting needles.
Next row (RS): Work Row 1 of Chart 1, starting with crocheted stitches, work Waffle pattern on next 21 (24, 27) stitches [see chart 3], work Diamond pattern on next 21 stitches, Patent rib work next 19 pet [see pattern 2], knit the next 21 sts with the Diamond pattern, knit the next 21 (24, 27) sts with the Waffle pattern [see. Scheme 3], chrome pet.
Knit as set to a height of 19 (20, 21) cm from the cast-on row. Finish by knitting a row on the WS.
Shaping the side line and sleeves.
Inc 1 stitch at the beginning and end of the next knit row, then 5 times on each knit row.
Cast on 2 sts at beg of next 14 rows, 3 sts at beg of next 10 rows, 4 sts at beg of next 6 rows, 5 sts at beg of next 2 rows, 7 sts at beg of next 2 rows, 16 sts at beg of next 2 rows = 255 (261, 267) pet. Knit the added loops with the “Waffle” pattern. Finish knitting at a height of 56 (57, 58) cm from the cast-on row, knitting a purl row.
Forming the neckline
Cast off center 49 sts on next RS row.
On the next purl row, cast on 49 stitches.
At a back height of 51 (52, 53) cm from the shoulder, rib knit as on the front 5 cm, evenly decreasing 8 stitches along the first row = 105 (111, 117) stitches. Close the loops according to the elastic pattern.

Pin the pieces to size and block.
Neckline
Using 4mm circular needles, pick up and knit 94 stitches along the neckline, completing the round.
Knit with an elastic band, making a patent elastic in the center of the front and back, 18 circular rows. Close the loops according to the elastic pattern. Fold the placket in half along the wrong row and sew on the wrong side.
Using 3.5 mm needles, pick up and knit 70 stitches along the edge of the sleeve and rib 7 rows. Close the loops according to the elastic pattern. Repeat on the other sleeve. Sew side seams and sleeve seams.


The “Batman” sweater is impractical, but incredibly feminine and eye-catching thanks to its strongly flared sleeves, the armhole of which begins not in the usual place - under the arms, but at waist level. It is knitted in several ways: on stockings or simple knitting needles, bottom or top. Wide sleeves can taper significantly at the wrist, up to the formation of tight cuffs, or remain the same width, but shortened for convenience. The silhouette can be represented by a seamless pullover or a jacket with button trims.
The raglan technique involves casting on stitches on stocking needles and knitting the product from top to bottom, starting from the collar or neckline. The number of loops is determined by making a test sample with the pattern with which you plan to knit the collar. Usually this is a single or double elastic band. All stitches are evenly distributed on four needles, and the collar is knitted to the desired length without any changes. When approaching the shoulders, the elastic band replaces the main pattern of the product, and additions begin. To do this, the circular fabric is divided into four parts in the proportion 1:2:1:2, the smaller of which are the sleeves. A facial loop is left between them, which will later form the raglan lines. These loops, in order to avoid missing increases, are marked with small pins or colored threads. Increases are made in every 2nd row by adding yarn overs one at a time on both sides of the raglan lines, that is, there will be 8 more loops in one row. In the following, these yarn overs are knitted with a crossed purl loop.
Knitting the fabric does not stop at the level of the armpits, as when making a regular pullover, but continues to the waist, while adding loops on both sides of the raglan lines continues. Having reached the waist, you should remove the loops for the sleeves so that the width of these elements corresponds to the usual ones. The same applies to the continuation of the front and back. The excess loops, which remain in large numbers between the continuing fabric and the sleeves, are closed and crocheted. Next, the work is done using the usual raglan technique: the loops of the product are tied to the bottom edge and closed. The removed sleeve loops are returned to the free stocking needles and knitted to the desired length.
In addition to the raglan style, the “Bat” sweater can be knitted from the bottom up - due to the width of the parts, you will have to use circular knitting needles, or from one side to the other. In both cases, you will have to perform a complex calculation of adding loops that form wide sleeves, while the narrowing towards the wrists is done gradually, since there is no way to close the extra loops with a crochet stitch or a knitted seam, as when knitting raglan.