Remember with what delight children look at magicians when they create in a matter of seconds balloon figures? For children, this is real magic: here in front of them is a simple long ball, and the next second a cute poodle or a bright flower appears. But a child doesn’t have to wait for the next trip to the circus to look at the art of twisting; this is the name given to the process of twisting various figures from balls, because you can learn this art yourself, as well as teach your child.
Balloon figures for beginners can be created by children and adults, it is a great hobby to relieve stress and have fun. Today in Russia this art has not yet gained widespread popularity, but in America it has been actively developing throughout the 20th century. The first act involving twisting rubber balls appeared during a circus performance in 1938, but mass popularity began only after the launch of the production of long balloons which happened after the Second World War.
The balls were produced in Japan and imported to the USA, but at that time the quality of the rubber had not yet reached modern levels, so the craftsmen could not make such intricate figures. At that time, only a real sculptor could make a dog or a giraffe.
The quality of rubber balls improved in the early 60s, they became thinner and stronger, and the color palette expanded, in addition, they became cheaper, which allowed twisting to spread among the masses. The balls became long: their length was now almost 20 times greater than their diameter, which made it possible to perform a lot of twisting.

Twisting gained mass popularity only at the end of the 20th century, and craftsmen began to unite into communities. In the States, open lessons began to be held, where everyone was taught the basics of twisting, how to perform figures made from sausage balls, instructions for beginners already then it appeared in the public domain, for example, they began to be published in entertainment newspapers and publications. The first exhibition was organized at the end of the 80s.
Balloon figures
To master the process, how to make figures from balloons, you will need knowledge of the basics and main techniques of this art. You shouldn’t start creating complex shapes right away; first, you have to learn how to inflate them correctly, how to twist it once or several times. Once you have all the basic elements, you can proceed to the simplest figures - flowers.
If you decide to figure it out, how to make figures from balloons, the first thing you need to learn is how to put the balls on correctly so that they remain flexible enough and do not burst while twisting. When you inflate it to the required length, you need to deflate a little to get rid of excess pressure, then it will be easier to tie.
Twisting should always start from the neck, then with each next step the air will move towards the tail, and there is free space there, so the rubber will not burst.
The main rule of twisting: twists must be made in one direction and with one hand, while the second to last bubble must be held. All fingers must be involved in the process, otherwise your “structure” will unwind and all efforts will be in vain. Looking at the instructions on how to do it figures made from sausage balls, you may come across some terms that are commonly used to describe the twisting process. The part between the two twists is called the “bubble”, the bubble in the tail is called the “ottoman”.

How to make figures from balloons
There are seven basic twisting techniques you need to master if you're going to create figurines made from ball sausages. A simple twist consists of squeezing the ball and holding it with one hand where you will twist it, with the other hand twisting it around its axis several times, and then holding both sides so that the twist does not come apart.
The “lock” option includes three bubbles in a row, then the middle ones must be stacked with each other and the ball bent at the junction. Pull up and twist around the joints three times, this way they will not unwind.

“Ear” is another simple technique: you need to make three bubbles so that the middle one is less than 2.5 cm in diameter. Then you need to hold the outer ones together, and carefully pull the middle one and twist it three times. The “kink” technique also assumes that at the very beginning you will make three bubbles, but the middle one should be larger than the rest. Now you need to hold the outer ones, pull the middle one and, folding it in half, twist it three times.
Reception "Tulip" - index finger you need to push the knot inside long ball the length of two phalanges, and with the other hand, grab the knot from the outside, holding it firmly, and then pull your finger out of the ball. You need to twist it so that the knot is lower, and you will see how a tulip has formed.
The next technique is called “with a clapperboard” and is performed according to the following scheme: the first medium-sized bubble must be twisted, then there will be a series of five small bubbles. The first and last small bubbles need to be twisted, thus making a ring, then the second and fourth are twisted into an “ear”, and now you have blocked the middle bubble. Now if you pierce it with a pin, there will be a pop and the remaining four twists will come apart.

To make an “ottoman,” you need to pull the tail several times, then squeeze the air into the tail from the inflated part, carefully moving your hands along it.
Please note that each type of bubble has certain sizes that should be adhered to. 2.5 cm in diameter is small, 3.5-5 cm is medium, 5-7.5 cm is large.
And, by the way, a real master who creates balloon figures, can twist 33 bubbles from one sausage, so start practicing right now. Of course, constantly inflating the balloons can be quite difficult, and if you overdo it, you can feel dizzy, so a small hand pump is sold along with a set of “sausages”. And if you like to create original figures with your own hands, then make them too.
It's impossible to imagine children's party no balloons. So bright, tender, weightless - they fill everything around with joy and create an atmosphere of fun and carefree. Sausage balls themselves are nothing special, but when they fall into capable hands, they turn into real masterpieces. Why don't you learn how to make a dog out of a balloon?
The art of creating balloon figures
Twisting a ball and turning it into intricate figures is a whole trend in modern art, called “twisting”. Today this trend is more popular than ever, and it all began back in the 1930s, when the production of long balls first began. It is not surprising that magicians were the first to twist the balls, because this is a real spectacle.
The balloons of that time were not of high quality, but the situation changed dramatically after World War II, when balloons became thinner and stronger. The peak of popularity of twisting was the end of the 20th century, at this time people who liked to twist air figures began to form clubs, conduct lessons, and organize exhibitions. Twisting initially found its fans in the United States and later spread throughout the world.
How to inflate a balloon correctly
Before you make a dog out of a ball, you should familiarize yourself with the basic rules of twisting, which will greatly facilitate the whole process. First, you will need:
- long balls;
- hand pump;
- patience.
Secondly, you need to learn how to properly inflate and tie a balloon:
- Before inflating, the balloon must be stretched to ensure even distribution of air;
- the ball must be placed on the pump spout, pressed between the index and thumb left hand, and right hand pump air with reciprocating movements;
- the tip of the ball must remain uninflated, otherwise the air will have nowhere to go when twisted, and the ball will burst;
- The tail of the inflated balloon must be tied tightly, and the modeling will begin from there.
Classic balloon dog
So, the balloon is inflated and tied according to all the rules. How to make a dog from a sausage ball? The scheme is quite simple.

- We twist the ball in three places, as shown in the picture. Twisting involves rotating 360 degrees or more, twisting all the bubbles in one direction.
- We twist the first and last twist (if you count from right to left in picture 1). We get a head with ears.
- If you have reached this point, then you have figured out the basics. We continue to figure out how to make a dog out of a ball. The diagram (point 3) shows how to make the front legs. Again we twist the ball in 3 places, forming 3 bubbles, and then twist the first and third twists together, as in the previous paragraph.
- Make three more bubbles and twist old scheme- we get hind legs and a tail.
- Now you know how to make a dog out of a long ball.
It's hard to say what breed our dog is. But if you take the ball longer and make the body more elongated, then you can confidently say that the four-legged Sharik is a dachshund.
How to make a poodle dog out of a balloon?
Another recognizable dog silhouette that can be made into a figurine is the poodle. How to make a dog from a sausage ball (diagram 2):
- Inflate the balloon, leaving the tail uninflated.
- We twist the ball so that we get a chain of 4 bubbles: big-small-big-small.
- We twist the first and last twists - the poodle's head is ready.
- Next, twist 1 bubble for the neck.
- Now you need to make the poodle's front legs. To do this, we make two oblong bubbles and twist the twist in front of the first leg with the twist after the second leg.
- For the body we make one bubble, and after it 2 more for the hind legs, connect.
- The remaining part of the ball will no longer require twisting. Half of the air needs to be pushed into the very tip of the ball. This way the dog will have the place where the tail grows from, as well as a beautiful flounce at the tip of the tail.

Balloon compositions
We have already figured out how to make a dog out of a ball. But if, in addition to balloons, you also have tape, a marker, perseverance and a flight of imagination, then you can make a whole composition that you wouldn’t be ashamed to give as a gift not only to a child, but also to an adult. To create such compositions, balls of different colors and sizes are used.

$58 million balloon dog
The famous American artist Jeff Koons, whose works are included in the list of the most expensive sculptures in the world, draws his inspiration from quite ordinary things. Inspired by the theme of balloons, in 1990 he created a series of sculptures dedicated to figures using the twisting technique.
The most expensive of them - a sculpture of an orange dog - was sold in 2013 for a record amount of $58 million. Until the sale at auction, the orange dog made of polished steel was exhibited in the most famous museums in the world, such as the Museum of Modern Art in New York, at Versailles palace, on the Grand Canal in Venice.
The author created 5 sculptures of dogs of different colors, but only the cost of the orange one broke all records. Another passion of Mr. Koons is sculptures resembling balloon flowers. The composition “Tulips”, which is a bouquet of seven intertwined flowers, amazes with its weightlessness and festiveness. The flowers, like the dogs, are made of polished stainless steel.

Imagine, create a holiday with your own hands, teach this to your children. A air balloons They will help you with this!
An ordinary birthday and anniversary, a wedding and the appearance of a baby in the family, the first of September and last call- almost all events in a person’s life are accompanied by these symbols of fun and joy. On threads and ribbons, on sticks and as part of intricate compositions, they demonstrate their almost limitless design possibilities. How to make a figure from balls without enough experience or where to start?
Unclassified materials
Despite all the impressiveness, balloon designs are quite expensive compared to the cost of the consumables used to make them.
All more people are inclined to create aerial sculptures on their own also because the professional use of balloons as festive street and interior decor has given rise to the production of elements and devices of various shapes and properties (special pumps, clamps and sockets, as well as double-tailed linkoluns and ShDM - long sausages of different sizes ), allowing ordinary people to master the basics of this design direction. 
Traditionally shaped balls have also not lost their popularity, which can be used to create a shape from the balls with your own hands to form tops or fill voids.
Before you start mastering the technique of making aerial compositions, you need to familiarize yourself with the developments and advice of design experts, stock up on all the necessary equipment and materials, and also be patient.
The most important thing is to decide which shape to start with, and also to purchase the right types of balls to create it.
It is important to acquire a hand pump - it will not only save time on filling the elements with air, but will also allow you to inflate them exactly as much as required by a specific composition - many assembly instructions contain information on the number of pump strokes for creating the components of a figure from balloons with your own hands .

Herringbone
Universal weaving pattern - “Herringbone”, which can be used not only in manufacturing New Year's tree, but also to create a conical-shaped object - the torso of a female character or a low column.
Required:
- hand pump;
- 18 twelve-inch lincoloons;
- 12 links 5";
- ruler.
 For the convenience of making figures using linkoluns and in order not to waste time knitting extra knots, it is better to inflate two links at once and tie them together from the side of the holes.
- You need to inflate the 12" links so that you get 6 of each size: 21cm, 16.8cm, 13cm.
- Connect chains of 6 identical links in each.
- Inflate 5" linkoluns to sizes: 10.75 and 8.6 cm and also tie them into a chain.
- Next, chains 21 and 16 need to be combined, bent at the size boundaries and twisted into four links in the coupling.
- Tie the tails of the last “four” together.
- The same needs to be done with chains of links 13 cm and 10.75 cm.
- The result is two trapezoidal strips that need to be connected to each other into a single (decreasing towards the top) canvas using tails.
- The chain of the smallest links is simply twisted with the balls at the top of the trapezoid (by threading small elements through the gaps between large ones).

You can insert small round balls into the gaps to imitate Christmas decorations. They are inflated and tied, like links, in pairs, and then threaded at intervals until the silhouette is formed.
When making figures from balls with your own hands, you must follow the instructions step by step, since the working material is very delicate and the slightest deviation from the diagram can nullify all previous stages.
The trapezoid needs to be rolled into a cone and fixed, i.e. tie the tails of the links on opposite sides. It is advisable to tie the tails of the links in the top row together to narrow the top.
All that remains is to make the top, for which the aerial figure “Star” will be useful.

Flower
The most popular DIY birthday balloon shapes are flowers. They are made using:
- elements of traditional form;
- lincoloons;
- air components of different types.
They look very solemn in the interior with two layers of petals. To make them you will need traditionally shaped elements:
- 5 large red ones;
- 5 small yellow ones;
- 1 small red.
Each five is tied by flowered tails. The tails of the small “petals” are threaded into the hole formed by the tails of the large “petals”. The middle is formed by a small red ball.
Such flowers are most often placed attached to the wall using double-sided tape.

Bouquet
Another technology involves creating flowers and entire bouquets from ShDM 260Q. The secret of working with this modeling material is that to create a bud, the ball must first be fully inflated and then slightly deflated (2 seconds) - the balloon should be filled, but soft.
- Tie the tail so that the air does not escape, and twist the windmill in the middle.
- Tie the tail with the hole and the opposite end into a ring.
- Having folded the SDMM into a strip, twist it in each third of the length (you will get a strip of three identical double bubbles).
- Holding the accordion of bubbles with one hand, with the other hand you need to squeeze the accordion in the center and twist the halves together to make a flower (you may need outside help at this stage, and the structure will have to be twisted along both axes).
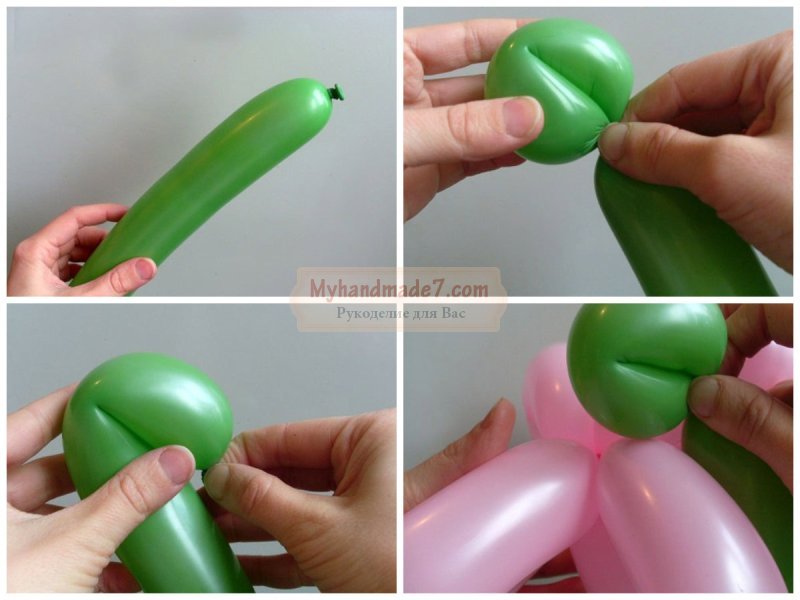
Finally, inflate the green SDM and turn it into a stem.

Design of structures
Large compositions look very solemn - airy columns, arches and plaits. Such creations take a lot of material, but they are incredibly simple to make.
One way is to create chains of links of the same size and tie them into a fabric to form a finished structure (the principle by which a herringbone is made).
A frame structure (for example, an arch or a heart) requires a rigid profile onto which “fours” of ordinary balls are strung, tied by the tails (first elements No. 1 and No. 2 are tied, then No. 2 and No. 3, No. 3 and No. 4, and No. 4 is tied to No. 1). You can wrap the frame with chains of linkoluns and fasten them together on a ready-made figure.
There are many ways to make unusual and interesting compositions based on this delicate, but very plastic and pliable material. Famous designers include dresses made from SDM in their shows, and fashionistas on vacation flaunt hats filled with air. And this means that everyone who has found something interesting for themselves in this area of modeling still has many discoveries to make.
Balloon figures are a great toy for a child or a holiday decoration. Although, more often – both, of course. It’s not surprising that many people are interested in how to make balloon figures with their own hands. In fact, it is not difficult to master this art, the main thing is to understand the principle.
After reading our article, you will know how to do different figures from balloons with your own hands, and also learn step by step how to create the most popular figures.
You can make anything you want out of balloons. You can create just a bouquet of balloons, or you can create a car with people. But more on that later. To begin with, it is worth studying the main rules of modeling. So, to work you need long sausage balls. To inflate them, you will need a special pump; without such a device, inflating the products will be very difficult and time-consuming.
The balloons are not inflated completely; they always leave a tail 10–15 cm long so that during modeling there is somewhere for the air to go. If you inflate the craft completely, it will simply burst when twisted. After inflating, the tail of the ball is twisted and tied tightly. That's it, the material for modeling is ready.
How to make different figures from balloons?
The main modeling technique is twisting, which is used to form bubbles different shapes and size. To make different figures, they use special patterns, each with their own, but in any case, you need to immediately make a certain number of bubbles.
Twisting technique quite simple. A distance from the knot of the ball is measured, equal to the size of the future bubble, and a twist is made at this distance. The ball simply rotates around its axis 3-4 times. It is important to remember that twisting each part of the craft should be done strictly in one direction.
Second reception - twist with lock. It is used when you need to secure bubbles running one after another into a certain shape. For this twisting, take the last two bubbles, put them together, bending the ball at the point of their connection. The bubbles then curl together around the junction with the previous bubble.
One more trick - bending twist. This technique differs from twisting with a lock in that the last two bubbles are not twisted together, but simply bent.
Do-it-yourself different figures from balloons
So, having mastered the basic techniques and found modeling schemes, you can make a variety of shapes from balls with your own hands. You don't have to use only long balls; round ones work great too. The most common figures are men and various flowers.
Making a little man
To make a big cute man you will need the following balls:
- 9 small round ones;
- 1 round (then draw a face on it);
- 1 large round with a tail;
- 3 long.
Immediately inflate the round base on which the face is drawn. If you take a ready-made smiley ball, you can do without art.
For the man’s legs, they inflate 4 large balloons and make a “flower” out of them. Another 4, smaller ones - a collar.
The next stage is connecting the legs, torso and head. After this, hands are made - from long options. At the end of each ball a loop is made, these will be “cams”, and in the middle you need to make twists - “elbows”. The arms are attached to the body at the point where it connects to the head.
The last long ball is needed for the cap. It is inflated and twisted into a loop. To fill the “hat,” a couple of small balloons are inflated. All this is attached to the head using double-sided tape.
The figure is ready. All that remains is to make the flowers and attach them to the man’s hands. The main thing is to give free rein to your imagination, and then you can make almost anything out of inflatable balls.
Making flowers from round balls
Another option for figures is flowers. They can be made from both round and long balls.
To make a flower from round balls, they are inflated and connected in pairs. After this, two pairs are twisted together - a flower without a core is obtained. For the core, a small round sphere is inflated, which is attached in the middle. Or a long ball, at the end of which a round bubble is formed - this will be a stem with a core. To connect the stem to the flower, a round bubble is carefully inserted and secured in the middle of the flower. From these flowers you can put together a large bouquet that children will definitely love.
Making flowers from long balls
As for flowers made from long balls, for each flower you need to take two objects of different colors. A bud is formed from one, a stem is formed from the second.
In order to make a bud, the balloon is inflated and connected into a ring. The ring is bent in half, and then twisted in three places - so that you get three double “sausages”. All the resulting parts are folded into a fan, so that the joints line up in one line. After this, the ball is compressed at the joints and twisted into a lock. All that remains is to straighten it - you get a flower.
To make a stem, you need to inflate a long balloon and make a round bubble at its end. They retreat 10 cm from it and twist it. From it, two more bubbles are made, “sausages”, which are twisted into a lock. The result is a leaf. Now do the same for the second leaf. The stem is ready - all that remains is to attach it to the bud. To do this, the upper round bubble is inserted into the bud.
So, quite simply, you can make different shapes from balloons to decorate any room, for any occasion. Well, if you don’t want to waste your time, you can order ready-made figures that will be made by professional decorators and brought to you for the holiday.
The material was prepared by the site Mechtalion.ru.
If this is your first time encountering twisting - the art of creating various figures or toys based on balloons, the first thing you come to do is a dog. This “model” is the simplest and most popular in twisting. Make figures from balloons with your own hands step-by-step instruction with photographs and examples will help everyone. In the article you will find examples, tips and secrets of doing the job.
Before you start creating an air toy, we recommend that you familiarize yourself with practical advice. If you decide to make figures from long balls, then the recommendations will be relevant for you, especially if this is your first time doing such a procedure. How to make a dog out of a balloon yourself:
- To ensure that balloon toys are always made, the base must first be inflated. Keep in mind that you will waste more time and effort if you inflate and twist the material at the same time. Moreover, using this technology it will not be possible to make a beautiful dog.
- Any balloon crafts, including dogs, should be twisted in only one direction. That is, either only from yourself, or only to yourself, otherwise it’s easy to get confused and then you will need to repeat all the actions again.
- You must take into account your strength when tying knots - you cannot tighten them too much, since the figure can burst at any stage, even at the final stage.
- Your actions must be confident. At the initial stage, before making crafts from sausage balls, the base must be visually divided into symmetrical parts, otherwise some parts may turn out to be different sizes.
- The material itself must be durable, preferably not made in China, since weak products are based on fragile artificial latex.
Step-by-step instructions for making balloon dogs
You can learn more about how to make a dog out of a ball in the presented master classes. To do this, you will need the material itself and a pump for making the dog, a little strength and patience. No threads are needed for this procedure. You should use a ShDM - a special ball for modeling. As stated above, cheap Chinese latex balloons are not suitable for this. How to make a dog out of a ball - read below.
From a sausage ball
First, you need to inflate the workpiece so that only part of the tail remains deflated (5 cm is enough). A fully inflated balloon will simply explode later, so in any case leave some free space. Please note: if it is full and the future toy becomes very tight, then you need to bleed off some air. Pinch the place to which you want to deflate the air. Do this carefully as the toy may come down completely. Once the required amount of air has been released, the warp should be tied. Let's get to the figure:
- The procedure for twisting the toy begins with the dog's head. This part takes up an average of 5 cm. Visually measure about 5 cm and twist this section. Beginners can easily figure out how to tie a balloon. 3-4 turns will be enough.
- The first ear of our toy will have the same dimensions. Twist this part in the same way. The dog's face and ear need to be folded along the rest of the ball.

- Then you should measure the second ear, which should be identical in size to the first. Twist them together two turns.
- Let's make the neck. It is performed as shown in the photo, and its size should be from 6 cm to no more than 8 cm.

- After this, we move on to the front legs, the size of which should not exceed 7 cm. Tie the parts a few turns, fold them together and turn the lock two turns.
- Next, we move directly to the body. The dog's body should be no more than 10 cm in length. The torso is twisted in the same way.

- Following the example of the front paws, we also do the hind paws. The dimensions of the hind legs are the same - no more than 7 cm. The twisted bubbles should be placed one on top of the other, and then tighten the lock a few turns.
- What's left is the tail. The final stage is the design of the resulting toy. Using a marker, draw the dog's face, add a nose, mustache, and eyes. You have just learned how to make a dog out of a balloon yourself.

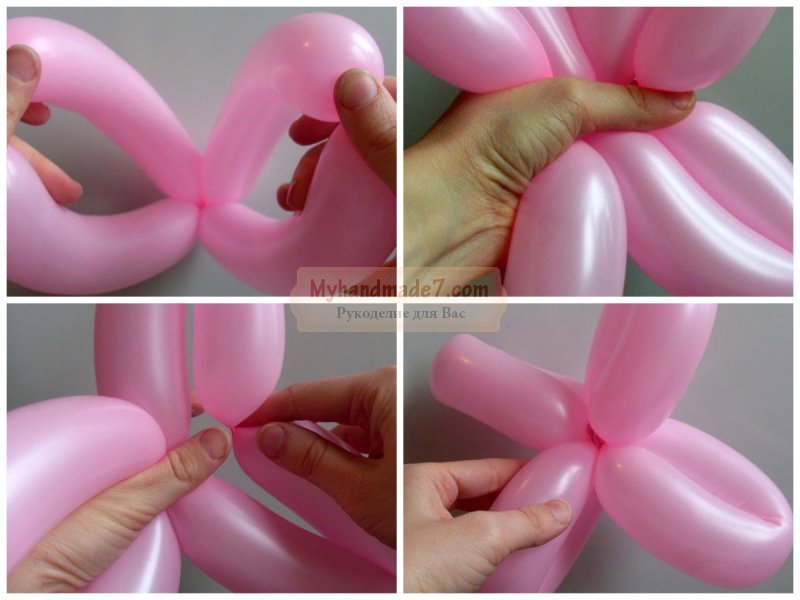
Diagram with dimensions and description of creating a poodle
- The base should be inflated, leaving about 12 cm for the tail.
- Then you need to blow five bubbles in a row and twist them, supporting them with your hand. A bubble of about 5 cm in size will be for the muzzle, the same amount for the back of the head, no more than 10 cm for one ear, 5 cm for the bangs and no more than 10 cm for the other ear.

- The back of the head and the bangs need to be aligned, as shown in the photo, and twisted with a lock.
- The poodle's face should be inserted into the hole formed between these bubbles. This way the head of the future toy will be almost ready.

- Next, you need to make several bubbles again: 5 cm for the neck, 8 cm for one paw, about 3 cm for the tip of the paw, the same amount for the tip of the other paw and 8 cm for the second paw.
- The paws must be placed opposite each other, aligning them.

- After this, the neck and paws should be twisted with a lock - the front part of the toy will be ready.
- Next, we perform the back part, for this we make several bubbles. For the body 5 cm, for the hind legs and their ends the same dimensions as for the front ones. The hind legs are combined in a similar way. All that remains of the material will be the tail. Actually, this completes the procedure for creating a poodle. Take a marker and design the resulting toy. The dog ball is ready.

Video tutorials: how to make a dog out of balloons
The instructions will help you start making such a simple and cheap, but original crafts. If, after the above master classes, you have any questions about the instructions, then we invite you to watch the video, which clearly describes step by step how to make crafts from sausage balls. This information will help you understand the basics of twisting, and over time, make more serious crafts.
Step-by-step master class for beginners
How to do it yourself
How to roll a long ball