How do girls and women see their braids?
Rich, voluminous, beautiful, neat and effective, making an indelible impression and sinking into memory.
How to weave voluminous braids? How to weave a voluminous braid correctly?
How to make any braid look voluminous? How to braid a voluminous braid on short or middle length hair?
How to make an evening voluminous braid: spikelet, French or reverse?
And I would like to know these braiding options in 2 versions: on myself and on the model. How to weave voluminous braids on sparse hair?
How do girls and women see their braids?
Rich, voluminous, beautiful, neat and effective, making an indelible impression and sinking into memory.
In order to make your braid look like this, you should answer a few questions:
How to weave voluminous braids? How to weave a voluminous braid correctly? How to make any braid look voluminous?
How to braid a voluminous braid on short or medium length hair?
How to make an evening voluminous braid: spikelet, French or reverse? And I would like to know these weaving options in 2 versions: on myself and on the model.
How to weave voluminous braids on thin hair? What will different volumetric braids look like using different techniques?
Volume braids for long hair (photo)

Look at the photo, here you will see:
- 4-strand braid;
- braids with one-sided pick-up (snake);
- French braid (dragon);
- braid made of strands;
- braid with tiebacks with loose strands.
For medium hair (photo)

This photo shows options for voluminous braids for medium-length or short hair (not shorter than a bob). Braided braids on bangs or across the entire head in several rows.
- braid fish tail in 2 versions;
- braids with one-sided pick-up in 2 rows and (snake);
- 2nd voluminous French braid from the ponytail;
- reverse French braid on bangs (with tiebacks to the crown);
- reverse French braid.
Let's start answering each question in detail and with video and photo instructions.
How to add volume to a braid?
Let's talk about 5 ways to add volume to even sparse hair, which will make your braid more voluminous.
Braids
 An easy, affordable and simple method of adding volume is to braid your hair at night for greater effect.
The secret to making your hair wavy is moisture.
It is necessary to braid slightly dried hair into small braids; the smaller they are, the more voluminous the hair.
To the owners wavy hair this method will work perfectly.
The technique is this:
Training video on creating volume in your hair using small braids:
The advantages of this method: accessibility, lack of special devices, suitable for any length of hair, does not require much time, harmless.
Attention! Disadvantages: braiding will take from 30 to 60 minutes, the ends will not be as wavy as the middle and at the roots.
Corrugation in a French braid, evening version

An analogue of braids, but a faster option is the corrugated attachment. This version of twisting looks like steps.
It doesn't matter whether your strands are the same or different, they will then be put back into a braid. Let's look at braiding and adding volume using corrugation.
The technique for weaving braids with corrugation is as follows:
Even just washed and dried hair will do.
- Treat all hair with heat protectant.
- Screw the corrugation onto the curling iron, paying especially close attention to the front strands; the back part will be almost uninvolved in our evening hairstyle.
- Starting from the place above the ear, make a side parting.
- Start weaving a reverse French braid by separating the wide and voluminous 1st strand. Selecting strands from 2 sides so that the braid towards the frontal part becomes as voluminous and wide as possible.
- Braid the braid to the back of the head, continuing the normal braid without tiebacks, and tie it with an elastic band. Stretch each strand giving even more volume.
- All that remains is to gather your hair under a crab or pin it with a hairpin. Choose the option that suits you best.
- Spray with varnish, hiding weaving flaws or stray strands. Laying down each link.
- Inspect the finished hairstyle and pin up any stray hairs using bobby pins.
How to weave a reverse French braid is discussed in this article with diagrams, and the tiebacks are discussed here.
To make it easier to master weaving volumetric French braid We recommend watching a video tutorial from Neonila Bronstein, which shows the entire process of creating a hairstyle step by step.
Bouffant
 This option is suitable in cases where there is no time for braids, and corrugation is not available, then a braid with a backcomb would be appropriate.
It should not be done on long or very brittle hair.
It can be directed to the root or to the strands, it depends on what kind of braid you came up with.
Cons: improperly done combing leads to deterioration of hair condition and brittleness.
Before you start doing it, watch a video on proper combing and giving your hair the desired texture. Contact such professionals as: Kot, Tatyana or other hairdressers.
Trying to comb the backcomb is a major mistake.
You need to get rid of it like this:
- Wash your hair without combing using shampoo and conditioner.
- When the hair is dry, comb the hair with a comb with very rare teeth.
Strands with clips or hair extensions
 The first option is easier to implement, although both methods are not cheap.
Strands on clips will add volume and length at the same time, but hair extensions cannot do this.
These methods are good for constant and long-term use.
When you constantly need to do this hairstyle, then the investment is justified.
Look at the look and length of your hair before the extensions and the result after. Whether extensions or false strands are better is a question girls decide individually.
Depending on the condition of the hair and the advice of the hairdresser.
Do you dream of a voluminous, chic braid like Elsa's?
How to make such a braid, see step-by-step photos.


If you don't fully understand the process, this will help you step by step video with explanations.
Video using backcombing, curlers and strands on hairpins:
Strand stretching

Plucking technique
In the process of weaving a reverse French braid, we stretch the links using a plucking technique, pulling only the outermost part of the links.
- We part the hair. We tie the second strand for the braid with an elastic band.
- From the separated large strand, passing from the parting to the temporal area with the sharp end of the comb, separate a thin strand.
- We divide it into 3 strands, from which we will weave a reverse French braid. By inserting 2 fingers into the strand, we get 3.
- We begin weaving by placing the right strand under the central one, then the left. The second and subsequent spans are done with a pick-up on both sides. When the weave is done, slightly stretch the link by the edges. We repeat this operation to the occipital region of the head.
This technique is suitable for evening or openwork braids, giving volume and width to each link, the braid itself acquires the airiness of lace.
We pull the whole link
We repeat all the steps from the previous technique until the links are stretched.
After weaving, we pull the entire link to the required volume. In this case, the braids turn out to be more voluminous and “rich”, creating the impression of being very thick hair and thick braids.
Curls without curlers and curling irons
Secrets to increasing the volume of your braids
It is worth using a few simple and well-known old secrets.
Putting bangs into a braid
Simple wisdom, but its owners rarely use it long bangs, but in vain. After all, by adding a few strands and using the stretching technique, you will immediately get a more voluminous braid.
Ladders are the enemies of volumetric braids
For those with ladder-shaped bangs, start straightening and growing out your bangs for a voluminous braid.
For those with a ladder along the entire length who want to have a voluminous braid, we recommend: trim and grow all your hair, so the braid will become more voluminous.
The techniques described above are used for both the French braid and the cornrow or fishtail.
Let's consider the option of adding volume to the braid.
Video on creating a voluminous braid on a model with a fishtail braid.
Educational video instructions for weaving a voluminous braid on long hair on yourself using the fishtail technique.
Now you can make any braid voluminous with ease and in a few minutes. Use what you've learned and add volume to every French or regular braid you make.
Always remain charming and attractive, and let your braids complement your mysterious image.
Content:Times and tastes change, but long hair still remains one of the main advantages. Beautiful and well-groomed, they attract glances of both admiration and envy. Simply loose, even chic - it’s too boring and monotonous. One way to transform your appearance is a fishtail braid; it is easy to braid and looks chic, unusual and fresh.
Hair preparation
Initially, the “fishtail” was called a spikelet, it refers to a type of spikelet weaving. Later it was renamed due to its external resemblance to a fish tail. The beauty of the braid is that it can be braided on thick and fine hair different lengths and structures. Ideal hair is long and straight; braiding it is easiest, and you can master the technique the second or third time.
“Fishtail” is not for those who like clear lines and are used to strict business hairstyles, the braid adds zest to the image and emphasizes individuality. Before you start braiding, you need to prepare your hair:
- comb your hair well, it is better if it is clean;
- spray with water and a special antistatic spray that removes electrification and reduces hair tangles;
- at the end of preparation, you can apply a styling product - foam or mousse, if the hairstyle is being created for the whole day, so it will not become disheveled and will not lose its presentable appearance.
It is not recommended to use styling products for children so as not to cause allergies or irritation.

Weaving technique
An easy-to-weave braid is perfect for everyday hairstyles, a holiday or an evening out. Classic fishtail weaving technique:
- For the first time, it is recommended to braid the braid from the side, starting not from the roots, but from the middle of the length. You can gather your hair into a ponytail, which will make it easier to braid at the back of your head;
- Divide the collected hair in half at the beginning of the braid. If the braid is on the side, first move the bun there, then divide it into two parts;
- on one side (for example, the right) separate a thin strand and move it to the other side (left), connecting the strand with the main mass of hair;
- Holding both halves firmly, select the same strand from the left side and transfer it to the right. This weaving is called cross weaving;
- Cross the strands until the braid is ready. Weaving looks more beautiful if you collect strands from the bottom of the hair and throw them to the top;
- To make the braid neat and even, watch the tension of the hair; while braiding, hold it firmly with your hands so that the strands do not unravel. Monitor the size of the separated strands; they should be approximately the same thickness (no more than 2.5-3 cm). The thinner the strands, the more beautiful the braid will be, but the weaving process will take longer;
- After completing the braiding, lightly spray your hair with a low-hold hairspray.
The classic version involves loose braiding at the base of the braid and tighter along the length of the hair. After finishing the work, you can slightly loosen the braid at the base with your hands.

Hairstyle options
The classic fishtail is the ideal basis for more complex and beautiful hairstyles.
- 1. The easiest way is to let the strands out a little. You can simply loosen them with your hands along the entire length, give them a slightly disheveled look, or pull out the strands, give them the desired shape and sprinkle them with varnish, it will look careless, but very stylish. If you release a thin strand on each side along the entire length, forming semicircles, the braid will become a real lace work of art.
- 2. A big plus of the fishtail is the ability to visually enhance the shine of the hair. This is explained by the peculiarity of the weaving: thin strands intertwined with each other cross-reflect light, which increases not only shine, but also the play of color. It looks very beautiful on highlighted hair, especially if you choose only bleached hair for some strands for braiding. You can weave strands of a different color into your braid, such as ruby, purple and even blue. Colored strands are sold in hairdressing salons or specialty stores.
- 3. You can braid a fishtail instead of a regular braid, make two of them or braid them around your head. On long hair, three fishtails woven into a regular braid look beautiful. Add to them beautiful hairpin, you will get a chic evening hairstyle.
- 4. Various techniques weaving can be combined with each other. Start making a French braid, from which the fishtail will originate. Or weave regular braids at the sides and join them into a fishtail. Instead of regular braids You can weave fishtails on the sides. A braid can complete almost any hairstyle.

- 5. A braid braided from a high ponytail on the top of the head looks intriguing and aristocratic. To create a business stylish look The fishtail can be gathered into a bun. At any interview or business meeting, this hairstyle will attract attention and will not look provocative.
- 6. A common and romantic option is to braid your hair on one side. Start from the temporal part with a simple spikelet, moving diagonally to the other side, ending with a fishtail. The finished braid can be thrown forward over the shoulder, decorated with a colored ribbon, hair accessories or a hoop. Decorations with flowers, small hats, beads and even feathers are widely used.
- 7. One of the weaving methods is a cascading fishtail. Its peculiarity is that for the main braid it is necessary to select a small part of the hair near the forehead, gradually weaving the remaining strands into the main braid. The side strands should be symmetrical and slightly loose. You will get a delightful and unusual hairstyle.
You can weave a fishtail in the most different options. A hairstyle with this braid will allow you not only to show creativity, but also to feel special, be it a business meeting, a walk or a romantic date.
Braiding for beginners is now a very popular activity. This method of hair styling was first demonstrated in Ancient Greece. Slaves had their hair grown and cut to add extra volume to the braided hairstyles of noble women. Today everything is much more prosaic and simpler. You need to choose what you want and, using diagrams, implement it. Every season, designers offer new types of haircuts and styles, but only the braid remains the constant leader of various shows. Romantic, feminine and stylish hairstyle with its use it will be appropriate at a party, a gala reception, and just in everyday life.
Braiding is a kind of art, having mastered the basics of which you can realize creative ideas and find a unique image and style. The skill of braiding is based on two types of weaving, which should be learned first. In the future, practice, experiments and imagination will do their job.
First of all, you need to prepare your hair. Wash thoroughly using balm. Washing should be done the day before you are going to start learning how to braid. Then the hair will be easy to comb and lie flatter. Next you need to choose accessories.
 It is preferable to have a wooden comb to avoid electrification. You will also need a fine-toothed comb to make even partings. Elastic bands, ribbons, hairpins with flowers, hairpins - everything is useful when weaving braids for beginners. And of course, you need to choose fixing agents.
Their list is small:
- oil;
- spray glitter;
- mousse.
Three strand braid
This classic look is easy to do and is a basic braiding staple for beginners. Hair should be clean; you can spray it with a styling product that adds shine and a glossy sheen. Using a ribbon will not only be a worthy decoration, but will also serve as a hairstyle fixer. The simple braid pattern includes several stages.
You need to gather the hair at the back of your head into a bun using an elastic band. Pass a medium-width ribbon under the bottom edge and tie with a bow. Then divide the tail into three strands of equal thickness. Place the right one on the middle one so that it is located between the left and the center one. Then the left one is placed on the middle one and ends up between it and the right one. The principle is simple - each strand alternately occupies a central place.
 The tape can be introduced both from the very beginning of the hairstyle and from the middle. It is placed under the braid so that the left end is connected to the left strand, and the right end, respectively, to the right. This is the kind of beauty you can get if you tie the ribbon in a bow to finish the braid. (Fig. 1)
The bun can be built on the side and under the back of the head. An interesting solution would be to decorate your hair with raw fabric, a silk scarf or colored threads. You can make a parting in the middle of your head and create not one, but two braids, following the same principles.
Many girls refuse a romantic hairstyle because of thin or sparse hair. Such young ladies can safely make a voluminous braid (Fig. 2). The basis of its construction is the classic look. The action scheme repeats the manipulations of the previous description, with the exception of a few additional ones:
- apply mousse to add density;
- curl your hair;
- lightly comb;
- braid in three parts to the end of the hair;
- do not tighten to maintain openwork and airiness;
- pull the strands on both sides of the weave to the required volume;
- fix with varnish.
For those with thick hair, it is not necessary to curl it; you can straighten it with an iron after pre-treating it with an oil-containing product. You can weave it, starting with the strands above the forehead, gradually adding side parts. Braids for medium hair are decorated with ribbons or leather laces.
 And the long beauty is wrapped around the head, secured with bobby pins or hairpins. Such an openwork looks interesting and unusual on a pre-tied ponytail. If a special event is planned, you can complement the styling with hairpins with flowers or stones or fix it with glitter varnish. The carefree and lightness of the image is emphasized by two patterned braids, decorated on the sides and with a zigzag parting. There are a lot of options, there is room to let your imagination run wild and show creativity.
French braid
Braiding hair french style- the second main type of this art.
He is the leader fashion shows and an indispensable option for all hair types.
From the very base of hair growth, you need to select one strand. Its width depends on the desired width of the braid. Next, you should divide it into three more equal parts. A regular braid is created. In the process, it is necessary, holding the right and central parts with one hand, with the other to introduce additional strands, highlighting them on the left side and thickening the left part so that it becomes larger than the other two.
 The same is done with the right side when it comes time to implement it. That is, each time either the left or the right side of the braid becomes thicker. This process should be repeated until the end of hair growth. You can then secure or continue working to the required length.
To make the French classic look neat, you need to tidy up your nails. Numerous snags will interfere with the process, and the strands will need to be intertwined. Braiding is a painstaking process that requires accuracy and skill. Finished work You can fix it with whatever your heart desires and fix it with varnish. This will be the classic look (Fig. 3). Many variations become available if you master this technique. You can start dividing into strands at the base of the neck, from the side or from the middle of the head. Not bad french weave combines with a ponytail or bun. Loose hair, decorated with a thin braid of this type, will add some lightness and incompleteness to the image, which is especially relevant this season.
Having learned the basic types of creating braids, you can arrange a real holiday for yourself. Any woman, girl, regardless of age, will feel luxurious and comfortable at the same time. In addition, you can choose an unforgettable braid styling style for any outfit. It is unlikely that you will be able to go unnoticed with such an elegant hairstyle.
Instructions for braiding 4-strand braids. Hairstyles based on a 4-strand braid are considered.
The braid is a universal hairstyle with the longest history. The most interesting thing is that each nation brought something of its own to the weaving technique. The most unusual and varied hairstyles are created using braids.
The art of weaving beautiful braids
Just ten years ago, the word braid was associated with a thick strand of braided hair or two braids. Nowadays, the variety of options surprises even experienced hairdressers. If you have long hair, then you will need some free time, a comb and elastic bands.
These components are quite enough to create everyday original hairstyle. For a professional, you will need styling products: gel, mousse, wax,
There are a lot of options for weaving braids, but the most popular types of weaving are:
- Fish tail
- French braid
- Lush braid
These hairstyles can be created using any number of strands. It all depends on the purpose and volume of the hairstyle.
How to prepare your hair for braiding
The procedure for preparing hair for braiding:
- Wash your curls
- Dry without using a hair dryer
- Apply thermal water to your hair
- Braid your hair
- Secure your hair with styling products
- Children do not need to use foam and varnish
Note! Some girls have very coarse and thick hair. Before braiding, you need to wash them well, but do not use conditioner.
The fact is that this hair care product makes it soft and slightly slippery. Because of this, the hairstyle will quickly fall apart.


What kind of braids are made from 4 strands of hair? Types of 4-strand braids
It is worth noting that a 4-strand braid is not the simplest. If you are just learning the weaving technique, practice a little in making hairstyles based on 3 or 5 strands.
Varieties of 4-strand braids:
- Spikelet
- French braid
These hairstyles differ in that the spikelet is woven exclusively on the free edge of the hair. That is, if you conditionally divide the hair into two parts, then the spikelet will be in the lower part, that is, it will begin at the point of extreme hair growth. In this hairstyle, the number of hairs at the beginning of the braiding and at the end are the same. A French braid can be woven into any part of the head, capturing additional strands.
A spikelet braid of 4 strands. Features of weaving such a braid
This type of weaving is considered complex. It is unlikely that you will be able to braid such a braid the first time. Need to practice.
- Take four ribbons of different colors and tie them to a horizontal bar
- You will get four ribbons of red (1), blue (2), green (3) and yellow (4). You can use a bar on a chair
- You need to learn the weaving order and get good at doing your hair automatically without having to calculate the strands.
- Initially, do not touch the outer tapes. Place the blue ribbon on top of the green one, and then wrap it behind the red one. Place the blue one on top of the yellow one
- Place the yellow strand over the red one. It is necessary that they be between the green and blue strands
- Place the blue one behind the red one again and cover it with the green one.
- Braid until you run out of hair
At the very beginning it seems that it is very difficult, but in fact it is not. Use the diagram and you'll get good at it in no time.

Master class on braiding a spikelet braid from 4 strands
Such a spikelet can be woven from hair or using ribbon. In this case, the tape acts instead of one strand. Only 3 strands of hair are involved in weaving.
VIDEO: Master class on weaving a spikelet from 4 strands
Original braid of 4 strands diagonally
The weaving technique is no different from a spikelet of 4 strands, it’s just that the hairstyle starts not near the forehead, but near the right temple and gradually moves to the left side of the back of the head. Simply put, you will end up with a side-swept hairstyle. It is best to use a ribbon to create this hairstyle. It will decorate your hair and make the process of creating a hairstyle easier and faster. But you can not use a ribbon, but create a hairstyle using only hair.

Master class on braiding braids with 4 strands diagonally
Instructions:
- Comb your hair and pull out a thin strand from under the bottom near the right temple
- Fold the ribbon in half and secure it to the strand using a loop
- Secure the tape with a thin silicone rubber band
- Let’s conventionally designate the ribbon as strand number 3
- Divide the hair at the temple into 4 parts so that our ribbon is the third
- Place the second strand on top of the first, and place a ribbon under it
- Place the fourth on the first
- Place the ribbon on 4 strands
- Bring the second strand from below and place it on the tape
- Place the strand on the right side on the tape too
- Add loose hair from the temple to the same strand
- Place a ribbon on this strand, and place strand 4 under the ribbon
- Add loose hair to this strand and bring it down too
- Thus, on your left, the outermost strand will always go underneath, and the right one will lie on top

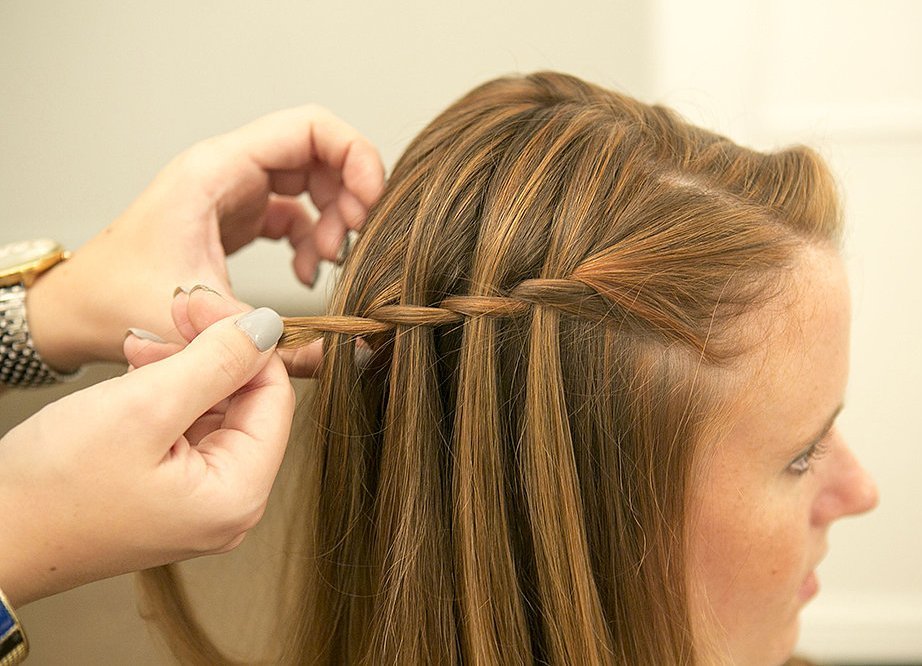
Luxurious braid waterfall. How to achieve perfect curls
This is a classic 4-strand braid, only the hair that was free is simply twisted between the strands and becomes free again. Thus, a kind of ornate pattern is obtained in the center of the head. The hairstyle is complemented by beautiful curls. It is best to curl your hair after braiding it, so your hair will be less tangled.
To create curls, it is best to use hot rollers or a curling iron.
But if you have very little time, then you can simply twist your hair into a rope and go through its entire length with a flat iron. Of course, such curls will not be large, but overall the hairstyle will turn out to be very romantic.

Master class on weaving a 4-strand waterfall braid
- Comb your hair
- Make a side parting and take 4 strands along the parting line
- Place the third on the fourth, and place the second under the fourth
- Place the first one on the fourth one
- And the third one on top of her
- Place the second strand underneath and add some loose hair from the parting.
- Bring the first strand horizontally and place it on top of all strands
- The hair that you pick up should be free again


Unusual 4-strand fishtail braid
This hairstyle is created at the bottom of the head, that is, along the hairline. You can also tie a ponytail. Accordingly, there will be no weaving on the top of the head. This is a great option for an everyday hairstyle or for a novice hairdresser. The weaving technique is performed according to the pattern.

Master class on weaving fishtail braids from 4 strands
- Comb your hair and tie a ponytail
- Divide it into 4 parts of equal diameter
- Put 2 by 3
- Place 1 under 3 and place 4 on top
- Place 3 under 4, and 2 under 1
- Continue until the end
Exquisite 4-strand French braid
The principle of weaving is the same as when creating a diagonal braid. This hairstyle is woven in the center, that is, along a vertical parting without displacement. The principle of weaving is that on the left all the hair goes underneath, and on the right it is placed on top.


Master class on weaving a French braid from 4 strands
- Start braiding the braid in the part of your head where you feel comfortable
- Divide the hair into 4 parts along the hairline near the forehead.
- Place the second part on the third
- Place the first on the third, and place the fourth under the second and third
- The first strand should be on the right
- Place the first strand under the third
- Weave with hooks, on the left everything goes underneath
- And on the right, all the hair is placed on top
- Braid until you have braided all the curls into a fishtail.
- You can fluff your hair a little by pulling out the strands
How to decorate a 4-strand braid
There are a lot of decoration options. Evening and wedding hairstyles are created on the basis of such a braid. Once you master the basic principles of braiding, you can easily create a holiday hairstyle. You can use jewelry for this.
Used as decoration natural flowers, hairpins with stones and pearls. Ribbons are often used for decoration.
I often use half braids to create evening hairstyles. That is, the braid is woven only in the upper part of the head, in the crown area. Next, the hair falls down. They can be curled using a curling iron or hot rollers. Hairdressers often use false strands for decoration. They add volume and make your hair look full. Among original ways Braid decorations include floss and scarf.

4-strand braid with silk ribbon. How to weave? Video
This is a cute hairstyle that is suitable for both going to the office and for a party. Instead of one of the strands, silk or satin ribbon. It should stand out on the hair. Choose contrasting colors.


VIDEO: Braiding with ribbon
Hair flowers as decoration for a 4-strand braid
To weave a flower, follow the instructions:
- In the place where you want to place the flower, separate 3 strands
- Braid a regular 3-strand braid
- On the left side, pull out the coils
- Twist the resulting curly rope like a snake
- It is necessary that the elongated turns be located outside the snake
- Secure the tip with a hairpin
- Attach a pin with stones in the center of the flower
Chamomiles from hair
Instructions:
- Wash your hair and straighten the strands with an iron
- Separate a thin strand and make a loop without completely pulling the hair out of the silicone elastic band
- Make a loop again
- Repeat the manipulation until you get 5 petals
- Hide the ponytail with a hairpin
- Spray the flowers with varnish

Who suits a 4-strand braid?
- This is a universal hairstyle that suits any type of appearance.
- This hairstyle can be done by businesswomen and students.
- This is an easy way to disguise regrown hair roots.
- Behind such a braid you can hide the not-so-clean Hollywood curls that you twirled before yesterday's party
- If you're camouflaging dirty hair, try to create a full fishtail by pulling out the side twists. For a smooth braid you need to wash your hair
- Thanks to its versatility, this hairstyle suits any clothing and appearance type.
- Girls with curvaceous It’s better to do voluminous hairstyles and, before braiding, backcomb it near the forehead and on the top of the head
- For women with a long face, a waterfall braid with Hollywood curls is suitable


The most beautiful 4-strand braids, photo
The variety of hairstyles based on a 4-strand braid is surprising. The simplest ones are used to create everyday hairstyles. By decorating your braid with flowers or hair bows, as well as hairpins, you can get an evening hairstyle.


How to make a 4-strand braid for yourself?
Weaving a braid of 4 strands is not at all easy. Initially, you should practice on ribbons or a chignon. It is necessary for your hands to remember the weaving order and master the technique. First, you need to sit near a large mirror and place another one behind your back. This way, you can control your every step and you won’t make a mistake.
Be prepared for the fact that you will make a mistake and the braid will not work the first time. The easiest way to weave a fishtail is with 4 strands. If you have long hair, you can rest your hair on your shoulder and watch your movements.


Adviсe:
- Practice on a hairpiece or girlfriend
- Wash your hair before doing your hair
- The easiest way to braid your hair is clean and dry.
- Keep the diagram before your eyes
- Before weaving, watch the video with the master class several times
- Once you have mastered the braiding technique, you can begin to create more complex hairstyles based on a 4-strand braid
To prevent hair from becoming frizzy during the hairstyle process, and this is especially true when braiding, hairdressers use various styling products. Useful tips will help your hair last longer and make it more neat.
How to treat hair when braiding
- The simplest and most harmless remedy is water. Spray your hair with water and comb it well, distributing the moisture. To make the braid smooth, comb the strands with a brush. Even though the water will dry quickly, your hair will still look neat. Suitable for everyday hairstyles.
- Moisturizing hair conditioner spray. In addition, curls will receive protection and nutrition.
- Serum for split ends or liquid crystals for hair. Hair is easier to comb, shiny and easier to style.
- Wax or cream gel. Designed for a tight weave you'll want to wear for days. Use a small amount of these products so as not to weigh your hair down.
- Special smoothing creams that you will find in professional series, such as Londa, and in household ones, such as Wella. They have an average fixing effect.
- Regular mousse or foam. Not suitable for thin, thin hair, as it can give it the effect of dirty, wet and sparse.
- Varnish for fixing the finished hairstyle or its elements during execution.
You will receive even more useful and practical information from the video tutorial. You will see with your own eyes how styling products help in the braiding process. Now you can confidently start mastering the various braided hairstyles that you will find