2011-04-07 11:16:33
Patchwork creation -
It's just a mood
This is heart inspiration
This is the purity of the lines
And nature's beauty,
Warmth from skillful hands.
Melnitskaya Elena "We sew."

Photo from the site http://patchworkpottery.blogspot.com/

Photo from the site http://www.mamochka.org

Photo by master Irina
So how do you make such a wonderful teapot?
For this we need:
- fabric (most often it is cotton, chintz, calico)
- padding polyester
- lace, buttons for decoration (optional)
- scissors, threads, needles, etc. :)
Pattern:

Photo from http://www.sewlover.com
The pattern of a long piece is 13 cm with allowances, the diameter of the upper circle is 14 cm, i.e. increase the pattern to these parameters.
Let's start with the largest thing in the teapot - the belly). According to our pattern, we make 8 patches with allowances for the outside and 8 for the inside.

Photo from http://www.sewlover.com
Take 2 pieces for the outer part and 2 for the inner:

Photo from http://www.sewlover.com
We sew all 4 parts in this way. it turns out like an asterisk. We make cuts on the folds/curves so that the fabric does not wrinkle after turning it out. When sewing, make sure that the outer side of the fabric (which is visible near the teapot) is on the outside.

Photo from http://www.sewlover.com

Photo from http://www.sewlover.com
As before, 4 layers are sewn together, we make cuts:

Photo from http://www.sewlover.com
We continue to sew very carefully from right to left:

Photo from http://www.sewlover.com
Sew the inner and outer flaps together:

Photo from http://www.sewlover.com
We turn it over from the front side to the inside as shown in the photo - so that everything is inside, like in a cocoon. We sew - we connect our strip into the future belly of the teapot. Don't forget to make cuts:

Photo from http://www.sewlover.com
We pull it out through the bottom of the “cocoon” and turn the future teapot inside out:

Photo from http://www.sewlover.com
We make the bottom of the teapot in 2 copies - for the inside and outside. You have the pattern, but, in my opinion, it’s better to fit it to the resulting teapot.

Photo from http://www.sewlover.com
Thus, we first sew the inner bottom:

Photo from http://www.sewlover.com
We cover the resulting slices with padding polyester. Here's what happens:

Photo from http://www.sewlover.com
We make the outer bottom, wrap the outer fabric in cardboard, stitch it, then sew the resulting bottom to the teapot with a hidden seam:

Photo from http://www.sewlover.com
Then we make 2 ribbons for the top of the teapot. 3.3 cm of fabric in width, as long as the perimeter of the circle of our top and 2.5 cm of tape for stuffing. It can be padding polyester or thick fabric.

Photo from http://www.sewlover.com
Fold the stuffing inside the fabric tape and sew it to the top:

Photo from http://www.sewlover.com
We cut out the spout and handle of the teapot, you have the pattern:

Photo from http://www.sewlover.com
We sew and make cuts:

Photo from http://www.sewlover.com
Stuffing with padding polyester:

Photo from http://www.sewlover.com
Using a hidden seam, we sew the tightly stuffed spout and handle to the “belly” of the teapot. Make sure they are diametrically opposite.

Photo from http://www.sewlover.com
Here's what happens:

Photo from http://www.sewlover.com
Making a lid. Make a pattern (circle) according to the existing top; it is better to make the fabric for the lid with good allowances:

Photo from http://www.sewlover.com
We stitch the lid, stuffing it with padding poly between the fabric and the cardboard. We make a second circle - for the bottom of the lid, we also “dress” a circle of cardboard in fabric and stitch it, pulling it up:

Photo from http://www.sewlover.com
We sew the resulting one with a hidden seam.

Photo from the site Photo from the site http://www.sewlover.com
All that remains is to hide something candy-tasty inside and put it in a visible place
Textile teapot pattern
Volumetric textile teapot
So how do you make such a wonderful teapot?
For this we need:
- fabric (most often it is cotton, chintz, calico)
- padding polyester
- lace, buttons for decoration (optional)
- scissors, threads, needles, etc. :)
Pattern:

The pattern of a long piece is 13 cm with allowances, the diameter of the upper circle is 14 cm, i.e. increase the pattern to these parameters.
Let's start with the largest thing in the teapot - the belly). According to our pattern, we make 8 patches with allowances for the outside and 8 for the inside.
Take 2 pieces for the outer part and 2 for the inner:

We sew all 4 parts in this way. it turns out like an asterisk. We make cuts on the folds/curves so that the fabric does not wrinkle after turning it inside out. When sewing, make sure that the outer side of the fabric (which is visible near the teapot) is on the outside.

As before, 4 layers are sewn together, we make cuts

We continue to sew very carefully from right to left
Sew the inner and outer flaps together:
We turn it over from the front side to the inside as shown in the photo - so that everything is inside, like in a cocoon. We sew - we connect our strip into the future belly of the teapot. Don't forget to make cuts:

We pull it out through the bottom of the “cocoon” and turn the future teapot inside out

We make the bottom of the teapot in 2 copies - for the inside and outside. You have the pattern, but, in my opinion, it’s better to fit it to the resulting teapot.
Thus, we first sew the inner bottom:
We seal the resulting slices with padding polyester. Here's what happens:
 We make the outer bottom, wrap the outer fabric in cardboard, stitch it, then sew the resulting bottom to the teapot with a hidden seam:
Then we make 2 ribbons for the top of the teapot. 3.3 cm of fabric in width, as long as the perimeter of the circle of our top and 2.5 cm of tape for stuffing. It can be padding polyester or thick fabric.
Fold the stuffing inside the fabric tape and sew it to the top


 We make a handle for the lid, by which it can be lifted. We make a circle of fabric, stitch it in a circle, tighten it

Like
Comments- Hot water bottle for the kettle!
I was reading knitting blogs online and found the miracle of blogs! So, there is a post there about a heating pad for a teapot. I'm drooling over it), it's amazing what crazy hands can get to!! So...
- ORF for dummies
ORF for "dummies" V. Kanevsky In ancient times there was no separate music, separate singing and separate dance. All arts were parts of a syncretic whole. So the idea of arts integration is not new. She is at least three thousand years old, with...
- CHOOSE A TEAP WISELY
One of the main electrical appliances in the kitchen of every home is an electric kettle. In addition to its practical purpose, it is also in some way an interior decoration. Let's talk about the types of teapots and try to choose a teapot for your home. To understand how...
- We knit a heating pad for the “Fairytale House” teapot
author of MK Anya "Pansies" I think you will agree with me that we are all a little children at heart. I really love fairy tales. I love watching them, reading them, and... making things. But since I'm also quite practical...
So, we will need:
Pattern;
Fabric, for external and internal parts;
Sintepon or holofiber;
Cotton lace;
Needle, thread, scissors, pencil, glue;
And the most important thing is a good mood :)
We prepare the pattern, use a pencil to transfer it to the fabric and cut out the details.

For the outside of the teapot I took calico of two colors, for the inside - cotton fabric white.
To get the side walls of two colors, I folded the pattern in half and transferred the top part to one fabric and the bottom to another. I stitched it and got a solid side wall. Here's what I got.


We take 2 parts of the outer wall and 2 parts of the inner wall. Place the outer pieces on top of each other with the right sides facing inward. We do the same with the inner walls. This makes 2 stacks of parts. See the photo below.


When unfolding our “book”, the seam should be on the inside. Don't forget to trim the side seam slightly with zig-zag scissors. If there are no such scissors, then we simply make cuts. So that when we turn the parts right side out, we get an even seam. We have 2 side walls out of 8 ready (photo below).

We sew the remaining walls according to the same principle as before. We apply 1 outer wall and 1 inner wall to one side, so that we get a “book”. We sweep, stitch, cut with a zig-zag and turn right side out. And so we continue with all the other parts of the side walls. We also make sure that the cotton lace of one part matches the height of the lace on the other part.


This is how we should get an eight-blade:

To make a round teapot, we connect the side parts of the eight-blade in the same way as before. The outer walls face each other. Internal facing each other. Those. making a “little book”. The result should be a “cocoon” of side walls. Baste and sew.


Carefully turn out our “cocoon” and get the finished side wall of the teapot.

Turn it inside out. We take the part of the bottom of the teapot from the inner fabric. We attach it to the teapot. We stitch on a typewriter.


We prepare the outer part of the bottom. Cut out the bottom piece from cardboard. Glue the fabric part to the cardboard. Next, we apply it to the teapot, secure it with needles and begin manually sewing the bottom to the teapot with a hidden seam.


When 7 of the eight walls have been sewn on, carefully fill the bottom of the teapot with synthetic padding. There should be a convex bottom inside the teapot. Then we sew on wall 8. The bottom is ready :)


Measure the diameter of the top. From the fabric we cut out a strip equal to the length of the measurement and 3.5 cm wide.


We attach it to the teapot as in the photo below. I sewed it by hand, because... The machine did not take the thickness.

We turn the sewn collar inside out, secure it with needles and sew it with a hidden seam. The side can be stuffed with padding polyester for more volume. But in in this case, I didn't do that.


The teapot belly is ready!
We make the spout and handle of the teapot. We turn out the parts sewn together and stuff them with padding polyester. We do not completely fill the spout with padding polyester, forming a small recess.


We attach the spout to the belly of the teapot, secure it with needles and sew it with a hidden seam. We do the same with the handle of the teapot.


The cut cardboard part of the lid turned out to be too big for my teapot, so I had to adjust it to fit.


This is what happens. Glue the cardboard piece to the fabric piece. We go along the edge with a regular seam and quilt the edge. Next we fill it with padding polyester.


Sew on cotton lace.


And now our teapot is ready!

Happy creativity! Creating together is great!
I will answer all your questions.
When copying or partially using materials from this master class on other resources, an active link to the source is required.
Best regards, Katerina Kumirova.
www.livemaster.ru
Sew a textile teapot - diagram and pattern, master class
A cute teapot made of textiles will decorate any kitchen. It can be used to store sweets and tea bags. This article - detailed description how to sew a textile teapot (diagram and pattern, master class). In any case, the kitchen will look fun and unusual if you decorate it with these homemade gizmos with unique designs.
- Cotton fabrics: for the inside and outside of the product.
- Material for stuffing (sintepon is best).
- White lace.
- Corrugated cardboard.
- Cotton white textile.
- Felt in two colors - white and pink.
- Brown linen fabric.
- Thick embroidery threads.
- The web is gluey.
- Twine for decoration.
- Hot glue.
How to sew a teapot from fabric? Step by step:
- Make a paper pattern. Transfer it to the textile, taking into account the seam allowances.
- Cut out the side parts from two types of textiles.
- Sew the 4 pieces together to form a book. Place the two outer sides right sides together. Fold the 2 inner parts with the front parts inward in the same way. The result was a structure that looked like a miniature tent.
- Moving from right to left, sew the remaining parts. In the same way, align the sides with the front parts facing inward.
Important! Don't forget to make cuts so that the product can be turned out.
- Connect all the wedges in single canvas, then connect. First baste by hand and then stitch by machine. Turn right side out.
- Now make the bottom for the teapot. Use a round plate of suitable diameter as a pattern. Cut out a circle for the inside and sew to the base.
- Fill the rollers that form the body of the product with padding polyester.
- Cut out a round piece from cardboard for the bottom, as well as 2 more round pieces: from padding polyester and the material used for the outside.
- Hand stitch the textile piece. Insert the cardboard and padding polyester parts inside. Pull it off.
- Sew the base and bottom piece together using a blind stitch.
- For the neck, cut a strip of fabric approximately 35 mm wide and slightly larger than the diameter of the neck of the product. Sew the trim by hand, being mindful of the folds at the corners.
- Insert the synthetic padding and sew from the inside.

Making the lid
To make a pattern for a textile teapot, find a mug that is suitable in diameter. Cut out round shapes from different materials:
- Corrugated cardboard - 2 pcs.
- Sintepon - 1 pc.
- “Internal” textiles - 1 pc.
- “External” - 1 pc.
Important! Make a larger space for the seams.
Operating procedure:
- Sew and pull together using the same principle as the bottom.
- Stuff it upper half covers with padding polyester.
- Connect the 2 halves and carefully sew with a blind seam.
- Cut out the parts for the spout and handle and make cuts. Sew and stuff the spout and handle with padding polyester. Cut a circle for the “handle” on the lid. Pull the circle and fill it with padding polyester.
- Sew the handle to the lid.
- Carefully, using a hidden seam, sew the nose and handle to the finished product.
How to decorate a teapot with your own hands?
Cut out a label from felt and decorate with lace and linen appliqué. Glue all applique elements with hot glue. Sew or glue the label to the finished product. Interesting and original decoration ready for the kitchen. We hope that you liked the master class on how to sew a teapot from fabric with your own hands.
Back to contents
Cup and saucer
So, there is a soft teapot, but no cup. Disorder. You can make a soft textile cup using the same principle as sewing a teapot. You cut out wedges for the front and inside sides, stuff them with padding polyester, and manually sew the gaps with a “machine” seam. Now all that remains is to stitch the bottom and sew on the handle, made using the already familiar technology.
The saucer can be round, rectangular or complex in shape. It is based on 2 parts made of fabric, with a layer of rolled padding polyester or non-woven fabric.
So, you will need:
- Textile.
- A piece of non-woven fabric.
- Scissors.
- Ruler and pencil for marking.
- Braid for decoration.
- Pins.
We make the heating pad so that it fits freely over the kettle. Width finished product- this is the distance from the spout of the kettle to the edge of its handle.
Important! Take a little extra so that you can easily put on and take off the heating pad.
Each side of the product consists of 2 textile parts with a non-woven layer:
- Pin the pieces together and stitch them along oblique lines. Draw the lines along the ruler. First - mutually parallel lines, and then - perpendicular to them. Select threads for stitches to match the color of the fabric.
- Decorate the second part of the canvas in the same way.
- Fold both halves and stitch them on the sides.
- Cut out 2 parts for the inner liner and sew.
- Now fold the inside into the front part. Fold the material inward, stitch and decorate the bottom.
Important! Leave about a centimeter of unstitched area in the center. Place a loop made of braid into it and sew up the hole by hand.
Having mastered this simple master class, you will be able to sew a heating pad for a teapot of a more complex shape - in the form of a dog, cat or bird. Good luck with your creative ideas that will help make your kitchen the most comfortable and beautiful.
serviceyard.net
MK Teapot for the tea fairy
Hello, Country! I’ve been brewing an idea for a tea fairy for a long time. I had already looked into how to make wings for her, but there was a problem with the teapot - I just couldn’t figure out how and from what one could create one required attribute, and those ready to take were not comme il faut. Having found a pattern on the Internet, I decided to experiment with it - and as a result, this MK was born.

Here is the pattern for the teapot. I printed it out on A3, resulting in a teapot with a height of 14 cm (without a lid). The teapot is double, so we cut the “belly” pattern twice - from the inner fabric and from the outer fabric.

My outer piece is made up of two fabrics with lace in between, so I machine sewed them together into one piece before cutting it out.

We cut 8 parts external and 8 parts internal.

We sew the outer parts into a single fabric. If you, like me, have two parts, we carefully make sure that the seam (or trim) matches throughout the entire length of the fabric.

This is how it looks from the back. At the end we sew the fabric into a ring.

We do the same with the inside.

Here are our two rings ready.

We put them one inside the other as shown in the photo. Align with the bottom edge.

From the fabric of the inner part we cut out the inner bottom of the teapot.

Sew together both sides of the teapot with the inner bottom.

We turn the teapot over, fill the space between the sides with padding polyester, and sew the “slices” on the hands with a decorative hand stitch. Important! For stuffing, take padding polyester sold in bulk, not in rolls.

The seam is closer.

Cut out three ribbons to decorate the teapot. The width of each is 5 cm, and the length depends on the length of the bottom, the upper edge of the kettle and the circumference of the lid.

We also cut out the bottom, a lid from outer and inner fabric, and a small circle for the handle of the lid. We cut out a circle for the bottom from cardboard and cover it with fabric. Fill a small circle with padding polyester and tighten it.

Along the perimeter of the bottom we sew one edge of the tape with a hidden seam, insert the bottom, and sew the second edge. Add padding polyester to the resulting “sleeve”.

Turn the teapot over and sew a second ribbon around the circumference of the top.

Inserting the padding polyester into the resulting “sleeve”, sew the second edge of the tape on the inside of the teapot.

We cut out the handle and spout of the teapot and sew it together.

Turn it inside out and stuff it with padding polyester.

Please note that the spout of the teapot is not completely filled, forming a ring.

We sew the spout and handle with a hidden seam to the teapot. Make sure that the spout and handle are exactly opposite. The easiest way to do this is to combine the seams of the “lobes” of the teapot with the middle seams of the spout or handle.

Let's take care of the lid. As I said, we cover a circle of cardboard with fabric, which will serve as the inside of the lid. We add padding polyester to the circle for the outer side, and cover it with fabric as well.

We sew a handle to the middle of the outer side of the lid, and sew (or glue) both parts together.

We sew a fabric ribbon around the entire perimeter, lining it with padding polyester.


This is what our kettle looks like from the inside.

Another angle.

stranamasterov.ru
Volumetric textile teapot. MK. - Magazine of Roses, who loves to embroider with ribbons.
I found some wonderful textile teapots on blogs. I really want to learn how to sew these... In the meantime, beautiful teapots and cups from Svetlana Shmeleva and MK for sewing (also from the Internet).


For this we will need: - fabric (most often cotton, chintz, calico) - padding polyester - lace, buttons for decoration (optional) - scissors, threads, needles, etc. :)
Pattern:


As before, 4 layers are sewn together, we make cuts
We continue to sew very carefully from right to left.


We pull it out through the bottom of the “cocoon” and turn the future teapot inside out

We make the bottom of the teapot in 2 copies - for the inside and outside. You have the pattern, but, in my opinion, it’s better to fit it to the resulting teapot.

We fill the resulting slices with padding polyester. Here's what happens:

Fold the stuffing inside the fabric tape and sew it to the top


We make a handle for the lid, by which it can be lifted. We make a circle of fabric, stitch it in a circle, and tighten it.


Original post and comments on LiveInternet.ru
moyarozochka.livejournal.com
2011-04-07 11:16:33
Patchwork creation - It's just a mood, It's the inspiration of the heart, It's the purity of the lines And the beauty of nature, The warmth of skillful hands. Elena Melnitskaya "We sew."
Earlier we saw amazingly beautiful voluminous teapots. A cozy and convenient piece of furniture that will definitely never break, 3D dishes made in patchwork style.

 Photo from http://patchworkpottery.blogspot.com/
 Photo from the site http://www.mamochka.org
 Photo by master Irina
So how do you make such a wonderful teapot?
For this we will need: - fabric (most often cotton, chintz, calico) - padding polyester - lace, buttons for decoration (optional) - scissors, threads, needles, etc. :)
Pattern:

The pattern of a long piece is 13 cm with allowances, the diameter of the upper circle is 14 cm, i.e. increase the pattern to these parameters.
Let's start with the largest thing in the teapot - the belly). According to our pattern, we make 8 patches with allowances for the outside and 8 for the inside.
 Photo from http://www.sewlover.com
Take 2 pieces for the outer part and 2 for the inner:
 Photo from http://www.sewlover.com
We sew all 4 parts in this way. it turns out like an asterisk. We make cuts on the folds/curves so that the fabric does not wrinkle after turning it out. When sewing, make sure that the outer side of the fabric (which is visible near the teapot) is on the outside.
 Photo from http://www.sewlover.com
 Photo from http://www.sewlover.com
As before, 4 layers are sewn together, we make cuts:
Photo from http://www.sewlover.com
We continue to sew very carefully from right to left:
 Photo from http://www.sewlover.com
Sew the inner and outer flaps together:
 Photo from http://www.sewlover.com
We turn it over from the front side to the inside as shown in the photo - so that everything is inside, like in a cocoon. We sew - we connect our strip into the future belly of the teapot. Don't forget to make cuts:
 Photo from http://www.sewlover.com
We pull it out through the bottom of the “cocoon” and turn the future teapot inside out:
 Photo from http://www.sewlover.com
We make the bottom of the teapot in 2 copies - for the inside and outside. You have the pattern, but, in my opinion, it’s better to fit it to the resulting teapot.
Photo from http://www.sewlover.com
Thus, we first sew the inner bottom:
 Photo from http://www.sewlover.com
We cover the resulting slices with padding polyester. Here's what happens:
 Photo from http://www.sewlover.com
We make the outer bottom, wrap the outer fabric in cardboard, stitch it, then sew the resulting bottom to the teapot with a hidden seam:
Photo from http://www.sewlover.com
Then we make 2 ribbons for the top of the teapot. 3.3 cm of fabric in width, as long as the perimeter of the circle of our top and 2.5 cm of tape for stuffing. It can be padding polyester or thick fabric.
Photo from http://www.sewlover.com
Fold the stuffing inside the fabric tape and sew it to the top:
 Photo from http://www.sewlover.com
We cut out the spout and handle of the teapot, you have the pattern:
Photo from http://www.sewlover.com
We sew and make cuts:
 Photo from http://www.sewlover.com
Stuffing with padding polyester:
 Photo from http://www.sewlover.com
Using a hidden seam, we sew the tightly stuffed spout and handle to the “belly” of the teapot. Make sure they are diametrically opposite.
 Photo from http://www.sewlover.com
Here's what happens:
 Photo from http://www.sewlover.com
Making a lid. Make a pattern (circle) according to the existing top; it is better to make the fabric for the lid with good allowances:
 Photo from http://www.sewlover.com
We stitch the lid, stuffing it with padding poly between the fabric and the cardboard. We make a second circle - for the bottom of the lid, we also “dress” a circle of cardboard in fabric and stitch it, pulling it up:
Photo from http://www.sewlover.com
We sew the resulting one with a hidden seam.
 Photo from http://www.sewlover.com
We make a handle for the lid, by which it can be lifted. We make a circle of fabric, sew it in a circle, tighten it
 Photo from http://www.sewlover.com
We tighten our handle and stitch it as shown in the photo. Sew the handle to the center of the lid:
 Photo from http://www.sewlover.com
OK it's all over Now! Tadadadam! The teapot is ready. The teapot is 9 cm high, not counting the lid, with a diameter of 10 cm.
 Photo from http://www.sewlover.com
All that remains is to hide something candy-tasty inside and put it in a visible place
Items such as a soft vase, cups, or a fabric teapot will help make your kitchen cozy and unique. Find out how to sew a ball from this material.
Beautiful soft vase with your own hands

To sew one, take:
- several cuts of different cotton fabric;
- rope or cord;
- needle and thread;
- pins;
- bowl;
- scissors.

When this fabric is wound, take the second piece. Place its beginning at the end of the first one, and also wrap it around the lace.

Continue twisting the base, making turns around it. To make it more convenient, place the work on an inverted bowl or other vessel. suitable shape. Pin the coils together.

Having fixed the row in this way, stitch it with the previous one. Remove the pins and fasten it to the next one.

Having completed the work to the end, all you have to do is cut the lace, tuck the fabric under it, and sew it to the previous turn. You have a beautiful soft vase, and also a very original one. If you want to make another one, check out how to do it.

This vase for all sorts of little things is made from scraps of fabric and old denim items. To create it, take:
- denim;
- cotton fabric;
- interlining;
- cardboard;
- sewing supplies;
- rope with a lock.

We put cardboard on the wrong side of the denim square and non-woven fabric on it. In the photo, the white dots show where the edges of the jeans are folded. Before doing this, cut off the corners on it.

Bend the side blanks in half, tuck the sides on one side and the other, and iron. Sew them to the front side of the square.

Sew the sides to the edge, retreating 1–1.5 cm. Thread a lace into the resulting hole in the side panels, connecting them in this way. By pulling it up, you can disassemble and assemble the soft fabric vase.

Sew a fabric rectangle on the other side of the bottom, and your new original piece of furniture is ready.
Fabric teapots
They will decorate any home. Such dishes can be given, sold, or presented to children so that they can play with a safe object, arranging doll tea parties.

Enlarge the pattern on the screen, attach a sheet of A4 format to it, and redraw it.

The pattern will tell you how to sew such a teapot. As you can see, it consists of five templates. The two circles are the bottom (the larger one with wavy edges) and the lid of the teapot. You can make the edges not like this, but even. For the sidewalls, you need to cut 8 wedges for the outside and the same number for the inside. Above on the right in the photo is the curved handle of the teapot, below on the same side is its spout. You will need to cut two such blanks from the fabric.
Here's what was needed to reproduce this model:
- plain fabric and variegated, matching color;
- loose interlining;
- thread and needle;
- cotton lace;
- sewing machine.
In this example, the blanks for the façade consist of two parts. They put a braid into the seam between them, thus grinding the canvas down, then opened it.

Applying the wedges to each other, sew them on a sewing machine into a single fabric.

In the same way, connect the wedges for the inside of the teapot.

Applying the bottom template to the variegated fabric, cut out a circle from it. Place the inner and outer sides of the teapot right sides together. Align their bottom part with the round bottom, stitch along the edge.

Turn the sides right side out and place interlining between them. To separate the slices, sew between them on your hands.

Sewing a teapot with the hands of a craftswoman, that is, with her own, is very exciting. Let's start finishing it. To do this, cut 2 ribbons from fabric, each 5 cm wide. The length depends on the length of the arc of the teapot neck and bottom.
Cut out two round pieces for the bottom and lid. You will also need two cardboard circles, slightly smaller than the fabric, so that its edges can be wrapped.

Place a little non-woven fabric on the bottom fabric circle, and cardboard on it. Hand stitch the bottom to the bottom of the side panel. Turn the teapot over and sew the ribbon to the top of the teapot on the face. When placing padding polyester here, wrap this tape inward and sew it to the second edge on your hands.

Open the spout and handle of the teapot, sew paired parts on the sides. Insert padding polyester into the resulting hole.

Sew the spout on one side to the teapot on your hands, and its handle on the other.

For the lid, you also need to cut out a circle from cardboard, slightly smaller in size than the fabric blanks. Place padding polyester on the back of the fabric lid, then cardboard. Sew the front part of the lid to the back part of the lid, laying a ribbon along the edge, which we also stuff with padding polyester.

Using the same principle, make a small handle for the lid and sew it into its center.

These wonderful sewn teapots are the result of fascinating needlework.

If you want to make a set, then look at how to sew such a wonderful cup and saucer.

It is created according to the same principle as a teapot: wedges are cut out from fabric for façade and reverse side, the gap between them is filled with padding polyester, and stitched between the slices on the hands. All that remains is to sew a small bottom on the bottom, hem the cup on top and sew a rounded handle to it.
The saucer can have beautiful wavy edges. It consists of two fabrics of equal size; between them you need to lay a thin rolled synthetic padding polyester or non-woven fabric. You can limit yourself to a circle made of cardboard. You will find the dimensions of the wedges for the cup and the template for the saucer in the following pattern.

Do-it-yourself heating pad for a teapot
Continuing the topic we started, let's see how to sew it. A heating pad will help the tea to brew well and will not allow the drink to cool for a long time. Let's start with simple example, which even dressmakers with very little experience can master.

This interesting little thing will soon appear in your kitchen. Take:
- textile;
- interlining;
- scissors;
- pencil;
- ruler;
- small ribbon;
- pins.
Each side consists of two pieces of fabric, between them there will be a slightly smaller interlining. Pin the interlining with the fabric and quilt these 2 layers. To do this, draw oblique lines along a ruler with a pencil. Some of them are located parallel, others perpendicular.

Take threads to match the façade fabric and make stitches according to the pencil marks.

Also decorate the second part of the façade quilted fabric, fold them with the first right sides, and sew them on the sides.
From another fabric, cut out two blanks for the inside, sew them together on the sides, and turn them right side out.

Insert the inner part into the front part so that the seams of these parts are on the inside. Sew along the bottom, folding the edges of the fabric inward.
When stitching along the edges of the blank for the front and interior, leave 1 cm unsewn at the top center. Place a loop of braid here and sew up the hole on the arms.
Having mastered this simple example, you will be able to sew a chicken on a teapot, the pattern of which is attached.

Each side also consists of three layers - two fabric layers, with interlining between them. Cover the comb and beak from red fabric. Give these parts volume, stuff them with non-woven fabric, and sew them in place.
You don’t have to sew the wings, but stitch them with lace braid to define them.

Having coped with this task, move on to a more complex one. Look what a wonderful chicken and chicken recipe you can make.
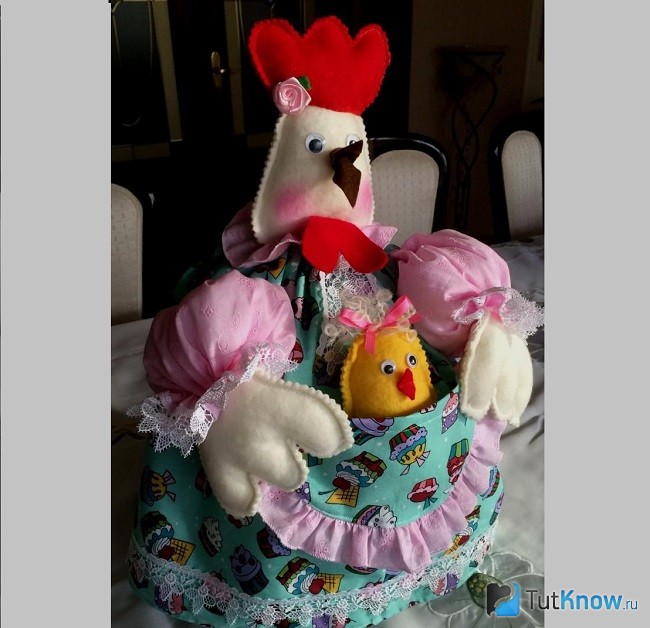
Here's what you'll need:
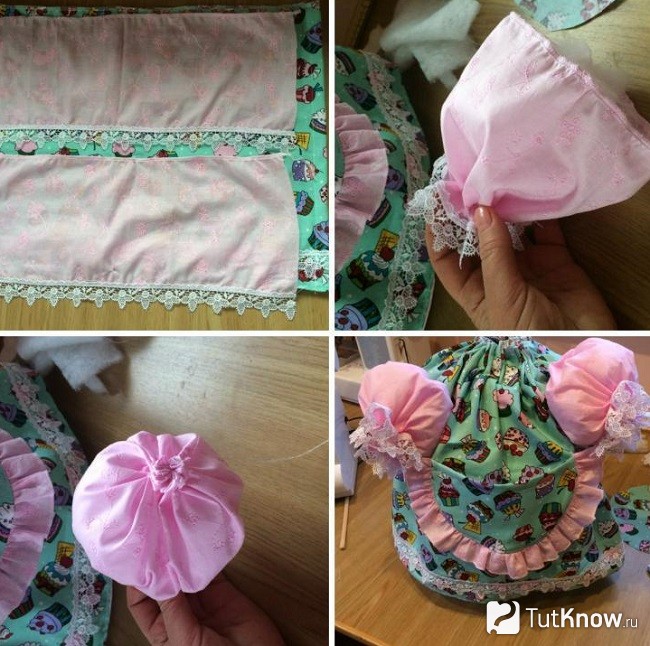
- fabric for a dress size 35x100 cm;
- fabric for the underskirt (quilted synthetic padding or insulation);
- 1 m of bias tape;
- 1.5 m lace;
- filler (sintepon, padding polyester, holofiber);
- for the eyes, pieces of felt (white or black) or plastic;
- felt or fleece;
- shadows, blush or pastel pencils;
- pattern paper;
- silicone gun or fabric glue;
- threads, needle;
- tailor's chalk;
- regular and zigzag scissors;
- tape measure.
We decorate the side edges and the bottom with bias tape, in the photo it is pink. We collect the upper side, which is not framed with bias tape, using thread. In this case, the opposite edges should overlap.
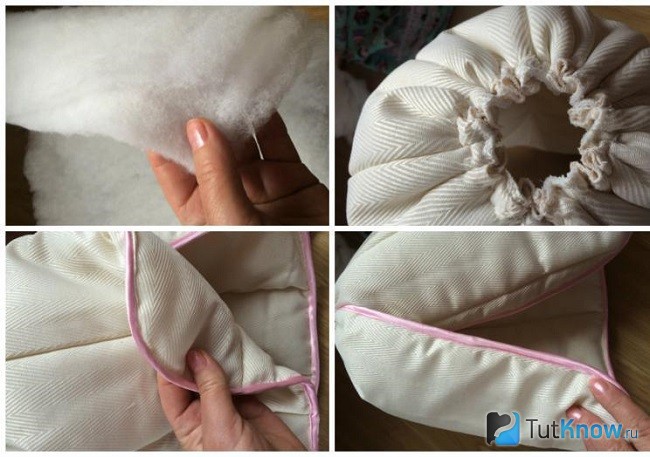
We cut the overskirt from fabric measuring 35x100 cm. Finish the edges with an overlocker, hem the bottom of the skirt, and sew lace on it. Connect the side edges and stitch.

From the same fabric, cut out a semicircular pocket measuring 16 by 10 cm, and sew it on all sides with an overlocker. Gather a strip of lace 40 cm long and stitch it to the rounded part of the pocket.
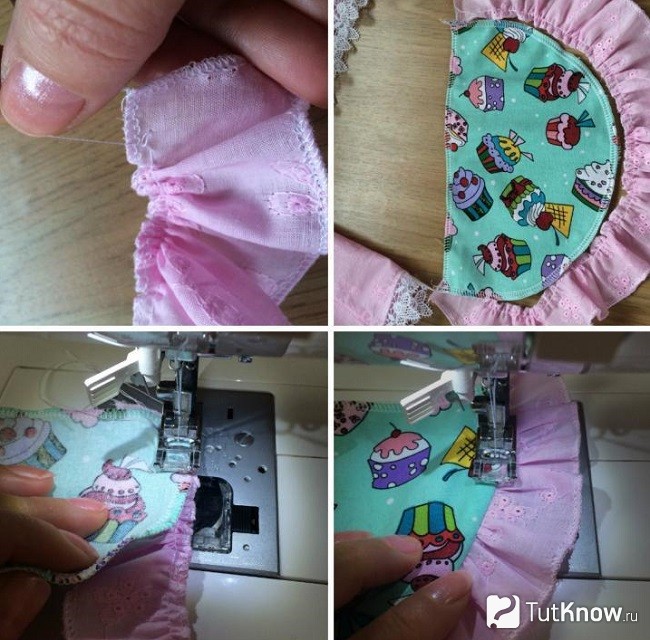
Place the pocket on the front panel of the skirt, pin it in place, then sew it here. Gather the top of the skirt with a strong thread and secure. Place the top of the skirt on its bottom, sew on the waistband on the arms.
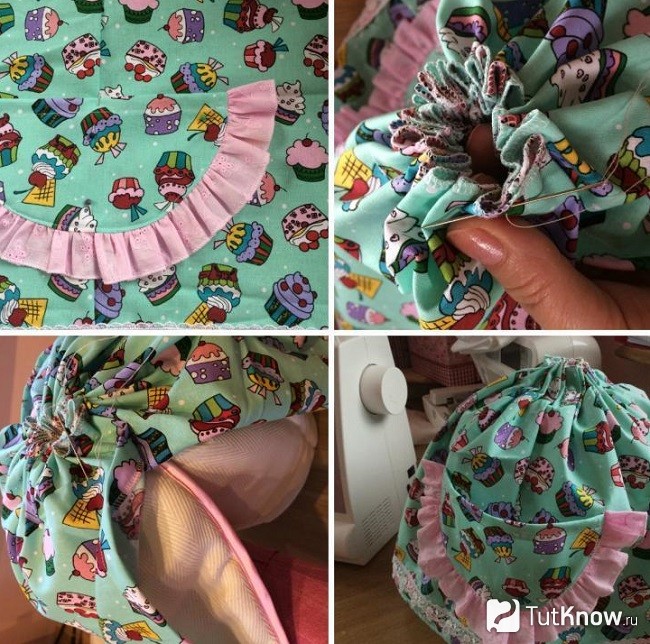
Here's how to make such a heating pad for a teapot; you need to cut out the sleeves for the chicken's dress with your own hands. To do this, take two rectangles of fabric measuring 15 x 35 cm. Process them with an overlocker, fold the 2 short sides together, and stitch. Just above the lace, gather the bottom of the sleeves onto the thread with a needle. Stuff the sleeves with padding polyester and sew them in place.
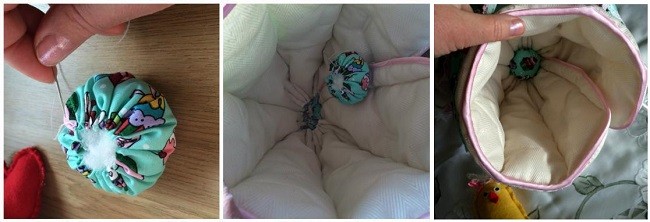
From the main fabric, cut a square with sides of 15 cm. Cut off its corners to make a circle. Sew along the edge with a basting stitch, tighten the thread, but not completely, but so as to fill the resulting part with padding polyester. You will sew it inside the skirt.
There is very little left to get the teapot warmer ready; do-it-yourself hen and chick patterns will help you complete the job.

Reshoot them.
Where it says “do not sew” on the pattern, there is no need to sew down the details. Please note how many blanks you will need for each item.
Cut the chicken out of yellow felt or fleece, cut the chicken's head out of white, cut the comb, beard and beak out of red material. Sew paired wing blanks on the wrong side, finish the edges with a zigzag, and turn them right side out. Place it in the sleeves of the dress and sew it on.
Glue the eyes in place, sew the beaks of the hen and chick. Sew paired parts of the comb and beards, stuff them with padding polyester, and sew them on the hands to the characters’ heads.
All that remains is to add beauty to the chicken by applying blush to her cheeks. Instead of chicken, you can put tea and coffee bags in her pocket.
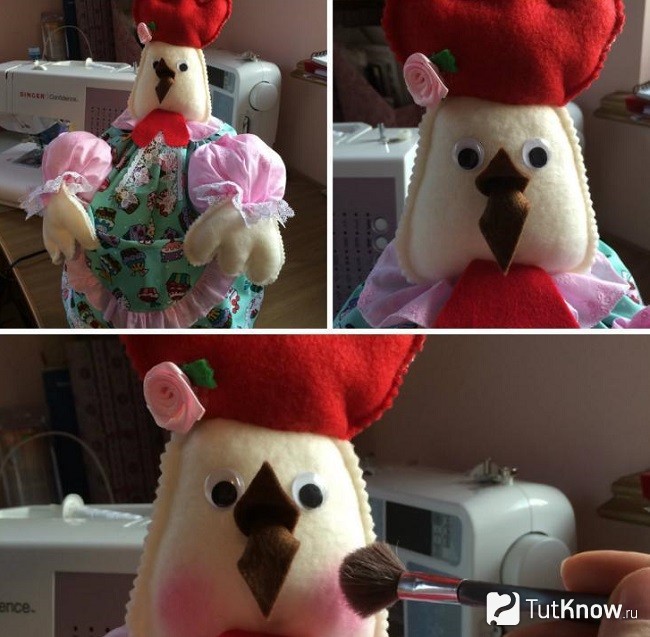
This is such a wonderful teapot warmer in the shape of a chicken. Let's see how to make another interesting fabric item to delight very young children.
Soft fabric ball for children

This one is intended for children under 2 years old. They will be able to touch the ball by its ribs, roll it, and throw it up. For needlework take:
- several pieces of fabric of different colors;
- soft filler;
- a needle;
- saucer;
- threads

Sew these circles in pairs, leaving one small pocket on both sides for stuffing them with padding polyester.

In total you need to create 5-6 such blanks. To avoid unnecessary gatherings at the seam, cut it in several places with scissors. Fold these blanks in a stack so that the pockets for stuffing the filling are on the outside, stitch them in the center.

Gradually fill each slice with padding polyester and sew up the holes.

One ball is ready. If you want to see how to make the second one, check out the process.

To make one, take: scraps of fabric; filler; threads; a needle; scissors.
For one ball, you need to cut out 8 oval blanks and two round ones, bend the edges inward by 6 mm and iron them.

In the photographs, three balls are created at once. Stitch all the pieces on the sides one by one.
To make sewing easier, pin the parts of the sides of the ball in pairs and stitch them on one side. Then pin together the paired elements and sew them together.

As a result, you should end up with a ball like this, which you need to fill through the remaining unsewn hole with padding polyester. Once this is done, sew it up on your arms.

To make the ball neat, sew a round piece of fabric on both sides, after which another masterpiece of needlework is ready. See how to make a teapot out of fabric.
In the second video we have selected for you interesting ideas. After familiarizing yourself with them, many will also want to create a knitted heating pad for a teapot or from fabric.


So how do you make such a wonderful teapot?
For this we need:
- fabric (most often it is cotton, chintz, calico)
- padding polyester
- lace, buttons for decoration (optional)
- scissors, threads, needles, etc.
Pattern:

The pattern of the long piece is 13 cm with allowances, the diameter of the upper circle is 14 cm, i.e. increase the pattern to these parameters.
Let's start with the largest thing in the teapot - the belly). According to our pattern, we make 8 patches with allowances for the outside and 8 for the inside.

Take 2 pieces for the outer part and 2 for the inner:

We sew all 4 parts in this way. it turns out like an asterisk. We make cuts on the folds/curves so that the fabric does not wrinkle after turning it inside out. When sewing, make sure that the outer side of the fabric (which is visible near the teapot) is on the outside.


As before, 4 layers are sewn together, we make cuts:

We continue to sew very carefully from right to left:

Sew the inner and outer flaps together:

We turn it over from the front side to the inside as shown in the photo - so that everything is inside, like in a cocoon. We sew - we connect our strip into the future belly of the teapot. Don't forget to make cuts:

We pull it out through the bottom of the “cocoon” and turn the future teapot inside out:

We make the bottom of the teapot in 2 copies - for the inside and outside. You have the pattern, but, in my opinion, it’s better to fit it to the resulting teapot.

Thus, we first sew the inner bottom:

We seal the resulting slices with padding polyester. Here's what happens:

We make the outer bottom, wrap the outer fabric in cardboard, stitch it, then sew the resulting bottom to the teapot with a hidden seam:

Then we make 2 ribbons for the top of the teapot. 3.3 cm of fabric in width, as long as the perimeter of the circle of our top and 2.5 cm of tape for stuffing. It can be padding polyester or thick fabric.

Fold the stuffing inside the fabric tape and sew it to the top:

We cut out the spout and handle of the teapot, you have the pattern:

We sew and make cuts:

Stuffing with padding polyester:

Using a hidden seam, we sew the tightly stuffed spout and handle to the “belly” of the teapot. Make sure they are diametrically opposite.

Here's what happens:

Making a lid. Make a pattern (circle) according to the existing top; it is better to make the fabric for the lid with good allowances:

We stitch the lid, stuffing it with padding poly between the fabric and the cardboard. We make a second circle - for the bottom of the lid, we also “dress” a circle of cardboard in fabric and stitch it, pulling it up:

We sew the resulting one with a hidden seam.

We make a handle for the lid, by which it can be lifted. We make a circle of fabric, stitch it in a circle, tighten it

We tighten our handle and stitch it as shown in the photo. Sew the handle to the center of the lid:

OK it's all over Now! Tadadadam! The teapot is ready. The teapot is 9 cm high, not counting the lid, with a diameter of 10 cm.

All that remains is to hide something candy-tasty inside and put it in a visible place.
Material taken from the Internet!!!