The Easter Bunny has become a symbol of Easter quite recently, and if you ask someone for what such merits, not everyone will answer. Not to mention the people of the older generation who had never heard of such a character. However, there is no single version of how the rabbit became an Easter symbol.
According to one version, the Easter bunny became the savior of the well-known ark. Legend has it that during its long voyage the ark received a hole in the bottom and would have inevitably sunk. If it weren’t for our long-eared hero, who covered it with his tail, for which he received such a high role in the main Christian holiday.
The second version takes us back to the pagan pre-Christian era, to Germany. Rabbits were considered the main assistants of the goddess of fertility and spring rebirth, Eostre, whom the Germans revered most of all. And due to the fact that Easter is always celebrated in the spring, the rabbit became the Easter rabbit.
But the idea to assign rabbits the unusual role of laying eggs is attributed to Goetta himself. To entertain his guests, the poet hid colorful eggs under the bushes in his garden, and when they found them, he claimed that the Easter bunny had brought them. To this day, children look for nests on Easter morning. chocolate eggs and gifts, believing that, of course, the rabbit brings them to them.
When this tradition came to us, our children liked it and they also began to make nests for the rabbit. However, adults are not averse to decorating their home with such a cute Easter symbol. If you also want to do original gift For your child, family or friends, we invite you to sew the Easter bunny yourself according to the master class we prepared.
Pink bunny for Easter

Pattern, click to enlarge:
Video master class on sewing a bunny for Easter:
Easter bunny made of fabric
Materials needed for sewing a rabbit:
- pattern;
- small scraps of fabric (not necessarily plain, but with a small pattern);
- filler (sintepon, holofiber).
Operating procedure


We offer you two options for rabbit patterns to choose from. They are sewn the same way, they differ only in the design.
- We print (copy from the screen) the pattern you like.
- Fold the piece of fabric into two folds. We chop off the material with the translated outline in several places with pins, then stitch it on a sewing machine. Leave 2-3 cm unstitched at the bottom.
- We cut out the workpiece. In places where the contour turns, we additionally cut the fabric. We turn our workpiece to the right side, then stuff it tightly with padding polyester. Since the rabbit figurine is small, it is better to use ball filler for stuffing.
- The opening can be stitched. It is better to do this with a hidden seam (see photo). We tie a satin ribbon around our rabbit’s neck and tie a bow. DIY Easter bunny is ready.
 Author: Splinter
 And for those who adhere traditional views for gifts for Easter and does not recognize anything other than Easter eggs, we have prepared a master class on sewing eggs, but with ears.
Easter bunny made of felt - video

For a detailed master class on how to sew these bunnies, watch the video:
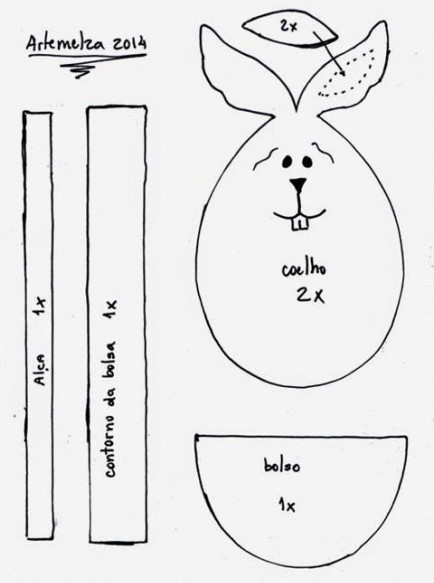
Rabbit pattern from video:
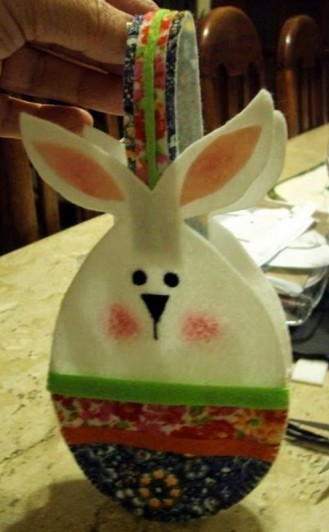
Easter egg-rabbits

Materials needed for sewing Easter bunny eggs:
- pattern;
- textile;
- filler (sintepon, holofiber);
- embroidery threads (iris, floss).
Operating procedure


- We lay out the proposed pattern on the material. It should be noted that a prerequisite is compliance with the split line indicated on the pattern. The grain line always coincides with the edge line, but if there is no edge on the cut, pull the fabric. Along the side where the material stretches slightly, there is a split thread.
- We translate the pattern of all the details, mark the top. We cut out the blanks, taking into account allowances (4-6 mm) for the seams. Place the two parts of the egg with their right sides facing each other and baste or pin together. We start sewing from the top of the egg, marked on the fabric, leaving 1 cm of the seam unstitched at the bottom.
- We turn the workpiece right side up and apply the third part, not forgetting to take into account where the top of the egg is. We stitch in the same way as the first two parts. All that remains is to sew all three parts along the last seam.
- We turn the workpiece inside out through the slot at the bottom, then fill it with padding polyester. Our ears are already stitched, turned inside out and ironed. All that remains is to assemble our egg into a cute bunny egg.
- We sew up the hole, if possible with a hidden seam. We do not cut the thread, but bring the eggs to the top and tighten them a little. A small indentation should form at the bottom of the base.
- We sew the ears to the egg and bring the thread to the nose area. Having made a small seam, we take the thread down and tighten it a little - a slight relief is formed in the area of the nose. All that remains is to embroider the nose of our rabbit egg.
- We begin to embroider with satin stitch, decreasing the stitch size by 1-2 threads each time. We embroider the mouth using small stitches. We bring the thread down and cut it.
- We draw eyes acrylic paints. We tie a bow on the ears. Meet the Easter bunny and egg in one bottle.

Now you know how to make Easter souvenirs with your own hands. Success in creative work.
Sometimes comfort in a home can depend on inconspicuous, unobtrusive details. Soft toys sewn by yourself will help give your home an atmosphere of comfort and coziness. There are a huge number of variations of the toy in the shape of a rabbit, but we offer the simplest version of the toy that even a beginner can master. Very important point The key to making such a toy is a correctly made pattern. In the West, the rabbit is considered an integral symbol of Easter, but in our country it will become a good gift not only for Easter, but also for any other holiday.
Option 1
Making such rabbits will not be difficult; besides, you can sew them from leftover fabric.
We will need:
- pattern
- small scraps of fabric (not necessarily plain, but with a small pattern)
- filler (sintepon, holofiber)
Rabbit pattern:
 We print out (copy from the screen) the pattern.
Fold the piece of fabric into two folds. We transfer the pattern to the fabric and cut it to shape. At this stage, you can embroider the rabbit's eyes and nose. Or later draw with a marker.
We chop off the material with the translated outline in several places with pins, then stitch it on a sewing machine. Leave 2-3 cm unstitched at the bottom.
We cut out the workpiece. In places where the contour turns, we additionally cut the fabric. We turn our workpiece to the right side, then stuff it tightly with padding polyester. If desired, fill the toy with hop cones. Then our bunny will be even more useful. Since the rabbit figurine is small, it is better to use ball filler for stuffing.
The opening can be stitched. It is better to do this with a hidden seam. We tie a satin ribbon, a bell and a bow around our rabbit’s neck. DIY Easter bunny is ready.

Varinat 2

These are the easiest rabbits to sew; there is no need to draw a face for them. Copy the pattern or draw it, and happily start making the toy.
Pattern:

The Easter Bunny is a tradition with long roots. In Germany, already in the 16th century, the Easter bunny was a symbol of fertility and wealth. In North America, as well as some European countries, there is a custom to hide Easter eggs. The awakened children rush to search the entire house and as a result discover the Easter bunny in a “nest” with many colorful eggs. Sweets and toys are made in the shape of rabbits, as well as souvenirs that look like entire families of rabbits.
Like Valentine's Day (February 14), this tradition has become widespread in our country. Children really enjoy playing and making up stories about these cute toys. Therefore, rabbits must be present at Easter. Bright, funny figurines of Easter bunnies in baskets with colorful eggs will be a great table decoration, an excellent keepsake for your guests, as well as talismans that bring good luck and wealth. And sewing such an Easter bunny with your own hands is very simple. We offer you several options.
So, to sew the Easter bunny, we will need small pieces of brightly colored chintz or any other cotton fabric.

Make an Easter bunny pattern out of paper, attach it to the fabric (you can pin it with pins) and cut out two parts. Don't forget seam allowances.

On the front side we embroider a muzzle. To prevent the embroidery from stretching the fabric, a small piece of calico is placed on the inside, but it does not need to be placed.

We immediately sew on the decoration - on our sample it is a heart.

Sew the rabbit together, leaving a small hole for stuffing. If desired, you can insert a tag on the side.

We turn the toy inside out, stuff it with padding polyester or other toy filling and sew up the hole with a hidden seam.

To make the second rabbit, we also prepare a pattern and cut it out with seam allowances.
On a sewn oval made of plain fabric (you can use thin fleece) we embroider a muzzle.


We cut out the paws from a fabric of a different color and sew them together.

Turn it inside out and stuff it with padding polyester.

We fold the two parts of the future toy with the front sides inward. Mark the places where the paws will be

We insert the paws inside:

And sew them together, leaving a small hole for turning them inside out.


Turn the sewn rabbit right side out. We stuff it with padding polyester and sew the hole with a hidden seam. The rabbit is ready!


Easter bunny tilde
Another variety of Easter bunnies are tilde bunnies. You can draw the tilde Easter bunny pattern yourself, or you can use this option:


To make such an Easter bunny, it is better to use cotton or linen fabrics.

The face of such a rabbit is embroidered with thread or painted with acrylic paints. Clothes for tilde rabbits can be sewn or knitted.

Napkins in the shape of an Easter bunny
Interesting decoration festive table will become linen napkins folded in the shape of a rabbit.

Step 1. Take a square starched linen napkin and fold it lengthwise into three layers.

Step 2. Mentally divide the napkin vertically in half. The upper right corner needs to be folded down so that a triangle is formed from the right half of the napkin.

Step 3. We bend the left corner in the same way.

Step 4. Now fold the lower right corner up diagonally towards the center.

Step 5. We do the same with the left corner.

Step 6. We have a rhombus. Again we take the right corner and wrap it towards the center again.

Step 7. We wrap the left corner in the same way.

Step 8. Turn the almost finished “Easter bunny” 90 degrees and bend its “tail”.

Step 9. Expand the “ears”.

Hello guests and blog subscribers! Today the topic will be unusual, but interesting.
More recently, a new symbol of Christ’s Resurrection came to the Russians. This cool tradition came to us from Germany and every year it takes root more and more among us. As you guessed, we are talking about a wonderful furry animal. And his name is rabbit, often called bunny.
In the last post, we already conjured over and even made a mountain, but today I want to invite you to make another Easter souvenir, I hope you don’t mind.
As always, I share with you those ideas from the Internet that I personally liked. What will we create from today? I think from everything that is at hand, that is, from scrap materials and all sorts of things.
Well, I'm starting to surprise you. Wow, hang in there! By tradition, I start my article with the most unexpected and interesting ideas.
For example, look, you can make such cuties out of ordinary disposable cups, and even molds from chicken eggs were used).

From ordinary paper ribbons or you can take satin or decorative ribbons and create such an adorable friend.

You can also make these little animals from sweet dough and then have a meal for tea. It can also be made in the form of a bun.


And you probably won’t even guess to cook something delicious). By the way, do you already know what you will have on this day?
Therefore, along with these specimens, you can immediately come up with types of work from a special modeling dough, I hope you are familiar with this, it is similar to plasticine, but softer.


You can also make figures from mastic.


Long-eared silhouettes made of polymer clay.


For an excellent master in this matter, see here:
And of course, there’s no escape – this is salt dough.


Well, plasticine, of course, has always been and will be loved among children.


These are such funny weirdos, they immediately lift your mood to 5+.
Or look, I found such a charming wreath of twigs, isn’t that a cool idea? And it smells just like spring.

Well, if it’s the simplest thing, then of course it’s paper crafts, roll the sheet into a cylinder and then glue on the ears and a face with a mustache, you can also use cotton wool.

Oh, you can get creative and make an envelope for decorations.

The most simple model ka, volumetric and in applique style.

Or that handsome guy on strings.

Even the product made from cotton wool is cute and fluffy.

And this one is so plaintive from a napkin.
Choose for yourself according to your taste).

Interesting! Disposable spoons and plates and chopsticks can also come to the rescue. Affordable and cheap material has always been in fashion, and will continue to be.
It looks great, you can even hang it on the wall, it will look like a painting.
And here is a masterpiece made from a glove, we already made one like this once. Remember? Something similar when it came to
In general, if you have a shirt in your locker that you don’t mind throwing away, then feel free to sew a little rabbit out of it.
If you don’t know how to sew, there is a thought for this case too. You can decorate a boiled egg.
Ha, from toilet bushings, such a friend will appear.
And even from ordinary clothespins you can do the following together with preschoolers.
Or these cute rabbits, a boy and a girl.
And this little bunny made from a chicken egg and pumpkin seeds is really a showpiece, haha).
Well, in conclusion, you can also make this craft quite sufficiently and attractively using pompoms.
How to make a paper rabbit for Easter?
In fact, everyone has paper and cardboard at hand, and therefore we often make crafts from these materials. Using various techniques, such as origami, etc. Now I want to show you something quite cool and unusual, our rabbit will be made in a vintage motif. Although you can build it in any other style, it is up to your discretion.
We will need:
- scrappaper
- cardboard
- glue or hot glue gun
- scissors
Stages of work:
1. The first thing you have to do is find or use this template. Print it out, you can enlarge it to create a great friend. Cut out all the parts with scissors.
2. Then, using this sample, you need to attach and trace all the details.

3. Well, now let’s get down to business, all that remains is to glue everything together. To make it look more voluminous, bend a strip of cardboard with a spring and glue it to two blanks.
4. I hope you understand what I mean.
5. You could first cover the hare with scrap paper to make it easier to work with.

6. And finally, our long-eared cutie is ready and will delight you and your whole family.

Also, as an option, you can make a rabbit in the form of a basket. By the way, I have a great compilation on this subject, if you missed it, then check it out


From corrugated paper You can also make such a product in the form of an applique.

You will probably be amazed, but from a child’s hand, or maybe an adult’s, you can also create one life-size masterpiece.

By the way, you can find any picture on the Internet and create something out of it.


Or you can not be tricky, but glue together ordinary cardboard strips, something like this.

How to make an eared animal from felt (diagrams and patterns)
You probably won’t be able to imagine any easier crafts made from this material. I have a blog on this topic, where you can find a bunch of new ideas for yourself if you are obsessed with this matter.
Today let's make small souvenirs that you can give on this bright holiday this year.
The kids will also play with them, in general, it will be a gift and a toy two in one.

As always, first get a picture somewhere, for example you can use this one.


Then start stitching along the edge.

For softness, you can add a little padding polyester inside. You can make a whole dozen of them.

Well, the final point is this decoration, make them bows from satin ribbons, you can also sew on a button and a bead.

You can create something like this, that’s more soft toy will remind you.

If you suddenly need a diagram for this friend, then here it is.

You can also make funny mini-rabbits on your fingers and put on a performance. Cut out such blanks from the material.

For the ponytail, use woolen threads, wrap them around your finger, then tie the middle with thread and cut.

Sew the blanks together along the edge.

This is what it should look like.

It is not necessary to use felt; you can make a toy from another material.

I also really liked the idea of a souvenir that can serve as a basket or vase.


This decor can stay in your kitchen for a long time; use it as a candy dish.

You can make anything you want, the main thing is to use your wits, you can even sew a bunny in the shape of an egg.

Or look at another funny animal I found in the form of a handbag.


This one is also a very cute and beautiful fluffy.


And if you want to sew a real toy, then take this masterpiece as a basis, I have its templates in my piggy bank, write to anyone who needs it.

And finally, another modest and sweet long-eared friend.


And if you want to please your kids, you can give them such a present from the cartoon Smeshariki Krosh.

Making a bunny out of a napkin for Easter
In general, you won’t guess what else people came up with to make a little rabbit from. Yes, you can take a handkerchief from an ordinary fabric napkin and make such a product.

Place the square fabric in front of you and get to work. Don't forget to take threads, scissors and all sorts of little things for decoration.


Turn over to the other side.

Fold it in half and that’s almost it.

A little magic, and everything will work out by itself.

Now that the ears are sticking out, tie a ribbon around the face.

Sew a pompom on the back, and a nose and eyes on the front.


No one can resist such beauty; the main symbol of Easter is ready.

You can also fold it like this, a little differently.

You can also make quite a lot of these Easter bunnies if you use these tips. After all, you can take paper napkin for table setting.

And use it to create a brilliant surprise with an egg.
This charm can live in your apartment.

For clarity, I took two similar diagrams to make it easier to understand. 
And this is the simplest model, you don’t even need a diagram with a description, so everything is extremely clear how to build this.

Rabbits (bunnies) using origami technique
We all created our first works in childhood and used this famous technique. You can do this work together with your child or for a labor lesson.
I found this diagram for you, at first it even resembles a shape, as if you were starting to create

And this model is more complicated than the previous one.

If you do not understand this model, then use a more detailed and step-by-step description that I found in one of my magazines.


Such a cute guy.

A more graceful image in this picture.


Don't forget that there is also modular origami.
Crocheted baby rabbits + description
Yesterday I came across one toy, in general, it’s just what you need for beginning needlewomen, because you don’t even have to rack your brains, just knit a square with any loops, you can use knitting needles or a crochet hook for this.

And if you really want a masterpiece, then knit according to this detailed master class.


I also suggest that you familiarize yourself with these stories:
One hare is more beautiful than the other, isn't it?
In general, I will soon publish an article on knitted Easter toys, so don’t miss it, there will be a lot of interesting things there and, as always, there is plenty to choose from. Well, in the meantime, you can tie up this big-eared boy.

Here’s another miracle they came up with, like a kinder surprise, you open it, I’m there. If your baby does not like chicken eggs, then try to disguise the egg this way. If anyone needs it, I can give you a link to this master class.

Or use the diagram, this souvenir resembles tilde dolls.

If you don’t like it, you can knit a hare amigurumi. 


You can also give everyone a knitted keychain.

You might like this yarn applique.
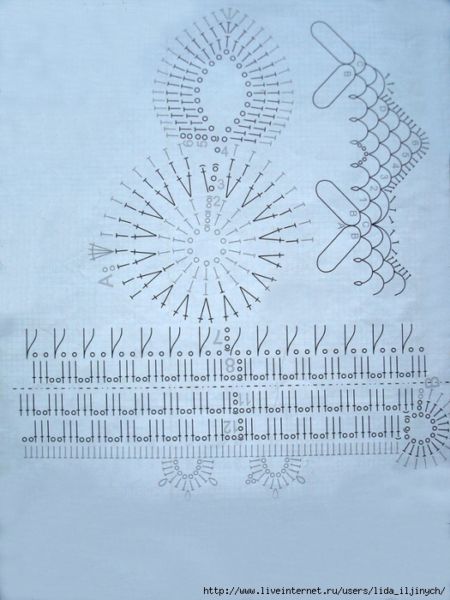
Master class on Easter bunny with pockets for eggs
There is probably nothing better than making something beautiful and unusual yourself. Like, for example, this beauty, you just can’t take your eyes off it.

I personally am very glad that I met such a bunny on the Internet, incredibly beautiful.

On forums and in contacts, girls shared diagrams with me.


I share them too).


Or this craft too.

The hook works wonders creating such magical decorations. Here's a work plan for you.
By the way, we made a basket out of fabric in
Well, if suddenly you are not friendly with threads, then make it out of paper.
It’s actually a great idea to make coasters out of napkins.
Original handbag.

And even a box.
But if you know the art of woodworking, then build something like this, a very beautiful composition.
Easter souvenir Rabbit made of fabric
I suggest that you first familiarize yourself with the patterns, maybe they will become your assistants in this matter.
In my city, Tilda dolls are in great demand; they can be found at exhibitions and on sale.
Here is a gift copy of the bunny.
And if you suddenly want to make someone laugh, then make such a weirdo. Super toy!
You can also make a brilliantly delicate and beautiful pink hare. Print out the blanks and trace them on the canvas.


In addition to everything, you can embroider with floss threads as a decoration.
The simplest is the ovoid rabbit shape.
That's all for me today. I hope you liked the post and write your comments and likes. Join my group in contact and be healthy! All the best and positive wishes to everyone! Bye!
Sincerely, Ekaterina Mantsurova
On the eve of Easter, it is customary to knit, sew and make crafts from paper rabbits. This is mainly true for schoolchildren and kindergarten, you can arrange various competitions among children with prizes. And whoever wants to surprise their child or teach them about such holidays for the future should conduct master classes at home. There are also paid courses where they conduct and teach how to sew rabbits from fabric or crochet beautiful baskets and nests for hares. And also perfect for a nest
In its own way, this custom has been preserved for a long time; our parents gave us gifts in baskets with various decorations and crafts. We'll talk about several ways you can make it interesting beautiful crafts from rabbits.
How to make your own Easter bunny from a sock
Sock toys have become very popular these days, and you get very interesting animals, all you need is interesting colors of different socks and synthetic fluff for filling, and you can sew eyes and noses yourself with simple threads, for variety you can buy special eyes in handicraft stores and grosgrain ribbons or flowers to complement the image. Especially from terry socks, they look like living figures or animals.
The simplest DIY master class of a sock rabbit turns out so charming
- Needle
- Matching socks
- Black thread
- Synthetic fluff filler
- You can use yarn pompoms for decoration.
- Blush lipstick
1. We take socks with different colors of heels, this is the front side, where we will cross-stitch the nose and eyes with a dot using black threads
2.Initially, cut the socks for the rabbit ears into halves, turn them over and sew them up carefully; you can sew them on a sewing machine.
3.Fill with synthetic down for round shape and score the ears until they are tight with scissors and sticks.
4.At the end, sew tightly with thread
5.We make the nose and eyes with threads.
6.For a more realistic ear, we pass the threads around and tighten the thread to bring them together.
7.Sew up our decoration using pink yarn
The second method is suitable for schoolchildren primary classes for DIY rabbit crafts for Easter. You don’t need to really strain yourself here, but it turns out very interesting, depending on what kind of smile and eyes you draw, that’s how you get the character.
Take:
- White socks with beige heels
- Scissors for needlework
- Black felt-tip pen
- Red, black and white threads
- Sintepon for filling

1.Take one sock and, from the beginning, cut out a rectangle about 2.5 cm in the middle
2.Sew in the shape of ears with white threads
3. We round the padding polyester into an oval shape and fill the socks
4. Don’t forget to fill your ears too
5.Sew up at the very end.
6. Take a felt-tip pen and draw a smile where the heels are.
7. We sew the nose in a triangle with red threads
8.Eyes can also be drawn with arrows using felt-tip pens or sewn with black threads
DIY Easter bunny made from paper
You can easily and simply make a rabbit out of paper, you will need colored paper or a regular landscape sheet, watercolor paints for coloring, for decoration you can use any decoration you want.
- Drawing templates
- Scissors
- Colored paper with different colors
- Landscape sheet
- Make a printout on the printer
- Any glue
- Black felt-tip pen
- Pen
- Small pink pompoms
- Transparency film and carbon paper
1. For the first option, take note of the templates, using these templates you can draw or trace around the office with carbon paper or regular transparent film
2. Trace an oval shape onto the colored egg shape and cut it out with scissors

3. For zig zag pockets, cut out half an egg in the same way.
4. Cut out the zagzag pattern with scissors and glue it onto the main egg.

6. We cut out individual elements for the ears, foot, and teeth separately using special colors.
7. Glue these elements onto the base
8. Draw a smile and a nose with a felt-tip pen and pen and glue the pompom.
9.Cut out flowers from two papers and decorate the pocket.
10. Bow according to the template  cut it out and glue it onto the egg
11. Insert the rabbit into its place if you want to hang
If this craft is somewhere in a visible place, it is better to stick a yellow loop.
12. If you are also interested in making a chicken out of paper for Easter, then you should repeat everything approximately as described above

Other paper bunnies for Easter

Basket in the shape of a hare

Beautiful DIY fabric Easter bunny
You can sew different and cute ones from fabric; there are many different rabbit patterns.
For beauty, they use more lace and regular ribbons, mostly cotton fabrics, will come out of especially high quality from American, Polish and Korean, well, now in this regard, they have begun to produce with various options and Russian producers, especially from Ivanovo. From Uzbekistan you can also choose normal colors. If not found in cotton, it is made from knitted fabrics from China and Turkey, which have become popular in recent years.

- Cotton
- Thread and needle
- Sintepon for filling
- Ribbon for decoration
- Rabbit pattern
- Scissors

1. Turn the fabric over to the wrong side and attach and trace the printed pattern.

Use scissors to cut a zig zag pattern, so your fabric will not fray. If you don’t have these, then with regular scissors you can lightly scorch it with a lighter or matches

2.If you have sewing machine, then carefully and slowly sew according to the shape of the pattern
You can do it yourself, but it will look much better on a typewriter
3. Fill the prepared synthetic padding polyester with sticks, try not to be sparing and hammer everything evenly and then sew up the end

4. Make the eyes and nose with threads of different colors, if you want, they already look very cute
5. Decorate with ribbons
There are other templates you can make yourself for Easter.
