Today we will get acquainted with what is the bead weaving technique for beginners of different beautiful crafts from beads. Weaving with beads is not as difficult as it seems at first glance, but this process requires patience and perseverance. But the result is simply amazing things made from beads: necklaces, funny toys, brooches, bracelets, animals, which will not only serve as decoration, but will also serve as a wonderful gift for friends and relatives.
Bead weaving for beginners is quite varied in its technique. If you are still a beginner, it is better to first master the simplest technique - knot weaving. Mostly beads are woven using this technique. It involves tying knots between the beads when weaving them. With this technique, the product becomes flexible and does not allow the beads to knock against each other. If you have not yet learned the technique of weaving with beads, then you can purchase crafts made from beads. A huge selection of these crafts can be viewed in the online store. And now for handcrafting their beads with your own hands.
Threading has gained the most popularity in beadwork. Using this method, you can make clothing parts, household items, various decorations and souvenirs. This technique of weaving with beads is best mastered using large beads or small beads, stringing them on thick cotton or linen threads. When threading, a thin needle is used. The needle passes through some beads 2 times: in the forward direction (as the first time), or in the opposite direction.
You should also pay attention to how the thread is tensioned: with a fairly strong tension, it can happen that the beads lie unevenly, and the product begins to warp. If the tension is weak, the product will not be able to hold its shape, and the threads will be visible between the beads. The threads on which the threads are strung are called sizka. They can be used as a finished bead product, or as a blank for weaving and embroidery. In addition, the following decorative elements are also distinguished: tassels, bundles, pendants and mosaics.
But besides this, you can not only string beads with your own hands, but also embroider with them. Often, embroidery beads are combined with various materials: sequins, braid, rhinestones, colored threads and buttons. Materials should be selected with special care, since the product must withstand both ironing and washing. Usually, bead embroidery work is done on a hoop. The first step is to prepare the drawing, and then transfer it to the fabric. You can do this using copy paper. On fabric, fastening of single beads is carried out according to the type of fastening of buttons. Bead line embroidered different ways seams: attached, stem, arched or lowercase (one bead is in each stitch of the seam).
Those who know how to knit or crochet will love the bead knitting technique. Beads in knitted products become part of the fabric. They are strung on a thread immediately before you start knitting. If, then a bead is placed between the same 2 loops: knit or purl loops. If crocheted, the strung beads are also placed between 2 loops. The beads are placed on the wrong side of the product.
When beading with your own hands, you can use your imagination, and most importantly, do not be afraid to experiment.
Beadwork for beginners
Beads have been called a mystery, a magic, and sometimes even alive. But how is this possible? Let's talk about how to perform the bead weaving technique for beginners using a diagram. After all, these seem to be just ordinary glass tubes or balls with holes. And it’s true that they are unable to speak, walk, or show feelings. But beads, despite this, continue their march through the states through the centuries. Products made from beads can tell us about what the tastes and habits of the people who lived in those distant times were. Time flies inexorably, more and more new technologies appear, materials change, but beads continue to live in human hands, conveying their moods and feelings. It seems to come to life, turning into magnificent and amazing jewelry, or into funny trinkets made of beautiful beads.
To learn bead weaving for beginners according to the pattern, you will need fishing line, knitting needles, threads, hooks and needles. And, of course, the beads themselves. It varies in color, shape and size. For any product you need different beads. The surface where the work will be carried out should not be slippery; you can use a linen napkin, tablecloth or any other fabric for this. When choosing a bead weaving pattern for your first work, focus on relatively simple models. Make sure there are enough beads for the entire project. Check out the method. It can be weaving, knitting, threading or embroidery. Now you can safely start working and learning the technique of weaving with beads according to patterns.
Beaded flowers
 In order to weave flowers from beads with your own hands, you will need: wire, beads, scissors and, of course, patience.
- We thread a bead onto the wire and secure it;
- We use the same method to weave the next rows of beads, adding 1 bead each time;
- Gradually increase the number of beads from two pink to five red. And then again two pink ones. We gradually reduce their number so that our flower turns out symmetrical;
- Let's make five leaves for our flower;
- Let's make the core of the flower from the largest bead;
- Now let's connect the bead and petals. To do this, simply thread a wire through them. Below you can see how to make a flower from beads for a beginner to fully master this technique.
Bead tree
How to weave a money tree from beads according to this pattern:

Using brown paint, we paint the tree trunk and straighten the branches of the tree. In the photo you can see how to weave a beaded money tree correctly and how it will look in the end.
 Don't be afraid to experiment with beaded flowers. When choosing a specific color, any person will rely on his own taste, and, therefore, select the color scheme at an individual level. To create a beautiful and original bracelet, you will need: beads (Czech or Japanese beads are the best for this, since this type of bead is smoother than others); diamond-shaped or 4 mm round beads; carabiner for fastening and fishing line; metal stoppers. You can also weave the lock itself from beads. And so what do we need and what is the technique for weaving a beaded bracelet.
The tools you will need are:
- scissors, pliers and a needle for embroidery with beads.
So, let's start with the technique of weaving a bracelet. Secure the final bead to the fishing line. After this, the following are strung: one bead, one large bead, two beads, one diamond-shaped bead, two beads and one large bead. Now you need to thread the end of the fishing line into the first bead. You can repeat the resulting pattern as many times as required by the volume of your hand. But it should be taken into account that the carabiner will also be included in the length of the beaded bracelet. So, the required length is woven and the beautiful bracelet is almost ready. The final step will be securing it with a carabiner line. To ensure that the fastener does not break and lasts a relatively long time, use pliers to secure metal stoppers at the ends of the fishing line. If you wish, you can watch a video for beginners to master the technique of weaving a beaded bracelet. Good luck to you in your endeavors.
Beaded bauble
 The bauble is a rather bright and beautiful accessory. With demonstrated imagination and skill, any needlewoman can make a beaded bauble on her own. But this will require patience and, of course, necessary material. So .
To make a beaded bauble you will need: threads, beads and a checkered notebook.
Beads are selected individually, depending on preferences, but most importantly they are the same in size. The choice directly depends on color range and product models.
It will be much better if you weave a test pattern using two or three colors. It is better to choose threads as thick as possible, because thanks to their elasticity they will keep the shape of your bauble well. It is best to start working with simple weaving, with a smooth and gradual mastery of new techniques. The most simple weaving Baubles are woven using the “cross” principle. When using this type of bead weaving, you can use beads with different colors. In a notebook, you should draw an ornament for your future bauble in advance. One cell will be like one bead. You should start weaving exactly according to this pattern.
The weaving of their beads begins as follows:
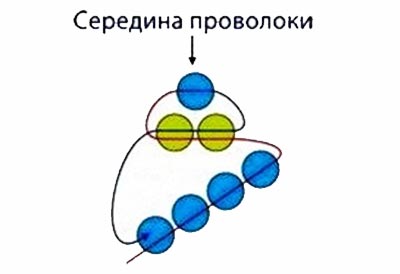
The thread is folded in half and then 4 beads are strung. After this, the second end of the thread is threaded into the outermost bead and tightened into a ring. Then two beads are threaded onto the end that is on the left, and one bead onto the end that is on the right. In the thread, the right end is threaded through the second bead located at the left end, and then tightened. All other work is done according to a similar pattern until you reach the required length.
You can also make one more row. To do this, you will need to string 3 beads on one thread, and pass the second end through the third bead. As a result, it should turn out that both ends come out of the side bead in the first row. Two beads are strung on the right thread, and one on the left. The right end of the thread is then threaded through the left one towards the left end. In other words, the ends are swapped. The bottom thread is threaded through the side beads in the first row and then tightened.
One bead is strung on the thread located on the right, and one on the left. The right end of the thread is passed through the left bead, as well as the side bead located in the first row, after which it is tightened again. All this continues according to a similar pattern of weaving a bauble with beads, up to the required width. Having mastered such weaving as a “cross”, you can easily master other weaving methods.
 Difficulty: medium:
When implementing the technique of weaving a butterfly from beads with our own hands, we will use 2 types of weaving: “tubular peyote” and weaving with a needle at a right angle. For this weaving you will need: beads of contrasting colors, black beads, thread (thin wire or fishing line), and a needle.
Let's start the work by creating the body of the butterfly. We will make a circle using 4 black beads. After that, put 2 beads on one and go through the next ball. Then we’ll go back again and put 2 beads on the nearest ball, and then we need to go through the next bead and add 2 more beads to the first one. After that, add one ball between the two beads. Row number one will be dark grey, row number two will be light grey, and row number three will be white. Further weaving of the butterfly with beads is carried out in a similar way until a tubular shape is obtained. Using the same weaving pattern, two wings will be created. When creating a wing for a butterfly, it is necessary to pull the thread.
Butterfly antennae
We weave a thread with the addition of 10 beads to the left wing, connect it to the main part, and then fasten it. The second tendril is made using a similar pattern. You can watch the video below to master this weaving.
 Beginner difficulty level:
And so what is the technique of weaving daisies with beads. Making petals. The method used for this is called parallel weaving. To do this, two beads are strung on a wire, which will be the first row. Then row number two - three beads, and row number four - 4 beads. This is how 8 rows are woven. Row number eight is duplicated, and the result should be a triangle. Then this triangle is woven to decrease. It is woven in decreasing rows for 6 rows. It is advisable to leave the ends of the wire about 10 - 15 cm long. 7 petals are created.
Creating a middle. 10 beads are strung on a wire. After this, to get a circle, we draw the 3rd bead through 4, and the 4th through 5, and so on. Take a petal and weave the end of the wire with the center (circle) of the chamomile. This procedure is performed with all available petals, leaving the ends of the wires free. In the end it should come out beautiful flower handmade daisies.
The leaves are woven using the same weaving pattern for chamomile as the petals. Having completed 7 rows, we then decrease one bead at a time. As a result, there are 14 rows. In this case, the ends of the wire remain free. Make 2 or 3 leaves in this way.
Connecting parts. We gather the wire of the leaves and the bud together and twist everything.
How to weave fruits
 Difficulty level – beginner:
In order to weave fruit from beads for beginners, we need. You will need fishing line or wire 0.5 meters long, as well as green, red and black beads. Weaving is carried out using the parallel weaving method. Depending on the size you want, a diamond is woven. At the same time, the woven black beads imitate the grains of a strawberry. Having made such diamonds, in the amount of 4 pieces, we connect them, weaving each side of the diamond (to give the strawberry shape, the workpiece can be made in the shape of a berry using polymer clay, and then strung it on a wire). After the berry has acquired its shape, the ends of the wire are connected into a stem.
Creating a leaf. You should thread 10 beads onto the wire, connect the ends of the wire and thread it through 1 bead. As a result, a small leaf comes out. After this, we pull out 1 end of the wire, and then thread another 10 beads into it. As in the first leaf, we also connect the ends. We do this 5 times. We connect the leaves to the berry by twisting the wire.
 Grapes made with beads
To do this, take green and purple beads and 0.5 meter long wire. Purple grape beads are strung on wire. Weaving for beginners is done using “cross” weaving. A chain is woven 1 cm long. With a wire, one of the ends is pulled through the beginning of the resulting chain. The wire is then tightened and twisted. The end result should be a small bunch. This weaving technique is done 14 times. The ends of the wires must be free.
Then all the bunches are connected and twisted into 2 or 3 tiers. It turns out to be a bunch of grapes. In a parallel way, weaving leaves is carried out. Make 5 small diamonds 1 cm long and then join them together. It turns out to be a grape leaf. All parts are connected by twisting.
 To weave a rose from beads, start with the petals. To make the middle petal, use light pink beads and 70 cm long wire. Start weaving the middle piece as follows: 3 rows of 13 – 3 rows of 12 – 2 rows of 11. After this, pass one of the ends of the wire through the entire middle row. We roll the petal from the first row to the last into a tube. Now you need to fix the petal. To do this, weave the wire between the rows, and then twist its ends several times.
For smaller rose petals, also take a wire 70 cm long. Weaving is done according to the diagram below. Take 2 wires for a large petal 90 cm long. Make the first three rows on one of the wires. After that, in the 3rd row, add a fishing line in the middle, bent in the shape of a hairpin and scroll its ends several times.
Weave a rose from beads according to the diagram. We weave green leaves. The length of the wire is approximately 55 cm. According to the pattern: 5 rows – 1 -2 – 3 – 4; 3 rows – 5 – 4 – 3 – 2 – 2. Now you need to assemble the rose. Small and large ones are attached evenly to the middle petal. Green leaves are attached under the petals, and the remaining fishing line is twisted. That's it, the beaded rose for beginners is ready. This diagram can be seen in the video.
Beaded animals
In order to weave animals from beads for beginners, you will need the following materials: scissors, thin special wire, beads and a diagram for making animals with beads. Depending on the chosen animal, the color of the beads and wire is selected. Having chosen the color, you should put 3 balls of beads on the middle of the wire and then swap the wires so that the right wire is in the place of the left and, accordingly, vice versa. Weaving with beads is carried out to the required length. The back is woven in approximately the same way, only it is given the required shape. The tail and paws are woven separately, and then attached to the rest of the parts using glue or wire.
Beaded crocodile for beginners
 You will need: green and yellow beads, fishing line 1.75 m long, 2 eye-catching beads and 1 black bead. Weaving is done using the parallel weaving method. Fold the fishing line in half and string black beads into the middle - this will be the nose. Continue with this pattern. At the same time, try to tighten the line tightly. A beaded crocodile for beginners should come out in two layers. To do this, it is necessary to distribute and lay each of the rows.
When the product is ready, pull the fishing line as tightly as possible, and then tie it in a strong knot. Now you need to hide the ends of the fishing line. Fill them in the direction.
How to weave a name from beads
Mostly, names are not woven separately, but they simply look amazing in bracelets. To weave a name from beads you will need wire and beads. In this case, the color depends on your preference. It will be much better if there is alternation in colors. The thickness of the wire depends on the size of the letters. To work, you need to put 2 or 3 balls of beads on a wire, and then swap the ends of the wire. Weave this way to the required width. Then the work should be carried out across the part, namely, with the wire strung with beads, alternate so that letters appear. Now you know the pattern and technique of how to weave a person’s name from beads, let’s move on to watching video lessons and a master class on bead weaving.
Bead weaving master class lessons
The parallel weaving technique is the most popular technique for making beadwork. It is often used in beading leaves, flower petals and different forms.
Parallel weaving with beads consists of passing wire or fishing line towards each other through the beads, according to the pattern, thereby creating relatively short parallel rows fastened together.
The method of this beading is quite simple and well suited for beginners. Therefore, before starting to study other, more complex weaving techniques, I would advise you to master the skills of working in this particular technique.
Learning to weave beads using parallel weaving
We take the wire, put beads of the 1st and 2nd rows on it, for a total of 3 beads.
Then we take one end of the wire and pass it through 2 beads, towards the other. During weaving, the ends of the wires must be directed towards each other. After passing through the beads, take the wires on both sides and tighten. The ends should be approximately the same length.

After tightening, take one end of the wire and string 4 beads onto it. We also pass the other end of the wire through these 4 beads and then tighten it.
We continue in a similar pattern for as many rows as you need. When will it be completed? the last row products, twist the ends of the wire tightly, this is done so that the product does not fall apart.
Advantages of parallel beading
This technique has its advantages over others:
- The diagrams are most often light and very easy to read.
- Even a beginner can weave.
- The product is woven easily and quickly.
From the above it is clear that the technique is simple and novice needlewomen can easily master it.
Examples of patterns using parallel bead technique
You can practice weaving using these patterns. 


Page 1 of 15
Beading
CHAINS
Chains can be strung of various widths and densities, using both round beads and short glass beads.
To make a chain, take a thread 120-150 cm long. To make it easier to work, start from the middle of the thread from left to right. When the thread runs out, turn the chain over and thread it onto the other, long end of the thread.
Place 4 beads on the thread, pass the needle through the first one, and carefully tighten the ring (Fig. 18). Cast on 2 more beads, pull the needle through the third, tighten the ring. Cast on 2 more beads, pull the needle through the sixth one. Adding every time
2 beads each, string a chain of the required length.
You can assemble a chain using a short glass bead (1-3 mm long). You should not string from only one bugle bead, since rather sharp edges with such tight stringing can damage the thread, and it will be difficult to achieve evenness of the chain. It's better to do the following.
Take 1 tube of glass beads and 3 beads, pull the needle through the glass beads, tighten the ring (Fig. 19). Pick up 1 bead, 1 glass bead, and pass through the last bead. Pick up 2 beads and thread them through the glass beads. Alternate rings made of beads and bugles with pure beaded rings. The bugle bead tubes will seem to line up in one row.

The size of the chain ring depends on the size of the bead. The ring should freely encircle the bead, without any gaps in the thread. Cast on 3 beads, 1 bead, 2 beads, pull the needle through the first one. Tighten the ring. There are an equal number of beads on both sides of the bead, which must be taken into account when enlarging the ring. Cast on 1 bead, 2 beads and pass the needle through the bead closest to the previous bead (Fig. 20). Next, string in the same sequence.

You can place the beads not on the outer edges of the chain, but inside it. This option is shown in Fig. 21.

Cast on 8 beads and close the ring by passing the thread through the first one. Cast on 1 bead for the center of the flower, pass the needle through the fifth. Collect 7 beads and close the ring (Fig. 22). Pick up 1 bead for the center of the next flower. Next, string in the same sequence.

Cast on 7 beads and pass the needle through the first one. Cast on 4 more beads, pass the needle through the sixth one (marked with a dot in Fig. 23a, b). Add two more and pass the needle through 2 beads of the flower, as shown in the fig. 23rd century Let's move on to the second flower. There are already two beads, add 5 more and make half a flower (Fig. 23d). Finish the second flower according to fig. 23d. Then weave in the same sequence.

Stringed in three steps. First, make a series of consecutive bead loops with bridges between them. Then turn the loops alternately up and down (Fig. 24). Using a new thread No. 2, strengthen a larger bead inside the loop of the top row, and to connect the loops, cast on several beads at a time. Next - in the same order. To strengthen the bottom row of loops, you will have to take a new thread No. 3. The weaving order is the same (Fig. 25).


Double chain
By connecting the loops of the “eights” with their sides to each other, you can get beautiful chains strung not on three, but on just one thread. The edges of the chain can be decorated with teeth. In Fig. Figure 26 shows the execution sequence of smooth double chain. The size of the chain loops can be any. By changing the number of beads in the loops, you can make a chain that expands (or tapers) at the top and bottom (Fig. 27-28). You can make the loops of the top row the same, and increase the bottom row (Fig. 29), or alternate large and small loops in the bottom row (Fig. 30). Proportionally changing the size of the loops
top and bottom edges, you can make a wavy chain (Fig. 31).
Other options are also possible.


 |
 |

Cross chain
It is strung on two needles. Take a thread 120-150 cm long, thread each end into a needle. Place 4 beads on one needle and move them to the middle (Fig. 32). Pull the second needle through the first bead towards the first needle. Pull up. The result is a ring - a “cross”. Place 2 beads on one needle, 1 on the other, and pull a No. 2 needle through the second bead at the adjacent working end. Tighten the ring. Then carry out the work in the same sequence.

Chain of “crosses” - flowers
It is strung on two needles. This chain is based on a chain of crosses. Make three “crosses” in succession (in Fig. 33 they are indicated by the letters a, b, c, respectively). Then pass one needle as it moves through the two beads of the last “cross”, add one bead (also marked with a dot) and pass the needle through the two beads of the last “cross”. Pull up. It turned out to be a flower. Complete the next flower, starting with a “cross” e. The connection of two chains of flowers (Fig. 34) is done with an additional thread on two needles.


Cross chain options
Each option can be called differently, but the principle of lowering is the same. You can change the number of beads in the ring, add bugles, beads (Fig. 35), connect rings not only through 1, but also through 2-3-4 beads (Fig. 36). By changing the location of the connecting bead, you can get a so-called “double-row” chain with a zigzag pattern (Fig. 37).


You can get very beautiful compositions by inserting beads into enlarged rings of chains (Fig. 38a). First, make a large ring of beads (Fig. 38a), then put a bead on one end of the thread, pass it through the initial bead of the ring (Fig. 38b), return through the hole in the bead and bring the thread through the last bead of the ring (Fig. 38c) . Then continue the chain as usual (Fig. 38 d).

Stringed on 2 needles. Make a cross in the middle of the thread. At each end of the thread, collect 4 beads and make rings - “crosses”. Pull both working ends through an additional bead (Fig. 39).
Place 2 beads on one needle, 1 on the second, pull the second needle into the 2nd bead on the first thread. Tighten the cross. Gather two “crosses” in succession at both ends of the thread, then at each working end - another “cross”. By connecting the threads in an additional bead, make a “cross” on two needles. Then continue in the same sequence. The connection of two chains of “complex crosses” is shown in Fig. 40.
The “complex cross” can be strengthened along the contour with the help of additional beads, working with the 2nd end of the thread (Fig. 41).

Compositions from “crosses”
From complex and simple “crosses” you can get beautiful compositions. One of these compositions is used in the “Skaz” typeface.
String the left and right sides symmetrically, starting from the central ring (Fig. 42a). With the 1st needle, 6 more beads are strung and the 2nd and 3rd rings are made sequentially (Fig. 42b). The 4th and 5th rings are made with the second needle (Fig. 42c). Both needles converge in the 6th ring. The seventh ring is also common, then again two rings are made at each of the working ends (Fig. 43 and 44a). The 12th ring is common (Fig. 44b). Then the element is sequentially strengthened along the contour with additional beads, first with one and then with the other working ends, as shown in Fig. 44 c - d and fig. 45.
 |
|
 |
|
 |
|
 |
|
Both ends of the threads come out through the top bead of the 12th ring; they can be used to continue stringing the chain, alternating simple sections with complex compositions. The second chain used in the necklace on the inside was later lowered onto a new thread.
To master such wonderful handicrafts as beading , first you need to get acquainted with the basic techniques and techniques of working with beads. Over time, knowing the basics of each technique, you will begin to independently create the design of future compositions and turn them into reality.
So, let's start with the theory, the main types of work with beads can be called threading, weaving and weaving; additional techniques include volumetric and overlaid weaving, as well as bead embroidery.
Lowering – beading technology, in which beads are collected only on one (working) end of the thread and only with the help of this end of the thread are further work carried out; the second end of the thread remains free and is not involved in the work. By the way, in the old days in Rus' all techniques for working with beads were called lowering.

There are several basic methods of threading depending on the method of working with beads: longitudinal, transverse, angular, circular.
Longitudinal depression – threading of beads is carried out along the entire length of the product. The desired length is selected, the beads are strung along this length, and then the product is woven in width. For example, the “ogalala” weaving technique is based on this principle.
Transverse lowering – the most common variant of weaving beads, in which the threading is carried out in length with a relatively constant width. Sometimes the width can be changed throughout the entire length of the product by adding beads or narrowing the fabric. Ready product when lowered transversely, it usually has the form of a grid consisting of individual rhombuses, circles, squares, etc.
Angular descent - a type of lowering that is used to obtain products or its beaded elements with a turn in the form of a corner. With this method of threading, one half of the product is usually completed first, and then the work is turned over and the second half of the product is completed in a mirror image. Most often, this method of threading is used to create pendants and necklaces. This principle is used, for example, to build the technique of dense mosaic corner weaving.
Circular lowering – elements of the product are lowered in a circle; in its finished form, the element can have the form of a circle, polygon, triangle (depending on the weaving method used). In the process of working on a beaded product, individual elements made using the circular threading technique can be connected to each other, forming parts of the product of different shapes: rhombuses, flowers, a large circle, etc. This principle is used, for example, to build the technique of stitching a polygon in round rows.

Weaving – a technology for working with beads, in which two working ends of a thread (or needle) are used simultaneously. The weaving pattern involves stringing beads onto several threads (from 3 to 30 or more) using an openwork mesh. The threads are intertwined at different angles, creating a pattern of fabric with cells of different shapes. For example, the monastic weaving technique is based on this weaving technology.

Bead weaving – beading technology, where it is used special machine with stretched warp threads, around which weaving is carried out with a bead needle. Products made using this technique are relatively similar in shape and are ribbons that differ in width, length, color solutions and the ornament used. There is also an analogue of weaving on a machine - hand weaving.
Today, bead weaving is not only an interesting and exciting activity, but also a way to earn extra money. In order to start earning money, you need to get the hang of working with these small beads. The best way training will become making small animal figurines from beads, and we will tell you weaving patterns for beginners. And even if you don’t succeed the first time, your children will still be delighted.
Materials and tools
The main material is beads, but in addition to it you will definitely need other components and tools. Stock up on scissors, beaded threads and needles, pliers and round nose pliers.
Types of beads

Additional materials

Technique options
1. To create a canvas, mosaic techniques are used: with rows arranged in a checkerboard pattern. For beginners, 10 pieces of beads will be enough to learn mosaic weaving. First you need to string them all on a thread, and then alternately thread the thread through the new and already strung beads. With this technique it is possible.

2. An analogue and, if necessary, a replacement for mosaic is brick stitch technique. It provides greater flexibility to the product than mosaic due to the looped connection of the rows.

From step by step photo For beginners, you can see that in the first row of brick weaving, the beads are firmly connected by double threading. The further density of all work depends on this.
3. If the product requires a direct arrangement of beads in vertical and horizontal rows (like cells in a notebook), then resort to hand weaving. Using this bead weaving technique, even for beginners it will not be difficult to create a picture from a photo or cross stitch pattern. First, the entire amount of the first row is strung on a thread, and in the next row, each upper bead is located above the corresponding lower one and is fixed by additional threading. The hand weaving technique is convenient for creating orchid petals.

4. To make three-dimensional models or “beaded fur”, needle weaving is used. Birch and willow trees, toys and decorations are made using this technique. The most justified frame material for such products is wire. With it you can model any figure. Especially if bead weaving patterns are intended not just for beginners, but for children.

5. Volumetric toys They are also created using weaving in a circle. A simple circular weave with the same number of beads in a row is. But if you increase or decrease the row by several beads, you will get a figured cylinder, which will be the basis of the toy, a flower bud or the body of an insect. For beginners, patterns for weaving small toys from large beads are best suited.

6. Parallel weaving also allows you to add volume to any product: be it a toy or decoration. The frame material here is wire, which can be bent in any direction.

You may be wondering how to weave beads using thread, but first, work with wire.
Snowflake
To make snowflakes from beads you will need: beads of different sizes, beads, glass beads, wire, our weaving patterns for beginners.

Such snowflakes can be hung on a Christmas tree, made into earrings or a pendant, or combined with other beaded decorations.
Would you like to make a more complex snowflake? Stock up on colorful beads of different sizes and shapes and watch the video:
Butterfly
Making a butterfly is also quick and easy. It will look more attractive if you use multi-colored beads.
To make a butterfly from beads you will need:
- beads for wings (88 pcs.);
- beads for eyes (2 pcs.);
- beads for the body (7 pcs.);
- mustache beads (2 pcs.);
- wire (80 cm);
- scissors;

To make it easier for you to learn the technique of weaving a butterfly, we suggest watching the video:
Dragonfly
The dragonfly will also be easy to make. You can make the wings in the form of loops or use the brick weaving technique using transparent beads.
To make a simple dragonfly from beads:
- beads for wings (76 pcs.);
- beads for the body (51 pcs.);
- beads for eyes (2 pcs.);
- thin wire (50-60 cm);
- scissors;
- weaving pattern for beginners.

More clearly, you can watch the process of making a dragonfly in the video:
Lizard
You have learned how to make a dragonfly, now move on to a more complex product. First weave the lizard in one color.
To make a lizard from beads you will need:
- green beads (65 pcs.);
- black beads for eyes, legs and back (26 pcs.);
- wire (100 cm);
- weaving pattern for beginners.

The weaving pattern is unclear - watch the video.
Spider
To make a spider from beads you will need:
- bugles (24 pcs.);
- round beads (87 pcs.);
- wire (60 cm);
- weaving pattern for beginners.

Find out how to weave a three-dimensional spider using the parallel weaving technique from the video:
Herringbone
- You can string beads onto wire and then make a pyramidal spiral.
- You can also weave a flat Christmas tree.
- But most interesting option there will be a product made using the needle technique. Follow this pattern for weaving a beaded Christmas tree for beginners, making 4-5 branches in each row. Twist the finished product along the axis of the trunk, arranging the branches in a checkerboard pattern.


We offer video tutorial on how to weave a rope beads for beginners:
If a rope seems like a very rough product to you, try weaving a necklace out of beads.