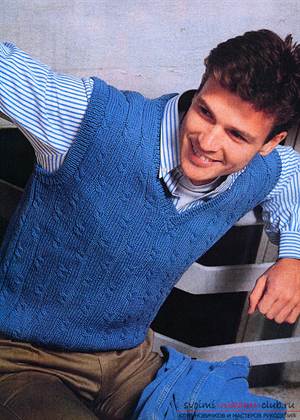
Sleeveless vest with braids -fashionable item and universal “insulation”. It looks natural in the office, at home and outdoors.
Men's sleeveless vest is knitted. Description given for all sizes.
Sleeveless sizes: S/M/L/XL/XXL/XXXL
You will need: 400/450/500/500/550/600 g green (serpolet) Bergere de France Berlaine yarn (100% wool, 90 m/50 g); knitting needles No. 3 and No. 3.5.
Elastic band 2/2: alternately knit 2, purl 2.
Facial surface: persons R. - persons p., out. R. - purl P.
Purl stitch: persons R. - purl p., out. R. - persons P.
Braid (width 10 p.): knit according to the pattern. Repeat from 1st to 4th row.
Braid pattern: the number of loops is a multiple of 16 + 2 sts. Knit according to the pattern. Perform 1 time from the 1st to the 26th row, then repeat from the 3rd to the 26th row.
Knitting density.
Persons stitch: 22 p. and 28 r. = 10 x 10 cm
Pattern with braids: 28 p. and 28 r. = 10 x 10 cm
Back: on knitting needles No. 3, cast on 104/114/124/132/144/152 sts and knit 7 cm = 24 r. elastic band 2/2. Switch to knitting needles No. 3.5 and knit. satin stitch After 38/39/40/40/41/42 cm = 112/114/118/118/120/122 r. from the cast-on edge, close for the armholes on both sides in every 2nd r. 1 x 3 p., 2 x 2 p., 5 x 1 p./1 x 3 p., 3 x 2 p., 6 x 1 p./1 x 3 p., 4 x 2 p., 6 x 1 p./1 x 3 p., 4 x 2 p., 7 x 1 p./1 x 3 p., 5 x 2 p., 7 x 1 p./2 x 3 p., 5 x 2 p. ., 6 x 1 p. = 80/84/90/96/104/108 p.
After 23/24/25/27/28/29 cm from the beginning of the armhole, close the shoulder bevels on both sides in every 2nd r. 4 x 5 p./2 x 5 p., 2 x 6 p./4 x 6 p./2 x 6 p., 2 x 7 p./3 x 7 p., 1 x 8 p./2 x 7 p., 2 x 8 p. Simultaneously with the 1st decrease for the shoulder bevel, close the middle 30/30/32/34/36/38 p. for the neckline and finish both sides separately. To round, close from the inner edge in every 2nd r. 1 x 3 p., 1 x 2 p. After 25/26/27/29/30/31 cm from the beginning of the armhole, all loops must be closed.

Before: on knitting needles No. 3, cast on 118/128/144/152/170/178 sts and knit 7 cm = 24 r. elastic band 2/2, starting with 2 p./1 knit./1 knit./1 knit./2 knit./2 knit. Switch to needles No. 3.5 and knit as follows: 16 stitches. satin stitch, 10 p. braids, 66 p. pattern with braids, starting from the 21st r. diagrams, 10 p. braids, 16 p. knits. smooth/21 sts. satin stitch 10 p. braids, 66 p. pattern with braids, starting from the 17th r. diagrams, 10 p. braids, 21 p. knits. smooth/21 sts. satin stitch, 10 p. braids, 82 p. pattern with braids, starting from the 1st r. diagrams, 10 p. braids, 21 p. knits. smooth/25 sts. satin stitch, 10 p. braids, 82 p. pattern with braids, starting from the 21st r. diagrams, 10 p. braids, 25 p. knits. smooth/26 sts. satin stitch, 10 p. braids, 98 p. pattern with braids, starting from the 7th row. diagrams, 10 p. braids, 26 p. knits. smooth/30 sts. satin stitch, 10 p. braids, 98 p. pattern with braids, starting from the 5th row. diagrams, 10 p. braids, 30 p. knits. iron.
Make armholes on both sides, as on the back = 94/98/110/116/130/134 p. 4/5/5/6/6/6 cm from the beginning of the armhole for V-neck Divide the work in half and finish both sides separately. To bevel the neckline, subtract from the inner edge every 2nd r. * 1 x 2 p., 2 x 1 p., repeat from * 6 times. 1 x 2 p./* 1 x 2 p., 2 x 1 p., repeat from * 6 times, 1 x 2 p./* 1 x 2 p., 2 x 1 p., repeat from * 6 times. 1 x 2 p., 1 x 1 p./* 2 x 1 p., 1 x 2 p., repeat from * 6 times, 4 x 1 p./* 2 x 1 p., 1 x 2 p., repeat from * 7 times, 2 x 1 p./* 2 x 1 p., 1 x 2 p., repeat from * 7 times, 3 x 1 p., while to decrease 2 p. at the beginning of the row, knit 3 persons ., purl 1, knit 3 stitches together purl, at the end of the row knit 3 stitches together purl, purl 1, k3; to decrease 1 p. at the beginning of the row, knit 3 stitches, purl 1, knit 2 stitches together, purl, at the end of the row, knit 2 stitches together, purl 1, k3. After 23/24/25/27/28/29 cm from the beginning of the armhole, close the shoulder bevels from the outer edge in every 2nd r. 3 x 5 p., 1 x 6 p./1 x 5 p., 3 x 6 p./4 x 7 p./2 x 7 p.. 2 x 8 p./1 x 8 p., 3 x 9 p./4 x 9 p. At the height of the back, all loops must be closed.
Neckline: on knitting needles No. 3, cast on 158/166/174/182/190/198 sts, knit 3 cm = 9 r. elastic band 2/2 and set the loops aside.
Armhole straps (2 parts): on knitting needles No. 3, cast on 126/134/142/150/158/166 sts, knit 3 cm = 9 r. elastic band 2/2 and set the loops aside.
Assembly: perform shoulder seams; Sew the strips using a loop-to-loop stitch to the armholes and neckline. Sew side seams.
A sleeveless vest should definitely be in a real man's wardrobe. Particular preference is given to strict options, and even if the product is knitted by hand, it is especially valuable to a strong representative of humanity. It will be useful for needlewomen to learn how to knit a men's sleeveless vest using knitting needles; the diagrams and descriptions for them will be very useful in the work.
Model of a men's sleeveless vest with knitting needles with diagrams and descriptions
Any man will like this stylish sleeveless vest. This model is especially interesting, because a sleeveless vest knitted specifically for men will be very practical to wear.
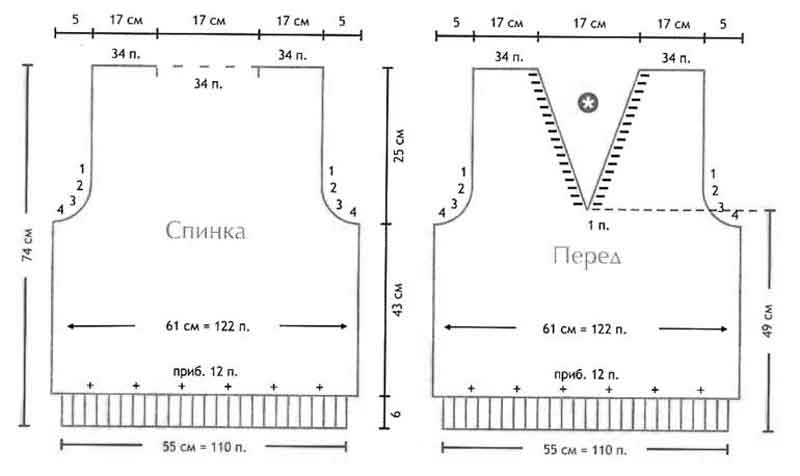
You need yarn and knitting needles. Consider size fifty-two to fifty-four. We start work by knitting the back. Cast on one hundred and ten loops and knit six centimeters with an elastic band one after another. In the next row, add one hundred and twelve stitches. The result was one hundred and twenty-two loops, which knitted according to the pattern:

When forty-nine centimeters have already been knitted, you need to close the loops for shoulder bevel. First, four loops, and then in every second row you need to decrease three, two and one loop. Having knitted twenty-five centimeters, from the beginning of the bevel we close thirty-four loops along the edges, and the thirty-four central ones that remain must be removed on an additional knitting needle.
The front is knitted similarly to the back, only the neckline will be a toe. For it, at a height of nine centimeters, we remove the two middle loops and decrease both parts seventeen times, one loop in every fourth row. At a height of seventy-four centimeters we close off thirty-four loops for each shoulder.
The knitting is almost finished, all that remains is to assemble the parts of the product.
We make one shoulder seam. Raise all the throat loops onto a knitting needle and knit eight rows with an elastic band. Decrease one stitch at a time from the two center stitches. Close the loops according to the scheme:
Sew along the shoulder seams and also the binding. Along the edges of the bevels, put all the loops on a knitting needle and knit with an elastic band, face to back, for six rows, then close the loops as shown in the figure. So the craftswomen have learned how to knit a basic men's sleeveless vest using knitting needles!
The second version of a brutal sleeveless vest
This version of the sleeveless vest is very conservative and is suitable even for business meetings. It looks neat and unobtrusive.

For this model you need number four knitting needles and acrylic yarn.
The diagram is attached:

Start the product from the back. Cast on one hundred and twenty-three loops and knit six centimeters with an elastic band. Then knitting proceeds according to the pattern, adding eight loops in one purl row. There should be one hundred and thirty-one loops.
Having knitted about forty centimeters, close four loops on each side and decrease three loops every other row, two loops three times, one loop three times. And in this way make decreases until ninety-nine loops remain. Having knitted to a height of sixty-eight centimeters, you need to close twenty-eight loops for the shoulders, and forty-three loops for the throat.

Before knitting it is similar to the back, but after forty-two centimeters are knitted, we knit the toe of the collar. To do this, the middle loop needs to be closed, and in every second row you need to decrease one loop from the toe side twenty-one times. At a height of sixty-eight centimeters, bind off twenty-eight loops for each shoulder.
Important! Before assembly, the product should be slightly moistened with water and wait until it dries.
Sew one shoulder. Raise the loops along the very edge of the neck, mark a corner loop and knit with an elastic band one on one, while decreasing one loop five times in every second row. And so knit ten rows, then close according to the pattern. Now sew the other shoulder. Along the edges of the bevels, pick up all the loops and knit with an elastic band one by one four centimeters, close all the loops. That's all, a great sleeveless vest is ready!
An interesting example of work for beginners in needlework
In some models, needlewomen themselves come up with interesting knitting patterns and then bring them to life.

Our material will present another version of a men's sleeveless vest.
For the back you need one hundred twenty-six loops, knit seven centimeters with an elastic band. Having knitted thirty-five centimeters, we begin to make an armhole, while closing off ten loops: five once, and then in every second row there are three loops, after which only two. Then knit without decreasing. The neck is knitted at a height of sixty-seven centimeters, forty-two loops in the center of the product. After knitting four more rows, close the loops on both sides and finish the back.
There are many models men's sweaters, which are very easy and simple to knit. Although knitting a sweater is extensive work, it will not only always warm you up in the cold winter season, but will also become the main decoration of your wardrobe.
option 1
This option is very good because it is easy and simple to knit. There is a simple pattern here, and you can also choose absolutely any thread for knitting this product.
option 2
This version has a rather complex pattern, but interesting. This type of vest is also ideal if you combine a men’s vest with a shirt, turtleneck and even a sweater. You can use any thread for knitting. Also, the model will look good in any color shades.

option 3
Quite a stylish type of vest that can be worn with a tie or even a bow tie. It is impossible to freeze in such a vest, since it is knitted from thick wool yarn. In this option, you can choose any color; a drawing in any color will look beautiful and original.

option 4
This vest has an original pattern that is very easy to knit. You can use any thread for knitting this vest, but preferably not too thin; Turkish types of threads, such as Yarnart or Gazal, are perfect.

option 5
A great option for a vest with buttons that will go with any outfit. The only thing is that knitting will be a little difficult for beginners, since the pattern is complex. But when knitting, you can use any other pattern, not necessarily this one, or just knit with stockinette stitch, which will also look quite attractive.

Men's knitted vest with knitting needles diagram with description
A simple but interesting option knitted vest, which is very easy and simple to knit. The vest has beautiful drawing, which is also quite easy to knit.

To knit this vest model you will need:
— 7 skeins of thread (in this version we used Gazal baby coton thread, 50 g);
- circular knitting needles % 3.5 by 180 cm.
This vest is knitted in the round. In this version, you do not need to knit the back and front parts separately, everything is knitted together in the round. There will be a pattern on the front side, on the back we will knit in stockinette stitch. Vest size 43-45.
Drawing diagram.

Only even rows (2, 4, 6, etc.) are not indicated in the diagram, since they are repeated. You should knit the first row as in the diagram, and repeat the second row according to the drawing, and so on. The pattern is very easy to knit. Where marked with dots, these are purl loops, where there are no dots, these are knit stitches.
Step-by-step instruction:
- We put 296 loops on the knitting needles and close them into a circle.
- We knit with a 2x2 elastic band (4 loops). We knit 4-5 cm.
- We distribute the cast-on loops across the floors. The back part is 148 loops, the front part is 136 loops. Leave 6 loops on each side. Half of the loops will be the back, we knit the back - facial loops, the second half is the front part, we knit according to the pattern.
- The width along the elastic will be 42 cm, where the pattern will be 53 cm. The girth will be 106 cm.
- When we have knitted the elastic, we begin to knit the front part of the vest according to the pattern, and we also knit the back in a circle with facial loops.
- The pattern report consists of seventeen loops. For beginners, it is recommended to wear a marker at the end of each report in order to make fewer errors and know when the report has ended.
- We knit 38 centimeters like this. You may need to knit more in height, it all depends on your height. When 38 cm is knitted, it is best to take measurements.

Then we begin to decrease and form the armhole.
- We set aside twenty loops that we will close for the armhole. For convenience, to know how many loops are closed and how many need to be closed, you can hang a marker. To do this, in the very first row on the front side we decrease five loops, after which we knit according to the pattern. When we knit to the end, turn the knitting over and close five more loops with reverse side. This is how we knit in reverse rows.
- In the second row we close - 3 loops, in the third again - 3 loops, in all remaining rows we close one loop each.
- We don’t touch anything on the back side, leave it alone for now and work only with the front part of the vest.
- Once the armhole is ready, we begin to form the neckline. In this vest it is V-shaped. You can also use the neck option in a circle.
- In this example, the neck height is 19-20 cm. 10 cm x 36 rows. We make up the proportion: 19 * 36 / 10 and get 68 rows. 68/20 and we get that in each row you should decrease 3 loops in every 8th row. We do the decrease with reverse-turning rows of 69 rows.
- Starting from the 62nd row to the 69th row, we begin to decrease 8 loops.
- On the 70th row we bind off the remaining loops.
- When the neckline is ready, continue knitting the back part in stockinette stitch.
- We place the working canvas on the left side. And we begin to form armholes according to the indicated pattern. The armhole is formed in the same way as on the front face.
| 1) -5 | 2) — 3 | 3) — 3 | 4) -2 |
| 5) — 2 | 6) -2 | 7) -1 | 8) — 1 |
| 9) -2 | 10) -2 | 11) -1 | 12) -1 |
| 13) -1 | 14) -1 | 15) -1 | 16) -1 |
| 17) -1 | 18) -2 | 19) -2 | 20) -2 |
| 21) -1 | 22) -1 | 23) -1 | 24) -1 |

- We form an armhole from the left and right. Decrease occurs in 26 rows:
- We start decreasing the neckline from the back. The decrease occurs in the same way as on the front of the vest. We knit straight up to the 60th row, make a cutout and continue to decrease until the 69th row. The shoulder should be at an angle.
We make such reductions in this way:
61) – 30; 62) From the wrong side - 8, after closed loops we close 3 loops; and in the next rows the loops are closed in the same order 63) – 8, – 3. 64) – 8, -3; 65) – 8, -1 66) – 8, -1; 67)- 8; – 1 68) – 10, 16; 9)- 10.
- We process the shoulder seams and sew them together.
- We process the armhole. We cast on the sleeves - 160 loops. There are 124 loops for the neck. And we knit with an elastic band 2 x 2. We do this with the sleeves and neckline. We knit 7 rows with an elastic band.
- Close the loops, hide the ends and the product is ready!

Neck treatment in a men's knitted vest
V-shaped neck processing
Before forming the neck, you should initially select the desired height for the neck. This could be a deep V-shaped neckline or closing the neck loops in a circle. In such cases apply ready product to another thing, for example, to a T-shirt and measure from it at what distance the neckline will begin.
- Initially, you need to finish the left side of the work. To do this, in every third row, the 2nd and 3rd loops should be knitted with pulling.
- On the right side you should knit two last stitches together.
- To form the strip, the edge is cast on and the loops for the binding also begin to be cast on the left side.

round neck processing
- To knit a round neck, it is important that all its edges are smooth and round.
- After the knitted parts have been processed, it is necessary to cast on the knitting needles the loops corresponding to the length of the neckline. You can cast on through one loop, not necessarily in a row (there will be no holes).
- You should knit with an elastic band of 2 x 2 approximately 7 cm. The number of loops should be a multiple of 4.
- After knitting, close the loops and hide the thread.

Men's knitted vest pattern
Exists a large number of options for patterns of knitted men's vests, we offer interesting and simple options.
option 1


option 2

option 3

Men's knitted vests with buttons, patterns with descriptions
option 1

option 2

Knitting a hood is not that difficult. It can be knitted separately, and then attached to the vest, or you can start knitting it after the main part of the work is ready. The hood can be knitted in several ways: according to the principle of knitting the heel, as well as dividing into the left and right parts (the second option is convenient for knitting hoods with patterns).

This version of the vest can be complemented with a scarf of the same color, and you can also knit the original men's cap and gloves.
Vests have been an integral part of the men's wardrobe for over 200 years. Over this period, they have become very diverse - from strict classic to sports, knitted, youth models. Vests go perfectly with suit trousers, jeans, even shorts.
It is not difficult to knit a men's vest with knitting patterns and descriptions of which are presented in this article. We invite you to choose for yourself suitable option vest for men and get to work.
Classic
Size – M
To work you will need:
- p/w yarn – 480g;
- straight knitting needles No. 4 and No. 4.5;
- pin;
- needle with a large eye.
Patterns used:
- elastic band 1 knit x 1 purl;
- knit stitch: for forward/reverse knitting - in odd rows all stitches are knit, in even rows - purl;
- “fantasy” pattern – see diagrams
Knitting density: on facial patterns. satin stitch and strands: 21p. corresponds to 10cm.
Description
A knitted vest for men consists of only two parts: a back and a front. They are made using the same patterns, with a slight difference in the neckline.
Back
Using knitting needles No. 4, cast on 100 stitches. and knit with an elastic band of 7 cm. Go to sp. No. 4.5, adding p. 7p. We get 107p in work. We begin to knit the “fantasy” pattern from the diagram above.
Knitting 32cm height sleeveless vests for men from last row elastic bands, to decorate the armhole, close on both sides in even rows 1 time 4p, 1 time 3p, 1 time 2p, 2 times 1p.
At a total height of a men's sleeveless vest of 67 cm, close 23 stitches for each shoulder and 39 stitches for the neckline.
Before
We knit with knitting needles like a back. Having knitted 32 cm - see diagrams, for the armhole we close in even rows. symmetrically on both sides 1 time 5p., 1p. 3p., 1p. 2p. 1r. 1p.
Having knitted 6 cm from the beginning of the armhole of a sleeveless vest for men, we divide the work into two parts - to design the neckline. At the same time, remove the central loop with a pin.
At a total height of the sleeveless vest of 67 cm, close both knitted parts of the front. On each of them we have 23 stitches for the shoulder.
Assembly
Sew one shoulder seam. Along the neckline of a men's sleeveless vest on the back. No. 4 pick up 133 loops, including the loop from the pin.
Continue knitting with an elastic band, calculating the location of the loops so that the middle stitch (the one from the pin) is the front stitch. On both sides of it we make decreases: in the faces. rows - 2 p. in purl 1, and in purl rows - 2 p. in 1 person Having knitted 7 stitches, close the loops according to the pattern.
Carefully sew the second shoulder, matching the elastic pattern on the neckline trim. Next we tie the armhole. We lift to sleep. No. 4 along its edge 122p., knit 7p. elastic bands, close the stitch according to the pattern.
Sew the sides. If desired, the collar and armhole binding can be done on circular knitting needles. To do this, first sew both shoulders. Then we collect loops along the edge of the cutout and knit an elastic band - see the description above. Same with the armholes - first sew the sides, then pick up the loops along the edge, tie them off.
The finished knitted men's vest must be lightly steamed to give it shape.
Men's vest: detailed video master class
Men's vest with round collar
This simple vest is very easy to make. Spectacular diagonal stripes are played out by alternating knit and purl stitches.
The model is designed for several sizes – XS (S, M, L, XL, XXL).
Chest volume – 81.5 (91.5; 101.5; 112; 122; 132) cm.
Length – 59 (60.5; 63; 66.5; 69; 72) cm.
To work you will need:
- h/w yarn (100g per 110m) – 500(500; 500; 600; 600; 700)g;
- circular sp. No. 5;
- straight sp. No. 5 and No. 6;
- markers.
Patterns used:
- elastic band 1 knit x 1 purl;
- diagonal pattern:
1r.: * 4l., 4i.* - repeat from * to * for the entire row;
2p.: 1i., *4l., 4i.* – to the outermost 3p., 3i.;
3p.: 2l., *4i., 4l.* – to the outermost 2p., 2l.;
4p.: 3i., * 4i., 4l.* - to the outermost 1p., 1i.;
5r.:*4i., 4l.* – to the end;
6p.: 1l., *4i., 4l.* – to the outermost 3p., 3l.;
7p.: 2p., *4p., 4p.* – to the outermost 2p., 2p.;
8p.: 3l., *4i., 4l.* - to the last 1p., 1l.
Repeat from 1st to 8th row.
Description of knitted sleeveless vests for men
Back
Using knitting needles No. 5, cast on 64 (72; 80; 86; 88; 96) sts. Knit 12p. rubber bands (this is approximately 6.5 cm). Replace the needles with number 6 and continue with the “diagonal” pattern from the diagram.
For each of the shoulders at a height of 39.5 (39.5; 40.5; 40.5; 42; 42) closed. 18(21; 23; 24; 25; 27) p. for the neck – 24(24; 25; 26; 29; 30) p.
Before
We knit with knitting needles in the same way - see the description and diagrams of the back. Having knitted 53 (54.5; 57; 57; 59.5; 59.5) cm, we divide the fabric into two parts: closed. in the center 8(8; 9; 8; 11; 10) p. and then we knit each of the parts separately.
For a cutout, close it twice. 2 p. Then we decrease by 1 p. in even p. 4(4; 4; 5; 5; 6) times. Continue with the pattern to the desired height. Close the loops on the shoulders.
Assembly
We make shoulder seams. For circular sp. No. 5 is raised along the neckline 62 (62; 60; 64; 70; 74) p. Having knitted 2.5 cm of elastic, loosely close the loops.
For armholes, mark on the front and back with a marker 21.5 (23; 24; 25.5; 26.5) cm from the shoulder.
Cast on with knitting needles 66(69; 74; 82; 88; 92) sts. between the markers and knit with an elastic band of 2.5 cm. Close the section. We do the same with the second armhole. We make the side seams.
Classic men's vest: MK video
It is considered a universal item. It is worn by both women and men. It can be of different styles and different models. It must be present in a man's wardrobe, perhaps not even in one copy. It can be worn every day and holiday events. Naturally, the style and fabric of such products will differ.
There are many types of sleeveless vests:
- classic;
- sports;
- knitted;
- youth, etc.
Vest goes well with a formal trouser suit, with jeans, and even with shorts. For its production the most different fabrics and threads. There are two ways to make it:
- sewing;
- knitting.
You can make knitted men's sleeveless vests yourself, or you can buy any item you like in the store.
Depending on the purpose of the vest, different fabrics and different threads are used for knitting. If we consider a model designed for corporate party, it should be made of thin, practical and light fabric. If the vest comes with a suit, then the fabric used for sewing it is suit.
A knitted item will decorate no less than a man’s wardrobe, will warm you up in the cold and add elegance. Men wear a sleeveless vest over a shirt, under a jacket - in winter time not cold and stylish.
The most chic vest models are tweed or knitted.
Men's sleeveless vest with knitting needles: diagrams and description
A practical, comfortable and warm sleeveless vest, knitted with your own hands, will protect your beloved man even in the most severe cold. It can be of any style and any model, it can be worn daily or just as an element of a corporate suit.
The vest can be:
- buttoned;
- with a zipper;
- without clasp;
- with a hood.
How to knit fashion vest and from what yarn - depends on the wishes and preferences of the man himself.
Knitted men's vest
In this knitted model a combination of two patterns is used: a diamond knitted with pearl knitting and an elastic band with 1x1 or 2x2 knitting needles. For such a knitted product, you can use woolen or half-woolen threads - they will make the item warm, or threads that contain synthetics - the item will not be very warm, but durable. It will not fray, stretch or shrink. When mating, it is also necessary to take into account the man’s height.
Depending depending on the thickness of the selected yarn, we choose knitting needles for work, and a vest pattern is made. If suddenly, while knitting a vest, you close off extra loops, then you can determine the error immediately, simply by attaching the product to the pattern. This is very convenient for beginner knitters.
To determine the number of stitches needed for the front and back of the vest, you simply need to knit a knitting pattern. In this case, it is a rhombus of knit and purl stitches.
Pearl pattern: in the front rows, 1 knit, 1 purl alternate. In purl stitches, knit stitches are knitted purlwise, and purl stitches are knitted with knit stitches.
You can use the pattern for the sample, or you can knit it step by step according to the description. You need to cast on 33 loops on the knitting needles - this is the repeat of the “Rhombus” pattern, plus 2 edge stitches:
- row: facial loops;
- row: purl loops;
- row: knit 14, 5 pearl stitches knit 14;
- row: purl 15, knit 1, purl 1, knit 1, purl 15;
- row: knit 12, pearl pattern 9, knit 12;
- row: purl 13, 7 pearl stitches, purl 13;
- row: knit 10, pearl pattern 13, knit 10;
- row: 11 purl, 11 pearl pattern loops, 11 purl;
- row: knit 8, 17 pearl stitches, knit 8;
- row: purl 9, 15 pearl stitches, purl 9;
- row: knit 6, 21 pearl stitches, knit 6;
- row: 7 purl, 19 pearl pattern loops, 7 purl;
- row: knit 4, 25 pearl stitches, knit 4;
- row: purl 5, 23 pearl stitches, purl 5;
- row: knit 2, 29 pearl stitches, knit 2;
- row: purl 3, 25 pearl stitches, purl 3;
- row: knit 1, 31 pearl stitches, knit 1;
- row: 1 purl, 31 pearl pattern loops, 1 purl.
From 19 - the rhombus begins to decrease. Knit in reverse order.
Knitting starts with an elastic band, in which knit and purl loops are knitted alternately. This can be a 1x1 or 2x2 elastic band. Usually the height of the elastic is 6–7 cm. Next we move on to the main pattern, which is knitted very simply:
- row: knit 3, purl 2;
- row: all even - according to the picture.
 This is how the back is knitted 48 cm, before the beginning of the armhole. The number of loops for bevels will depend on the density of the threads. When closing the loops for the armhole, periodically apply work to the pattern to prevent mistakes.
After 66 cm from the beginning of knitting, we close off all the remaining loops.
Number of loops the same as for the back. The elastic is knitted in the same way. After that, we begin knitting the main pattern. There will be a diamond in the middle of the front, and on both sides of it there will be the same knitting as on the back.
The armhole cutout is designed in the same way as on the back. Next, you need to decide on the neckline and knit it, applying the fabric to the pattern.
We sew the finished parts on the shoulders and sides. We tie the neckline and give the new thing to my husband.
If the description of the main pattern is not clear, use the diagram and look at the photo.
Vest with pearl pattern
To knit this pattern you will need threads (wool or wool mixture) and knitting needles. You need to make a pattern based on the man’s size to avoid mistakes during the knitting process.
The pattern is so simple that the product will be made very quickly. First you need to knit a sample and use it to calculate the required number of loops for the front and back of the product.
Start the front and back you need an elastic band, the height of which can be up to 10 cm. After the elastic, the main pattern is knitted, adhering to all sizes according to the pattern.
This vest model cannot be called festive; it is most likely for everyday wear, under jeans.
Advantages of a sleeveless vest
 Its main and undeniable quality is practicality. This applies to both knitted product, and sewn. A sewn sleeveless vest is an excellent organizer for drivers, security guards, military personnel and even special forces employees. You can hide a notebook, pen, personal items, weapons, etc. in its pockets.
A modern man must have a sleeveless vest in his wardrobe, as it has the following qualities:
- protects against cold;
- does not hinder movement;
- does not interfere with natural air and heat exchange.
A sleeveless vest is both an additional insulating layer and a stylish accessory.