It’s very sad to watch how autumn comes after a sunny summer: the leaves on the trees turn yellow, it almost always rains, it becomes cold outside, you have to take warm things out of the closets.
Despite this, autumn can also become beautiful and full of colors during the onset of sunny days. Cheerful children run through city parks, play, and collect colorful bouquets from fallen leaves.

I'm starting to collect at home various crafts for school and kindergarten, sometimes just for yourself. There is a huge variety exciting ideas, our article will be about them.

Leaf crafts for kindergarten
The child loves to take part in creating various crafts. Show him what can be made from the colorful leaves that filled all the streets of your yard, and he will be incredibly happy to take part in it.
Creating crafts is not only fun; thanks to such activities, children can get wonderful, exciting lessons in getting to know the world around them, develop thinking and creativity. The presented options for working in kindergarten will help you with this.

What is needed for crafts from autumn leaves:
- The leaves themselves, of different colors, sizes and types;
- Stationery (Glue, pencil, scissors, paper, white and colored cardboard);
- Threads;
- Wish.

Possible options for crafts made from leaves
Applique of autumn leaves
Considered the most simple view crafts made from leaves. You and your child can easily make an applique in the form of animals or birds.
You can create a lot with dry leaves, PVA glue and paper. To make your work more vibrant, use leaves of different colors.
Crafts from leaves and cardboard
Making a craft from cardboard and leaves is not difficult. You just need to cut out the base from cardboard and glue dry leaves to it.
Herbarium
One of the most exciting and common types of crafts for children is an amateur herbarium. You can collect many types of natural material, which will help your child to study with interest the variety of plants growing in your area. Include as many plant species as possible to create a beautiful herbarium.
Garland of autumn leaves
Dry the leaves, then dip each of them in yellow paint to give the leaves a brighter color. Then we hang the leaves to dry in the form of an elegant garland.
You need to take maple leaves of different sizes and colors, then cover them with transparent varnish. After the leaves have dried well, you need to hang them on strings, decorate them with beads or beads and hang them. The resulting pendant will be an excellent decoration both outdoors and indoors.

Bouquet of flowers from autumn leaves
Flowers created from maple leaves look very impressive.
Vase of leaves
You can use any leaves you like. For one vase you can use several types of leaves, different in color and shape, or you can make them from the same ones.

Instructions on how to make crafts from leaves Applique First you need to prepare everything necessary materials, and shoot the table with oilcloth.

To create an overlay applique, you should draw the picture itself on cardboard, then put leaves on the drawing, there is no need to cut the leaves, they are used entirely. Anything that is not enough can be painted on with paints or made from other materials.

Silhouette applique is created from cut leaves. The leaves are cut to realize the intended design with their help.

The most difficult way is to create a modular application. It is made from leaves of the same size. Fish scales or bird feathers are made in this way.

To obtain a symmetrical application, it is necessary to select paired leaves that are identical in all respects.
Note!


Tape - with its help, many details are created in one drawing.
Herbarium
It is better to collect leaves for the herbarium in dry weather, since wet leaves require additional processing. Each part of the herbarium must be straightened with a cold iron; before this, all creases in the sheet must be carefully removed.

If there is constant dampness outside and there is no time to wait for dry weather, then they should be given the opportunity to dry on their own. After the leaves have dried, they are ironed with a warm iron, placing them between two sheets of paper. There is no need to press the leaves with an iron, just press a little so as not to flatten them.
The prepared elements are placed on a sheet of paper, which will serve as a background and at the same time a frame. Fix the leaves with threads or glue.
Bouquet of flowers/rose
In order to get neat and beautiful flowers, the leaves must be even and clean. Place the piece of paper directly in front of you and fold it in half. Then you need to twist half the leaf into a tube, but do not twist it very tightly, the flower should be voluminous.

The result is the core of the flower; we make the petals from the remaining leaves. The core is placed in the second maple leaf. Take turns folding the edges of the sheet to form petals. The sheet can be secured with thread so that it does not fall apart later.

Note!

To make the flower voluminous, you should twist at least six or seven in this way. maple leaves, each of which is secured with a thread. To create a bouquet you need several of these flowers.
Vase
To make this craft you will need:
- PVA glue;
- Leaves of different colors;
- Ordinary balloon IR.

You need to inflate the balloon to the desired size of the vase. Take glue diluted half and half with water. Lubricate one half of the ball with adhesive solution.

Each sheet must be properly glued and lubricated with another layer of solution on top so that the upper layers of the sheets adhere just as well. When you're stuck top layer, then it should also be lubricated with glue.

After this, remove the ball for several days until it hardens completely. When our fake is completely dry, you will need to burst the balloon. A vase of leaves is suitable for use. Making such work is not difficult, but it is very interesting, so it is good to do it with children.
Photos of crafts made from leaves

Note!


DIY autumn crafts for kindergarten
Application of autumn leaves “Autumn Lion Cub”
Nikita Sharshavenkov, student of kindergarten No. 11 “Fairy Tale”, first junior group.Age: 2 years 5 months
Supervisor: Belashova Tatyana Anatolyevna, teacher at MDAOU general developmental kindergarten No. 11, Korenovsky district
Purpose: This master class will be useful for educators who work with children of early preschool age.
Target: development of artistic and creative abilities in children, fosters patience, perseverance and imagination in children. Learn to look at autumn leaves different shapes and compare with familiar objects or their parts, show analogies with construction from leaves.
Tasks: Arouse interest in creating an image of a lion cub from leaves in collaboration with a teacher. Introduce the child to a new type of creativity for him - applique from dry leaves. Learn to make a composition from leaves and a finished lion's face from cardboard: select them at the request of the teacher and place them on a sheet of paper. Develop a sense of form and composition. Foster independence and accuracy in work.
Description: Do beautiful crafts from autumn leaves all children love, so we start with junior group After all, this natural material is available to everyone, all you have to do is take a walk on a sunny autumn day along the alleys of a park, square, or just down the street with your parents and pick up beautiful leaves. The first children's crafts made from birch leaves are, of course, appliqués. Their children master crafts with great pleasure; it is not difficult to do if there is a teacher nearby.
Lion cub today
A bit tired,
Lay down next to mom
And I dozed off a little.
Closed with his paw
Eyes from the sun,
But something tickles
His mustache.
He opened his eyes slightly,
Who's going there?
The butterfly is trampling
Doesn't let me sleep
It will sit on your ear,
It will sit on its tail,
It will sit on its paw,
And then it flies up.
Lion cub offender
Wants to catch.
If only for a while
Become a butterfly.
Sat on my nose
And she’s not ashamed
Apparently he doesn't know
That he is the king of beasts.
Nikita presents to your attention his autumn craft"Autumn Lion Cub"
Necessary materials:
1.Cardboard brown, white and green colors
2.Scissors (for the teacher)
3.PVA glue
4.A rag napkin (you can use regular cotton pads)
5.Marker and eyes for a leopard
6. Autumn leaves (from any tree, preferably from birch)
Step-by-step work process
The teacher places several beautiful autumn leaves in front of the child.

Since the child is small, you can play with the leaves, lay out the lion as it should be, the child should see it.
And so the teacher prepares a template of a lion’s muzzle, I imagine two types, large and small

Now we have chosen the color of the face and transfer the template to cardboard, trace it with a pencil and cut it out with scissors, this is the work of the teacher


Now the teacher carefully draws the contours, the face is almost ready

And now the time comes when the child will work, we choose a green background and in order to make it easier for the child to glue the leaves, the teacher draws ovals like this

Now we will glue the mane, you can grease each leaf with glue separately, but this will take a very long time, small child I don’t have the perseverance yet, so we apply glue and smear it for the first row of leaves

And carefully begin to apply the leaves one by one

F-5834
Remind your child to press well with a napkin.
Now we will glue the second row, let me get ahead of ourselves, we do not specifically lubricate the leaves with glue, the tips of the leaves just lie, when the work dries, the leaves that are glued to them will rise a little, this will be the effect of a fluffy mane.
Glue the second row


In our work we used different leaves, colors and sizes.
We continue to make a gorgeous mane


And now the mane is ready, now we need to glue the face, for this we take PVA glue, eyes and get started

The child smears the back side with a brush

And glue it in the middle

Let's take a closer look at our leftist


It all depends on your imagination - what kind of lion you get


You can also make a “Clown” applique from beautiful autumn leaves.


Collecting beautiful leaves on a fine autumn day is a most exciting activity. And when you return home, you want to somehow preserve this splendor or use it to create something beautiful - the material simply begs for it! The most interesting thing is to make it from colorful autumn leaves. various compositions and applications. This type of creativity develops the child’s fantasy and imagination. In it, images can be created from ready-made forms, just placing them on top of each other, and not cutting them out of paper. And the color palette of leaf fall will put any largest set of colored paper to shame!
YOU WILL NEED:
Colorful autumn leaves
Multi-colored cardboard or velvet paper
PVA glue (you can use starch glue or rubber glue)
Brush
Scissors
Tweezers
Oilcloth
DRYING AUTUMN LEAVES
Applications can be made from either freshly picked or dried leaves. If you want to preserve the leaves, two drying methods can be recommended.
The first, well-known, method is to insert leaves between the pages of an old unnecessary book. It is better to lay each leaf on both sides with a paper napkin.
The second method is express drying of the leaves using an iron. Just remember that the leaves are not sterile, so it is better to iron them on a surface that you don’t mind throwing away later, for example, on large sheets of paper. You also need to place a sheet of newsprint or a paper napkin on top of the sheet before ironing.

AUTUMN LEAVE APPLICATION TECHNIQUE
Before you start work, cover the table with oilcloth so as not to stain it with glue. Prepare the base - a sheet of cardboard, collected leaves, scissors, glue, tweezers.
First you need to come up with a future picture. Then arrange it on a separate sheet of paper. And only then start gluing the individual leaf parts to the base. It is best to apply the glue in droplets along the edges. If you apply glue to the entire surface of the sheet, it will warp when the application dries.
The finished picture should be placed under a press for one or two days.
Don't forget to frame it!
4.
TYPES OF APPLICATIONS
Overlay applique. Try to start by coming up with pictures that do not require cutting out any details from the leaves, but are created by overlaying the leaves. You can come up with a lot of such pictures: butterflies, mushrooms, chickens and other birds... The missing elements can be drawn in with a felt-tip pen or made from other natural materials.
Having mastered simple pictures, children can begin to come up with multi-tiered images. In this technique, leaves are glued on top of each other in layers. The application will turn out bright and cheerful if the leaves are different in color.
5.
6.
Silhouette applique.
In this type of appliqué, excess parts of the leaf are cut off so that the result is exactly what the little artist intended.
7.
8.
9.
10.
11.
12.
Modular application (mosaic).
Using this technique, a picture is created by gluing many leaves of the same or similar shape and size (or, for example, maple seeds). This way you can make the scales of a fish, the tail of a cockerel or a firebird.
13.
Symmetrical applique.
It is used to create individual images or entire paintings with a symmetrical structure, as well as to obtain two completely identical images (for example, reflection in water). To do this, you need to select similar leaves to get an image with its “reflection” or symmetrical in itself (“Butterfly”, “Dragonfly”, “Landscape with a lake”, “Boat on the river”).
14.
15.
Ribbon applique- a type of symmetrical applique.
Its difference is that it allows you to get not one or two, but many identical images - ornaments. You get a whole “round dance” of trees, flowers, mushrooms, butterflies, etc.
Finally - small selection pictures collected from different parts of the Internet - to awaken the first associations for you and your baby. One has only to show the child how this is done, and his imagination will allow him to create more and more pictures from this amazingly beautiful natural material - autumn leaves!
16.
17.
18.
19.
20.
21.
22.
23.
24.
25.
26.
27.
28.
29.
30.
31.
32.
33.
34.
35.
36.
37.

Source: http://allforchildren.ru/article/autumn01.php

And these work samples are taken from
1.
2.
3.
4.
5.
6.
7.
8.
9.
10.
11.
12.
13.
14.
15.
16.
17.
18.
19.
20.
21.
22.
23.
24.
25.
26.
27.
28.

 My daughter Katya, wearing this wreath, became the “Queen of Autumn” in 2007!
In my deep conviction, our education, starting from Soviet times, has been built on the following principle:
“If you didn’t complete the teacher’s assignment as a child, you will still do it when you help your child” :-).
So, dear mothers, since we met on this page, it means your child has been given the task of bringing an autumn craft. Did you guess right?
I have no doubt that you will now breathe a sigh of relief! I've collected a bunch of ideas, and your fall leaf craft will definitely delight your teacher! 🙂
In order not to confuse the entire experience of mankind in this matter, I tried to combine collages and applications that were similar in meaning.
Let's begin!
Portrait of autumn leaves

 I didn't find many examples of people using natural materials, but there are enough for inspiration. The face can be glued together from several fragments and an oval of the desired shape can be cut out.
For a hairstyle or a hat, we choose coarser plants. You can use spikelets or stems of dried herbs.

Here are some more very cute characters with “mood.” Mommies. Don't try to find the right shape of leaves. To make the head, simply cut a circle or oval from any sheet of paper. If you don't have dried narrow blades of grass for your hair, cut a large leaf into thin strips.
I also found babies for them, though not from leaves, but from acorns. To quickly make them you will need a glue gun and permanent marker. The scarf can be made from scraps of felt or any other bright fabric. Incomparable kids!

Birds-butterflies-animals
This is the most common type of autumn creativity. We make cute animals and insects from dry leaves of different colors and shapes. The hardest part to find is leaves in contrasting colors, as almost everything turns yellowish-brown once they dry out.
To have a choice, dry not only autumn ones, but also green leaves too, then the color palette will be much wider and you will definitely get something from this. By the way, dry rose petals look great on a peacock's tail, take note:


Here are simple and expressive birds. By the way, leaves with small flaws look quite harmonious; there are always many unexpected spots in the plumage of birds. a couple of lines with a pen, and the beak becomes like a beak. Chickens are made in a minute, you can make a whole brood.

Impossibly handsome... He bit off an apple :-). This collage is made using colored cardboard pieces. My version of the hedgehog is on the right in the frame. We also sprinkled semolina porridge on PVA glue here and there. I hope the teacher likes it...

Here's another option for those who can draw these simple drawings. Draw the lion's head and fish large - on the entire landscape sheet. Cardboard is preferable. The rest is clear from the illustration!

Information for educators and teachers! , there is a lot of useful and accessible stuff there!
 More from ash seeds...
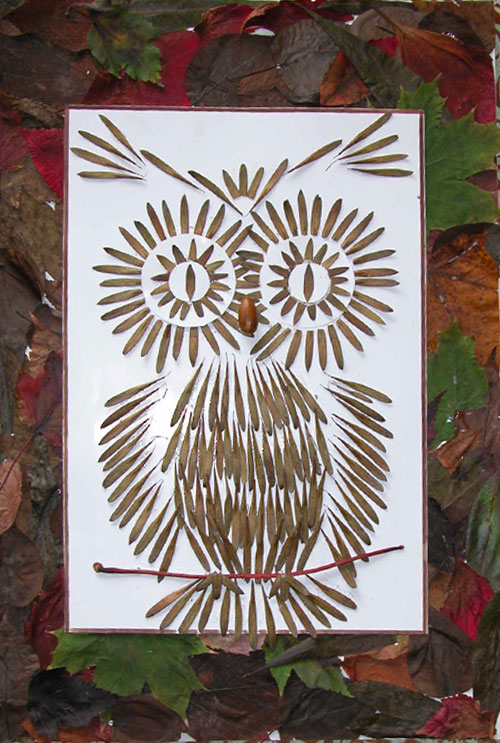
Here's our latest craft. This is a beautiful owl in a frame of autumn leaves. Leaves were glued onto a sheet of A3 cardboard around the perimeter with an overlap using PVA. They didn’t try very hard, because then the excess was cut off along the edge, and another sheet was glued to the inside with an owl applique made from ash seeds, so there’s no need to try too hard along the line. Our beak is made from half an acorn. I think it's good...
From these seeds you can come up with a lot of interesting things (application) - roofs of houses, a field of dry grass, animal skin or bird feathers. The work is long and painstaking, but if you did not have time to collect and dry the leaves, there is a way out. They tore it from the tree and immediately glued it on.
Here are some more examples for inspiration.

A mosaic of dried leaves and flowers can be used to complement the design. This looks very nice:


Dry leaf hairstyle
In these pictures of their leaves, lips, eyes and even eyelashes are cut out, but the face can simply be drawn, without laying out thin twigs, but we make a mop of hair not just from individual leaves, but from whole twigs with dry leaves. The fact that they are dried not in one plane, but three-dimensionally, gives our work special charm. Well, what a beauty... I found it on my favorite social networks and decided to post it here so that the idea wouldn’t get lost.

Cutting figures from fallen leaves
I highlighted these collages separately because autumn leaves are used a little differently - they are just material for cutting out simple shapes and letters. This needs to be done BEFORE the sheet dries, otherwise it will crumble . First we cut it out, then dry it in the usual way. old book or between sheets of newspaper. This way you can cut out entire words and phrases.
To ensure that the letters are neat, print them on a printer of the desired size.
Now we put copy paper on the autumn sheet, with your printout on top. We outline so that the drawing remains on the yellow sheet. All that's left to do is cut!
This way you can make not only letters of the alphabet, but also simple silhouettes (animals, houses, clouds).


Interesting examples of paintings from autumn leaves:
Thuja twigs are used here, and the desired shape for the applique is cut out of dry leaves. For the house you will need thin dry twigs, but you can also assemble them from matches.


You can get an idea from this picture. The woman's profile is simply drawn, but the leaves in her hair could be not paper ones, but real ones ! Is it difficult to find them in different sizes and shapes to make such a beauty?
Here are some cute owls. A silhouette is cut out of paper, then we glue the leaves, as shown in the figure, and at the end of the work, we trim all the protruding excess along the contour of the cardboard blank. We make the eyes from paper of a contrasting color. 
Multicolored collages
Autumn leaves are so beautiful on their own that they look great framed and without any plot. Look how beautiful it is! The first layer is dark leaves, then put the contrasting and most beautiful ones, so you will feel the volume. Everything is framed.
I also liked the idea: we put a sheet of thick cardboard on a collage of leaves, in which stationery knife a letter or simple figure is cut out.


Another unusual technique, which for some reason is called "iris folding"
, I discovered on the “Country of Masters” website. Detailed master class right here: http://stranamasterov.ru/node/99098


Photo frame
For the autumn exhibition, you can make frames for photographs and for the design of essays and poems on the theme of autumn. Here are the options I found. In my opinion, it is very simple and effective. 

Interior decoration
Crafts made from autumn leaves can be very romantic.
To get such a tree, you need to dry the leaves in advance, and then reattach them to a beautiful branch with transparent adhesive tape.


We work with a hammer...
Unusual technique. I saw it on an American website, translation and . The idea is that fallen leaves are placed between watercolor paper and a napkin and carefully tapped over the entire surface with a hammer so that the coloring pigment remains on the paper.

Roses from autumn leaves - master class
Olga Borodacheva
: Autumn A great time for walks with children, you can observe the beauty of trees, bushes, and grasses. Walking for a walk, my children and I collected a lot autumn leaves with different trees : Birch, poplar, ash, rowan, oak, bird cherry, acacia, cotoneaster. In the group we looked at leaves, it turned out that everything leaves different in shape and color. We decorated the herbarium and played the game which tree is from leaf and then everything leaves put them in old books and dried them so that in winter they could work miracles from leaves, turning them into animals, birds, fish and more.
At one of the individual lessons, Veronica, Masha and I did something like this: "Red lion cub» ,
We offer to do it with us, I think that such work will be interesting for parents and educators preschool institutions, and can also serve autumn decoration in the interior of a group or reception room in a kindergarten.
One day I decided
Make a lion cub
hairstyle,
But I didn't find it
Curlers and comb.
Looking in the mirror
Lion cub sadly:
Well, to what extent?
Shaggy mane! (Yu. Polyakov)
Materials: Colored cardboard, red, brown plasticine, white, 2 pistachio peels, 2 watermelon seeds, glue, birch leaves, cotoneaster, black felt-tip pen, glue, scissors.
1Cut out the base for the body from yellow and orange cardboard lion cub and legs.
2) Using a compass, cut out a circle - this is the head of our hero, take white plasticine, roll two small balls, and glue them onto the cardboard base, glue two watermelon seeds on top, the eyes are ready!
3 Take red plasticine, roll a ball and glue it to the middle of the head, glue pistachio peels parallel to each other on top, then roll an oval from brown plasticine and glue it on top - this is the nose lion cub, black Use a felt-tip pen to draw a mustache.
4 Let's take birch leaves and lay them out in a circle, glue them on top leaves cotoneaster bush, and glue the muzzle lion cub.
5 Glue the body, legs, tail, decorate them cotoneaster leaves!
6 Our « Red lion cub» ready!
With Veronica and Masha we learned this poem, and our lion cub We donated creative works to the exhibition!
Publications on the topic:
To decorate the group, I suggest making such a wreath. Looks great in the interior. It can also be used to decorate musical.
Master Class " Autumn bouquet"Autumn is a beautiful time. It gives inspiration. My children and I collected a bouquet of autumn leaves and flowers.
Hello friends and colleagues! Continuing the corn theme, today I want to offer you a master class on flowering cacti. In my "russling" one.
This year, 2015, autumn came to us quite early; already at the beginning of August, I noticed, while walking through the forest and picking mushrooms, that the trees began to change.
Hello mother - autumn! How nice it is that you gift us with your gold. How many things can you do at this beautiful time of year?
Master class on making an applique from autumn leaves "Peacock" Autumn has come - the most wonderful time of the year and, unfortunately, the most...


