AFGHAN BRAID
This type of weaving is widespread in the East. This is how waist belts, horse harnesses, bag handles, etc. are woven. Having learned how to weave such a bracelet, you will at the same time learn a simple and durable way to connect leather strips without using metal fittings. 
1. Cut two strips of leather 5mm wide and 160mm long.
2. Using a blunt awl, mark the edges of the slots according to the dimensions given here or change them as desired.
RULE: a) the distance between the slots is equal to half the width of the strip;
b) the number of slots on the strips differs by one (for us it is six and seven).
3. Make the slits with a chisel with a blade width of 6 mm.
4. Sharpen the ends of the strips with a chisel or knife.
5. Take in left hand a strip with seven slits with the end free from the slits towards you. Use a smoothing iron or a screwdriver to widen the nearest slot. Pass the short end of the six-slit strip down through this widened slit and lightly pull and straighten the weave.
6. Sand the short end of the strip with six slots and glue the strips with seven slots to the bakhtarma.
7. Using an ironing pin, widen the nearest slot on the six-slit strip and pass the seven-slot strip through this slot from the bottom up.
8. The principle of weaving is clear. Pass the bottom strip through the top strip each time.
9. Upon completion of weaving, sand the short end of the strip with seven slots and glue strips with six slots to the bakhtarma.
10. The choice of bracelet length is yours. Trim the excess from the ends of the strips. Punch holes. Install the bartack.
SINGLE PUZZLE
This and the next bracelet represent the embodiment in leather logical problems about braids. We refer lovers of such problems to books on entertaining mathematics.
1. Trim exactly one edge of the cooked skin.
2. Mark the ends of the slots, and then cut them with a knife. The length of the slots is 160 mm, the width of the cords is 3-4 mm.
3. Now trim the second edge of the bracelet.
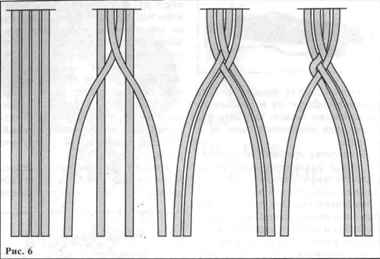
4. Weaving. Mentally mark the top and bottom of the weave and number the cords from left to right: 1,2,3.
First cycle: - 3rd between 1st and 2nd;
- the bottom of the weave between the 1st and 2nd (turning out the cords should not bother you);
- 2nd on 1st, 3rd on 2nd;
- the bottom of the weave between the 3rd and 2nd. After the end of the cycle, the normal arrangement of the cords is restored.
Second cycle: This cycle can be repeated 2-3 times until the weaving is completed.
- 1st to 3rd;
- the bottom of the weave between the 1st and 2nd;
- 2nd on 1st, 3rd on 2nd;
- the bottom of the weave between the 2nd and 3rd.
Stop when weaving becomes impossible due to the tight arrangement of the elements.
5. Using a blunt awl or ironing iron and tweezers, distribute the weave evenly over the bracelet. Trim the edges with a semicircular chisel, punch holes for the fastening, and install the fastening.
DOUBLE PUZZLE
A variant of the puzzle in which six strips of weaving are used instead of three. In this case, each pair of stripes is taken as one strip, and weaving is performed in the same way as in the case of a single puzzle. Options with nine stripes are possible, with three stripes being taken as one.
GIRL'S BRAID

1. Cut three cords 220-250 mm long and 3 mm wide.
2. Gather the side surfaces of the cords with glue into one strip. The length of such an assembled strip is 25 mm. The opposite end of the cords should be free. Insert the assembled end into a clothespin or clamp. 

3. Mentally number the cords from left to right: 1,2,3.
Weaving pattern: 3rd on 2nd, 1st on 3rd, 2nd on 1st, 3rd on 2nd, etc.
Make sure the cords are evenly spaced in the braid.
4. When the length of the braided part reaches 140 mm, clamp the edge of the braided part with a large clothespin or clamp so that the unbraided ends of the cords remain free. Gather the unbraided ends into a single strip with glue.
5. Chop the edges of the bracelet with a chisel so that the length of the unbraided ends is 10 mm.
6. Make two pieces to decorate the ends of the bracelet. Details are shown in the picture.
7. Sand the unbraided ends of the bracelet from the mesh side.
8. Connect the ends of the bracelet with the details of the ends using “Moment” glue, gluing the decorated parts to the ends of the bracelet.
9. Make and install the bartack.
FOUR CORDS BRAID

1. Cut four cords 220-250 mm long and 4 mm wide.
2. Gather the side surfaces of the ends of the cords with glue into one strip. The length of such a strip is 25 mm. The opposite end of the cords should be free. Clamp the assembled end with a clothespin.
3. Mentally number the cords from left to right from 1st to 4th.
Weaving pattern: 5th on the 2nd, 1st on the 3rd, 4th under the 2nd and on the 1st.
Next, the weaving pattern is as follows: the leftmost “ON” and the rightmost “UNDER and ON”.
4. Repeat steps. 4-9 “Maiden braid”. The details of the design of the ends of the bracelet are similar to those given above. Change the width of the gluing area according to the width of the cords.
CIRCULAR BRAID

To make it you will need in addition thin skin a rope around which cords are braided.
1. Cut four cords 250 mm long and prepare a rope of the same length with a diameter of 3 to 5 mm.
2. Glue the ends of the cords to the end of the rope in a circle. The length of the glued section is approximately 15-20 mm. Additionally, secure the place where the cords are glued together by tightly wrapping them with thread.
3. Divide the cords into two pairs - left and right. Mentally number the cords from left to right from 1st to 4th, take the left cords in your left hand, and the right cords in your right.
4. Weave according to the pattern: pass the 1st cord behind the rope and pass it between the 3rd and 4th, lay it on the 3rd, draw the 4th cord behind the rope and pass it between the rope and the 2nd, lay it on the 1st. Next we weave like this:
the leftmost cord goes under the rightmost cord, the rightmost cord goes under the leftmost cord.
5. When the length of the braided part reaches 130-140 mm, the end of the braid should be secured. To do this, wrap the end of the weave with thread. Glue the loose ends to the rope.
6. Trim the unbraided sections. Their length should be 10 mm.
7. Make two end trim pieces.
8. Lubricate the unbraided ends with Moment glue and leave to dry. Now lubricate the details of the ends with glue on the bakhtarma side.
9. Roll the tubes of design details around the unwoven ends of the bracelet so that the threads are completely covered. Flatten the ends of these tubes by lightly tapping them with a shoe hammer. It is possible that the gluing area on the tube itself will have to be additionally glued.
10. Punch holes for the bartack and install it.
HARLEQUIN
This is a variant of a circular braid, which is woven with two pairs of cords, one of them light, the other dark. Place a pair of dark cords on the left and a pair of light cords on the right and follow all the instructions for weaving the previous bracelet. 

The article uses materials from the book by Ilya Mitsel “Skin. Braided and embossed bracelets."
Do-it-yourself leather weaving as a separate art form dates back to ancient times. It amazes with its sophistication and beauty. Don’t think that weaving from leather is difficult. There are a lot different ways leather weaving, master classes are held on it, and there are also many different patterns by which you can weave a leather bracelet with your own hands. However, the most popular are the girl's braid, the circular braid and the single puzzle. Each of them is interesting in its own way.
Can be done like this female version, and male. In order to start weaving a bracelet with such a mysterious name, you will need strips of leather approximately 4 cm wide. Before preparing the material for processing, you need to think about the length of the bracelet and add another one and a half times the length.
 As you craft, the strip will become smaller (shrink), so a little more leather won't hurt. The best length is a quarter of a meter. To trim you need to use sharp knife, razor or scissors.
You need to make a couple of parallel cuts along the length of the strip, however, you should not cut it all the way. You can’t touch it; there should be three centimeters from the edge to the cut. The ribbon will turn into three identical parts - laces. For further work, you should number from left to right: 1, 2, 3. You need to be sure that they end on the same line.
First of all should be prepared workplace . It should be perfectly smooth. As a last resort, you can put a plastic or wooden board on the table. To process leather strips, it is allowed to use a construction knife with a replaceable blade, tailor's scissors or stationery knives.
 Before you start weaving, you need to secure one end of the strip. To do this, you can take a clamp, press the strip with something heavy, or even nail it with a hammer and nail. Now we can begin. It is necessary to pull the bottom of the strip in your direction, and then thread it to the bottom of the future decoration between the second and third stripes and return it to its original state.
For a more comfortable process, it is better to twist the three laces (make bundles), this will be much easier. To make sure that the weaving goes in the right direction, you should pay attention to the middle of the bracelet.
In the middle of a correctly executed decoration there is a knot. However, the resulting braid should not be too tight.
- The first lace is placed under the third.
- Thread the third lace through the first.
- Thread the second lace through the third. There should be a distance between them at the bottom of the bracelet.
- Again you need to pull the solid end of the leather strip in your direction and thread it between the second and third laces. Pull down.
The first stage ends with this loop. In total these stages can be from 4 to 6.
Circular Braid
The braid looks like a braid of 4 cords. First you need to cut four laces from a strip of leather. As in the previous technique, when braiding the laces, the leather also shrinks, so it is recommended to make the blanks for the laces long. The laces should not be too wide, since the braid is already quite large, and with wide blanks it will become even larger.
 Before the weaving procedure, you need to tie the ends of the threads into one knot. In order to make the work as convenient as possible, the workpiece should be attached to the work surface. It could be tape, tape, or something heavy. However, one of the more comfortable ways the ring will be fixed to the ends tied with thread; this allows you to conveniently fix the structure on the leg of a table or chair.
You can try to braid the most ordinary rope or tie woolen threads to all the laces involved in the work:
- Bring the fourth lace to the left through (from above) the second and third laces.
- Now from left to right the laces should be arranged like this: first, fourth, second, third.
- The second passes through the fourth in the same direction. Lace placement: first, second, fourth, third.
- The first goes through the second and fourth. Position: second, fourth, first, third.

The same manipulations must be done with the fourth and first laces: second, first, fourth, third. If everything went well at the initial stage, then the fourth and first cords should be located in the middle. The second is the last one on the left, the third cord is the last one.

The whole process must be repeated until the desired size is achieved. After finishing the weaving, all ends must be tied and secured with a special ring; it is great for making jewelry.
Maiden braid
This technique differs from others in its sophistication and simplicity. To make such a leather bracelet with your own hands, you need to cut three laces of equal width from a strip of leather. One end of the strip must be left intact (at the other end of the strip the laces will hang freely) or the entire strip must be cut into three equal parts.
 It is worth remembering the properties of the leather (it shrinks during the weaving process) before the workpiece itself. For a large bracelet, the thickness of one cord will be quite large. If you want to weave a necklace, the laces for it should be long. If the braid consists of completely cut strips, then at one end they need to be connected into a knot with a tail of approximately 2.5 cm, and attached with tape or tape to the workplace.
The ends of the strips must be the same length. They should be spaced evenly. Start of the process: insert the first strip through the second. They must change; the first one takes the place of the second one.

Varieties of unusual products

The most important thing is to constantly develop in this craft. Some people don't stop at decorations and decorations.
They are interested in how to make a whip, a whip or a crop with their own hands. This requires other techniques that also need to be learned.
.
We offer interesting master classes on creating unique bracelets from simple to more complex ones. It is not difficult to learn this craft.
Prepare a piece of leather belt that looks presentable (without scuffs or protruding threads). Before cutting off a segment, measure the width of your wrist, be sure to leave a small margin so that you can sew on a clasp.

Select several suitable beads to decorate your jewelry. It is better that the beads are flat, then the jewelry will be more comfortable to wear.

Carefully begin sewing decorative elements to the leather belt using a needle and thread of a suitable color.

Fill the entire space of the bracelet symmetrically with beads.

Buttons are used as clasps in factory leather bracelets. If there is no special riveter, then prepare regular sewing accessories. The wider the decoration, the more buttons it is better to use.

Using strong shoe thread, carefully sew the button elements to the ends of the bracelet.

This method will allow you to get an invisible fastener. But a button or clasp from old jewelry is also suitable as a fastener.

As you can see, you can make a leather bracelet with your own hands in a few minutes and at minimal cost.


A thick old leather belt can be easily and happily turned into a stylish bracelet. This is a pleasant activity that will captivate you and allow you to realize yourself in needlework. We don't need any special tools. This handmade idea does not require any financial costs. You can cut skin stationery knife. We will sew on the beads with an ordinary strong needle. There will definitely be beads in stock. You can buy colored lace. It's quite inexpensive. We choose the color of the lace depending on own preferences. The bracelet bracelet is made like this:
Cut the blank from the belt. It should be of medium thickness so that you can braid it later. We cut this workpiece not completely into three thin strips of equal width.

We make a hole in the part where we will have a buttonhole.

Cut two pieces of colored thin lace. Their length should be longer than the leather blank, since we will be forming a buttonhole from the lace.
We thread both pieces of lace through the hole.

We tie a knot so that we get a loop into which our beautiful metal button will pass with medium effort. We secure this loop with thread.

We braid a braid from five parts (three leather and two parts from a lace).

We wrap a colored cord around the end of the bracelet. We tie it in a knot.

We sew the button so that the length of the bracelet suits us. To do this, mark the location where the button is attached when trying it on your own wrist.
Use a blade to cut off the excess ends of the braid. We tie two wooden beads to the ends of the lace.

We sew beads, all kinds of metal decorative elements, beads with invisible stitches.


We enjoy wearing a stylish bracelet that we made with our own hands. An old belt turned into a real designer piece of jewelry.


Other options for alterations and the use of old things can be found in.
Master class on making a bright leather bracelet
A stylish leather bracelet is an essential attribute fashionable look. The variety of these accessories today is enormous. And despite this, it is still quite difficult to choose what will suit us in a particular situation. Therefore, we suggest making a stylish decoration yourself. A bracelet will be made that will complement an airy dress with leopard print, or any other “leopard” item. The whole secret lies in the stone that we will use. This is a moss opal that resembles the color of a leopard. To highlight the stone, we will use bright red leather. We will place a metal base inside the bracelet.

Materials for making jewelry:
— genuine leather of bright red color;
— moss opal 2.5x1.7 cm;
— metal base 18x2 cm;
— cord (5 cm);
- instant glue;
- scissors;
- ruler.

Lay it out in front of you genuine leather. We place a metal base on top of it. Using a ruler, measure the dimensions of the future decoration. We mark the center where we will attach the stone, and the edges.

We attach moss opal to the center of the workpiece. Generously coat its flat side with glue and apply it to the skin. We wait until the glue dries completely.

Glue a metal base to the wrong side of the leather. In this case, we lubricate only the central part (under the stone) of the base with glue, leaving the edges unfixed for now.

We take a small piece of cord.

Lubricate it with glue and wrap it around the stone from the wrong side of the leather.
We stretch the skin over the cord so that we get a convex frame of the stone.

Lubricate the metal base with glue. Apply the skin on one side first. Make a light wave on the surface of the skin. To do this, gently tighten the skin with your fingers in the center and smooth out the rest of the skin.

We do the same on the other side.

Trim off excess skin. We leave a little margin for the inside of the decoration, literally 1.1 cm.

Lubricate the back side of the metal base with glue. Carefully glue one of the edges of the leather, tucking it inward.

Glue the second edge of the skin. We make sure that the edges lie as evenly as possible and that there is no gap left at the junction.


We also fold the skin at the junction of the two ends of the bracelet and hide it inside.


Remove traces of glue from the surface of the leather. Carefully bend the metal base.

The bright leather bracelet is ready!

Bracelets are one of the most popular types of jewelry. Therefore, many fashionistas and fashionistas want to know how to make a leather bracelet. To please yourself or a friend stylish decoration First of all, you should find suitable schemes.
These diagrams clearly show what the finished product will look like:

They also answer the question of how weaving occurs:


How to make a leather bracelet for men
Men's bracelets are most often woven from leather. They look elegant, courageous and even a little brutal. The decoration you weave will become the best gift for a loved one. And to make your work easy and enjoyable, below is suggested step-by-step master class for leather goods.
You will need:
1) A small piece of leather;

2) A set of buttons;

3) Set for inserting buttons:

4) Hammer and knife.

Sequencing:
1) Prepare a piece of leather, cut it to the desired shape according to the length of the wrist.

2) We secure with a pin the place where we want to make a button.

3) Remove the bracelet and lay it out.

4) Lay out the buttons and attachments on them.

5) In total, you will need four types of buttons with attachments.


6) We make punctures on the skin in the places where the pins were. You can use a gypsy needle.

7) Expand the hole. We insert the rod and hit it with a hammer.


8) You should get a hole like this.

9) We make the same hole on the other side.

10) We put the nozzles on the plastic plate.

11) Insert the button.


12) Insert the bottom part of the button. It requires other tools.

13) We put the attachments on the plate.

14) Insert the button like this.


15) It should turn out like this.


The bracelet is ready.

You can decorate the product with another button.


How to make a leather bracelet for women
Looks very original leather bracelets in the hands of women. They go well with jeans and sportswear. Women's jewelry is more elegant and sophisticated than that of men. They are usually thinner and more difficult to manufacture. Today we invite you to get acquainted with the weaving of a very simple and original women's leather bracelet.
You will need:
1) Thin belt.
2) Chain.
3) Scissors.
4) Hole puncher.

Sequencing:
1) Cut out two rectangles from the belt.

2) Cut out arrows from leather, using a template.

3) Make two holes in the arrow and stretch a chain through them.

4) Wrap the chain around your wrist and cut off the excess.

History of leather jewelry: myths and truth
Leather jewelry is easy to make and very durable. Your young man will be able to wear them for many years. And every time he puts on a bracelet, he will think about you.
Bracelets, both men's and women's, have a long history of existence. Even a thousand years ago, in the north of Russia, wrist jewelry was made from birch bark. And in distant southern states they made similar products from bird feathers.
Leather bracelets are not as deep and ancient history. However, their story can get a little scary if you consider one thing. Now in some countries of Africa, Australia and the distant lost islands of the Pacific Ocean, aborigines living in wild primitive tribes wear very strange bracelets.
These wrist ornaments are made from tanned animal skins, as well as the dried skin of enemies. It is a symbol of strength, power and victory.
Men's leather jewelry has a rich history; they trail behind them a trail of mystery, bloody battles and fierce battles. Therefore, women consider them very beautiful and sexy.
Women rarely wear this kind of accessories. They are preferred mainly by ladies who dress in sporty style. These beauties look very good in sports jackets, jeans and sneakers. And leather jewelry suits them surprisingly.
A selection of videos on the topic
Leather bracelets are a fairly universal accessory that has not gone out of fashion for many seasons and does not lose its popularity. It has countless varieties and shapes: flat and voluminous, wicker, with various accessories, with spikes. Leather bracelets symbolize the spirit of freedom and the rejection of all rules, because they are made with your own hands.
We sew leather bracelets with our own hands step by step in the master class
Experienced craftsmen and craftswomen know that when creating bracelets it is very important to choose the right leather material. For each of the patterns for weaving bracelets with your own hands, you need to select the appropriate type of leather material.
So, to create thick, large leather bracelets, it would be correct to give preference to a rough type of leather: saddle or crust. To create men's bracelets, saddle leather is most often used.

For the manufacture of thin, elegant woven leather accessories for women, leatherette is most suitable. This material is softer in texture and is easy to process with needles and hole punches.
Since elegant leather bracelets have become very popular, we offer several detailed descriptions manufacturing processes of this accessory.

Let's try to create a leather bracelet decorated with beads. To begin, prepare all the materials necessary for work:
- Several pieces of leather cord that will have a length equal to the circumference of your wrist and plus a small margin for forming knots;
- Clip or clothespin;
- Beads for decoration;
- Clasp for your bracelet.
Take your cut laces and secure one side with a clothespin or clamp. Now start stringing decorative beads onto one of the threads. Don't forget to secure them on both sides with knots. Repeat the above steps with all of your laces.
After you complete these manipulations, secure the free ends of the leather threads using the bracelet clasp. Your leather bracelet is now ready to use.
We create leather bracelets for men quickly and easily: the manufacturing process
Men's leather bracelets are distinguished by their simplicity and laconicism compared to women's ones.

We invite you to learn how to weave a simple men's leather bracelet. To work, you will need a piece of leather five centimeters wide and about twenty centimeters long.
Start making the bracelet:
- Create a pattern for the product back side skin. The length of the bracelet must be at least nineteen centimeters. Make two slits in the middle, not reaching the edges by 1.5-2 centimeters.
- Place the workpiece vertically and, using a washable pencil, number the cords from one to three. Bring the bottom edge of the bracelet between the second and third cords.
- Straighten leather laces as your weaving progresses. Continue weaving in the following order: the first cord with the second, the third with the first, the second with the third.
- Bring the bottom of the workpiece forward between the third and second laces.
- Place the cords again so that the lines go down to the bottom of the weave. in the right order- first, second, third cord.
- Repeat steps two through four. You should end up with a braided look. Give the desired shape to the edges of the bracelet and use an awl to make holes.
- To make the fastener, glue several pieces of leather together and leave to dry for a day. After drying, round the edges, make a hole in the middle and smooth out any rough edges with sandpaper.
- Thread a thin leather cord through the holes in the bracelet. Pull both of its edges through the resulting leather nut. Tie the edges of the lace with knots.

This accessory will be a wonderful gift for your man and will be a pleasant and bright addition to his image.
Children love to imitate adults by decorating themselves and wearing their parents' clothes. You can please a little fashionista or fashionista and weave them leather bracelets with your own hands that will attract the child bright design. Such bracelets can compete in popularity even with the famous bracelets made of rubber bands.
For children's bracelets, it is best to use leather laces in bright and rich colors. Kids will be happy to wear such fun accessories to school and kindergarten.
Video on the topic of the article
At the end of our article about making leather bracelets for women, men and children, we offer you a selection of thematic videos. We hope that it will help you explore the topic we have described in even more depth. Enjoy watching!