Today we will make with our own hands the main character of the New Year - Santa Claus. We have collected for you best ideas and master classes. All materials are elementary, and the diagrams are simple and understandable - even children can handle it. Get inspired and get to work!
With ready-made toys you can decorate a Christmas tree or table, place them under Christmas tree or hang it on the window. In addition, a homemade Santa Claus is one of the best additions to a gift.
We invite you to try making this fairy-tale character from felt, paper and a bottle.
Santa Claus made of felt
Felt toys are always very popular. First of all, this material is very beautiful. Secondly, it is convenient to use. Thirdly, standard felt crafts are always sewn according to patterns, and therefore making even the most unusual souvenir is not so difficult.

Our Santa Claus is also very easy to sew. A little effort - and you will get a wonderful New Year's souvenir that will perfectly complete the gift for loved one or decorate the Christmas tree.
What do we need?
- pieces of red (or blue), white, nude and green felt
- red and white sewing threads
- some cotton wool for stuffing
- beads and any other decor
First you need to make a pattern. Take a look at what the details look like. You can draw them or print the drawing and simply cut out all the parts of the future Santa Claus from paper.

Transfer the template to felt. It is better to take red, blue or blue felt as a basis - we will make a fur coat and a hat from it. Let the beard and mustache be white, and let the face and nose be flesh-colored. The edging for the hat can be made green or white - try on whichever you like best.

We put the large parts together and sew them together with red or white thread from the front side. When connecting the backing and the outer part, add a little cotton wool inside so that Santa Claus “grows” a small tummy - it looks very cute and funny.
Small parts and decor can be glued rather than sewn on. However, see for yourself what is more convenient. New Year's crafts can be decorated with beads (you can also make eyes from them), small details made of foamiran, plastic snowflakes and flowers, embroidery, etc.

Try making several Santa Clauses at once. Sewing several identical figures at the same time is much easier than making toys one at a time. Sew at once and decorate each one separately to make it more interesting and make the crafts a little different from each other.
Santa Claus made of paper
This is the simplest option for making the main symbol of the New Year. The process of “assembling” it can be great fun for children.

The finished toy is an excellent decoration for the table. Place these crafts next to each guest's plate and hide a candy or tangerine inside. This small but very pleasant surprise will immediately create a New Year's mood.
By the way, you can increase the size of Santa Claus and hide someone’s gift under it!
What do we need?
- red cardboard or thick paper
- White paper
- glue stick
- colour pencils

We make a square out of red cardboard. Coat one edge with glue.

Roll the square into a cone and press the edge tightly.

We cut off the excess.

On a white sheet of paper we draw arbitrary shapes, a little reminiscent of the beard of Santa Claus.

We will make a hole in the center: such that the beard will fit through to a certain level of the cone. We do not throw away the cut off part.

Let's draw the face, eyes, outlines of the mustache and beard.

We will make pompoms from the cut out circles.

It is very convenient to do such crafts at the same time: fold the paper into a stack and cut it out at once. If you want a more durable product, replace paper with cardboard. If desired, you can cover it with fabric and various decorative elements.
Santa Claus from a bottle
In this master class, the basis of our favorite New Year's character will be a bottle. It doesn't matter which one. You can decorate a bottle of champagne with an image of Santa Claus New Year's table either as a gift, or simply transform an empty bottle and put it under the Christmas tree.

You can also use a plastic bottle as a basis. Just keep in mind that the structure will not be very stable. In this case, you can pour small pebbles or cereals inside.
Views: 1,891
Good day, dear readers and guests of the Harmony of Life blog! Spring is on the doorstep, you say, and she and Santa Claus are here! Please forgive me, I couldn’t do it before. But this is not the main thing, because this master class on making Santa Claus will be relevant every year.
How to make Santa Claus with your own hands
We will make a grandfather easily and cheaply.
Unfortunately, this time I had to make Santa Claus myself during those short breaks while my little son was sleeping. I hope that our next craft will be made by all family members.
Well, now let's move on to the main thing, how to make Santa Claus with your own hands. During this master class there will be several photographs that I took on my smartphone, so the quality is not very good, but you can see it). I captured only the main stages. I was in a hurry...
To make Santa Claus, I used the following materials:
- Sintepon (the craft took 1m 30cm)
- 3 red Santa Claus hats (bought for 15 rubles each).
- Nylon sock or flesh-colored stocking.
- Plastic five-liter water bottle.
- The threads are white and red.
- Two buttons for the eyes.
- Tinsel and “rain” for decoration.
- A piece of brown velvet for making a bag with gifts.
- A small stick for making a staff.
So, the first thing you need to do is cover the bottle with padding polyester, to do this, first wrap it with padding polyester, measure how much you need to cut so that the padding polyester fits tightly around the bottle, see the photo below. Using white thread we sew the edges together so that they fit tightly around the bottle. This is the future body of Santa Claus.

The next step will be sewing a fur coat. if you have sewing machine- Amazing. If not, no problem, I don’t have one either and I sewed by hand. For Santa Claus' fur coat we will need two Santa Claus hats. We cut the top of the hats together with the bubo by 7 cm. We rip the rest of the hats and sew the two parts together, because from one hat the fur coat will not fit on the grandfather. When the parts of the two hats are sewn, we put them on the body and sew them in the middle, see photo.

Now it’s the turn to sew the arms, we have one Santa hat left, we also cut off the top of the hat along with the tambourine by 7 cm, then cut the hat into two parts lengthwise, measure the approximate length and width of the arms, focusing on the size of Santa Claus and now We sew each part, then stuff the arms with padding polyester and sew them to the body.

We cut out a strip of padding polyester approximately 10 cm wide and sew it to the fur coat instead of fur, thereby closing the seam and at the same time decorating the fur coat, see photo.

Now we make the collar; it’s up to you to decide how thick it will be. We cut off the required amount of padding polyester, wrap it beautifully around the upper part of the body and carefully sew it to the vertical strip of padding polyester with which we closed the seam on the fur coat. See photo.

Well, the grandfather’s torso is ready. Now let's start making the head. To do this, take the prepared stocking and stuff it with padding polyester so that the head is proportional to the body. In place of the spout, you can sew a button or make a nose also from padding polyester, like my Santa Claus, for this we tear off a small piece of padding polyester and roll it up into the ball and carefully insert it into the place where the nose will be. To highlight the nose a little, you can sew it with threads. Unfortunately, I did not capture this process. But you can watch the process on YouTube, just ask “stocking dolls”. When the nose is ready, sew on the button eyes.

Above the eyelet we sew small pieces of padding polyester, giving them the desired shape of the eyebrows. We tear off a small piece from the padding polyester, pull it out in the form of a mustache, and carefully sew the mustache under the nose. Below we glue a mouth, which can be cut out from the remnants of red fabric.

How to make a beard for Santa Claus
Next, we put the head on the neck of the bottle; you can glue or tie it for reliability. What is Santa Claus without a beard? We cut out a beard from padding polyester and sew it to the head. Now, from the remnants of the red fabric (if you remember, I cut off the tops of Santa’s hats with buboes), now we cut off the buboes and sew a hat from the remaining pieces of material, and, putting it on Frost’s head, lightly grab it with threads so that it doesn’t go anywhere. We trim the edging of the cap with padding polyester.
Now all that remains is to do the most enjoyable part - decorate our Santa Claus a little. We sew pieces of tinsel onto the fur coat. The cheeks can be highlighted with blush.
DIY Santa Claus photo
I completely forgot, we sew a bag from the fabric prepared for it, fill it with something that clicks, I used a clicky bag. We tie it with a string and you can decorate it with pieces of tinsel. We sew the finished bag to the hand of Santa Claus. We also need to decorate the staff. To do this, take the prepared stick, wrap it with padding polyester and wrap rain of any color on top. The staff is ready. Now you need to tie it to Frost's hand. This is how you can make Santa Claus with your own hands, simply and inexpensively (about 150 rubles). By the way, you can make the Snow Maiden in the same way. The final photo was also of low quality, but you can see how our grandfather turned out.

I hope that my master class on making Santa Claus with your own hands will help you create the same, or maybe even better, grandfather for yourself. And this is our Santa Claus in the garden under the Christmas tree, photo from the camera, so good quality not like from a phone.

Sincerely, Elena Kurbatova.
The main fairy-tale character, without whom the New Year is impossible. How to make a figure of Santa Claus under the Christmas tree, decorate windows with it and make a panel on the wall - teachers share ideas and talk about their experience. Master classes on creating sculptures of Santa Claus in different techniques- papier mache, modular origami, knitting, use of natural and waste materials. Ideas for children's creativity - New Year's crafts, cards, applications, Christmas tree toys with Grandfather Frost. Everything you need to create a classic image of Santa Claus with your own hands.
Grandfather Frost has a job he likes - he is needed in every home, on every floor
Contained in sections:Showing publications 1-10 of 406.
All sections | DIY Santa Claus and Snow Maiden. Crafts, templates, master classes
Regulations on the competition of parent-child crafts “Tower for Father Frost and the Snow Maiden” "I affirm" Head of MKDOU d/s No. 26 _ E.V. Gorlova Regulations on the competition for children and parents crafts"Terem for Grandfather" Frost and Snow Maidens» 1. General provisions 1.1. This provision determines the procedure and regulations for holding the Child-Parent Competition crafts in MKDOU d/s No. 26...
Summary of the master class for students in the CDT studio “Making a souvenir bell from clay “Father Frost” Subject « New Year's story. Working with the layer. Grandfather Freezing» . Target: introducing students to the traditions and customs of celebrating the New Year in our country. Tasks: - teach how to sculpt a toy for Grandfather Frost from a cone; - consolidate the skills of obtaining an even ceramic layer or strand; -...
DIY Santa Claus and Snow Maiden. Crafts, templates, master classes - Master class “Santa Claus and Snow Maiden” from paper napkins
Publication “Master class “Santa Claus and Snow Maiden” made from paper...” Santa Claus and Snow Maiden made from paper napkins. Goal: teach how to make flowers from napkins and stick them on a cone. Objectives: to develop the ability to see beauty through the production of arts and crafts; create a desire to give gifts made by your own...
 Image library "MAAM-pictures"
 We will create the image of the Snow Maiden, plasticine will help us with this. This type of productive activity for preschoolers develops attention, logical thinking and imagination in children. This sculpting technique is a painstaking process, it stimulates perseverance, patience, the desire to finish what you started...
 The goal is to create crafts using the planar facing technique. Objectives: 1. introduce planar facing technology; 2. teach basic work techniques; 3. develop hand motor skills, imagination, creative thinking; 4. cultivate interest in working with paper napkins, wish...
 We held a master class with Father Frost and the Snow Maiden before the New Year in middle group master class for parents on making decorations for our group: Father Frost and Snow Maiden from “palms”. Goal: Creating a festive, positive atmosphere, attracting parents to join...
DIY Santa Claus and Snow Maiden. Crafts, templates, master classes - Photo report on a lesson on decorative drawing of Gzhel painting using plasticine “Decorate the Snow Maiden’s boots”
 Goal: to familiarize children with the features of Gzhel art, master the elements of Gzhel painting. Objectives: - give an idea of Gzhel, its history and features; - learn to depict a Gzhel flower from plasticine, create a decorative composition for a specific shape of an object according to...
Integrated lesson on the application “Good Santa Claus” (second junior group) Goal: Making an applique from cotton pads and development of creative abilities. Objectives: Educational: - to develop children’s skills in making appliques from cotton pads to decorate their faces; - learn to create a beautiful compositional picture - a portrait. Developmental: - consolidate...
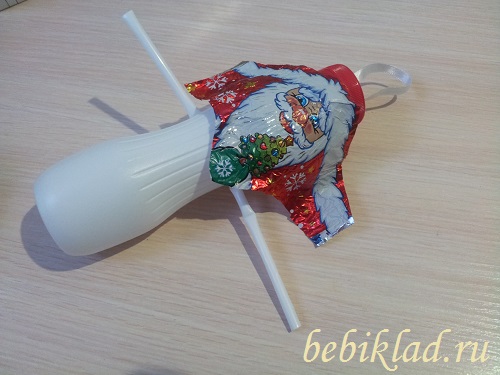
For several years now, before the New Year holidays, my child and I have been making Christmas tree decorations from cotton wool. This material for children's crafts is convenient, affordable and safe. This time we made a wizard Santa Claus so that ours would not be bored.
We needed:
- cotton wool- 250 grams
- Potato starch- 0.5 tbsp
- Yogurt bottle- 1 piece
- Packaging from chocolate Santa Claus- 1 piece
- Plastic straw- 1 piece
- Satin ribbon- 30 cm.
- Decorations(sequins, sparkles)
How to make Santa Claus from cotton wool and a plastic bottle
1 . One tablespoon cold water pour into a plate. Add 0.5 tablespoon of potato starch.
 2
. Stir until dissolved.
2
. Stir until dissolved.
 3
. Gradually pour 1 cup of boiling water into the resulting mixture, constantly stirring the potato paste. Leave for 15 minutes for the glue to cool to room temperature.
3
. Gradually pour 1 cup of boiling water into the resulting mixture, constantly stirring the potato paste. Leave for 15 minutes for the glue to cool to room temperature.
 4
. Pierce a plastic yogurt bottle (this is easily done with ordinary scissors), making holes at the same level on both sides for a plastic tube, which you can then pull through. Leave pieces of the same length on both sides - this is a blank for Santa Claus's hands.
4
. Pierce a plastic yogurt bottle (this is easily done with ordinary scissors), making holes at the same level on both sides for a plastic tube, which you can then pull through. Leave pieces of the same length on both sides - this is a blank for Santa Claus's hands.
 5
. You need to make two holes in the lid and thread a piece of beautiful ribbon through them. Tie a knot on the inside of the lid.
5
. You need to make two holes in the lid and thread a piece of beautiful ribbon through them. Tie a knot on the inside of the lid.
 6
. Remove the wrapper from the chocolate Santa Claus. Cut out a piece with a face. Attach the image to the bottle. Secure the top edge by screwing the foil lid on.
6
. Remove the wrapper from the chocolate Santa Claus. Cut out a piece with a face. Attach the image to the bottle. Secure the top edge by screwing the foil lid on.
 7
. Now we begin to cover our Santa Claus with cotton wool. We tear off thin, long cotton flaps, moisten them generously in starch jelly and place them on the bottle, without touching the area with the image of the face. The ends of the flaps should lie crosswise. When you wrap cotton wool around Santa Claus's hands, try to ensure that the ends of the flaps end not on the palms, but on the torso.
7
. Now we begin to cover our Santa Claus with cotton wool. We tear off thin, long cotton flaps, moisten them generously in starch jelly and place them on the bottle, without touching the area with the image of the face. The ends of the flaps should lie crosswise. When you wrap cotton wool around Santa Claus's hands, try to ensure that the ends of the flaps end not on the palms, but on the torso.
 8
. In this way we gradually make a fur coat, a beard, a hat, and hands. To make your beard voluminous, simply place several flaps (not one thick one, but several thin ones on top of each other, from different trajectories). Wet the cotton generously!
8
. In this way we gradually make a fur coat, a beard, a hat, and hands. To make your beard voluminous, simply place several flaps (not one thick one, but several thin ones on top of each other, from different trajectories). Wet the cotton generously!
 9
. While the starch jelly is wet, you can attach various accessories to it, for example, sequins, light braid, sparkles. If, after drying, some of the jewelry falls off, it can be secured with a glue gun or thread.
9
. While the starch jelly is wet, you can attach various accessories to it, for example, sequins, light braid, sparkles. If, after drying, some of the jewelry falls off, it can be secured with a glue gun or thread.
 10
. Ready craft should be left to dry at room temperature. Do not place Santa Claus on a window or radiator, the cotton wool will turn yellow and the festive appearance will deteriorate. It will take at least a day for it to dry completely. Santa Claus will lose significant weight and the Christmas tree toy will become light, suitable for decorating the holiday tree.
10
. Ready craft should be left to dry at room temperature. Do not place Santa Claus on a window or radiator, the cotton wool will turn yellow and the festive appearance will deteriorate. It will take at least a day for it to dry completely. Santa Claus will lose significant weight and the Christmas tree toy will become light, suitable for decorating the holiday tree.
Magic grandfather is ready to decorate the New Year tree

Santa Clauses made from cotton pads
Prepare a craft in kindergarten for the New Year? An excellent solution would be to make a magic grandfather from cotton pads. By the way, in the course of work, you can discreetly and unobtrusively find out what kind of gift awaits you. New Year child.
For the craft you will need:
disposable plate;
cotton pads;
red colored paper;
half of a Kinder egg case;
shifty eyes;
PVA glue, scissors, simple pencil.
Start with the Santa Claus hat. Cut out a semicircle from red paper. You can use a disposable plate as a stencil. Let the child try to cut out the part along the contour on his own. Glue the hat to the plate. Decorate the edge of the hat with halves of cotton pads. Make a pompom from the whole disc.
For the nose, take half a Kinder egg case and carefully wrap it in red paper. Try to make as few folds as possible. Secure the paper with glue and attach the red nose in the desired place. Glue on the eyes.
Divide the cotton pads into two parts. By the way, this is a great exercise for development. fine motor skills child. Glue the discs so that the fleecy (inner) side is on top. After all, Santa Claus has a fluffy beard. Make sure that the circles are positioned evenly along the circumference of the plate. For volume, you can make several layers.
Glue on the hat paper snowflake, Christmas star, brooch or other decoration. Let your imagination run wild. This will add personality to the craft.
If with reverse side glue a loop and it will work Christmas tree decoration or simply Christmas decoration. The craft will become an interesting gift if you write on the free side New Year's greetings. From disposable plates and cotton pads you can make the Snow Maiden and other fairy-tale characters. Perhaps you will have actors for the real thing New Year's performance. It's so great to create with children!
Santa Claus: all about your favorite New Year's character
It may seem that New Year's celebration existed at all times. Moreover, exactly in the form it is now - cheerful the winter vacation with decorated Christmas trees, children's round dances, the beautiful Snow Maiden and, of course, Father Frost. However, this was not always the case.
A little history
In Rus', the arrival of the New Year was celebrated either in spring or autumn, and no one ever decorated the Christmas tree. Peter the Great tried to force people to celebrate the coming of another year on the first day of January just a little over three hundred years ago. True, the glorious tradition did not take hold immediately. And if in Germany Christmas trees appeared a long time ago, then in Russian cities - only by the middle of the nineteenth century. In village houses new custom has taken root for decades.
The character, without whom the modern New Year is unthinkable, did not exist at all. The image of Santa Claus emerged somewhere at the beginning of the twentieth century. By this time, Zimnik with its cold and snowfalls, and the harsh Moroz the Voivode, and the perky Morozko, and the foreign Santa Claus were known, but our beloved hero was not.
Some researchers are inclined to believe that the Russian Father Frost was borrowed from European culture, and his prototype is St. Nicholas. Others are sure that this New Year's hero was invented by the Russian people. In any case, by the beginning of the last century, the purpose and image of this character were completely formed. His character was also determined: a handsome and kind grandfather, at the same time strict and fair, inspiring trust and able to fulfill his innermost desires.
In pre-revolutionary Russia, both Father Frost and the decorated Christmas tree symbolized well-known biblical events. The tree was decorated for Christmas, the main decoration was the golden star of Bethlehem, and the kind Father Frost gave gifts to the children for the holiday. In those days, our character was not particularly popular.
The revolution and wars pushed all kinds of celebrations “for later,” and the anti-religious campaign launched in 1927 completely canceled everything related to Christmas. In 1935, the government, with the personal permission of Comrade Stalin, returned everything to Soviet citizens at once: the holiday, the Christmas tree, and Santa Claus. True, new winter holiday symbolized only the arrival of the calendar year, and its original meaning was lost.
Santa Claus has become one of the main symbols of New Year's celebrations. Now he has faithful assistants: a cheerful and beautiful granddaughter Snegurochka, as well as a snowman, always ready to help out in difficult situations. Over time, our character acquired personal transport: a traditional Russian troika, harnessed to a painted cart or wide sleigh.
Ordering Father Frost and Snow Maiden to your home was already possible in those years. Thousands of Soviet children carefully prepared for the exciting meeting, learning songs and poems.
Our days
The national recognition and respect won by our hero in the Soviet country remained even after the collapse of the state. In Russia, New Year (including the old one) and Christmas are loved and awaited; the large country begins to prepare for the celebrations almost from mid-November. Nothing is complete without a kind, fair and generous wizard. New Year's event, be it Kremlin Christmas trees or office corporate parties.
The New Year's character is also used for pedagogical purposes: every child knows that a gift from an attentive and fair Santa Claus can only be received if he studies well and behaves well throughout the year. However, in wonderful holidays All children receive gifts from their kind grandfather - both obedient and not so obedient.
The most important residence of our hero is located in Veliky Ustyug, in the Vologda region. There, Santa Claus rests, receives guests, answers letters, and on November 18 celebrates his birthday.
For many Russians, the annual meeting with their favorite New Year's characters is another opportunity to return to a serene childhood and believe in all the good things.
Video “How to make Santa Claus from cotton wool master class”
Competitions for the best have begun in schools and kindergartens creative works among pupils and parents. The New Year theme is quite extensive. In some groups it was decided to make a mitten from scrap materials, in others - a Christmas tree, in others - New Year's toys. My daughter and I have already knitted a mitten with fairy-tale characters(with a scratching mouse, a jumping frog, etc.). There are up to a dozen different paper Christmas trees at home. So, today we’ll make a simple one New Year's toy. It will be Santa Claus.
Junior children can handle a craft made from colored paper without any help. school age. Children are not yet able to do this kind of work.
So, let's prepare:
- scissors
- white and colored paper
- pencils.

Next you need to make a fur trim for the hat and fur coat. We'll need two lanes white approximately 10 mm wide. Let's bend the strip in half lengthwise, and use scissors along the edge opposite to the fold, cutting a narrow short fringe.

Glue the fur trim to the bottom of the fur coat. We immediately decide on the height of the hat and mark the edge of the headdress with a white border.

Next, cut out an elongated trapezoid from a landscape sheet and carefully round all four corners. Immediately cut thin long strips into the resulting figure - a beard. At the end of the work, we will go through each hair with the blade of the scissors to fluff up the snow-white beard.

Using gouache, watercolors, felt-tip pens or pencils, we draw the face of Santa Claus. Distinctive feature the hero's appearance is thick eyebrows and a mustache.

We will also cut out the hair for our craft from paper. No difficulties.

All that remains is to glue all the parts into place. Santa Claus made from colored paper is ready. Of course, if you wish, you can continue the work, in particular, design the hero’s arms and legs. However, the craft also looks great in its presented form.

Let's put Santa Claus next to the paper Christmas tree. The tree is made of multi-colored (white and green) palms. We will place tinsel next to the children's crafts. It's a pity that there were no silver items at home. We will correct any misunderstanding this coming weekend. You still have to prepare for the matinee.