A beautiful craft in the form of Santa Claus is great for decorating a home, a school class or a kindergarten bedroom. Attractive toys made from improvised materials, fabrics, nylon tights can be easily made with children from primary and secondary school. Santa Claus made of paper, glued with his own hands, will look stylish and unusual. Original products from plastic cups and bottles are perfect for kids to create. Do-it-yourself bright toy or Christmas tree pendant Santa Claus can be made both with parents and under the guidance class teacher, educators. Adults themselves, using the indicated photo and video instructions, can sew a Santa Claus costume with their own hands and make his beard. Such carnival outfit suitable for both extracurricular holidays and for home events.
Do-it-yourself pendant in the form of Santa Claus from improvised materials - a step-by-step master class with a photo

Colorful fabric pendants in the form of Santa Claus are a great solution for decor Christmas tree. They can be made in any quantity and with any size. It is not difficult for adults and teenagers to sew Santa Claus from improvised materials (scraps of fabric, beads) with their own hands. But for kids, such work will be too difficult. With children 4-7 years old, it is better to make crafts in the form of Santa Claus from plastic bottles or glasses.
Materials for a master class on hanging Santa Claus from improvised materials
- scraps of white, beige, green and red fabric (you can use any kind of material that does not sag);
- ready-made eyes for toys or a pair of black beads;
- red beads;
- synthetic winterizer;
- threads, needles, pins, scissors, pen.
Master class on making Santa Claus pendants with your own hands
- Prepare the required materials at hand.

- Make your own Santa Claus pattern in suitable sizes. Cut out all the details. Fasten the face and the beard and hair framing it together.

- Sew the previously fastened parts and draw the face of Santa Claus with a pen.

- Embroider eyebrows, lips, nose. Attach eyes.

- Attach with a pin two parts-caps (both for the front and for the back of the suspension).

- Sew a hat and a white trim framing it to the head of Santa Claus.

- Sew on leaves and beaded berries.

- Sew a thread to the back of the pendant.

- Start sewing two parts of the Santa Claus pendant, leaving a small hole for filling with padding polyester.

- Fill with padding polyester and complete stitching.

How to make funny Santa Claus from nylon tights with your own hands - video master class

A do-it-yourself voluminous Santa Claus toy made of nylon tights can be considered a real work of art. Such products from improvised materials look really unusual and bright. If you follow the detailed instructions, even a beginner can make it. Do-it-yourself Santa Claus crafts are being assembled from tights and synthetic winterizer, and fabric is additionally used for sewing a puppet costume. In work, you will certainly need ready-made toy eyes. But the blush on the face of the doll can be done using decorative cosmetics. A video master class will help you learn more about the secrets of sewing Santa Claus with your own hands from nylon tights:
A simple do-it-yourself Santa Claus toy from a plastic bottle - a master class for adults and children

Using improvised materials to create beautiful toy Santa Claus allows you to get really original things with minimal time and money. At the same time, special skills in work are not required: the Santa Claus toy is made very easily and simply with your own hands. To create it, you only need a little patience and the desire to make a beautiful little thing.
Materials for the master class - Santa Claus toy from plastic bottles
- plastic bottle- 2-liter (1 pc.);
- acrylic paint - white, black, red;
- cotton wool packing;
- scissors, brush, glue.
Step-by-step master class - Santa Claus do-it-yourself from a plastic bottle

Cute crafts in the form of Santa Claus from glasses with your own hands - an easy master class for children

Original toys in the form of Santa Claus can be made with your own hands not only from plastic bottles, but also from other improvised materials. Red plastic cups are great for this task. They cannot get hurt, which is very important when creating crafts by children. A cute Santa Claus is made with his own hands from glasses according to a master class in just half an hour. The finished product has an attractive appearance and is great for festive decoration of rooms.
Materials for working on the master class - Santa Claus from glasses with your own hands
- plastic cup - 1 pc.;
- scraps of felt (can be replaced with any other fabric) red, black and white color;
- yellow button;
- eyes for toys;
- a small red pompom;
- roll off toilet paper- 1 PC.;
- scissors, glue, cotton wool.
Easy master class for children: how to make Santa Claus with your own hands?

Is it possible to make a beautiful Santa Claus costume with your own hands and how to do it?
Bright Santa Claus costume will be a great addition to holiday contests and games, because every kid is looking forward to the appearance of this character. Both dad and teacher can dress up as Santa Claus kindergarten, and a teacher at school. Everyone can make a beautiful Santa Claus costume with their own hands. You just need to carefully choose the fabric: it should be fluffy, minimally sagging. As decorations on white inserts, you can sew sequins in the form of snowflakes with your own hands. You should not limit yourself in decorating: the more interesting the clothes turn out, the more kids will like them. The patterns and detailed video tutorials below will help you make a neat Santa Claus costume with your own hands:
In addition to the outfit, you should make a Santa Claus beard with your own hands from cotton wool or fluffy white fabric. Making it is no less simple than crafts from the proposed master classes. Additionally, it is worth making decor for school classrooms, an assembly hall, and your home. After all beautiful craft Santa Claus with his own hands from plastic bottles, glasses will help emphasize the festive atmosphere. Toys made from improvised materials, fabric and nylon tights, although more complex, are no less suitable for decorating rooms. Having chosen the appropriate instructions and prepared the materials at hand, you should definitely study the described photos, video master classes. They will help to create beautiful and neat figurines in the form of Santa Claus without errors.
Always waiting magical holiday the whole family is involved in the production Christmas decorations for green beauty and dwelling. And the main symbol is considered to be the most beloved craft new year holiday- Father Frost.
We suggest you make Santa Claus out of paper. With the help of such simple material you can create real masterpieces with your own hands. You just need to devote a little time to this lesson and show all your boundless imagination.


Study our master classes on making Santa Claus with your own hands and you will be able to please your loved ones with unique New Year's gifts made with soul and care.
Modular origami Santa Claus - master class


We will need: sheets of A4 paper: of blue color- 14 pieces for 211 modules, white - 13 pieces for 207 modules, pink - 1 sheet for 17 modules.
We divide each sheet into 16 rectangles, from which we will make modules.

Step one. We bend a rectangular sheet along in half. With the help of another fold, we outline the line of the middle.

Step two. We bend the edges of the rectangle folded along to the middle, as shown in the photo. Turn the part over and bend the bottom edges up.

Step three. We fold the corners, bending them over a large triangle, and then bend these corners inward. We bend the resulting figure in half - so we learned how to make a module. Now, in the same way, we make the required number of modules, indicated above, from the rest of the paper.

Step four. Let's start making crafts. We take 5 white modules and arrange them as in the photo (we place the module of the upper row with the smaller side up). Next, we assemble a chain of 3 rows of white modules. Each row consists of 25 pieces.

Step five. We close the chain in a ring and turn it over. Next, we perform 3 rows of blue modules. From the seventh row we make a beard. To do this, insert 2 white modules with the smaller side out. The remaining blue modules of the 7th row are inserted as usual.

Step five. In the 8th row we fix 3 white modules, as usual, with the long side, the rest of the modules are blue. With each next row, we add one white module on each side of the beard.

Step six. In the 11th row, we insert one red module in the middle of the beard - this is the mouth. 12 row consists of white modules. We put them on the blue modules with the smaller side outward, on the white modules (beard) - with the long side, as usual. In the 13th row, opposite the red module, we put on the white one with the long side out, and 2 pink modules each with the smaller side (see photo).

Step seven. In the 14th row we dress 6 pink modules with the smaller side, and we dress the white modules as usual. 15 row - we dress 17 white modules and 8 pink ones. In the 16th and 17th row we put on all the white modules with the smaller side outward - this is a hat.

Step eight. The last 18 row consists of blue modules with the smaller side out. We collect hands from 3 white modules and 5 blue ones. We glue the finished eyes and insert the nose (detail of the children's mosaic). Santa Claus from paper in technology modular origami ready. We hope that after studying the master class, the Snow Maiden, made in the same technique, will appear next to your Santa Claus.
Origami paper Santa Claus - master class

We'll need colored paper and a little patience. We offer you several schemes according to which you can easily make Santa Claus with your skillful hands. You can hang it on the Christmas tree, decorate it greeting card or gift it to friends New Year.


Santa Claus do-it-yourself from colored paper - master class

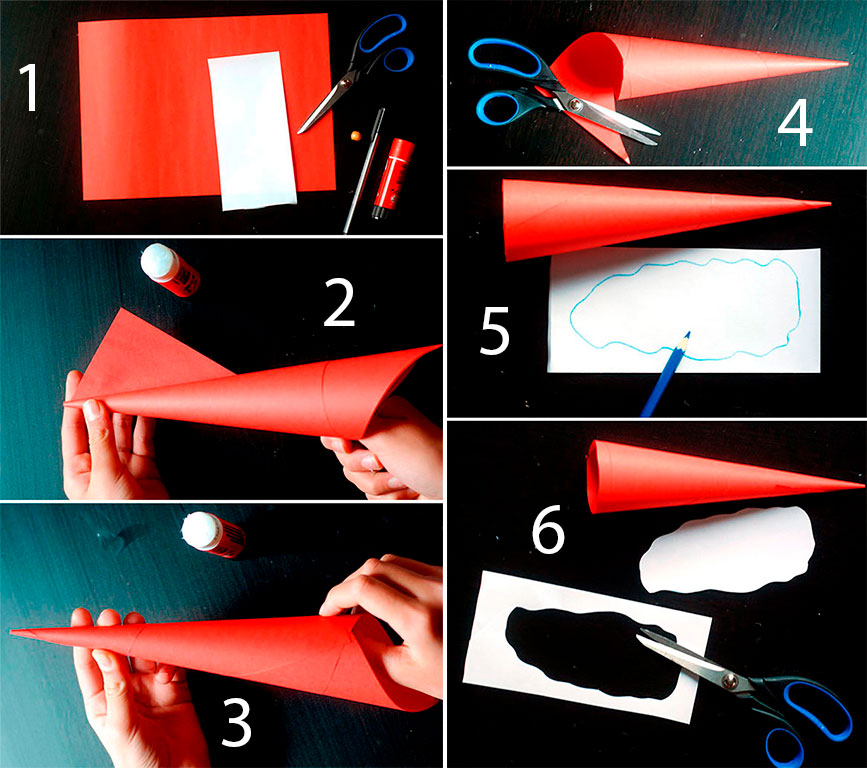
We need: red paper, pink for the face, White paper for a beard, cotton wool, felt-tip pens, scissors and glue.

Operating procedure:
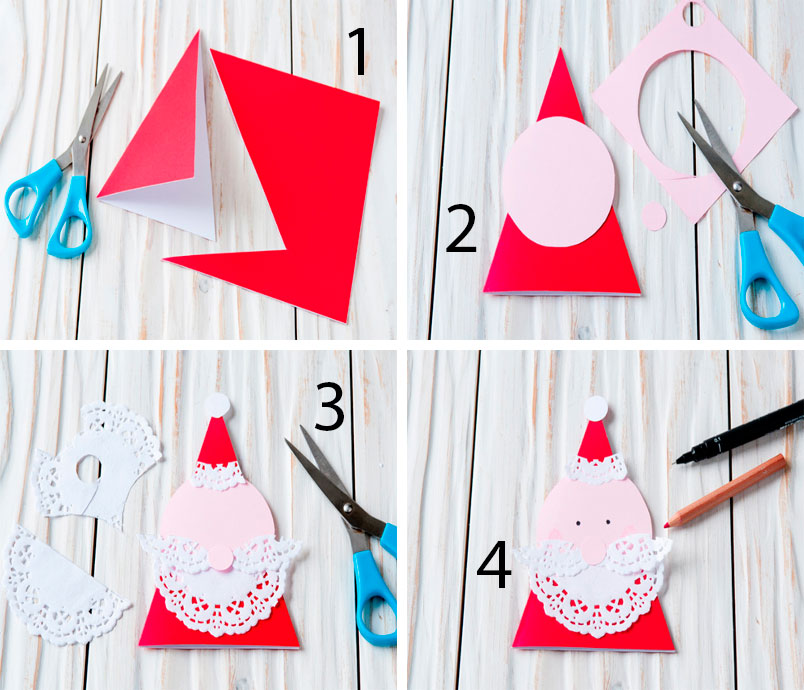
- Using a compass or a small plate, draw a semicircle on red paper. Cut it out, fold it into a cone and glue it.
- We cut out an oval from pink paper, draw eyes and a nose on it with a felt-tip pen and glue the face of Santa Claus to the cone.
- Next, glue the beard and white paper hat. To do this, cut out white stripes, cut a fringe on them and twist it with scissors. We glue the strips with twisted fringe to the cone in the lower part of the face in several rows, giving the beard splendor. We make a hat from the same strip. A beard, hat and fur coat for Santa Claus can be made from cotton wool, which is glued to the cone along its lower edge, on the face and upper part of the cone. Smart Santa Claus made of paper, made by hand, is ready. With the help of a cone, using fantasy, you can also make a Snow Maiden.
Santa Claus from colored paper strips - master class

We will need: thick colored paper, white corrugated cardboard, scissors and glue.

Operating procedure:
- We cut out 6 strips of red paper measuring 1 cm by 15 cm and 6 strips measuring 1 cm by 10 cm. Glue them into rings. We collect a ball from 6 large rings, fastening it with glue in the upper and lower parts. From small rings, we collect a smaller ball in the same way. It turned out the torso and head of Santa Claus.
- From pink or orange paper, cut out a small circle for the face. We cut out a mustache, a beard and a hat from corrugated cardboard of any size and decorate the face with them. Cut out and glue the eyes and nose. Glue the face to little ball, which is then glued to the body. We cut out mittens and felt boots from cardboard and glue them to the craft. The symbol of the new year made of paper, created by yourself, is ready.
A few more ideas for creating Santa Claus with your own hands
Applying imagination and using the schemes we have proposed, you can make Santa Claus even from a paper napkin.

A paper cone allows you to make many options for Santa Claus with your own hands.


And this family of Santa Clauses is made of ordinary toilet paper rolls.

Santa Claus and Snow Maiden in the popular technique of modular origami.

We hope that our master classes helped you understand the technique of making Santa Claus from paper and encouraged you to be creative. Apply a little imagination and create your own kind Grandfather or even several. They will decorate your holiday and create a magical mood!
What New Year is complete without Santa Claus? Santa Claus is the main attribute of the New Year. Fairytale time is on the nose, you need to start preparing already. Today we will make Santa Claus with our own hands from improvised materials.
To create Santa Claus, we need:
- paper (for patterns);
- cardboard (for a footrest);
- wire (for shaping the legs);
- glue gun (for strengthening and gluing parts);
- thread with a needle (for sewing);
- fabric (for pants, mittens, cap);
- synthetic winterizer (for shaping the torso, nose and pompoms);
- foam rubber (for shoes);
- fleece (for tight boots);
- paints (to create a face);
- multi-colored felt (decoration for a fur coat, cap, shoes);
- buttons, beads, beads (decoration for a fur coat);
- wool (to create a mustache, beard, hair);
- scissors.
 We fasten a thin, relatively long wire to a massive wire. We fasten the places of fastening cardboard with wire, as well as wire with wire, with hot glue using a glue gun. From the same fabric that covered the circle, we cut out two long strips of a rectangular shape. We sew both rectangles from the wrong side and put them on Santa Claus's feet. This will be his pants.


 In order for Santa Claus to stand firmly and confidently, you need to strengthen the support of the legs. To do this, take cardboard, cut out traces. Using hot glue, we fix the footprints and the bent wire together. To give the boots a shape, we cut out the lining from the foam rubber and fix it with glue.
 To make the boots attractive, we cover them with fleece material. We glue felt on the sole, if the material goes beyond the boundaries of the boots, then carefully cut it with scissors.
 Here we come to the design of the face. Conditionally divide the cone into the body, head, hat. We make the nose from a small piece of fabric and synthetic winterizer. We put the synthetic winterizer inside the fabric and with the help of a needle and thread we tighten it to give the shape of a ball. Sew the nose to the face of Santa Claus. First, paint the face with white paint, then draw eyes, mouth, red nose and cheeks with other colors.
  It's time to dress up Santa Claus. We sew a red fleece coat. We take the size a little larger than the body itself. Cut, sew, twist. According to the paper template, cut out 4 strips of future hands. We also sew them together, fill them with synthetic winterizer.
 We put on a fur coat on the body, sew on the hands. We decorate the fur coat with details cut out of felt. Add beads, beads and drifts of snow from white felt.
  From white felt we cut out strips for trimming the sleeves, collar, and lapels for boots.

 The final step is the manufacture of the cap. We sew together two conical pieces of fabric, then turn inside out. Right now, are we going to need that little wire? sticking out of my head. The cap is put on the head, and with the help of a wire we shape the tip of the headdress. We also decorate with a pom-pom made similarly to the nose and a white fleece lapel.

That's all, we made Santa Claus, which means we are ready to celebrate the New Year with our heads held high! Happy Holidays!
The favorite holiday is approaching - New Year. I want to create a fabulous atmosphere and a festive atmosphere, and creative crafts will help us with this. In this article we will look at: how to make Santa Claus and Santa Claus with your own hands.
You will need: foam ball 6 cm in diameter, faux fur, shabrak, bias binding, holofiber, hemispheres for the eyes, pattern, snowflake sequins, sewing machine, iron with sleeve block, scissors, textile glue, blue crepe satin, white, nude and blue fleece, staff stick, silver braid.
Master Class
- Cut out 2 parts of the body from the shabrak, glue the crepe satin, then process the long sections with bias binding.

- Fold the crepe satin pieces together and sew the long sections with a seam over the edge.
- Form a rounded shape using an iron and a sleeve last.
- Cut out the details of the fur coat and handles from blue fleece.

- Sew, turn right side out, and leave holes in the handles for stuffing.
- Cover the ball with flesh fleece and make a neck by wrapping the thread around the excess fabric.
- Make and attach the nose, then attach the hemispheres as eyes.

- Put the fur coat on the shabrak blank, insert the head into the opening of the body, then sew.
- Make a hat in this way: cut a rectangle around the volume of the head from blue fleece, sew the short side and wind the top with thread.
- Prepare the strips of fur for the lapel of the cap and the trim of the fur coat.
- Pin the blue hat with a basting stitch to the head, then sew the blue fleece fur strip butt and turn the fur up.

- Stuff the handles with holofiber, sew up the holes, decorate the wrists with fur and sew on the hands.
- Make a beard in this way: cut several rectangles of nude fleece with a difference in length of 1.5 cm. It is worth noting that the rectangles need to be cut so that the fleece stretches along the long side of the rectangle. Cut the fringe.
- Sew the details of the beard to the head, starting with long blanks, gradually rising to the nose.

- Relax and curl your beard into curls.
- Decorate the fur coat by attaching snowflake sequins.
- Wrap the wand with silver braid to make a staff.
Gorgeous Santa Claus is ready!
You will need: red napkin, template, marker, glue, scissors, paper, printer, hole punch, twine.
Master Class

Napkin Santa Claus is ready!
You will need: cotton wool, ice cream sticks, red felt, decorative eyes, red pompom, glue gun, flesh-colored paint, brush, scissors.
Master Class

Santa Claus from cotton wool is ready!
You will need: felt 1 mm thick in beige, white and black, white felt 3 mm thick, thick beige cotton fabric, white felting wool, synthetic winterizer, wire, template, black beads for the eyes, threads in black and beige, scissors, pencil, glue gun, small bell and other decorations.
Master Class
- Print the template.

- Cut out the body of Santa Claus and transfer it to thick white felt.
- Cut out the body of Santa Claus from felt.

- Cut out the same part of the body, only from thin white felt.
- Cut out boots from thick white felt, then cut the same boots from thin black felt.
- Cut out boot cuffs from thin white felt.

- Draw the mittens and cut them out of thick white felt.
- Cut out the details from thin beige felt - the trim of the fur coat and hat.
- Cut out 2 circles from a beige cotton fabric.

- Make a nose out of a small circle: pull off the thread, fill it with padding polyester and sew the nose to a large circle.
- Sew on black beads for eyes.
- Sew the face onto the thin felt body. It is worth noting that during sewing, you need to add a little padding polyester for volume.

- Make eyebrows and a beard from felting wool, then attach with a glue gun.
- Glue the trim of the hat and fur coat.
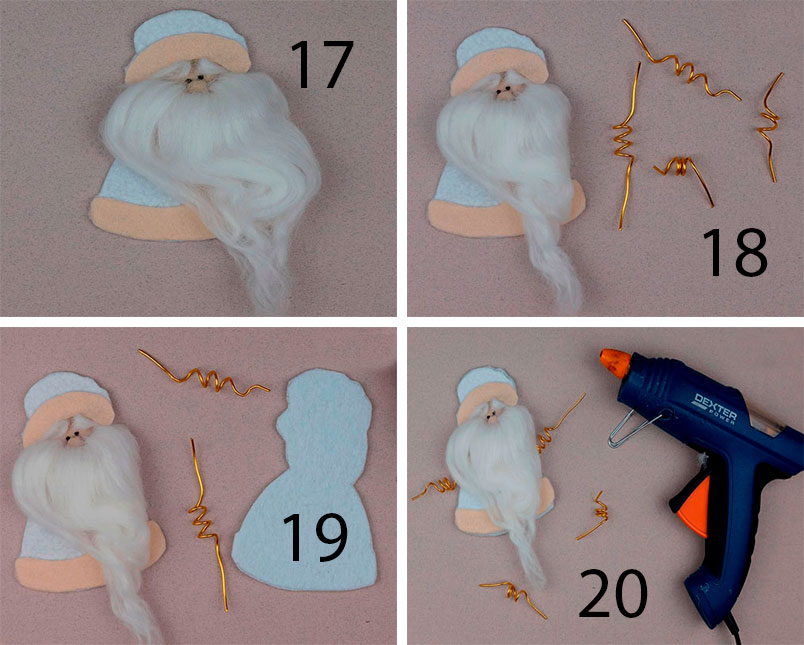
- Prepare 4 pieces of wire, twist them onto a pencil, giving them the shape as in the photo.
- Glue the details of Frost's body from thin and dense felt, gluing a wire between them in place of the arms and legs.

- Glue the mittens and boots to the twisted pieces of wire.
- Twist the holder for the bell from the wire and glue it to the mitten.

- Sweep the figure of Santa Claus with a beige thread.
You will need: a bottle of champagne, a hook, a yarn, a centimeter, an edge, a filler, ordinary threads, a needle, doll strands, glue, jewelry.
Master Class
- Knit the head in single crochets with beige yarn, according to the principle of knitting a ball. It is worth noting that the number of rows without increases and decreases should be two rows less than for the ball.
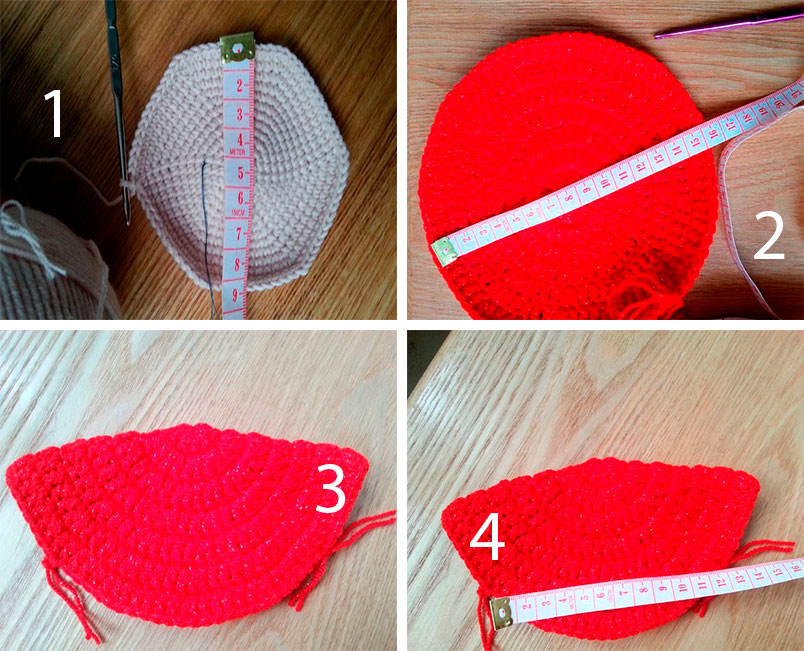
- Make the base of the doll with red yarn: knit a circle with double crochets, fold it in half and make knots at a distance, as shown in the photo.
- Knit the arms and torso in circular rows that taper towards the bottom.

- Tie the nozzle on the bottle with beige yarn and do not forget to constantly try on so that it does not sit too tight.
- Connect the bottom of the nozzle and the blank with your hands on the bottle.

- Stuff the handles of the red blank and the empty space with filler.
- Dimensions: head circumference 30 cm; arm length 18 cm; body width 30 cm; body height 16 cm.

- Knit and decorate clothes.
- Clothing sizes: cap blank diameter 10 cm; sleeve length 12 cm; coat length 28 cm; sleeve volume 18 cm; fur coat volume 47 cm; the circumference of the finished hat is 32 cm.
- sew on clothes ordinary threads, sewing lines are indicated in the photo.

- Attach the doll strands to the yarn and fix with glue. Make a beard from long strands, and take a shorter one for a hairstyle.

- Glue the hat to your head.
You will need: red cardboard, flesh-colored paper, 2 lace napkins, scissors, marker, pencil, glue.
Master Class
Santa Claus from openwork napkins ready!
You will need: bright and flesh-colored cotton fabric, white and red fleece, felt, synthetic winterizer or holofiber, combed tape (wool for felting), foam rubber, felting needle, thick and thin wire, glue gun, Moment-Crystal glue, thick cardboard, acrylic paints and brushes, wire cutters, pliers, stationery knife, buttons, beads, beads, floss threads.
Master Class
- Make a pattern out of cardboard: a cone with sides of 13 cm; circle with a diameter of 6 cm and handles (optional).
- Draw a line through the center of the circle and divide into 3 equal segments, then make holes for the wire at their junctions.

- Place a synthetic winterizer circle and a circle of cotton fabric a slightly larger diameter, then pull the fabric around the cardboard using a thread and a needle, as shown in the image.
- Bend a thick wire into the letter P, then insert it through the holes in the cardboard, synthetic winterizer and fabric.
- Bend the ends of the wire so that you get stops.

- Prepare a piece of thin wire 25 cm long and screw it to a thick wire, then glue it with hot glue. At this stage, make sure that the structure is stable.
- Prepare 2 pieces of cotton fabric with a length of 22 cm and a width of 4 cm. Fold in half lengthwise, sew, turn inside out, pull on the legs and sew with a blind seam to the bottom.
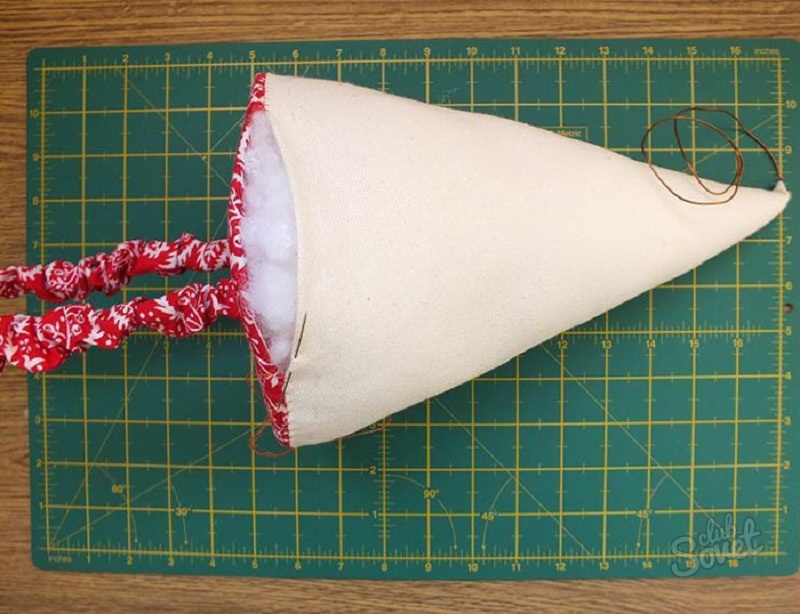
- Make a cone pattern from flesh tissue, fold in half, sew, leaving 2 mm of the top unsewn, fold the edge around the circumference, baste and turn the cone inside out.
- Put the cone on a thin wire leading its end through the hole in the top. Stuff the cone with holofiber so that the wire is in the center of the body, then sew the folded edge to the body around the circumference with a blind seam.
- Cut out large feet from cardboard, then glue them to the wire feet with hot glue.
- Cut out the boots from the foam rubber, and make a hole in the back for the ankle wire, then attach them.

- Cut out 2 ovals from the red fleece, cut a triangle in the upper part, fit the foam boots, sew the heel with a blind seam and pull the fleece around the cardboard sole.
- Cut out 2 ovals of felt a little larger than the cardboard sole, glue to the sole with hot glue, cut off the excess and sew the felt to the fleece with a blind seam.
- Mark on the cone the lines of the top of the jacket and the bottom of the cap, then roll up the ball from the synthetic winterizer, cut out a circle from the fabric, pull it along the edge and sew it in place of the spout.
- Draw a face to your liking.

- Open the red fleece jacket in the form of a truncated cone, fold in half, sew along the edge, then turn it inside out.
- Sew red fleece and cotton fabric handles and gloves as shown.
- Pull the jacket over the body-cone and sew on the bottom and along the neck with a hidden seam.
- Cut out figurines from felt - Christmas trees, at home, then glue them on the Crystal glue and only then sew them on as desired.
- Sew a snowdrift ribbon of white fleece with a blind seam and decorate the composition with beads and buttons.
- Cut the lapels and cuffs from the white fleece, fold in half, sew along the edge, stretch over the arms and legs, then sew by hand. Make a wavy collar in the same way.

- Sew the arms to the body using a button fastening: pull off a little thread, tie a knot and glue with Moment.
- Tear off 10 cm of wool from the combed ribbon, gather it into a bun and attach a beard with a felting needle.
- Tear off the bundle 2 times thinner and 2 times longer, then roll it in place of the mustache.
- Tear off 2 more bundles as for the beard, then roll on both sides of the face.
- Roll the hair on the sides and on the back of the head in the same way.
- Cut out from cotton fabric on the basis of half of the cone an elongated and narrowed to the top cap, sew it, leaving a hole at the top.

- Turn the hat inside out and put it on, pulling the wire through the hole and sew along the edge to the head. Loop the end of the wire.
- Make a pom pom and a lapel with white fleece, then sew them on.
- Make a small felt Christmas tree and glue it to the hat as a decoration.
You will need: colored paper in red and white, scissors, glue, marker, pencil, wooden bead.
Master Class
Santa Claus from a plate
You will need: paper plate, colored paper, scissors, glue, marker, printer, eyes, hole punch, rope.
Master Class

You will need: box, colored paper, scissors, glue, marker, pencil, button, elastic band, envelope.
Master Class

You will need: plastic bottle, paints, colored paper, pompom, scissors, buttons, 2 sleeves, glue, cotton wool, white and black lace.
Master Class

Santa Claus from the bottle is ready!
You will need: white and red paper, scissors, template, printer, pencils or felt-tip pens.
Master Class

Creative grandfather is ready!
You will need: cotton pads, plastic spoon, glue, red yarn, buttons for eyes, ribbon or thread for hanging, red felt-tip pen, scissors.
Master Class
- Take a cotton pad.
- Bend its side to the center.

- Make cuts along the edge of the circle.
- Draw a smile with a marker.
- Take a plastic spoon.

- Apply glue to the spoon, leaving its tip without glue.
- Wrap the yarn tightly.
- Apply glue on both sides to the tip of the spoon and glue the face of Santa Claus to the convex part.

- Glue a clean cotton pad to the concave part of the spoon.
- Cut out a circle from a cotton pad and glue it to the tip of the spoon handle.
- Cut out a circle from a cotton pad, color it with a felt-tip pen and glue it as a nose.